Film cameras
Widelux panaromic User manual
User manual for Widelux panaromic. 10 pages in English. Read the original PDF, download or print a copy without registration.
10 pagesEnglish0.9 MB PDF

Loading your manual…Open PDF directly
Document details
- Brand
- Widelux
- Model / document
- Widelux panaromic
- Document type
- User manual
- Language
- English
- Pages
- 10
- File size
- 0.9 MB
- Category
- Film cameras
- Document date
- Not specified in catalog
Search available document text
Find a term, then jump to its page in the original PDF. Image-only pages may not be searchable; check the PDF for exact wording and diagrams.
Page 3 · Read text
www.orphancameras.com


                              PREFACE
         Thank you very much for choosingour "WlDELUX" for your camera.We sincerelywish you successwith
            this camera.
                 It is needlessto say that without knowledgeof the proper handlingproceduresof this unique camera,you
             will not be able to make the best use of its features.You may evencausesomedamageto the mechanism.
          Past experiencein the handlingof other camerascannot be applied to the "WIDELUX" becauseof its
           specialdesign.
            In order to becomeacquaintedwith the camerabefore using it, pleaseread this instructionbooklet com-
           pletely.


H                                                                                                 - 1 -
                                                                                                                                                      . - .-*a&id&rr
View original page 3Page 6 · Read text
www.orphancameras.com
                    LOADINGTHE CAMERA
First, remove the camera back by turning the knob on the back of the camera to the "UNLOCK"  position.
Then pull up on the "FILM REWIND KNOB", until the film cassettecan be insertedinto the film chamber.
Releasethe knob, and turn  it slightly, to engagethe spool in the cassette.

T o m a k e t h e f i | m e a s i e r t o t h r e a d i n t o t h e c a m e r a , c u r | t h e t i p o f t h e f i | m , a s s h o w n i n f i g u r e A .
Thread the film through the rollers and around the film guide, making sure that the sprocket holes in the
film are properly engaged by the sprockets of the film advance mechanism. Insert the end of the film  into
the take-up spool, and turn  the "FILM WIND KNOB"  until the sprocket holes on both sides of the
film have been engaged by the film sprockets.
Continue turning the film winding knob until  it stops. Observe the film as it moves through the camera,
and make any adjustments in the position of the film at this time. Replacethe back on the camera, making
sure that the red "UNLOCK"   is on the  left of the camera; turn the "LOCK KNOB"  to the "LOCK"
position while gently pressingagainst the back of the cover. Pressthe "SHUTTER RELEASE", and Wind
the "FlLM WIND KNOB" once, to take up any slack in the film,
and to bring unexposedfilm into the film aperture.
Your WIDELUX  is now ready to use.

                                                                      F ] G U R EA

                                                                                                                         maEgd,rigsdr,                                                                                   r:i#i;
View original page 6Page 7 · Read text
www.orphancameras.com
Because the film  is loaded in a curve, which permits the super wide angle of view, the film  is somewhat
harder to transport than normal.
After finishingthe roll of film, rewind the film into the cassetteby pulling outthe "FlLM REWIND KNOB"
to the first position, and rotating it in the direction of the arrow. The "REWIND BUTTON", on the bottom              .  l
of the camera, must be depressedduring the rewinding operation.
Although  film magazines are manufactured to  international standards, some custom magazinesmay not  fit
properly in the camera. This may cause the film to bind, and may even cause the film to break. We recom-
mend that only standard size film magazinesbe used in the WIDELUX.

               TWO "DON'T"S,and THREE"DO"s
DO NOT:
1. Releasethe shutter without setting the shutter speed control knob exactly on the desired speed.
2. Forget what kind of film  is loaded in the camera,and whether it is a long roll (36 exposuresin an ordinary          :, a
   camera), or a short roll (20 exposures in an ordinary camera).
DO:
1. Positionthe camerahorizontallywhentakinga normalpicture- the spiritlevelon thetop of the camera
   should be used to  level the camera.
                                                  5 -
View original page 7Page 8 · Read text
www.orphancameras.com
2. Be very careful to keep your fingersout of the picture.
3. Rememberthe other important items in this instructionbooklet.


                                 ,,DON'T"S

 1. Don't release the shutter without  setting the shutter speed control knob exactly on the desired speed-
   becausethe shutter of the WIDELUX  is a unique mechanism. lt  is similar to the transmissionsystem of
   an automobile. Just as in an automobile transmission the improper use of the gears can damage the
   system, so can the improper use of the shutter speed control knob damage the shutter mechanism.
   To change shutter speed, it is not necessaryto  lift the control knob; simply turn  it to the desired setting.
      lf the knob does not turn easily, do not force it, but turn  it in the opposite direction slightly, then try
    to turn   it back. When the camera is new, this may happen often, but never use force to turn the knob,
   as this will damage the shutter mechanism.

 2. Don't forget what kind of film  is loaded in the camera, because,with your WIDELUX, you can obtain
    only 21 pictures on a standard long roll, and only 11 on a short roll. DO NOT TRY TO GET MORE
  THAN THAT, or the film may break, and it will be impossibleto rewind the film and unload the camera.
      lf the film does break, the camera may be unloaded in a darkroom or changing bag.
   C H E C K T H E A U T O M A T I C F I L M C O U N T E R B E F O R E T A K I N G E A C H P I C T U R E .
                                                                                - 6 -

                                                                                  itn
View original page 8Page 9 · Read text
www.orphancameras.com
                                       "DO's"
          Position the camera horizontally when taking a normal picture, becausetheWIDELUX usesa rotating lens
         system to obtain the amazing super wide angle pictures.
        One characteristic of the system is that  if the camera is pointing up, horizontal lines will appearconcave,
          while  if the camera is pointing down, horizontal lines will appear convex. This effect is demonstrated to
        some extent by the image in the viewfinder. To obtain straight horizontal lines, place your eye as close as
          possible to the viewfinder, and line up a horizontal line within the viewfinder frame. This technique isI      easily masteredafter only a few trials. The picture in the viewfinder is actually only 9oo/oof the picture
         recorded on the film; things barely seen in the viewfinder will be recorded on the film clearly.
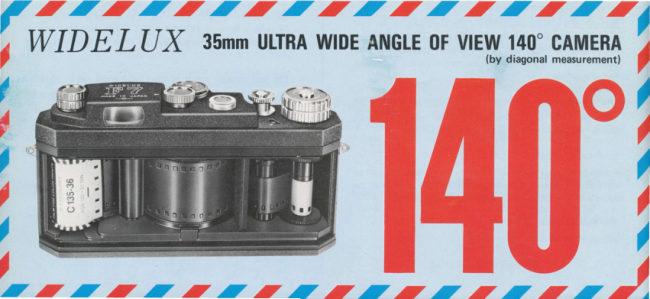
        2. Be very careful to keep your fingersout of the picture. The field of view is 55" vertical and 140" horizontal
         by diagonal measurementwhich means that new users often include the image of their finger tips in the
           picture. On the top of the lens housing, there are two arrows, set 140" apart. When making hand-held
          shots, be sure that your fingers do not intrude into the area outlined by the arrows. lf you are making
           vertical shots, you may find that your feet show in the negative, as well as your fingers.
       3. Remember the other important items in this booklet. Your photographs may display a peculiar per-
          spective distortion inherent in this camera, which makes horizontal parallel lines appear to curve away
         from each other at the edges of the picture. This  is not a defect in the lens, but the natural property
                                                                                           - 7   -
View original page 9Page 10 · Read text
Ttr                                     www.orphancameras.com

         of images as the distance to the object increases.

       Although the range of shutter speedsmay seem limited, in practice, the three speedsof 1115, 1/125,and
       11250 will cover just about every situation.

   We haveexplainedrathermeticulouslythe itemsand proceduresto be rememberedin usingyourWlDELUX.
   Such detail may lead you to believethat it is complicatedto operate,and requiresspecialtechniques.Al-
    though the WIDELUX is a complex pieceof machinery,it is really quite simpleto operate.The special
    techniquesare only to insurethat you receivethe maximum benefit from the specialfeaturesof the
  W I D EL U X .
   The WIDELUX is a uniquenew camerain its design,performance,and mechanicaloperation.
   We are surethat you will find the best useof the WIDELUX after masteringtheseinstructions.Wesincerely
     wish to improve the camera, and to give the best service to you.
   We wish you good luck in your photography with the WIDELUX.
  +++++++++++++++++++++++                     ++++.:..++:
                         g
                                                                                                                                            -   8   -                                                                          '::
.      -,;fa;m*                           -.,i..  '*,.  ,       .rih*'p;*r                *
View original page 10Related documents and language editions


From the M. Butkus archive. Original publisher and archive notices are retained.
Check the model and edition against your equipment.
PDF verified 2026-10-10.