Lenses & filters
Yashica Aux lens instructions(rangefinders) User manual
User manual for Yashica Aux lens instructions(rangefinders). 1 pages in English. Read the original PDF, download or print a copy without registration.
1 pagesEnglish6.9 MB PDF
Loading your manual…Open PDF directly
Document details
- Brand
- Yashica
- Model / document
- Yashica Aux lens instructions(rangefinders)
- Document type
- User manual
- Language
- English
- Pages
- 1
- File size
- 6.9 MB
- Category
- Lenses & filters
- Document date
- Not specified in catalog
Search available document text
Find a term, then jump to its page in the original PDF. Image-only pages may not be searchable; check the PDF for exact wording and diagrams.
Page 1 · Read text
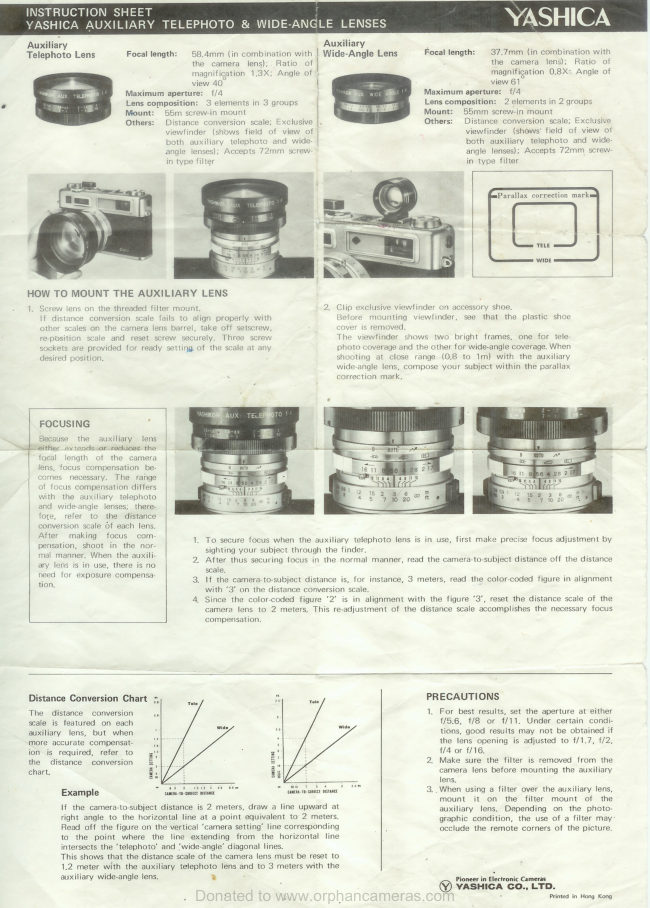
INSTRUCTION SHEET

YASHICA AUXILIARY TELEPHOTO & WIDE-ANGLE LENSES

Auxiliary Auxiliary ;

Telephoto Lens Focal length: 58.4mm (in combination with | Wide-Angle Lens Focal length: 37.7mm (in combination with
the camera lens);. Ratio of ‘ the camera lens); Ratio of
magnification 1.3X; Angle of magnification 0.8X: Angle of
view 40 view 61

Mount:
Others:

Maximum aperture: f/4
Lens composition: 3 elements in 3 groups

Maximum aperture: f/4

Lens composition: 2 elements in 2 groups
Mount: 55mm screw-in mount

Others: Distance conversion scale; Exclusive

55m screw-in mount
Distance conversion scale; Exclusive |.

viewfinder (shows field of view of viewfinder (shows’ field of view o7
both auxiliary telephoto and wide- | both auxiliary telephoto and wide-
angle lenses); Accepts 72mm screw- © angle lenses); Accepts 72mm _ screw-
in type filter in type filter

Parallax correction mark

cz TELE

WIDE

HOW TO MOUNT THE AUXILIARY LENS

1. Screw lens on the threaded filter mount. 2. Clip exclusive viewfinder on accessory shoe.
If distance conversion scale fails to align properly with Before mounting viewfinder, see that the plastic shoe
other scales on the camera lens barrel, take off setscrew, : cover is removed.
re-position scale and reset screw securely. Three screw The viewfinder shows two bright frames, one for tele-
sockets are provided for ready setting of the scale at any photo coverage and the other for wide-angle coverage. When

desired position.

shooting at close range (0.8 to 1m) with the auxiliary
wide-angle lens, compose your subject within the parallax
. correction mark,

FOCUSING

Because the auxiliary lens
~L_ either ex tends.or—radueces the

“focal length of the camera
fens, focus compensation be-
comes necessary. The range
of focus compensation differs
with the auxiliary telephoto
and wide-angle lenses; there-
fore, refer to the distance
conversion scale Of each lens.
After making focus com-
pensation, shoot in the nor-
mal manner. When the auxili-
ary lens is in use, there is no
need for exposure compensa-
tion.

Wutepasy

SAL

5 oe oo
7 1 20

1. To secure focus when the auxiliary telephoto lens is in use, first make precise focus adjustment by
sighting your subject through the finder.
2. After thus securing focus in the normal manner, read the camera-to-subject distance off the distance

scale.

3. If the camera-to-subject distance is, for instance, 3 meters, read the color-coded figure in alignment
with ‘3’ on the distance conversion scale. ‘

4, Since the color-coded figure ‘2’ is in alignment with the figure ‘3’, reset the distance scale of the
camera lens to 2 meters. This re-adjustment of the distance scale accomplishes the necessary focus

compensation.

Distance Conversion Chart

The distance conversion
scale is featured on each
auxiliary lens, but when
more accurate compensat-
ion is required, refer to
the distance conversion
chart.

CAMERA SETTING

PRECAUTIONS

1. For best results, set the aperture at either
£/5.6, f/8 or f/11. Under certain condi-
tions, good results may not be obtained if
the lens opening is adjusted to f/1.7, f/2,
£/4 or f/16.

2. Make sure the filter is removed from the
camera lens before mounting the auxiliary

: lens.
Example tmuncmunniee” | Saini 3..When using a filter over the auxiliary lens,
mount it on the filter mount of the
If the camera-to-subject distance is 2 meters, draw a line upward at auxiliary lens. Depending on the photo-
right angle to the horizontal line at a point equivalent to 2 meters. graphic condition, the use of a filter may:
Read off the figure on the vertical ‘camera setting’ line corresponding : occlude the remote corners of the picture.

to the point where the
intersects the ‘telephoto’ and ‘wide-angle’ diagonal lines.

line extending from the horizontal line

This shows that the distance scale of the camera lens must be reset to ;

1.2 meter with the auxiliary telephoto lens and to 3 meters with the
auxiliary wide-angle lens.

® : : Pioneer in Electronic Cameras

Y) YASHICA GO., LTD.

Printed in Hong Kong
View original page 1
Related documents and language editions
From the M. Butkus archive. Original publisher and archive notices are retained.
Check the model and edition against your equipment.
PDF verified 2026-10-10.