Film cameras
Yashica FX-3 quick guide User manual
User manual for Yashica FX-3 quick guide. 9 pages in English. Read the original PDF, download or print a copy without registration.
9 pagesEnglish5.6 MB PDF
Loading your manual…Open PDF directly
Document details
- Brand
- Yashica
- Model / document
- Yashica FX-3 quick guide
- Document type
- User manual
- Language
- English
- Pages
- 9
- File size
- 5.6 MB
- Category
- Film cameras
- Document date
- Not specified in catalog
Search available document text
Find a term, then jump to its page in the original PDF. Image-only pages may not be searchable; check the PDF for exact wording and diagrams.
Page 2 · Read text
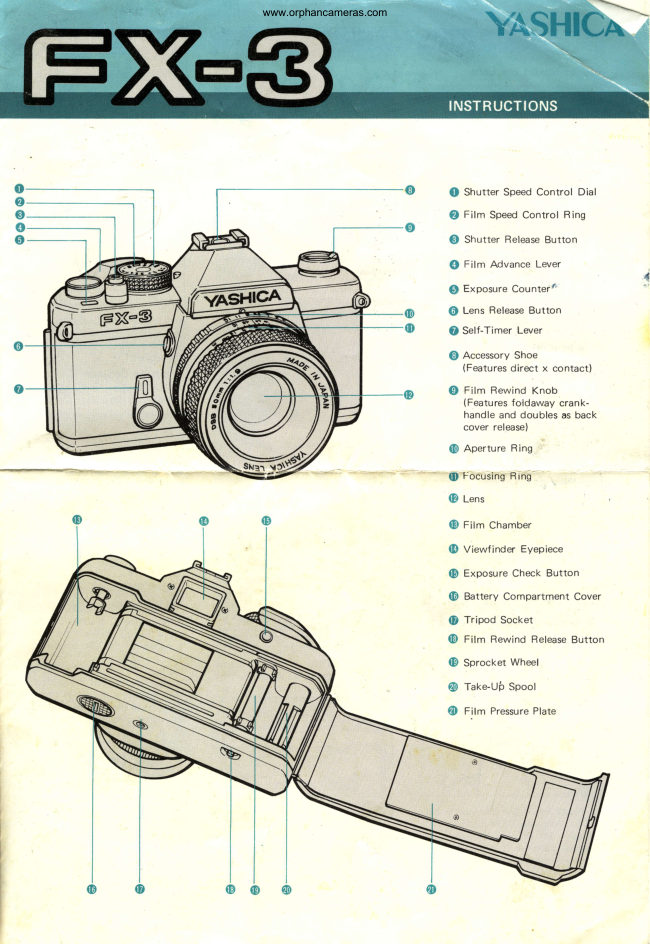
INSTRUCTIONS

© Exposure Check Button
© Battery Compartment Cover

@® Tripod Socket
© Film Rewind Release Button

© Sprocket Wheet

@ Toke-u)
View original page 2
Page 3 · Read text
How to Mount and Remove
the Lens

How to Mount the Lens

‘After removing the camera body cap,
set the lens in the mount by match+
ing the red dot on the lens barrel
with that on the camera body. Then,
while gripping the lens barrel firmly,
give it a right turn until it setf-locks
with a click.

‘The method of mounting is the same
with all lenses. Improper mounting
will result in poor focus and/or ex-
posure,

How to Remove the Lens
While keeping the lens release button
depressed, turn the lens barrel all the
way to the left and lift the lens
straight out of the lens mount,

@ Avoid touching the linkage sys-
tems on the camera body and the
lens,

@ Avoid direct sunlight when inter-
changing lenses,

cover at the base of the camera by
turning it in the direction of the
arrow with the edge of a coin,

2 Insert two 1.8V silver-oxide bat

teries (Eveready $76, Ucar S76,
Mallory MS-76 or equivalent) or
alkaline batteries (LA 44) into the
battery compartment in accordance
with the polarity diagrams on the
side of the holder. Then, replace the
holder side the compartment and
retighten the battery compartment

www.orphancameras.com.

Battery Check
When the LEDs in the viewfinder no
Jonger light after pressing the exposure
check button, it is time to replace
batteries,

Film Loading

Avoid direct sunlight when loading
the film.

(Open the back cover by pulling
the film rewind knob all the way out.
When the back cover is opened, the
exposure counter automatically resets
to""S" (start) position,

@ Place the film cassette in the film
chamber as illustrated and reset the
film rewind knob to its original
position,

@ Insert the tip of the film leader
into one of the slots on the take-up
spool spindle

@ Advance the film by manipulating
the film advance lever. Then, after
making sure the sprocket teeth pro-
perly engage the perforations on both
‘edges of the film, close the back cover.
Press the back ‘cover firmly against
the body to lock in place.

@® Turn the film rewind knob in the
direction of the arrow until it stops,
This will take up the film slack in the
cassatte,

® Wind the film advance lever and
depress the shutter release alternately
Until the exposure counter registers
the figure "1",

Exposure Counter

The exposure counter registers the

number of exposed frames. It is
calibrated from $, 1 to 36, with
dots denoting odd numbers, The

figures "12',,'24', and "36" are given
in red to indicate the last frame of
the film cassette of the corresponding

After properly loading the film, al
ways see to it that the camera is
adjusted to the corresponding ASA
film speed setting,

To set the film speed, lift up the
milled ring around the shutter speed
diel and bring the figure correspond-
ing to the film loaded in the camera

lignment with the index,

‘The ASA film speed rating indicates
‘the degree of light sensitivity of the
film emulsion, It is clearly specified
in the instruction sheet or the box
in which the film is supplied.
View original page 3
Related documents and language editions
From the M. Butkus archive. Original publisher and archive notices are retained.
Check the model and edition against your equipment.
PDF verified 2026-10-10.