Film cameras
Yashica Electro 35 GSN / GTN User manual
User manual for Yashica Electro 35 GSN / GTN. 24 pages in English. Read the original PDF, download or print a copy without registration.
24 pagesEnglish2.5 MB PDF

Loading your manual…Open PDF directly
Document details
- Brand
- Yashica
- Model / document
- Yashica Electro 35 GSN / GTN
- Document type
- User manual
- Language
- English
- Pages
- 24
- File size
- 2.5 MB
- Category
- Film cameras
- Document date
- Not specified in catalog
Search available document text
Find a term, then jump to its page in the original PDF. Image-only pages may not be searchable; check the PDF for exact wording and diagrams.
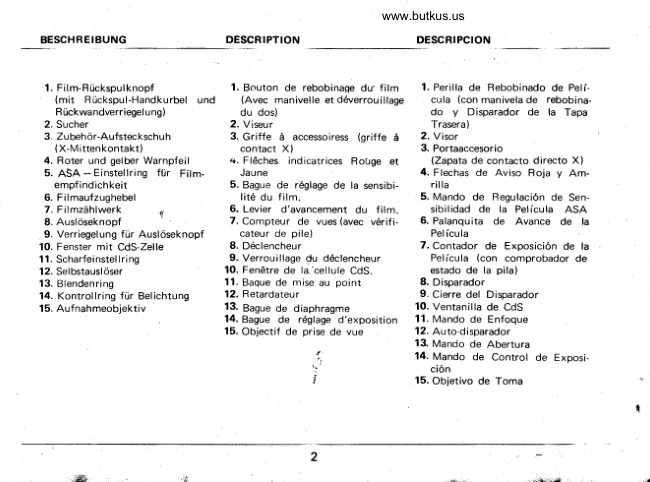
Page 2 · Read text
ELECTRO35G.


                            INSTBtICT I O t \ Bl O O K L E T . G E B R A U C H S A N W E I S U N G
                        MODE D 'E M P L O I r F O I - L E T OD E I N S T R U C C I O N E S
View original page 2Page 5 · Read text
BATTERY LOADING AND CHECKING


     Unscrewthe Battery CompartmentCoverwith
  the edgeof a coin.
           I nsert a 5.6V mercury battery, " -'  ' (minus)
  end in first, and replaceCover. Always carry a
  spare battery (Mallory PX32, EvereadyE164 or
  equivalent).When camerais not in use for a long
  periodof time, removebatteryand store in a cool,
  dry place.

     Check battery before picture-taking.PressBat-
   tery CheckerButton. lf the green light comes on
   brightlyin the Film ExposureCounter,the battery
  power is sufficient.lf not, the battery should be
  replaced.


                          www.orphancameras.com
View original page 5Page 6 · Read text
FILIVII.OADIt\G


     To open Back Cover, lift up Film Rewind
  Knob and pull  it out forcibly. As soon as Back
   Cover opens, Exposure Counter  is automatically
   set at "S"  (Start).

      Place a 35mm film cassetteinto film chamber
  and push down the Film Rewind Knob.

       Insert  f il m  leader into Take-uo Soool and
  advance film  with  Film Advance Levei making
   sure the  perforations properly engage the spro-
   cket teeth. Close Back Cover.
View original page 6Page 7 · Read text
FILM LOADING (continued)


    4. To take up the film slack in the cassetteturn the
    film rewind Knob slowlv in the direction of arrow
    until it stops.

    5" Advance   f ilm,  then  press Shutter  Release
   Button, and repeat until the  f igure "1" appearsIn
    Film ExPosureCountbr'

    6. Make sure the film  is properly loaded.As you
   advancethe film, Film Rewind Knob should rotate
    counter-clockwise,as i | | ustrated.


                           www.orphancameras.com
View original page 7Page 8 · Read text
ASA F!LM SPEEDSETTING

Align the mark on the ASA Film Speed Setting
Ring with the ASA rating of the film  in use. The
film rating is shown on the box or the instructions
which comes with the film.


  A S A   25 32 40 50 64 m r00 t25 r60 200 250 320 4{10500 64t! 800t00l
    ! t r     15  t6  t7   l8  19 20  2l  22 23 24 25 26 21 28 29 30  3l


SHUTTER RELEASE BUTTON

To  lock the Shutter Release Button, align the
mark on the Shutter Release Lock with the letter
" L"  To  unlock, give Lock 1l4  turn clockwise.
When camera is not in use, the shutter should not
be  left cocked, and  the  Shutter Release Lock
should be in the locked position.


           Locked                                          I j n l o c k c d


                                       1 1
View original page 8Page 9 · Read text
AUTOMATIC OPERATION


Turn the Exposure Control Ring until the letters
"AUTO"   ls alligned with  mark. You  are now
ready for automatic oPeration.


EXPOSURE SYMBOLS

Select the appropriate Exposure Symbol and set it
opposite the mark by turning the Aperture Ring.

SUN  or CLOUD symbol     for outdoor photo'
grapny.
WINDOW symbol -  for indoor and night photo-
grapny.


    Symbols    Conditions    Apertures
                ^,<         Bright Sun     1 6 t 1 1 t B
              Heavy Overcastor            c__J                     5.61412.8              Open Shade.
                   Indoors       211.7


                       www.orphancameras.com1 3
View original page 9Page 10 · Read text
FOCUSING


 1.  Sight through the  Viewfinder and  turn  the
 Focusing Ring until the two images in the center
 focusing area for one clear image.


 2. Compose  picturq  within  the  bright    f rame
 which, during focusing, in  particular at  short
 distances,moves diagonally for automatic parallax
 correctron


O u t o f  f o c u s                                      l n  f o c u s


                                        1 5
View original page 10Page 11 · Read text
EXPOSURE CONTROL


     The RED and YELLOW warning arrows in the
   Viewfinder and on  the camera too are actuated
  when the Film Advance Lever is wound and the
   Shutter ReleaseButton is half-oressed.

     The absenceof both arrows signifieshand-held
   photography is possible. All you need do  for a
   perfect picture is FOCUS and PRESS the Shutter
   ReleaseButton down all the way.


                                                   '47
                           www.orphancameras.com
View original page 11Page 12 · Read text
EXPOSURECONTROL (continued)


      the appearanceof the RED arrow (when the
   Shutter Release Button  is half-pressed)signifies
   too rnuch light. Turn  the Aperture Ring in the
   direction of the arrow until  it disappears.lf     lt
   fails to disappeara neutral density filter should be
   used and the ASA" Film Speed Setting Ring reset
   accordingly.lf the original setting was ASA 100,
   reset to ASA 25 when an ND4 filter is used.

       ''     The appearanceof the YELLOW arrow signi-
   fies too  little  light for  hand-held photography,
   since the exposure speed will be slower than 1/30
   second.Turn the Aperture Ring in the direction of
   the  arrow  until   it  disappears. lf    it  fails to
   disappear, use  a  tripod  (Yashica Grip/Tripod
   ST-7). Whether the YELLOW arrow disappearsor
   not, the preciseexposure speed will be determined
  and set automaticallV.


                                          1 9
View original page 12Page 13 · Read text
FILM UNLOADING


       After  the  last exposure, DO NOT  try  to
  advance the film  further as  it may tear or come
   loose, making it impossibleto rewind the film into
   the cassette.

      Before removing it from the camera, the film
   should be rewound.into its cassette.Pressthe Film
   Rewind ReleaseButton.

      Unfold the crank-handleon the Film Rewind
   Knob and turn   it  in the direction of the arrow
    until a slight resistanceis felt. Continue winding
    until you  feel  it turning freely. Open the Back
   Cover, remove  the  cassette and send  for  pro-
   cessrng.


                                      21
                          www.orphancameras.com
View original page 13Page 14 · Read text
DEPTHOF FIELD


      Depth of  f ield is the area in front and behind
   the subject on which the camera is focused, within
   which all objects also appear acceptably sharp in
   the picture  lt varieswith the aperture and is more
   extensrve:
   a. when the lens is stopped down
   b. when the camera is focused on a distant subject
    c. in the background rather than the foreground.

                                                     'by     The  depth  of    f ield can be determined
   reference to  the  depth-of-field scale on the lens
   barrel. With the camera focused on 2 meters and
   an aperture of   f 116, the depth  of  field will be
   from 1.4 to 3.8 meters, i.e. the range enclosedby
   the number 16 on both sides of the red index
   mark.


                                    23
View original page 14Page 15 · Read text
S E L F - T I M E R


 lf you want to include yourself in the prcture,use
the Self-Tirnerand proceed as follows:
a. Advance the film
b. Move Self-Timer Lever down  all the way in the
   direction of the arrow
c. Press Shutter Release Button and the shutter
   will click about I secondslater.

,B'  SETTING
Since the shutter will  operate automatically for
                          'B'long time exposure,    setting is used only very
occasionally,mainly for specialeffects.

                 'B'  ,  Align the    symbol on the Exposure Control
Ring with the red triangularmark.

   '  The  use of  a  tripod  and  cable release is
essential.

     'B'At     setting the shutter will remain open fo-r as
long as the Shutter Release Button  is kept de-
pressed.


                                 25
                        www.orphancameras.com
View original page 15Page 16 · Read text
FLASH PHTOGRAPHY


   In most cases,your  Electro 35 does not require
   the use of a flash. However, when photographinga
   moving subject under subdued light the use of a
   flash is recommended.

     Remove the  plastic cover of  the Accessory
  Shoe and mount an electronic f lash unit or  f lasn
  gun in place.
    When using an electronicf lash unit or  f lash gun
     featuring a hot-shoe, simply insert it  into the
     Accessory Shoe and keep the  Protective Cap
     placed over the synchro terminal.
          lf  your  flash unit does not have a hot-shoe
      provision, clip   it on the Accessory Shoe and
     plug the synchro-cord into the synchro terminal
      of your camera, after removing the Protective
     cap.

     Turn the ExposureControl Ring to set it to
  the mark "J"  . The shutter speedwill now be
  automaticallyset to 1/30 second.Your Electro:35
   is providedwith "X"  contact,so picturescan be
  takeneitherwith an electronicflashunit or a flash
  gun.
View original page 16Page 17 · Read text
FLASH PHOTOGRAPHY (continued)


      Focus the camera on your subject

     Read the camer.a-to-subjectrange off the Dis-
   tance Scale.

      Correct lens aperture is obtained by dividing
      t h e g u i d e n u m b e r ' o f    t h e  e l e c t r o n i c f l a s h  ( o r
   flashbulb) by  the camera-to-subjectdistance. Set
   the lens opening accordinglyby turning the Aper-
   ture Ring and trip the shutter.

    In  flash photography, the  correct exposure is
   determined on the basis of the guide numbgr of
      t h e e l e c t r o n i cf l a s h u n i t o r  f l a s h b u l b .T h i s g u i d e
   number is normally indicatedon the packageor in
   the instruction manual. To obtain the correct lens
   aperture, divide the guide number by the subject
   distance (meters or feet) as shown below (Distance
    in meters):

   GuideNumber(32)                     = LensAperture(16)   SubjectDistance(2m)


                                   29                           www.orphancameras.com
View original page 17Page 18 · Read text
ACCESSORIES


                    To  ward  off  extrane-
                     ous reflected light, the
                     use of the lens shade is
                       advised.To  fit the lens
                      cap, flip back the lens
                    shade as shown in the
                          illustration.


   Filters are invaluable for  special photo-
  graphic  effects. Many  kinds  of  55mm
  screw-in type  filters are available for color
  a n d B & W f i l m .

                                          3 1
View original page 18Page 19 · Read text
Grip/TripodST-7
        Unlike the conventionaltripods,the Grip/TripodST-7
       can be held againsta wall or your chest to eliminate
       camerashakein slow shutterspeedexposure.Beingso
        small ,in size and light in.'weight while providing
        excellentstability, it  is indispensablefor Electro 35
         featuringslow shutter speeddown to 30 seconds.


     MS.2ODX
        This electronicflash unit is smallenoughto be carried
       even in a pocket ..... the world's smallestwith Guide
        No.20. lt has a direct contact hot shoe and also
          perrfiitsuse of the synchrocord. A replacementof two
         AA:iize batteriesis good for 2 cassettesof film (ZO
       expousreload).


www.orphancameras.com33
View original page 19Page 20 · Read text
Auxiliany
                              Lens Set
                                      The Auxiliary Lens Set consistsof an auxiliary telephoto lens which
                                         extends the  focal length of  the camera lens to 5B.4mm and an
                                                auxiliary wide-anglelens which reducesthe focal length of the camera
                                              lens to .37.7mm. To make picture composition easier and more
                                            accurate,,an exclusive viewfinder is supplied to  serve both  lenses.

 Converter-Satz                              l-entilles de conversion                 ..!uego de Objetivos  Auxiliares
Der  Converter-Satz  besteht aus      Cette optique compl6mentaire se      El  juego de  objetivos auxiliares
einem  Zusatz-Teleobjektiv,  wel-     compose d'une lentille "T616" qui      contiene un  teleobjetivo auxiliar,
ches  die  Brennpunktldnge  des      porte  la distance focale de  l'ob-     que extiende la longitud focal del
 Kameraobjektivs auf 58,4mm ver-       jectif d 58,4mm,,et de  la lentille     objetivo a 58,4mm, y un objetivo
ldngert und einem Weitwinkelob-      "grand  angle" eu i ramdne cette     granangularauxiliar, que reduce la
jektiv,  welches  die  Brennpunkt-      distance. focale ,,d 37.7mm.  Pour      longitud  focal  del   objetivo  a
16nge des  Kameraobjektivs aut        faciliter  le cadrage et  le rendre     Para hacer m5s f5cil  y  exacta la
37,7mm reduziert. Fr-ireinfachere      plus pr6cis, un viseur special est     composici6n de vista, se suministra
und genauere Bild-Komposition ist       livr6 avec ce compl6ment optique.     un exclusivo visor que se usa para
ein Spezialsucher frir beide diese                                    ambos objetivos.
Objektive lieferbar.
                                   35
View original page 20Page 22 · Read text
SPECIFICATIONS


      Lens: COLOR-YASHINONDX t11.7 45mm; 6 elementsin 4 groups;stopsdown
       to f /16.
      Shutter: Electronicshutterwith an infinite rangeof speedsfrom 1/500 sec.to 30
      seconds;B setting;built-in self-timer;X sync. (X-ContactHot Shoe);shutter re-
      leaselock;automaticsetting.
      Focusing: Coupledrange/viewfinderfocusing;0.8 meter (2'6"1 to infinity; bright
      framewith adtomaticparallaxcompensation.
     ExpousreControl: Solid-state'ElectronicBrain'controlsthe electronicshutter
      accordingto light intensitymeassuredby the CdS sensor;preciseshutterspeedfor
      correctexposurein any light is determinedand set AUTOMATICALLY;exposure
      symbols for easy selection of aperture; arrows warn againstover-expousreand
      signalslow shutterspeedand advisabilityof usinga tripod; ASA rangefrom 25 Io
     1000 (DlN 15-31);power source-MalloryPX32, EvereadyE164 oi equivalent.
      Other Features: Single-strokefilm advancelever chargesshutter, sets electronic
      exposure control to standby condition, registerscount of exposedframes and
      prevents double exposure; automatic resetting exposure counter; fold-away
     crankhandlefor rapid film rewind;multi-slottake-upspool for easyfilm loading.
      batterycheckerincorporatedin the exposurecounterwindow.
      LensShade: 57mm slip-ontype.        ,f,                                                                               ';        Filters: 55mm screw-intype.
      Dimensions:180 x 84 x 73.5mm (4.08 x 3.3 x 2.Bg in.)
      Weight: 750 grams(1.65 lbs)


                                    37
View original page 22Page 23 · Read text
FOR BETTER PICTURES


     o For better color pictures,shoot in soft, diffused light.
     o Whenthe YELLOW arrow is ON, usea tripod (alsowith B and Self-Timer).
     o When the main subjectis the point of interest,use the largestaperturesuited for
        the prevailinglight. lf a greaterdepth of field is required,stop down the aperture
       as necessary.
     o When it  is necessaryto stop action in outdoor photography,turn the Aperture
       Ring to where the RED arrow just disappears.At this point, the shutter speedis
       about 1/500 sec.
         r When photographingspot,lightedsubjectsor againstlight, reset the ASA Film
      SpeedSetting Ring.
      Examplewith AsA 100 film:
         (a) Strong spot-lighted-  reset to ASA 200400.
         (b) Againsttight -  resetto ASA 50 or 25.
      o The use of an ND filter when shootingin blazingsunlight,snow or beachscenes
          is recommended.
       Resetthe ASA Fllm SpeedSetting Ring accordingto filter factor.
      o For night photography,WITHOUT FLASH, set the ExposureControl Ring at the
     AUTO positionand the ApertureRings1 the INDOORS(window)symbol.ln all
       cases, the shutter speed will  be determined and set AUTOMATICALLY.
       However,when shootingwith the YELLOW arrow ON, use a tripod.


                        www.orphancameras.com41
View original page 23Page 24 · Read text
CARE OF YOUR CAMERA


   Keep both the insrde and outside of your camera
    clean. Use a soft, clean cloth.
   To clean the lens, first blow away any dust or
     grit, then clean with a lens brush ro soft, clean
       I intlesscloth.
   Avoid storing the Qamerawith the shutter charg-
    ed.
   Do not leave the camera in the glove compart-
   ment or trun k of a car, or  in d irect sunI ight, as
    heat may affect the  f ilm, batter:y,etc.
   When the camera is not  in use for a long period
    of  time, remove the battery and store  it  in a
    cool , dry place.  lt  is advisable to  carry a spare
    battery.
   Do  not  dismantle the camera or  the  lens for
    cleaning.
   When photographing without  using a  flash, be
    sure that  the  plastic cover is inserted into the
   Accessery Shoe and the  Protective Cap set over
    the synchro terminal.                                              ,


                                       45
View original page 24Related documents and language editions
From the M. Butkus archive. Original publisher and archive notices are retained.
Check the model and edition against your equipment.
PDF verified 2026-10-10.