Film cameras
Zenith 12 User manual
User manual for Zenith 12. 19 pages in English. Read the original PDF, download or print a copy without registration.
19 pagesEnglish1.7 MB PDF
Loading your manual…Open PDF directly
Document details
- Brand
- Zenit
- Model / document
- Zenith 12
- Document type
- User manual
- Language
- English
- Pages
- 19
- File size
- 1.7 MB
- Category
- Film cameras
- Document date
- Not specified in catalog
Search available document text
Find a term, then jump to its page in the original PDF. Image-only pages may not be searchable; check the PDF for exact wording and diagrams.
Page 3 · Read text
www.butkus.us


The illustration/description of equipment and accessories throughout this book is for information only and
should by no means be considered an offer of sale.


To get the best results from your Zenith study these instructions thoroughly to make sure you are familiar with
the essential features of the camera before you start taking pictures. It is suggested that before loading the first
film you sit down with the instructions in front of you and try out all the controls to generally 'get the feel' of the
camera. It is also recommended that a 'test' film be shot and the results examined before taking further pictures.
This will enable any early operator errors to be corrected and will give you confidence for the future.

As a 'system' camera your Zenith will accept a large number of different lenses and additional accessories; we
particularly recommend as most suitable those from the Hellos range which will enable you to cope with almost
any photographic situation.

Your Zenith is sturdily built to work happily under widely varying conditions but it should always be
remembered that as a precision optical instrument it must at all times be treated with due care and consideration
and protected from shock, damp, dust, sand and sudden changes of temperature. With care it will give many
years of reliable service - and ; brilliant pictures.

This booklet has been provided to enable you to get the best results as quickly as possible and is not intended to
be a comprehensive manual of photography. There are many good inexpensive books on photographic
technique available and your dealer will be pleased to recommend one suitable for your particular need.

Format: 24 x 36mm;using standard 35mm cassettes of 12, 20, 24 or 36 exposure color or black and white film.

Shutter: Horizontal traveling Focal Plane type, speeded 1/30,1/60,1/125, 1/250 and 1/500th second plus B
(brief time). Linked to self-timer giving approximately 7 seconds delay.
View original page 3
Page 4 · Read text
Flash Synchronization: Electronic flash at 1/30th sec. through 'Hot-shoe' or standard 3mm co-axial socket

Viewing/Focusing system: Eye-level pentaprism/instant return mirror shows upright laterally correct image.
Bright Fresnel focusing screen with central microprism spot.

Exposure meter: Zenith 12. Built-in CdS cell with L.E.D. indicators in the viewfinder.

Power source: two Mallory D386 cells. (These should be replaced once a year.) Zenith 11 Selenium cell with
match-needle read out. Both meters calibrated for 16-500 ASA/13-28 DIN.

Frame counter: Additive 0-36 manual resetting type

Standard Lens: Helio 44M-4, 58mm focal length

Construction: 6 elements in 4 groups

Diaphragm type: Fully automatic instantly re-open.

Aperture range F2 - F16 with click stops at full and half apertures (except between F11 and F16)

Distance scale: 0.5 to infinity

Filter size: 52mm screw

Lens mount: 42mm thread, accepts standard single pin automatic lenses and accessories

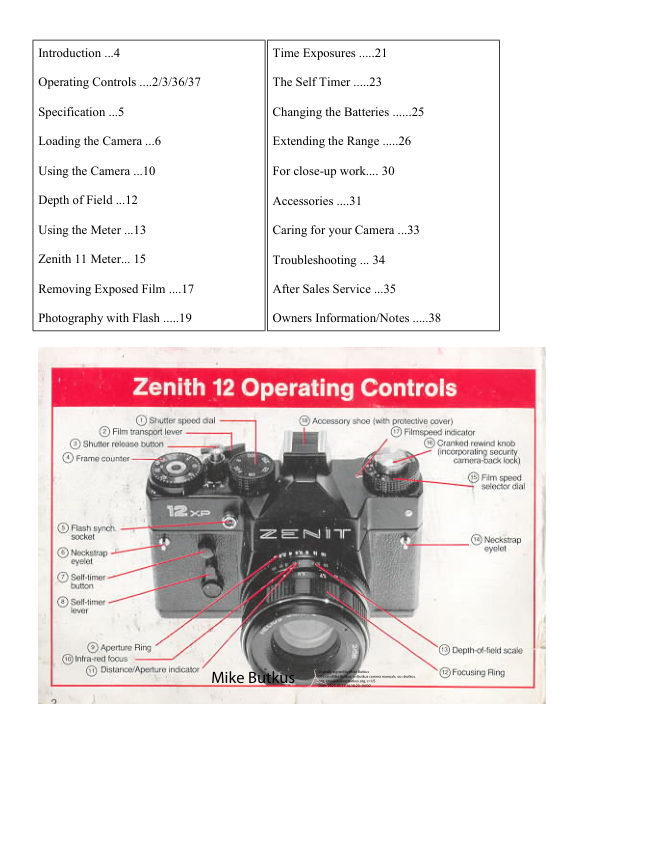
Loading the Camera - Step by step instructions


                                           Depress Shutter
                                             Release Button [3] -
                  Make sure that the
Always load the                                            if shutter does not
                          indicator on the
camera in subdued                                    fire advance
                        Shutter Release
light; if outdoors                              Transport Lever [2]
                      Button [3] is facing
shield from direct                                 in short strokes until
                      towards the front of
sunlight.                                                           it stops and press
                         the camera.
                                                Shutter Release
                                            Button [3] again.
View original page 4Page 5 · Read text
www.butkus.us


                             Insert film cassette
                            into Film Chamber       [22] slots ensuring that
                          [21] projection of         the second hole
                            cassette to bottom.       engages with a tooth
                      Push Rewind Knob      on the spool. Ease film
Lift Rewind Knob [16]    [16] down turning       forward by swat
to open back.               slightly to seat into       strokes of Transport
                             cassette.               Lever [2] until it stops.
                    Draw out enough film   The lower Sprocket
                            to insert tip of leader     Teeth [26] should be
                            into any of Take-up      properly engaged.
                          Spool's


                                  the arrow on the lever until
                                   resistance is felt. This is
                                  especially necessary with twelve
Fire shutter. Advance film by    exposure films.
short strokes of transport lever
until both top and bottom        Close the back of the camera
sprockets are engaged. If          until it clicks shut. Complete        Fire shutter. Advance film
necessary tighten film on        wind-on if necessary until          Transport Lever [2] using
Take-up Spool [22] by turning   Transport Lever [2] stops.          short strokes until it stops.
                                                       The Rewind Knob [16]the flange at the base of the
                                                                should revolve while this isspool anti-clockwise with the
                                                                being done.finger and in the cassette by
gently turning the Rewind
Knob [16] in the direction of
View original page 5Page 6 · Read text
If using 1000 ASA film set the
                                                                       selector to 500 ASA but use the
                                                               next faster shutter speed than
                                                                   indicated by the meter or close
                                                                   the aperture ring by one full
                                                                       stop.
                                Set Film Speed Selector Dial
                                                               Zenith 11 owners see Page 15                                 [15] against Indicator [17]
                                                                      for how to set exposure meter.                                 appropriate to the speed of the
                                 film to be used. There are two
Fire shutter and advance film                              The camera is now ready for                                   scales for films rated in ASA
again. Set Frame Counter [4]                                        use.                            and DIN. Only click-stopped
to zero.
                           numbered or intermediate
                                  positions may be used.
                                 Intermediate positions are
                                  proportional.


Using the Camera


                                                           Initially we suggest that outdoors the speed set
                                               should not be less than 1/125th sec.

Set the Speed Dial [1 ] appropriately according
to the subject. The dial is marked in figures that
represent fractions of a second-i.e. "60" is 1/60th
second. It may be turned in either direction but
not between "500" and "B" and must not be
between marked speeds.
View original page 6Page 7 · Read text
www.butkus.us


                                                                          portraits and the like). There's a
                                                                          built-in safety margin of course,
                                                                      in common with many other
                                                      modern single lens reflex
                                                              cameras, the viewfinder
                                                         showing an overall area
                                                      somewhat smaller than the total
Focusing. Look through the      For critical focusing using the    film area. this ensures that
Viewfinder [27] and roughly     inner of the two rings in the      everything you see in the
decide what you wish to take     center and adjust until the        viewfinder appears in the
remembering you are actually   image is clear and undistorted.    finished picture despite the fact
looking through the lens. Focus  Since you are viewing and        that slide mounts and masks in
by turning the Focusing Ring     focusing through the actual       printing equipment cover part of
[11] clockwise for close and      lens that takes the finished        the film's image.
anti-clockwise for far distance    picture you can feel safe in the
until the subject is sharp and     knowledge that there will be no
clear on the large viewing        parallax problems (no more
screen.                            cut-off heads in close-up


Depth of Field


                                          Depth of Field is also greater with a more distant
                                                   subject that a nearby subject and increases nearly
                                                twice as much beyond the subject than in front
                                                  of it.

                                     To use the depth of field scale, first focus on
The lens is also provided with a scale calibrated   your subject then determine how great a Depth
in meters but it will seldom be necessary to refer   of Field a given aperture will give by reading
to this.                                            distances against the two marks for that aperture.
This is the depth of field scale [13] and works     The figure on the left will be the nearest point in
the following way:                               focus and that to the right the furthest, thus
All lenses when focused on a given subject will    enabling you to select that aperture which will
show some objects in front of and behind that      give the desired Depth of Field.
subject sharply in focus. This range is called
"Depth of Field" and varies with different lenses.
With any lens you will find that "Depth of Field"
is always great as small apertures such as F/16
and less at large apertures such as F2.
View original page 7Page 8 · Read text
Using the Meter


                                                                                     If it is not possible to get both
                                                                           lights flashing in sequence
                                           If it is the upper one this         even at the end of the range of
Having focused on the subject     indicates over-exposure and       the Aperture Ring then alter
set the Lens                      the Aperture Ring [9] should      the Shutter Speed Dial [1] up
                             be turned clockwise thus          or down and repeat the
Aperture Ring [9] in the          reducing the amount of light      process. The meter fitted in the
middle of the range (say f/8)      reaching the film. Should the     Zenith 12 XP is very sensitive
and press the Shutter Release     lower light come on it           and in some cases the indicator
Button [3] about half-way.        indicates under-exposure and      lights may move from top to
This will switch on the meter     the Aperture Ring [91 should     bottom without an intermediate
and one of two red lights on      be turned anti-clockwise. Turn     'flashing' stage. In this case
the right-hand side of the          until both lights flash rapidly     choose the exposure at the
viewing frame will come on.      in sequence - this is the correct    point of the change from top to
                                exposure.                     bottom when the latitude of
                                                       modern film will still give you
                                                                    the correct exposure.


A Helpful Hint for Better Exposure
The meter measures all the light reaching it and "averages" it to achieve a reading which is correct when dark
and light areas are evenly balanced. When dark and light areas are not evenly balanced (such as an illuminated
face against a dark doorway or a person against a sun-lit background) then it will be necessary to take a close-up
reading of the main subject thus excluding the distracting area- and use this setting when you return to your
original viewpoint.

The Zenith 11

The Zenith 11 incorporates a built-in selenium exposure meter which needs no batteries. See pages 36/37 for
operating controls. Apart from this it is identical to the Zenith 12 XP described throughout the rest of this
booklet. Zenith 11 owners, therefore, should carefully study and follow all the instructions for the 12 XP apart
from the meter.
View original page 8Page 9 · Read text
www.butkus.us

Set Film Speed
In the cut-outs in the Aperture Indicator Dial [15a] there are two scales for films rated in ASA and DIN.


                                            Point the camera at the subject, if outdoors
                                          with a bright sky tilt it downwards
Set the speed of the film in use by turning
                                       somewhat. Also study the 'Helpful Hint
the dial with the small projection. Any
                                                for Better Exposure' on page 14. Always
intermediate positions may be used and
                                           ensure Exposure Meter Window [15c] is
are proportionate.
                                            not obscured in any way when taking a
                                              reading.

                                                                   In extremely dim lighting, the
                                                          Exposure Meter Needle [19a]
With the camera still pointed                            may rest near the right-hand
at the subject turn the Shutter                                 edge of the transparent window.
Speed Indicator Dial [15b]                                    Should this occur, place your
until the ring of the Exposure                                hand close in front of the
Meter Cursor [19b] is centered                                Exposure Meter Window and
over the Exposure Meter                                     watch the needle carefully. If
Needle [19a]. Read off                                             the needle moves when you
possible combinations of                                       block the meter cell the
speed and aperture opposite                                    exposure meter is able to
each other on the two dials.                                        function in the existing light -
Only those speeds in white                                 remove your hand and
may be set directly on the                                       determine exposure in the
camera; of the others, 2-15                                    normal way However, if no
represent fractions of a second                                   needle movement occurs-when
and are for information only                                 you place your hand in front of
but the figures 1-30 are whole                                      the meter cell the existing light
seconds which may be used in                                              is insufficient and the exposure
a time exposure. Choose the                                    meter cannot be used. In this
most suitable combination.                                       event either a time exposure or
                                                              use of a flash gun is
                                                        recommended.
View original page 9Page 10 · Read text
Removing Exposed Film - Step by step instructions


Replace the lens cap to prevent                                          Lift out Rewind Crank [16]
                            With the finger tip depress the
accidental exposure of film                                   and rotate clockwise in the
                              Film Rewind Sleeve (arrowed
during rewinding.                                                     direction of the arrow. You
                               above) into the cut-out portion
                                                                        will feel the film being
                                  of the surrounding sleeve. It
Press Shutter Release Button                                 rewound into the cassette -
                                    will click and stay down.
[3].                                                                stop when resistance ceases.


                         Advance Film Transport
                           Lever [2] in short strokes
                                  until it stops. The Film
                        Rewind Sleeve will return to
Lift Rewind Knob [16]
                                       its original position.
fully to open camera back.
Remove exposed cassette.
                               Fire shutter.

                        The camera is now ready for
                           your next film.
View original page 10Page 11 · Read text
www.butkus.us

Photography with Flash


The meter cannot be used when
taking flash pictures as the burst
of light is too short. In all cases
the Speed Dial [1] must be set to,
"30-X", the aperture being
determined by the camera-to-
subject distance. Tables or
calculators for this are given in
the instructions for the flashgun
often being incorporated into the
gun itself. Some flashguns have                                   Set the Speed Dial to "30-X".
built-in computers which allow
the aperture to be left at one                           Remove square shield from Accessory Shoe [18] and put in a
setting regardless of camera-to-                                     safe place.
subject distance.


                                                            Set Aperture Ring [9] in
                                                        accordance with the
                 A large or heavy gun must      flashgun's instructions.
A lightweight compact gun   be fitted to a flash bracket
may be slid into the         screwed into one of the        Switch gun on, wait for
accessory shoe. If there is a   Tripod Bushes [23] on the      "ready" light, focus and
lead connect the plug to      camera base. Connect the       proceed.
Flash Sync. Socket [5].       lead to the Flash Sync.
                           Socket [5].                Remember to replace the
                                                          accessory shoe cover after
                                                     removing gun.
View original page 11Page 12 · Read text
For exposures longer than
                          Although the camera may be
the meter range (1/30th at                                  Set the Speed Dial to "B"
                               rested on a firm surface the
f/2) the "B" setting on the
                              best results will be obtained
Speed Dial [1] must be                                     Set the Aperture Ring [9].
                        by the use of a tripod but
used. The exposure should                              Focus and wind the shutter
                           avoid those of a flimsy
be determined by using a                              by advancing Film
                               nature. A Hellos Tripod or
hand-held meter such as                                   Transport Lever [2] in short
                           Hellos Mini-Tripodthe Leningrad or by                                       strokes until it stops.
                                  (illustrated) is ideal.
experience/estimation.


                                                                If you do not have a cable release depress the
Fit a short cable release (obtainable from any
                                                camera's Shutter Release Button until the shutter
good dealer) into the screwed portion of the
                                             opens and turn it fully anti-clockwise to the "T"
camera's Shutter Release Button [3]. Depress the
                                                      position. The shutter will remain open until the
cable release and the shutter will stay open until
                                                 button is returned to the normal position. We
pressure is released. Some cable releases have a
                                        recommend the use of a cable release where
screw lock which avoids the need for holding it
                                                   possible as this will reduce the chance of
during a lengthy exposure
                                            "camera shake" during the exposure.
View original page 12Page 13 · Read text
www.butkus.us


The Self Timer [7] provides about a seven
second delay in the firing of the shutter and
enables you to get into the picture yourself.
Flash can be used.

Place camera preferably on a tripod,
otherwise on a firm surface.

Set speed and aperture. Frame area In                         IMPORTANT- Do not                                         Depress Shutter Release
Viewfinder [27j and focus. Wind the                                     leave the Shutter Release                                            button [3] halfway until
Shutter by advancing Film Transport Lever                             locked in the 'V' position                                               lens closes down and
[2] in short strokes until it stops.                                        longer than necessary in                                               turn it fully clockwise to
                                                                        order to minimize battery
                                              the "V" position.
                                                                               drain.


Turn the Self-Timer Lever [8] down until it   Press the Self-Timer Release Button p1 and move
will go no further. The "V" that is revealed    into the picture area as quickly as possible. The Lever
is just a reminder that you should have set     [8] will slowly return firing the shutter during its
the Release Button [3] to its "V" position.      travel.


Changing the Batteries


                                                                     Fit two new batteries both with "+"
                                                          outwards. Replace battery cover with
                                                                      slot horizontal locating the two cover
                                                    arms in the camera body slots. With a
The Meter is powered by two
                                                           coin edge push inwards and turn to
Mallory D386 cells which
                                                           lock in vertical position.
should be changed every
twelve months.
                                                 Use a clean linen cloth when
                         To remove. Place coin in                                                          handling batteries -the grease from
                                      slot of Battery Cover [19]                                                           bare fingers can adversely affect the
                            and turn anticlockwise                                                                     electrical contacts.
                                     until slot is horizontal.
                         Remove cover and old
                                      batteries.
View original page 13Page 14 · Read text
To extend the range of your photography


. . . many accessories are
available from your dealer
suitable for your Zenith
including an exciting range                                   In the Hellos range specially
under the Hellos name.                                 computed to suit the Zenith - are
                                                       Wide-angle 28mm and 135mm
Alternative Lenses.                                       Telephoto lenses, together with a
The Zenith lens has a 42mm                                range of Zoom Lenses some with
thread mount and may be                             Macro or Close-Focusing facility.
removed from the camera body                        From the USSR come the well-
by grasping the whole lens                           known Mirror Lenses, MTO 3M5A
barrel and fuming it                                    and MTO 1000A. All lenses (except
                             Lenses may beanticlockwise. Other 42mm                                Mirror type) operate in the same way
                                interchanged at any pointscrew lenses of a different                                    as the standard lens.
                               without losing any frames.focal length may then be fitted
providing they are of the
single-pin operating type.


In addition there are x2 and x3 Helios Teleconverters which are very small, light and convenient to carry and
when fitted between the lens and camera body double or treble the focal length of the lens employed. Some
additional exposure is necessary when using teleconverters. Helios converters come in their own carrying case
together with full instructions.

Filters. Are screwed in front of the lens and improve color rendition, contrast and protect the lens. They are
available from your photographic dealer.

      Helios 2x Teleconverter         Helios 3x Teleconverter

      Construction                 4 elements in 4 groups         4 elements in 4 groups

      Diaphragm                   Auto/manual linkage            Auto/manual linkage

      Length                25mm approx.            50mm approx.

      Weight                     85g approx.                  130g approx.

      Supplied with Carrying Case    Supplied with Carrying Case


To fit Teleconverter: Remove camera lens. Fit Converter to lens. Fit both together to camera body holding
converter.

To remove Teleconverter: Remove lens and converter together holding converter. Separate. Refit lens to camera
body.
View original page 14Page 16 · Read text
Filter size:      67mm         55mm         49mm         58mm

Length:        98mm approx.    115mm approx.   123mm approx.   163mm approx.

                                                                   612g approx.
                                 400g approx.      440g approx.      Macro
Weight:           465g approx.     One touch zoom   One touch zoom    Magnification
                                     Multi coated       Multi coated        Ratio: = 1:10
                                                                                to1:3 (maximum).


                             Tubes.
                               Helios Auto Extension Tubes
                                  are in sets of three and are used
                             between the camera body and
                                  the lens. They extend the
                                     possibilities of magnification
                           up to 1/1 reproduction. Some
                                  additional exposure is
Close-up Lenses.                                necessary but providing this is
                                within the meter's range the      Bellows. Helios Macro Bellows
Helios Close-up
                                Zenith 12 XP will                 will give greater - and infinitely
supplementary lenses are made
                                 automatically compensate.        variable magnification than
in strengths of +1, +2 and +3
                                                                extension tubes -up to 4x life
dioptres. They may be obtained
                                                                      size with standard lens.
from your Photographic
Dealer.


In addition to the supplementary lenses, Teleconverters and tripods mentioned earlier a number of other Helios
accessories are available to enhance and expand your photography.

Firstly, a comprehensive range of electronic flashguns ranging from a small manual model, Guide No.14
(100ASA/m) up to a large automatic model Guide No.35 (100ASA/m) with power saving thyristor circuitry, 0°
to 345° horizontal rotation of the zoom bounce head, plus a 'fill-in' mini-head. Also in the range is the Helios
Slave Flash Unit, which fires a secondary flash gun in synchronization with the main flash without the need for
trailing cables. Secondly a range of strong aluminum cases, in various sizes and with either foam filled interior
or rubberized grooved interior with adjustable partitions, in which to keep your camera and accessories safe and
secure. Alongside these cases, and performing a similar function, are several gadget bags and hold alls in vinyl
or material for those who prefer a soft beg for their equipment, and five neck straps of various widths, designs
and colors, plus three lens pouches in which to keep your extra lenses when they are not in use.
View original page 16Page 17 · Read text
www.butkus.us

Helios Binoculars, Telescopes, Monoculars and Opera Glasses are further examples of the fine quality of our
optical industry. They will add enormously to your enjoyment of the world around you. The binoculars all have
excellent fully-coated lenses, easy center wheel focusing and an adjustable right eyepiece. They are complete
with neck strap, leather carrying-case and strap and haze reducing filters and are available in 7 x 35,
7x50,8x30,10x50 and 12 x 40 models. The Telescopes have similar high-quality lenses and come complete with
carrying case 10 x 30 and 20 x 30 models. Also available are four Opera Glasses all complete with case and two
Monoculars (7 x 50 and8x30).


Camera Care

Your Zenith is a ruggedly built camera designed to provide many years of dependable performance. For the
longest service and best performance always treat it with the care and respect due to any precision instrument.
Transport your Zenith in a Zenith ever-ready case, or Hellos gadget bag or aluminum case if you wish to carry
your camera without a case, then attractive Hellos straps are available to clip on to the camera neck strap eyelets
[6] and [141
View original page 17
Page 18 · Read text
Do not leave the camera inside a car on a hot day, or in direct sunlight. The lens in particular must be protected
at all times - a UV filter, which needs no additional exposure, may be left in position permanently. Never
attempt to clean the mirror, viewing screen or lens by wet means; should they ever need cleaning your
photographic dealer should be consumed.

If you do not use your camera regularly, and especially before going on holiday, or on an important occasion
such as a wedding etc. we recommend that you run off a test film making sure that all available settings,
including the self-timer mechanism, are used.

Trouble-free photography is assured if the instructions are followed carefully, but perhaps just a few points
could be emphasized;

If this happens . . .             Here is why . . .            And how to correct it . . .

After loading, Frame Counter    Film transport Lever [2] not
                                                      Advance Transport Lever fully
[4] skips two or more numbers    fully wound before counter set
                                                                before setting counter to 'O'.
after being is set to 'O' position.   to 'O' position.

                             See above - or Counter set      See above - always wind
Frame Counter [4] 'skips',
                                before Transport Lever was      Transport Lever before setting
counting incorrectly.
                            wound.                          counter.

                                                 Wind Self-Timer Lever fully
                                                                           until lever points downwards
                               Self-Timer Lever [8] not fully
Self-Timer does not trip                                        with no further movement
                            wound. Transport lever [2] not
shutter.                                                              possible. Always ensure
                            wound.
                                                               Transport Lever is fully wound
                                                                before setting Self-Timer Lever.

Film will not rewind.          Rewind release not engaged.     Refer back to page 17.

If anything should go wrong
                         Remember that your Zenith
with your Zenith and the
                            and its accessories are backed
preceding chart has not got you
                           up by top-class service
out of trouble never attempt to
                                        facilities where factory-trained
mend it yourself - you could
                                     specialists are available to put
turn a minor adjustment into an
                                  things right.
expensive repair.


After Sales Service


At Zenith House you will find a well organized team of servicing experts including factory trained English
personnel and a full complement of technicians from the camera manufacturers, not to mention a highly
sophisticated range of electronic test equipment.

Your new Zenith (camera is covered by our comprehensive, transferable two year guarantee. Should' service be
required at any time please return your equipment either to your original supplier or direct to Zenith House,
ensuring that you include a brief description of the defect. If sending equipment direct it must be securely
packed and carriage paid. It is also recommended that you insure against loss or damage in transit since this is
not covered by the guarantee.
View original page 18Related documents and language editions
From the M. Butkus archive. Original publisher and archive notices are retained.
Check the model and edition against your equipment.
PDF verified 2026-10-10.