Film cameras
Zenith E User manual
User manual for Zenith E. 12 pages in English. Read the original PDF, download or print a copy without registration.
12 pagesEnglish1.6 MB PDF
Loading your manual…Open PDF directly
Document details
- Brand
- Zenit
- Model / document
- Zenith E
- Document type
- User manual
- Language
- English
- Pages
- 12
- File size
- 1.6 MB
- Category
- Film cameras
- Document date
- Not specified in catalog
Search available document text
Find a term, then jump to its page in the original PDF. Image-only pages may not be searchable; check the PDF for exact wording and diagrams.
Page 2 · Read text
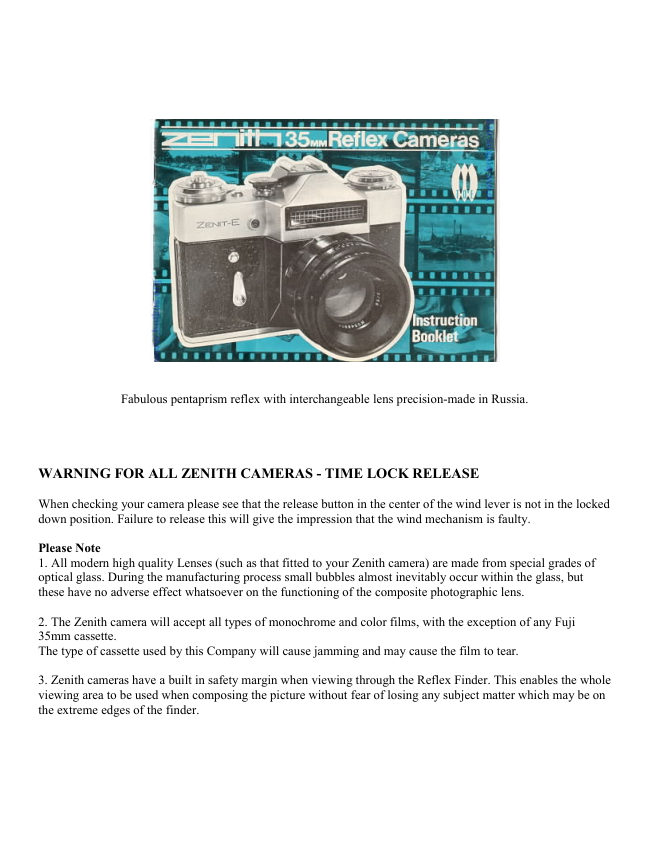
Fabulous pentaprism reflex with interchangeable lens precision-made in Russia.


WARNING FOR ALL ZENITH CAMERAS - TIME LOCK RELEASE

When checking your camera please see that the release button in the center of the wind lever is not in the locked
down position. Failure to release this will give the impression that the wind mechanism is faulty.

Please Note
1. All modern high quality Lenses (such as that fitted to your Zenith camera) are made from special grades of
optical glass. During the manufacturing process small bubbles almost inevitably occur within the glass, but
these have no adverse effect whatsoever on the functioning of the composite photographic lens.

2. The Zenith camera will accept all types of monochrome and color films, with the exception of any Fuji
35mm cassette.
The type of cassette used by this Company will cause jamming and may cause the film to tear.

3. Zenith cameras have a built in safety margin when viewing through the Reflex Finder. This enables the whole
viewing area to be used when composing the picture without fear of losing any subject matter which may be on
the extreme edges of the finder.
View original page 2
Page 3 · Read text
www.butkus.us

                           ZENITH E

F2 Hellos
Specification is similar to the Zenith B f2 Hellos but, additionally, features a built-in selenium photo-electric
exposure meter. See pages 14 and 15 for instructions relating to the controls and operation of the Zenith E
exposure metering system and for unloading of camera.


ZENITH BF2

This instruction manual contains the basic characteristics and essential operating principles of the Zenith B
Camera. Read very carefully and follow the instructions in the first few days of use. Soon you will become
familiar with the camera's controls, and handling, until you do not have to think about the 'mechanism' of the
camera -- but enjoy concentrating on the more creative possibilities with this fine instrument.


6 IMPORTANT RULES TO OBSERVE

1. When removing or fitting the lens, grip it as a whole avoiding undue pressure on any one ring.

2. Do not touch the optical surfaces of lenses or the return-mirror. Fingerprints diminish optical efficiency, and
may damage coated surfaces

3. Do not rotate the shutter-release button. Apply only direct 'push-button action with your fingertip to avoid
engaging 'T' lock.

4. Do not rotate the shutter speed selector the short distance between "B" and ''500".

5. Always advance the film-transport crank to its fullest extent This avoids blank exposures.

6. Always ensure pre-set ring is closed after focusing and before exposure.


SPECIFICATION

Lens: 58mm Hellos f/2 interchangeable super-fast 6 element; minimum focus: 18 inches; apertures: f/2 to f/16;
pre-set diaphragm; depth of field index; distance scale.

OR . . .

50mm Industar f3.5 interchangeable; minimum focus: 24 inches; apertures f3.5 to f16; aperture-setting ring;
depth of field and distance scales.

Shutter: Focal plane; Instant return mirror; speeds: 1/30 see to 1/500 see; B and delay time & 'M' and 'X'
synchro.


Viewfinder: Reflex viewfinder with ground glass focusing screen; Eyepiece magnification: 5X.
View original page 3Page 5 · Read text
www.butkus.us


               6. Cassette spool guide

               7. Viewfinder eyepiece

               8. Sprocket

               9. Opening catch

             10. Cassette chamber

             11. Film aperture

             12. Film channel runners

             13. Take-up spool

             14. Take-up spool spring

             15. Back cover

             16. Film pressure plate
View original page 5Page 6 · Read text
INSTRUCTIONS FOR LOADING
(see p. 14 f or Zenith E)

The camera can be loaded in normal lighting conditions. Open the back cover of the camera by pulling the lock-
catch upwards. Next, pull the film-rewind wheel upwards and inset (the film cassette).
View original page 6
Page 7 · Read text
www.butkus.us

Now fix the leading edge of the film under the take-up spool spring and engage on the spool tooth and film
sprocket. Ensure that the film is guided correctly over the film-channel runners. Replace the cassette into its
seat. Return the rewind wheel to its original position. Close the back cover by pressing down the lock-catch.
Advance the shutter setting lever to the stop position: then press the release button. As the lever turns, the film
is advanced by the space of one shot. To transport non-exposed film to the film aperture: wind the shutter twice:
pressing the release button after each winding:

Note. While winding the shutter, check whether the film rewind wheel rotates. If not, check whether the camera
is correctly loaded with film. Finally, turn the exposure-counter dial and set the figure 'O' to align with the index
dot on the ring. Set the exposure counter when the shutter


EXPOSURE SETTING

A gentle upward pull on the shutter speed dial followed by a rotating movement sets the shutter speed duration.
The selected speed figure is aligned with the index mark in the middle of the dial, then depressed to fix it in the
primed position. Figures indicated are in fractions of a second. 'B' indicates a hand-controlled exposure
duration.
View original page 7
Page 8 · Read text
Time exposures are obtained by first winding the shutter: setting the dial to 'B'; then, by pressing the release
button until locked by rotating it .

It is released by turning the release button to its former position.

NOTE:
1. The exposure duration can be set both with the shutter wound and released.
2. Use a tripod for slow shutter speeds on 'bulb' exposure.
3. When photographing without flash bulbs the synchro setting lever can be set at X.


STOP SETTING

To set apertures on the 58mm HELIOS lens: set the index mark to align the selected aperture figure engraved
on the aperture-setting ring of the lens. Each setting is click-stopped at each aperture setting. The same
procedure applies to the INDUSTAR-50 lens except that with this lens there are no click stops: the lens aperture
is set only after focusing.


FOCUSING THE LENS FOR IMAGE SHARPNESS

58mm HELIOS: Focusing should be done with the diaphragm aperture opened at maximum. For this purpose
the diaphragm ring of the 58mm Hellos should be turned counter-clockwise to its full extent. Aim the lens at the
photographed object Observe through the viewfinder eye-piece: turn the lens focusing ring until a sharp image
appears on the ground glass. After focusing, the lens is instantly stopped down by turning the diaphragm ring
clockwise to its full extent, i.e. to its preset figure.

50mm INDUSTAR: When photographing with the 50mm Industar lens (which has no pre-set diaphragm), the
aperture setting ring of the lens is set after the focusing is done. In situations where you want to photograph a
number of objects disposed at different distances: use the depth-of-field scale. The depth-of-field scale is
symmetrically arranged on both sides of the index and corresponds to diaphragm values After the camera is
focused you Can read off the depth of field for a chosen aperture by noting the limits of the depth-in-field scale
on both sides of the index on the distance scale for the aperture setting selected. For example: when the lens is
focused at 10 ft and f:11 aperture is selected. the image will be sharp in limits from 8ft to 40ft.
View original page 8
Page 9 · Read text
www.butkus.us

FLASH SYNCHRONIZER:

For photographing in conditions with poor illumination, you should use a flash gun. For this- purpose the Zenith
B camera is fitted with a special device which synchronizes flash to coincide with the shutter operating time. To
switch on a single action flash bulb: set the synchronization setting lever against index "M". When operating
with an electronic flash gun, the synchronization setting lever should be set against index "X". Only one
exposure time of 1 /30th sec. may be used in the Zenith B camera: when photographing with either flash bulbs
or electronic flash. Hand exposure ''B' is not recommended when using flash bulbs: a considerable amount of
stray light (after flash) enters the camera with resulting over exposure.


THE SELF TIMER -
When shooting with the self-timer, observe the following procedure: wind the shutter: wind the self -timer
mechanism by turning the self-timer setting lever down as far as it will go. Set exposure, choose the frame,
focus the lens . . . Close the lens opening to the f stop and press the self timer release button. The shutter
operates in no less than 9 sec. after pressing the button.
View original page 9
Page 10 · Read text
UNLOADING THE CAMERA
(See p.14 for Zenith E)

When the exposure counter dial shows figure (36 or 20) it means that the exposed film should be rewound into
the cassette. The procedure is the following:
1. Disengage the shutter mechanism by pressing the film-rewind release button and, holding it in this position,
rotate the film rewind knob in the direction shown by the indicating pointer until you feel, by the relaxed force,
that the end of the film has left the spring of the take-up spool.
2. Open the back cover of the camera.
3. Pull the film rewind knob upwards and remove the film cassette out of the camera.


IMPORTANT TIPS
The camera should be handled gently and carefully avoiding undue force to controls and dials. Always keep the
camera scrupulously clean and protected from excessive vibrations, moisture and sharp temperature
fluctuations. Keep the camera in a closed carrying case. For storage purposes the cap should be placed on the
lens and the shutter and self-timer released. Never remove the lens from the camera unnecessarily. This
prevents dust and dirt from reaching the surfaces of optical parts. Clean the optical coated lens surfaces only
with a camera blower-brush. As the camera is a complex optical and mechanical device, any repair and
adjustment should be performed only by a highly qualified specialist.


BULB FLASH WARNING
When using bulb type flashguns, do not insert a new flashbulb into the gun while it is connected to the camera
with the shutter unwound. The shutter must always be wound before the flashbulb is connected .


ZENITH E - 58mm F2 Helios Lens
Specifications as Zenith B but, additionally, features a built-in selenium photo-electric exposure meter
calibrated for aperture settings and film speeds.


Except for exposure, and unloading the camera, all operations and instructions for the Zenith B apply equally to
the Zenith E
View original page 10
Page 11 · Read text
www.butkus.us

EXPOSURE CONTROLS
The principal controls comprise two circular dials and each is concentric to the rewind knob (see illustration).
The Outer Dial (calibrated from 1/30th to 1/500th sec ) is the shutter speed control and this, when rotated, is
constantly linked to the small 'zero' index in the curved meter-window, (see illustration). The Inner Dial is the
film-speed control (calibrated with ASA and DIN speed ratings and aperture figures).


LOADING & UNLOADING

Proceed as previously instructed but as the spring-loaded rewind knob is recessed within exposure meter
controls it has first to be brought into operating position by depressing slightly and turning it anti-clockwise.

(Illustration shows the knob in the rewind position, for loading and final removal of the cassette pull the knob
upwards from this position).
View original page 11
Page 12 · Read text
EXPOSURE OPERATION
To obtain accurate exposure: first align the film-speed setting line (engraved on the Inner Dial) to coincide with
the small black dot engraved beneath the selected film speed rating (ASA or DIN). Next, point the camera lens
to the subject and ensure that fingers do not obscure the photo-electric window (mounted above the lens). Note
the position at which the needle comes to rest. Now, rotate the knurled Outer (shutter speed) Dial until the small
'zero' index is bisected by the stationary meter-needle (located in the curved window). The meter is now primed
for any selection of coincident reading of aperture and shutter speed. Finally, align the red dot on the Hellos
lens with the selected aperture: point the camera at subject, rotate the focusing ring until sharp image-resolution
is obtained, turn the pre-set diaphragm ring clockwise to its fullest extent--depress the release button to obtain
perfect exposure.
View original page 12
Related documents and language editions
From the M. Butkus archive. Original publisher and archive notices are retained.
Check the model and edition against your equipment.
PDF verified 2026-10-10.