Flashes & lighting
ZENOBIA Flash User manual
User manual for ZENOBIA Flash. 1 pages in English. Read the original PDF, download or print a copy without registration.
1 pagesEnglish0.6 MB PDF
Loading your manual…Open PDF directly
Document details
- Brand
- Zenobia
- Model / document
- ZENOBIA Flash
- Document type
- User manual
- Language
- English
- Pages
- 1
- File size
- 0.6 MB
- Category
- Flashes & lighting
- Document date
- Not specified in catalog
Search available document text
Find a term, then jump to its page in the original PDF. Image-only pages may not be searchable; check the PDF for exact wording and diagrams.
Page 1 · Read text
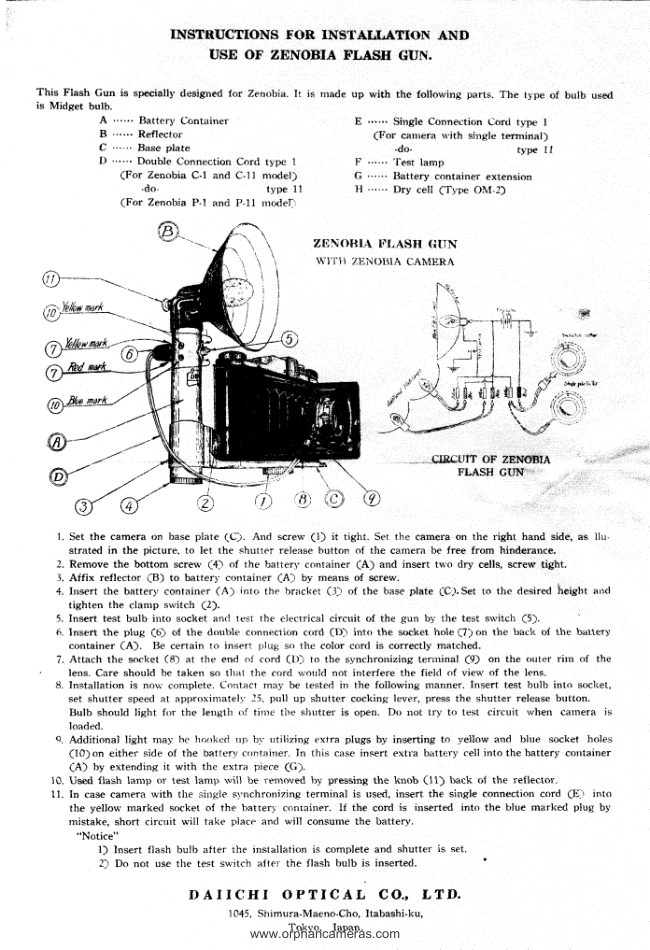
INSTRUCTIONS FOR INSTATJ,ATION AND
                 USA OF ZENOSIA FLASII GUN.

This Flash Gun is specialll. designed {or Zeno}:ia. Ir  is nrade up with  the  following   parts. The  type  of bulb  used
is Midget bulb.
         A  ,..... Battery Container                                           ...... Single Connection  tjorti  tr*pe  I
         B  .'.... Reflector                                       (For  carrrera u'ith  single terminal)
        C  "'... Base plate                                                                          .CIU.                                                                                                                                                                                                                                                                                                                                                                                                                                                                                                                                                                                                                                                     l  -                       type  t I
           n  ..'... Dotrble Connection Cord type  I           F  .."... 'fest lamp
                (For Zenobia C.l and C-11 nrndel)        G  ,..-.- Battery container extension
                    -do-                   t1,pe 11       H  """   Dry  cell  (llype   Otvt-l)
                (For Zenobia P-l anti F.ll  rnodel-:

                                                          z$l{{}}ilA   F-I,ASH (;t}N
                                                                    wj'i}i  ZHN0tlL\ L:.Ah{ERA
                                                                                                                                     t                                                              \I                                                                                                                                      I
                                                                                                             - * . '       .    !    I       I                                                              ;l:1              t      i
  ,';  YcIa*'mlt                                                                      I (9/-*---.-..-....--'-                          ,                 I


                                                      CIRCUTTOT                                                                                 ii:;
                                                                                                                                                                                                                                                           '                                                            FLASH GUN

                                                                               I
                                                                          t . L )

     1. Set the camera  on base plate  (C-). And  screw  (1)    it  tight.  Set the carnera on the  right  hand  side, as  llu"
        strated  in the  picture,  to  let  the  shutter  reiease hutton  of  ttre camera be free from  hindsrance.
     2. Remove the bottom  screw  (4)  of the  batrert  container  (A)  and insert  trrr,odry  cells, scre*   tight.
       .]. Affix   reflector  (B)  to  battery  container  (A)  by means  of screw.
     4. Insert  the batter). container  (A)   into  the bracket  (3)  of the base ptate  iC). Set to the desired hei.ght a,rcl
       tighten  the clamp switch  (2).
     5. Insert  test  bulb  irito  socket  ancl test  the  eiectrical  circuit  of the gun  b1' the  test  srvitch  (5).
     6. Insert  the plug  (b)   tf  the  rlotrbl* eonnection  cortl (D)  into  the socket hole (7) on the bach  of the  balttry
       container   (A).   Be certain  to  insert  lrlug so the  color  cord  is correctly  matched.
     7. Attach  the socket (8)  at the enC of cord  (l))  ro the sl'nchronizing terminal  (9)  on the otrter rint  of  the
        lerrs. Care should be taken so  tlral  the cord  rr,'orrld not  interfere  the  fielcl of view  of the  lens.
       tl. Installation  is no\,v contplete. Corrtact mny be testerl irr the followiug  n'lanner. Insert test brrlb into socket,
       set shutter  speecl at  approxir)'ratel\: J5" prrll up shutter  cockingl lever, press the shutter  release button.
       Bulb  shoulcl light  for the  lerrgtir  rrf tirne  tire sliutter  is open. Do not  tr!'  t(.) test  circuit  r,vhen catnera   is
       loaded.
     q. Additional   light may he hookcd  rrp b:'  rrtilizing  e'xrra plugs by inserting  to  yellow and  hlue  socket  lroles
      (10)on  either  sicle of the oat{er},container.  In  this case insert extra  birtterS, cell into the battery  corrtainer
       (A)  bv extending  it with  tlre extra piece ((i).
   10. Used flash  lanrp  or  test lamp  ruill be rernoved by pressing the knob  (11) back  of the  reflector.
   11. In case camera with  the  sir:gl*  si,nchror:izing  terminal   is usetl, insert the single connectiein cord  (Llr   intcr
       the yellow  markerl  socket  of the  hatter-\  contairrer.   If  the cord  is  inserted  into the blue marl<ed plug by
       mistake,  short  circtrit  will  take  plpse and  *rilt censume the  batter.v.
         "Notice"
                     l)  Insert flash butb after the installation  is complete and shutter  is set.
                                                                                                                                                                                                                                                                  '              2) Do not use the test su,itch after the flash hulb  is insertecl.

                   T , A I I C H I   O P T I C A L   C O . ,  L T N .
                                     r045'shirrr'fi1ff"i*:.  rtabashi'ku'
                              www.orphancameras.com
View original page 1Related documents and language editions

From the M. Butkus archive. Original publisher and archive notices are retained.
Check the model and edition against your equipment.
PDF verified 2026-10-10.