Film cameras
Ricoh RZ-3000 User manual
User manual for Ricoh RZ-3000. 29 pages in English. Read the original PDF, download or print a copy without registration.
29 pagesEnglish1.7 MB PDF
Loading your manual…Open PDF directly
Document details
- Brand
- Ricoh
- Model / document
- Ricoh RZ-3000
- Document type
- User manual
- Language
- English
- Pages
- 29
- File size
- 1.7 MB
- Category
- Film cameras
- Document date
- Not specified in catalog
Search available document text
Find a term, then jump to its page in the original PDF. Image-only pages may not be searchable; check the PDF for exact wording and diagrams.
Page 3 · Read text
www.butkus.us


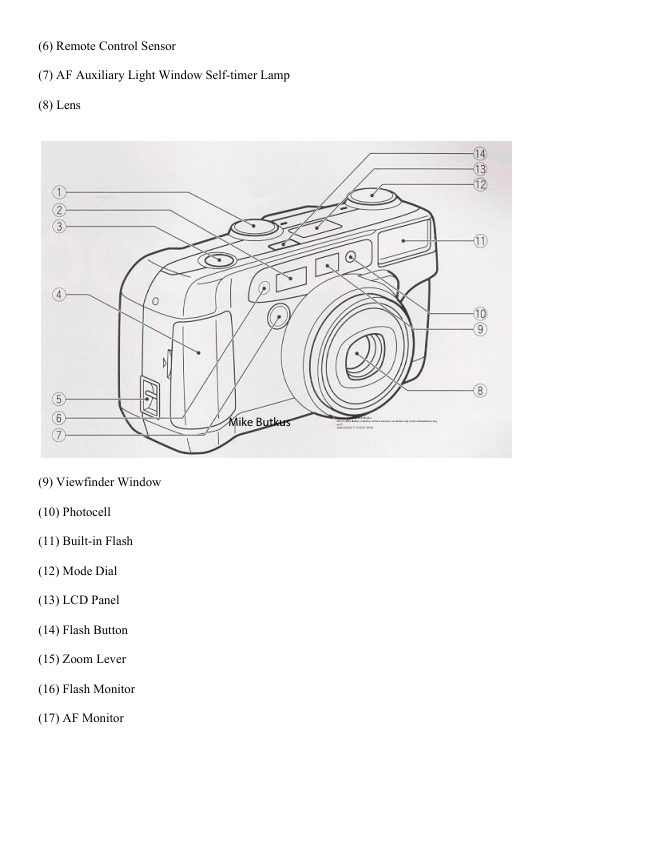
(18) Viewfinder

(19) Back Cover Latch

(20) Tripod Socket

(21) Manual Film rewind Button

(22) Film Loaded Window

(23) Back Cover
View original page 3
Page 4 · Read text
× Combining the modes

It is possible to set the camera to combine the Self-timer and Remote Control with the shooting modes and the
flash modes. Some of the shooting modes can also be combined with the flash modes, as shown below.


               A
  Shooting Modes                 Portrait     Action      Infinity    Super Night    Single AF
                      (Auto)
    Flash Modes             Mode     Mode     Mode      Mode       Mode
                 Mode
      Normal      O     O      O         x       O        O
 Red Eye Reduction
              O     O         x         x       O     O O x x O
      Mode
   Flash-off Mode    O     O      O      O           x        O
   Flash-on Mode    O     O      O         x           x        O
 Slow Synchro Mode   O        x         x         x           x        O
 Red Eye Reduction
              O        x         x         x           x        O
 Slow Synchro Mode

MAIN FEATURES

× Powerful 38-130 mm multi coated zoom lens with aspheric lens elements

× 7-zone passive multi autofocus in 1024 measuring steps

× High-power zoom flash for tele shooting

× Easy to access 2-dial control with illuminator

× Creative modes (portrait, action, super night, infinity, etc.)

× Compact and light weight body

BEFORE USING

* A fast film such as ISO 200 or ISO 400 is recommended to prevent blurriness and to obtain a longer flash
range.

* When focusing is difficult or impossible, AF monitor blinks to warn you that an out-of-focus picture will
occur. Set infinity mode or use focus lock function. (page 24, 29)

* Do not hold the camera by the lens

* Before taking important pictures (at weddings, on trips abroad, etc.) test the camera and learn how it works.
View original page 4Page 5 · Read text
www.butkus.us

CAUTIONS

 This camera has a high voltage circuit. Because it is dangerous, do not attempt to take the camera apart.

 If the built-in flash does not operate, do not touch the internal parts of the camera, as it contains a high
voltage circuit. Take the camera to the shop where it was purchased, or to your nearest Ricoh service
center.

ATTACHING THE STRAP

1. Insert the small loop at the end of the Strap under the Strap Holder. (Fig. 1 (a)

2. Insert the other end of the Strap through the loop to tie the Strap onto the Strap Holder (Fig. 1 (b)

INSERTING THE BATTERIES

The camera will not operate unless the batteries are installed. Make sure that the batteries are installed correctly.

1. Insert a coin in the slot of the Battery Compartment Cover to open it. (Fig. 2)

2. Slide the inner cover latch in the direction indicated to open. (Fig. 3)


3, Insert the recommended 3 volt lithium batteries, checking that the + and - are inserted correctly. (Fig. 4)

4. Press down the inner cover to close.

5. Close the Battery Compartment Cover by pushing it in the direction indicated until it locks firmly in place.
(Fig. 5)


                                           * Do not remove the batteries from the camera until
                                           you are ready to replace them.

                                           * The date display ["00 0 0] blinks when the batteries
                                                     are replaced. By pressing either the Mode Button,
                                                     Select Button, or Set Button, [1 1 '95] will be
                                                     displayed. Reset the correct time and date. (Optional)
View original page 5Page 6 · Read text
* When replacing the batteries, do so as quickly as possible to avoid erasing camera memory. We recommend
replacing the batteries when there is no film in the camera.

* The batteries can explode or cause burns if disposed of in fire or if shorted, disassembled, heated or
recharged.

* Recommended Replacement 3V Lithium


Batteries

CR-123A, or equivalent X2

TURNING THE POWER ON/OFF


                   The power is turned on or off by selecting ON or OFF on the Drive Dial.
                          (Fig. 6)


When the power is turned on, the lens moves from the storage position to the wide-angle position, and the
camera is set automatically to the mode selected on the Mode Dial.

CHECKING THE BATTERIES

1. When the batteries are nearly exhausted,      will appear on the LCD Panel. Replace with new batteries as
soon as possible.

2. When the batteries are exhausted, the     symbol will blink in the LCD Panel. Replace with new batteries.
 * As the battery voltage is reduced in extremely cold temperatures, the do symbol may blink. You may be able
to use the camera if you remove the batteries and warm them up.

* In the following cases, battery voltage is insufficient and the batteries need to be replaced.


1 ) When the power does not turn on.

2) When the     symbol blinks.

3) When the shutter does not release.

4) When film advance or rewind do not function.

5) When the Self-timer does not function. * To avoid tripping the shutter inadvertently and wasting battery
power, always turn the power off when you are not taking pictures.
View original page 6Page 7 · Read text
www.butkus.us

* If the camera is not operated (buttons, dials and lever) for about 5 minutes, the power automatically turns off,
the LCD Panel display disappears and the lens returns to the storage position. The purpose of this function,
called Auto Power OFF, is to prevent waste of battery power. The power will turn on again by operating any of
the buttons, dials or lever.


LOADING THE FILM

Always avoid direct sunlight when loading the film.


                            1. Push the Back Cover Latch Downward to open. (Fig. 7)


                            2. Load the film cassette into the Film Chamber and pull out enough film
                          leader to extend past the mark of the film leader position. (Fig. 8, 9)


                     * If there is any dust on the inside lens surface, use a blower to blow the dust
                       away.
View original page 7Page 8 · Read text
3. Make sure the film stays within the Film Guides and lies flat. (Fig.
                        10,11)


                            4. Press the Back Cover shut so that the Back Cover Latch returns to its
                            original position. When you close the Back Cover the film is automatically
                        advanced, and the first frame is set in place. The Exposure Counter on the
                LCD Panel displays the number of frames remaining to be exposed. (Fig. 12)


                     * If the film has not advanced correctly and is not taken up onto the Film
                      Take-up Spool, the Exposure Counter will blink. (Fig. 13) The Shutter
                        Release Button will also lock so you cannot take a picture until the film is
                        loaded properly. (DX Film only) Reload the film by following steps 1 -4
                    shown above.


                     * Whether there is film in your camera or not can be confirmed by either
                          the Film Loaded Window or the Exposure Counter in the LCD Panel.

                     * You can confirm that the Film-Wind or Rewind is working properly by
                        observing the Exposure Counter.


* You can load film in your camera with the power off. However, the LCD Panel display will disappear after
loading is complete.

* Do not touch the inner lens with your fingers or the edge of film.
View original page 8Page 9 · Read text
www.butkus.us

* This camera's Pre-wind System automatically prewinds the film to the end when you load it and rewinds it
back into the film cassette as each shot is taken. If the back cover is accidentally opened before the film has
reached the end, close it immediately. The film will automatically rewind. When it has completely rewound, the
Exposure Counter will display "E". Remove the film and develop.

* Sometimes more exposures can be taken than the standard number of frames listed on the film. For this
reason, the number of frames counted in the Exposure Counter on the LCD Panel may sometimes be higher
than the number of frames listed on the film.


SETTING THE FILM SPEED


                    DX-coded film cassettes have black-and-silver patterns corresponding to
                          film speeds that the camera reads and automatically sets. Your camera
                         accepts DX films with speeds ranging from ISO 50 to 3200. (Fig, 14)


Most color negative films on the market are DX-coded. When using DX-coded films, setting the film speed is
not necessary. Your camera automatically sets the correct film speed.

When using a film without a DX code, your camera will automatically set itself to ISO 100.

HOLDING YOUR CAMERA


                            1. Always use both hands to steady your camera. (Fig, 15)


                      * When holding the camera vertically always position it with the flash at
                          the top. (Fig. 16)
View original page 9Page 10 · Read text
* Be careful not to place your fingers over the lens, flash or focusing
                      windows. (Fig. 17)

                      * We suggest that you become familiar with your new camera by
                         shooting and processing at least one roll of film before using your camera
                            to record an important occasion.

                      * If the camera moves during the exposure, the whole picture will be
                            blurred. To help insure sharp pictures, hold the camera steadily and
                           properly.


VIEWFINDER (Fig. 18)


                          (1)Field of View Frame:

                     The subject (such as people or scenery) you wish to photograph should
                       be contained within the frame.


(2) Parallax Correction Marks (Close Focusing Telephoto)

When taking a picture of a subject that is between m-1.8 m (3.3 ft.-6 ft.) away from your camera, the subject
should be positioned within this mark. Any thing outside the marks will not be included in the picture even if
you can see it through the viewfinder

(3) Single AF Spot

The center spot of multi auto focus mark (in wide)

(4) Multi Auto Focus Marks (in Wide)

(5) Multi Auto Focus Marks (in Tele)

MONITORS

When the Shutter Release Button is pressed lightly, the AF Monitor and the Flash Monitor on the right of the
viewfinder will either light up or blink to indicate the following.
View original page 10Page 11 · Read text
www.butkus.us

AF Monitor (Green)


   Display             Description                           Shutter                   page

  Lights up         Subject is in focus              Shutter Shutter will release           pg. 21

                      Subject is out
    Blinks                                  * Shutter Shutter will release          pg. 21
                         of focus

                       Subject too
    Blinks                                            Shutter will not release             pg. 21
                           close


* In certain cases the shutter will not release. However, this is not a malfunction.


Flash Monitor (Red)


      Display                    Description                         Shutter           Page

     Lights up             Subject within flash range            Shutter will release       P.23

       Blinks                  Flash is charging                Shutter will release       P.23

                                Subject out of
   Blinks rapidly                                                Shutter will release       P.23
                                     flash range


ZOOMING THE LENS

The built-in 38-130 mm zoom lens lets you get more in the picture, or closer to your subject without changing

your position. This allows you to easily select the composition that best suits your subject. (Examples 1, 2)


To zoom the lens, just turn the zoom lever to the led for Tele or to the right for Wide until your subject is
framed properly. (Fig. 19)
View original page 11Page 12 · Read text
* When zooming the lens, keep your fingers away from the moving lens
                       components.

                     * When the power is turned off, the lens will return to its storage position
                          automatically.

                     * To save on battery life, after about 5 minutes of inactivity, the lens will
                           return to the Storage Position and the display on the LCD panel will
                          disappear.


When zooming to the telephoto end, be sure to hold the camera firmly to prevent camera shake.

MACRO PHOTOGRAPHY

Used for close-up photography of flowers, etc. (Example 3)


                            1. Turn the zoom lever to the left to set the 130 mm position. (Fig. 20)

                            2. If necessary, approach to the minimum distance of 1 m (3.3 ft.) and
                           release the shutter gently.


* At 130 mm, the magnification at the minimum distance of 1 m (3.3 H.) is approximately 1/7.1 times.

A (AUTO) MODE
(MULTI AUTO-FOCUS MODE)


                             1. Turn the Mode Dial to A. (Fig. 21 )

                             2. Set the subject you wish to take within the multi auto-focus area in the
                           center of the viewfinder. (Fig. 18, Viewfinder)
View original page 12Page 13 · Read text
www.butkus.us

The multi auto-focus area changes depending on the lens position (wide or tale).


                            3. Press the Shutter Release Button gently to avoid camera shake.

                                If the subject is closer than 1 m/3.3 ft., the AF Monitor blinks and the
                           shutter will lock to prevent out-of focus pictures. (Fig. 22)


The distance between the subject and the camera is measured in 7 zones within the multi auto-focus marks.
Among these zones, focusing will be adjusted to the closest subject. This function will help prevent out-of-focus
pictures.

* The AF system uses an actual image of the subject to focus properly. In low light conditions, the AF Auxiliary
Light automatically lights momentarily to provide a bright target for the AF system to see.

In backlight conditions, make sure the subject is in the center of the multi auto-focus area. Otherwise, the
camera cannot detect the backlit condition, and even if the subject is less than 6 m/20 ft. away, the flash will not
fire.

When the subject is difficult to focus on:

The autofocus sensor determines precise focus b reading the contrast of the subject. In certain rare situations,
there may not be enough contrast for proper focusing. For example, clouds, hazy mountains, whit walls and
dark subjects that do not reflect light well.

In these situations, the camera is designed to warn yo that an out-of-focus picture may occur. It does so b
blinking the green AF monitor in the viewfinder.

When this happens you should:


                                1. Turn the Mode Dial and select the Infinity Mode (Fig. 23) These
                       modes automatically set the focus to infinity to assure sharp focus of
                           long distance subjects.
View original page 13Page 14 · Read text
2. Or for closer subjects use the "pre-focus technique" to lock the focus on a subject of equal distance but with
better contrast. To do this simply hold the shutter release halfway down (while in the single autofocus mode) on
a subject of equal distance and then recompose back to the original subject and continue to depress the shutter
release button to take the picture (see single AF for additional details).

3. If you press the Shutter Release Button all the way down, the shutter can be released. At this time,
focuses either at infinity in daylight or to the pair where AF system estimate in dark condition, to minimize out
of focus pictures. * In very rare cases, however, shutter may lock such as strongly backlit subject, clear sky etc.
Use prefocus shooting. SINGLE AF MODE (PRE-FOCUS SHOOTING)

Your camera's multi autofocus system will provide excellent results in most shooting conditions. However
when the subject you wish to focus on is behind a window, fence or bars, or located high or low in the
viewfinder, you should use pre-focus shooting. This will ensure a sharply focused image of your subject.

When the subject is high or low within the viewfinder:


                               1. Turn the Mode Dial to S × AF. (Fig. 24)


                               2. There may be cases where none of your main subjects are at the
                            Single Auto-Focus spot located at the center of the viewfinder (eg.
                             subject located high or low). If you release the shutter then, only the
                         background will be in focus, and the subject will be out-of-focus. (Fig.
                          25)


                               3. To pre-focus, move the camera so that one of the subjects is within
                             the Single Auto-Focus spot. (Fig. 26)


Press the Shutter Release Button halfway so that the AF Monitor lights up. Keep holding your finger halfway
down on the Shutter Release Button.
View original page 14Page 15 · Read text
www.butkus.us


                            4. Now return the camera to its original position so that your main
                          subjects are composed to your liking within the Field of View Frame
                           again, and press the Shutter Release Button fully to take the picture. (Fig.
                        27)


When the subject is difficult to focus on:

1. When you are photographing subjects that are difficult to focus on, or if your main subject is behind other
closer objects, then find another subject at the same distance from the camera. You can pre-focus on that subject
in the same way as described above.

* If you are shooting through a window under low light conditions, aim the camera at a slight angle to the glass
to minimize any direct reflection of the AF Auxiliary Light.

* When you release your finger from the Shutter Release Button, the pre-focus setting is cleared, so that you
can pre-focus again as many times as you wish.

AUTO FILM REWINDING


                                                         1. After the end of the film has been reached, the
                                                   film will automatically rewind.

                                                         2. When the film is fully rewound, the motor
                                                    stops automatically and "E" is displayed in the
                                LCD Panel. (Fig. 28) Open the Back Cover to
                                               unload the film. (Fig. 29)


* If you wish to rewind the film before reaching the end of the film, push the Manual Film Rewind Button with
a pen, etc. (If the Film Rewind Button is pressed with a pen whilst it is rewinding, the film leader will not be
wound into the film cassette and will remain outside.) (Fig. 30)


                      * Be careful not to touch the inner lens surface with your fingers or the
                       edge of film.
View original page 15Page 16 · Read text
FLASH PHOTOGRAPHY

1. If additional light is required, the built-in Flash automatically activates.

* Recommended Flash Shooting Range

(ISO 100)

Wide-angle: 1 m-5.3 m (3.3 H.-17.5 ft.)

Telephoto: 1 m-3.2 m (3.3 H.-10.5 ft.)

(ISO 400)

Wide-angle: 1 m-10.6 m (3.3 H.-35 H.)

Telephoto: 1 m-6.4 m (3.3ft. -21 ft. ft.) * To increase shooting range, use higher speed film such as ISO 400.

* To check if the subject is within the recommended flash shooting range, press the Shutter Release Button
halfway. When Red Flash Monitor turns on steady, it is within the range, and when it blinks fast , it warns
that the subject is out of the range.


                            2. When the Flash is still charging, the Red Flash Monitor will blink and
                          the shutter will be locked.

                            (Fig. 31 ) Wait until the red LED turns off in order to use the flash.


AUTO BACKLIGHT CONTROL/AUTO FILL FLASH

When taking pictures of backlit subjects, important details are open lost in the shadows. Your camera
automatically compensates for these lighting situations. If the subject is backlit and is about 6 meters
(20 feet) from the camera, Auto Back-Light Control (ABLC) will be activated. If the subject is within
about 6 meters (20 feet) of the camera, the Flash activates automatically and the shadows are
lightened up using automatic daylight fill-flash. Thus, with backlit subjects, natural looking pictures
can be taken easily and automatically. (Fig. 32)


                      * Frame the subject in the center of the viewfinder to activate
                         compensation.
View original page 16Page 17 · Read text
www.butkus.us

FLASH MODES

The following Flash Modes can be selected by pressing the Flash Button:

? Red Eye Reduction Mode ? Flash-Off ? Flash-On ? Slow Synchro - Red Eye Reduction Slow Synchro

RED EYE REDUCTION MODE

Minimizing the Red-Eye Effect

Selecting this mode makes it possible to minimize the red-eye effect that sometimes occurs when taking portrait
photographs with flash. Now it's easy for anyone to take superior shots of people.


                             1. Press the Flash Button until the (eye) symbol appears on the LCD
                          Panel. (Fig. 33)

                             2. Press the Shutter Release Button The flash system will begin its Pre-
                         Flash Cycle. After a brief delay the Main Flash will then fire.


* Be sure to hold the camera still after pressing the Shutter Release Button.

You should advise your subjects that you are using Red Eye Reduction flash and they should wait for a second.

This mode is not cancelled when the camera is switched off.

* To cancel this mode, press the Flash Button again for any other selection.

Reducing Flash Output

The Flash adjusts the flash brightness to prevent excessively overexposed pictures when photographing, for
example, fair skinned subjects at close range. This function works similarly in any of the Flash Modes.

FLASH-OFF MODE

This mode forcibly prevents automatic firing of the flash, thus allowing available light photography in
museums, churches, etc. where flash photography is prohibited.


                            1. Press the flash Button until the ~ symbol appears on the LCD Panel.
                            (Fig. 34)

                            2. Press the shutter Release Button and the Shutter will be tripped without
                             flash.
View original page 17Page 18 · Read text
* To cancel this mode, press the Flash Button until there is a different mode symbol (or none) on the LCD
Panel.
 * In dim light, the camera's shutter speed will be automatically reduced. Take particular care in Telephoto (130
mm) Mode. To prevent a blurry picture hold the camera steadily and press the Shutter Release Button gently.


FLASH-ON MODE

This forcibly trips the flash when you want to photograph subjects with sunlight to their side or back. It lets

you take more natural looking pictures by softening

harsh shadows.

Example 4: When the Flash-On Mode is set

Example 5: When the Flash-On Mode is not set


                            1. Press the Flash Button until the     symbol appears on the LCD
                          Panel. (Fig. 35)

                            2. Press the Shutter Release Button. There will now be flash every time
                          the shutter is tripped.


* The camera will follow a daytime Synchro-Sunlight Exposure program in cases of bright light.

* To cancel this mode, press the Flash Button until there is a different mode symbol (or none) on the

LCD Panel.

SLOW SYNCHRO MODE

Use this mode indoors, at parties and in lighted rooms when you want both the subject and the background to be
sharp. (Example 6)

With Auto-Flash and Flash-On modes the background may be dark because of the limited range of the flash
light. (Example 7)


                            1. Press the Flash Button until SLOW appears on the LCD panel. (Fig.
                        36)
View original page 18Page 19 · Read text
www.butkus.us


* To cancel this mode, press the Flash Button until there is a different mode symbol (or none) on the LCD
panel.

* In dim light, the camera's shutter speed will be automatically reduced up to 2 sec. To prevent a blurry picture,
hold the camera steady and press the Shutter Release Button gently.

(Take particular care in Telephoto (130 mm) mode. )

RED EYE REDUCTION SLOW SYNCH MODE

Set this mode to take red eye reduced slow synch photography.

; At the previous slow synchro mode, red eye reduction does not operate.


                      * Press the Flash Button until SLOW (eye with lighting bolt) symbol
                         appears on the LCD panel. (Fig. 37)

                      * To cancel this mode, press the Flash Button un there is a different
                    mode symbol (or none) on the LCD panel.


CREATIVE MODES

* Portrait Mode

* Action Mode

* Infinity Mode

* Super Night Mode

PORTRAIT MODE

Set this mode for shooting portraits. The camera is set to single auto-focus, the zoom sets automatically, and the
flash fires even in daylight.


                             1. Turn the Mode Dial to the (person) symbol. (Fig. 38)

                             2. Press the Shutter Release Button lightly. The camera automatically
                     zooms and the flash fires when the shutter Release Button is pressed
                          completely.
View original page 19Page 20 · Read text
* Use this mode to obtain photographs with a constant image size, even when the distance to the subject
changes.

* If the Shutter Release Button is pressed lightly again, automatic zooming will also be repeated.

* The flash fires automatically in dim light. A soft flash also fires in sufficient-light conditions.

* If the Zoom Lever is used after pressing the Shutter Release Button lightly, automatic zooming will not
operate. It will operate again after the Shutter Release Button is pressed completely.


ACTION MODE

Set this mode to maintain a moving subject in focus The camera is set to single auto-focus, and pictures

can be taken continually for as long as the Shutter Release Button is pressed.


                            1. Turn the Mode Dial to the (person running) symbol. (Fig. 39)

                     * The shutter will release continually for as long as the Shutter Release
                       Button is pressed.


* This mode cannot be combined with the Red Eye Reduction Mode or the Slow Synchro Mode.

* The camera may not focus on very fast moving subjects.

INFINITY MODE

Set this mode to take beautiful pictures of distant landscapes.

The camera focuses on infinity.


                            1. Turn the Mode Dial to the (mountains) symbol. (Fig. 40)

                     * When the Shutter Release Button is pressed, the' camera focuses on
                            infinity and the shutter is re leased.

                     * In dim light, the shutter speed becomes slow. Try prevent blurry
                            pictures, use a tripod to keep the camera steady.

                     * The flash does not fire in the Infinity Mode.
View original page 20Page 21 · Read text
www.butkus.us

SUPER NIGHT MODE

With the Super Night Mode, beautiful pictures can be taken at night. The camera automatically selects the
optimum settings for pictures of night scenery, pictures of people at night (slow synchro photography), and
evening or day landscape pictures. (Example 8)


                            1. Turn the Mode Dial to the (picture of moon) symbol. (Fig. 41 )

                       * Use a tripod to keep the camera steady.


2. Gently press the Shutter Release Button to take the picture.

For taking photos of people against a background of night scenery, the camera will first focus on infinity and
open the Shutter for up to 2 second without flash. After closing the Shutter, the camera will then focus on the
people and take another picture with the flash.

* By doing this, beautiful pictures focused on both the night scenery and people are possible. (The people have
to within 6 m (19.7 ft.).

* When taking pictures of night scenery with no subjects, the camera will focus on (infinity). The flash will not
fire, and the shutter will open for one second. (when there is no object within 6 m (19.7 ft.).

* When taking pictures of landscapes in bright daylight, the camera will focus on an (infinity) and set it self to
Auto Exposure.  If people are taken in bright daylight, the camera will set itself to daytime exposure program
which will set the flash off.

Reference:

* To prevent blurry pictures from slow shutter speeds, we recommend the use of a tripod or remote electronic
shutter.

* You may wish to advise your subjects not to move until the flash fires, to prevent blurred pictures.

* Also, we recommend that your subject sit on a bench or lean on a fence etc. to be stable.

* Use a wide 38 mm position to reduce the possibility of pictures with a blurred subject and to gain flash range.

* The following shooting modes are automatically selected depending on lighting of the subject and the
shooting distance. (Using a ISO 100 film speed)
View original page 21Page 22 · Read text
Brightness of the subject

                   Dark (Less than 5.5 EV)                  Bright (More than 5.5 EV)

                   <Super Night Mode>
                                                   <Slow Synchro Mode>

            Less
                                                           Focusing On the subject
Shooting     than
                                                                 Shutter speed: Automatic
Distance   6M      (Multiple exposure in (1) and (2)
                                                                  Flash: Fires
                        (1) Night scene photography
                     Focusing: Infinity
                       Shutter speed: Max. 2 sec.
                       Flash: Does not fire

                        (2) Shooting people
                     Focusing: On the subject
                       Shutter speed: Automatic
                       Flash: Fires

                    <Night Mode>                             <Infinity Mode>

          More
                     Focusing: Infinity                        Focusing: Infinity
             than
                       Shutter speed: Max. 2 sec.                 Shutter speed: Automatic
           6 m
                       Flash: Does not fire                        Flash: Does not fire


CONTINUOUS SHOOTING FUNCTION

This mode allows you to shoot continuously as long as

the shutter is pressed.

You can accurately capture continuous action such as competitive sport events, moving subjects, and even the
movements of an infant without missing any important moments.


                            1. Turn the Drive Dial to the (multiple frame) mark. (Fig. 42)

                     2 Press and hold down the Shutter Release Button. Your camera will
                         continuously take pictures at a rate of one frame per second as long as the
                          Shutter Release Button is held down.


* Auto-focus in continuous shooting is set each time the shutter is released.
View original page 22Related documents and language editions
From the M. Butkus archive. Original publisher and archive notices are retained.
Check the model and edition against your equipment.
PDF verified 2026-10-10.