Film cameras
Ricoh RZ-3000 Ricoh RZ-3000 - - Direct User manual
User manual for Ricoh RZ-3000 Ricoh RZ-3000 - - Direct. 64 pages in Spanish. Read the original PDF, download or print a copy without registration.
64 pagesSpanish4.2 MB PDF
Loading your manual…Open PDF directly
Document details
- Brand
- Ricoh
- Model / document
- Ricoh RZ-3000 Ricoh RZ-3000 - - Direct
- Document type
- User manual
- Language
- Spanish
- Pages
- 64
- File size
- 4.2 MB
- Category
- Film cameras
- Document date
- Not specified in catalog
Search available document text
Find a term, then jump to its page in the original PDF. Image-only pages may not be searchable; check the PDF for exact wording and diagrams.
Page 2 · Read text
Digitally signed by Mike Butkus
                                                   DN: cn=Mike Butkus, o=Butkus camera manuals,
                                                         ou=butkus.org, email=mike@butkus.org, c=USMike Butkus       Date: 2024.03.03 18:48:51 -05'00'
View original page 2Page 5 · Read text
Venmo @mike-butkus-camera  Ph. 2083
PayPal Name  Lynn@butkus.org      www.PayPal.me/lynnbutkus
View original page 5
Page 13 · Read text
Example 5  Exemple 5                        Example 6  Exemple 6Ejemplo 5   Beispiel 5                          Ejemplo 6   Beispiel 6


Example 7  Exemple 7                        Example 8  Exemple 8Ejemplo 7   BeispielT                          Ejemplo 8   BeispielS
View original page 13
Page 16 · Read text
We are most gratified that you have selected a RICOH camera. Before using your camera, please be sure
  to read these instructions carefully.


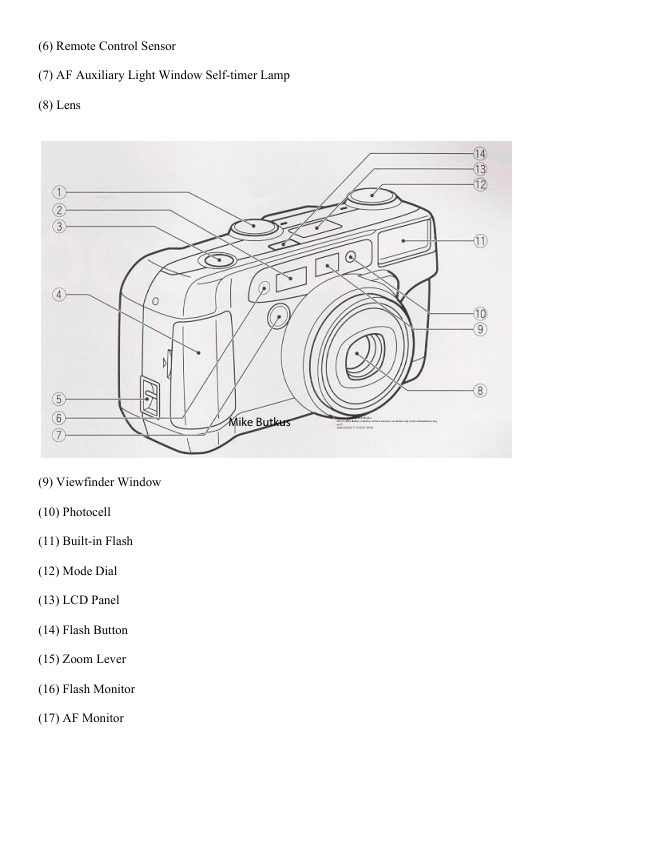
LOCATING THE CONTROLS

 O Drive Dial                 @ LCD Panel
 @ Distance Measuring Window          @ Flash Button
 @ Shutter Release Button                          r9 Zoom Lever
 @ Battery Compartment Cover          @ Flash Monitor
 @ Strap Holder                @ nf Monitor
 @ Remote Control Sensor            @ Viewfinder
 @ AF Auxiliary Light Window Self-timer Lamp     @ Back Cover Latch
@ Lens                    @ Tripod Socket
@ Viewfinder Window              @ Manual Film rewind Button
@ Photocell                 @ Fitm Loaded Window
O Built-in Flash                @ Back Cover
@ Mode Dial
View original page 16
Page 18 · Read text
www.butkus.us
o Gombining the modes
It is possible to set the camera to combine the Self-timer and Remote Control with the shooting modes and the flash
modes. Some of the shooting modes can also be combined with the flash modes, as shown below.
 \__!!99tin9!9991    A (Auto)      Portrait       Action         Infinity      Super     Single AF
   Flash Modes     \    Mode      Mode      Mode      Mode     Night Mode   Mode
 Normal                                          X       n              a)

 Red Eye Reduction                                      X        X      o Mode             o
 Flash-off Mode              r)                                   X       o

 Flash-on Mode                   \J       o                 X        X       o

 Slow Synchro Mode               t-\        X        X        X        X       o

 Red Eye Reduction                             X        X        X         X Slow Synchro Mode
View original page 18
Page 20 · Read text
www.butkus.us
   you are ready to replace them.                       2. When the batteries are exhausted, the qsymbol
 * The date display ["00 0 0l blinks when the batteries            will blink in the LCD Panel. Replace with new bat-
    are replaced. By pressing either the Mode Button,           teries.
    Select Button, or Set Button, [1 1 '95] will be dis-    * As the battery voltage is reduced in extremely cold
   played Reset the correct time and date. (Optional)          temperatures,  the CI  symbol may blink. You may* When replacing the batteries, do so as quickly as       be able to use the camera  if you remove the bat-
    posslble to avoid erasing camera memory. We rec-          teries and warm them uo.
   ommend replacing the batteries when there is no    *   In the following cases, battery voltage  is insufficient
    film in the camera.                                    and the batteries need to be replaced.
* The batteries can explode or cause burns if dis-       1) When the power does not turn on.
   posed of in fire or if shorted, disassembled,       2) When the g   symbol blinks.
   heated or recharged.                                     3) When the shutter does not release.
                                                                4) When film advance or rewind do not function.*Recommended               Replacement 3V Lithium Batteries       5) When the Self-timer does not function.
CR-1 23A. or eouivalentx2                          * To avoid tripping the shutter inadvertently and
                                                         wasting battery power, always turn the power off
                                                  when you are not taking pictures.
TURNING THE POWER ON/OFF             *   lf the camera is not operated (buttons, dials and
The power is turned on or off by selecting ON or OFF          lever) for about 5 minutes, the power automatically                                                                   turns off, the LCD Panel display disappears and theon the Drive Dial. (Fig.6)
When the power is turned on, the lens moves from the         lens returns to the storage position. The purpose of
storage position to the wide-angle position, and the          this function, called Auto Power OFF, is to prevent                                                 waste of battery power. The power will turn oncamera is set automatically to the mode selected on
the Mode Dial.                                                again by operating any of the buttons, dials or lever.

                                  LOADING THE FILMCHECKING THE BATTERIES
                                                                   avoid                                                                                        sunlight                                                                      when                                                                                                 loading the                                                                               direct                                                                                                                                         film.         the                            nearly                                 exhausted,                                                                      will     Always              batteries                     are1. When                    E
                                                          Back Cover                                                                              Latch                                                                      Downward                                                                                                      open.                                                             the                                                                                                 to                                                                                                                                                                                  'l . Push                        Panel.   appear         on              the LCD                          Replace                                        with new                                                       bat-
    teries as soon as possible.                                  (Fis.7)
                                                                                                       19
View original page 20Page 21 · Read text
2. Load the film cassette into the Film Chamber and       Do not touch the inner lens with your fingers or the
           pull out enough film leader to extend past the mark        edge of film.
          of the film leader position. (Fig. 8, 9)                      This camera's Pre-wind System automatically pre-
     *    lf there is any dust on the inside lens surface, use a        winds the film to the end when you load it and re-
         blower to blow the dust away.                          winds it back into the film cassette as each shot is
     3. Make sure the film stays within the Film Guides and         taken. lf the back cover is accidentally opened be-
            lies flat. (Fig.10,11)                                        fore the film has reached the end, close it immedi-
ft    4. Press the Back Cover shut so that the Back Cover          ately. The film will automatically rewind. When  it
        Latch returns to its original position. When you        has completely rewound, the Exposure Counter will
        close the Back Cover the film is automatically ad-         display "E". Remove the film and develop.
IT        vanced, and the first frame is set in place. The Ex-        Sometimes more exposures can be taken than the
        posure Counter on the LCD Panel displays the        standard number of frames listed on the film. Forlil
I       number of frames remaining to be exposed. (Fig.         this reason, the number of frames counted in the
         121                                               Exposure Counter on the LCD Panel may some-
    *   lf the film has not advanced correctly and is not         times be higher than the number of frames listed on
        taken up onto the Film Take-up Spool, the Expo-         the film.
        sure Counter will blink. (Fig. 13) The Shutter Re-
         lease Button will also lock so you cannot take a pic-
          ture until the film is loaded properly. (DX Film only)    SETTING THE FILM SPEED
       Reload the film by following steps 1-4 shown     DX-coded film cassettes have black-and-silver  Dat-        above.
    * Whether there is film in your camera or not can be      terns corresponding to film speeds that the camera                                                         reads and automatically sets. Your camera accepts         confirmed by either the Film Loaded Window or the                                         DX films with speeds ranging from ISO 50 to 3200.
        Exposure Counter in the LCD Panel.                    (Fis.14)    * You can confirm that the Film-Wind or Rewind is
       working properly by observing the Exposure    WhenMost colorusingnegativeDX-codedfilmsfilms,on thesettingmarketthearefilmDX-coded.speed is
                                                               necessary. Your camera automatically sets the    *  Counter.You can load film in your camera with the power off.     not                                                                       correct film speed.       However, the LCD Panel display will disappear                                               When using a film without a DX code, your camera  will          after loading is complete.                                                                     automaticallv  set itself to ISO 100.
     20
View original page 21Page 22 · Read text
HOLDING YOUR CAMERA               VIEWFINDER Gb. re1
1. Always use both hands to steady your camera.   O Field of View Frame:
   (Fig.1s)                                       The subject (such as people or scenery) you wish
  When holding the camera vertically always position       to photograph should be contained within this
      it with the flash at the top. (Fig. 16)                         frame.
  Be careful not to place your fingers over the lens,  @ Parallax Correction Marks (Close Focusing in
   flash or focusing windows. (Fig. 17)                       Telephoto)
  We suggest that you become familiar with vour new       When taking a picture of a subject that is between  1
  camera by shooting and processing at least one roll        m-1.8 m (3.3 ft.-6 ft.) away from your camera, the
   of film before using your camera to record an tm-          subject should be positioned within this mark. Any-
   portant occasion.                                            thing outside the marks will not be included in the
      lf the camera moves during the exposure, the whole         picture even if you can see it through the viewfin-
   picture will be blurred. To help insure sharp prc-          der.
   tures, hold the camera steadily and properly.     @ Single AF Spot
                                                   The center spot of multi auto focus mark (in wide).
                        @ MultiAuto Focus Marks (in Wide)
                        @ MultiAuto Focus Marks (in Tele)
View original page 22Page 23 · Read text
MONITORS                        ZOOMING THE LENS
When the Shutter Release Button is pressed lightly,     The built-in 38-130 mm zoom lens lets you get more in
the AF Monitor and the Flash Monitor on the right of the     the picture, or closer to your subject without changing
viewfinder will either light up or blink to indicate the fol-      your position. This allows you to easily select the com-
lowing.                                                           position that best suits your subject. (Examples 1, 2)
                                                To zoom the lens, just turn the zoom lever to the left for
AF Monitor (Green)                                        Tele or to the right for Wide until your subject  is framed
                                                                 properly. (Fig. 19)  Display      Description         Shutter     Page                                             * When zooming the lens, keep your fingers away
 Lights up   Subject  is in      Shutter will       P.21          from the moving lens components.
            focus             release                 * When the power is turned  off, the lens will return to                              .Shutter                                                     will      P.21                its storage position automatically. Blinks      Subject  is out
              of focus          release                 * To save on battery life, after about 5 minutes of in-
                                                                          activity, the lens will return to the Storage Position            Subject too       Shutter  will       P.21                                                     and the display on the LCD panel will disappear.             close             not release                                        When zooming to the telephoto end, be sure to hold
- ln certain cases the shutter will not release. How-          the camera firmly to prevent camera shake.
  ever, this is not a malfunction.
Flash Monitor (Red)                    MACRO PHOTOGRAPHY
  Display      Description         Shutter     Page     Used for close-up photography of flowers, etc.
 Lights up   Subject within    Shutter will      P.23      (Example 3)
              flash range       release                               1 . Turn the zoom lever to the left to set the 130 mm
                                                                        position. (Fig. 20) Blinks      Flash is charging  Shutter  will      P.23                                                 2.  lf necessary, approach to the minimum distance of                            not release                                                          1 m (3.3 ft.) and release the shutter gently.
 Blinks      Subject out of    Shutter will      P.23      *  At 130 mm, the magnification at the minimum dis-
 rapidly      flash range       release                       tance of 1 m (3.3 ft.) is approximately 1/7.1 times.

22
View original page 23Page 24 · Read text
A (AUTO) MODE                          When the subject is difficult to focus on:
                                           The autofocus sensor determines precise focus by(MULTT AUTO-FOCUS MODE)                                                            reading the contrast of the subject. In certain rare situ-
 1. Turn the Mode Dial to A. (Fig. 21)                          ations, there may not be enough contrast for proper fo-
z. Set the subject you wish to take within the multi      cusing. For example, clouds, hazy mountains, white
   auto-focus area in the center of the viewfinder.       walls and dark subjects that do not reflect light well.
    (Fig. 18, Viewfinder)
* The multi auto-focus area changes depending on       In these situations, the camera  is designed to warn you
   the lens position (wide or tele).                            that an out-of-focus picture may occur.  lt does so by
3. Press the Shutter Release Button gently to avoid       blinking the green AF monitor  in the viewfinder.
* cameralf the subjectshake.is closer than 1 m/3.3  ft., the AF Moni-    When this happens you should:
    tor blinks and the shutter will lock to orevent out-of-      1. Turn the Mode Dial and select the Infinity Mode.
   focus pictures. (Fig. 22)                                        (Fig. 23) These modes automatically set the focus
* The distance between the subject and the camera         to infinity to assure sharp focus of long distance
    is measured  in 7 zones within the multi auto-focus          subjects.
   marks. Among these zones, focusing will be ad-     2. Or lor closer subjects use the "pre-focus tech-
   justed to the closest subject. This function  will help         nique" to lock the focus on a subject of equal dis-
   prevent out-of-focus pictures.                          tance but with better contrast. To do this simply
* The AF system uses an actual image of the subject         hold the shutter release halfway down (while in the
    to focus properly. In low light conditions, the AF Au-         single autofocus mode) on a subject of equal dis-
    xiliary Light automatically  lights momentarily  to pro-         tance and then recompose back to the original sub-
   vide a bright target for the AF system to see.                ject and continue to depress the shutter release
*  In backlight conditions, make sure the subject is in        button to take the picture (see single AF for addi-
   the center of the multi auto-focus area. Otherwise,           tionaldetails).
   the camera cannot detect the backlit condition, and     3.  lf you press the Shutter Release Button  all the way
   even  if the subject  is less than 6 m/20 ft. away, the       down, the shutter can be released. At this time,  it
   flash will not fire.                                       focuses either at infinity in daylight or to the point
                                                       where AF system estimate in dark condition, to mi-
                                                              nimize out of focus oictures.
View original page 24Page 25 · Read text
t   ln very rare cases, however, shutter may lock such     4. Now return the camera to its original position so
   as strongly backlit subject, clear sky etc. Use pre-          that your main subjects are composed to your liking
   focus shooting.                                                  within the Field of View Frame again, and press the
                                                            Shutter Release Button fully to take the picture.
                                                             (Fis.27)
SINGLE AF MODE
(PRE-FOCUS SHOOTTNG)                   When the subject is difficult to focus on:
                                                       1. When you are photographing  subjects that are diffi-
Your camera's multi autofocus system will provide ex-         culttofocus on, or  if your main subject is behind other
cellent results in most shooting conditions. However,          closer objects, then  f ind another subject at the same
when the subject you wish to focus on is behind a win-         distance   f rom the camera. You can pre-focus on that
dow, fence or bars, or located high or low in the view-         subject in the same way as described above.
finder, you should use pre-focus shooting. This will en-    *    lf you are shooting through a window under low light
sure a sharply focused image of your subject.                  conditions, aim the camera at a slight angle to the
                                                                glass to minimize any direct reflection of the AF Au-
When the subject is high or low within the viewfin-            xiliary Light.
der:                                          * When you release your finger from the Shutter Re-
1. Turn the Mode Dial to S .AF. (Fig. 24)                      lease Button, the pre-focus setting is cleared, so that
2. There may be cases where none of your main sub-        you can preJocus again as many times as you wish.
   jects are at the Single Auto-Focus spot located at
   the center of the viewfinder (eg. subject located
   high or low).  lf you release the shutter then, only the   AUTO FILM REWINDING
   background  will be in focus, and the subject will be
   out-of-focus. (Fig. 25)                                1. After the end of the film has been reached, the film
3. To pre-focus, move the camera so that one of the            will automatically  rewind.
   subjects is within the Single Auto-Focus spot. (Fig.     2. When the film is fully rewound, the motor stops
   26)                                                       automatically and "E" is displayed in the LCD
   Press the ShUtter Release Button halfway so that         Panel. (Fig. 28) Open the Back Cover to unload the
   the AF Monitor lights up. Keep holding your finger           film. (Fig.29)   halfway down on the Shutter Release Button.         *   lf you wish to rewind the film before reaching the

24
View original page 25Page 26 · Read text
www.butkus.us

   end of the film, push the Manual Film Rewind But-         (Fig.31) Wait untilthe red LED turns off in order to
    ton with a pen, etc. (lf the Film Rewind Button is        use the flash.
    pressed with a pen whilst  it is rewinding, the film
    leader will not be wound into the film cassette and
     will remain outside.) (Fig. 30)              AUTO BACKLIGHT CONTROL/AUTO
 * Be careful not to touch the inner lens surface with    FILL FLASH
    your fingers or the edge of film.
                                            When taking pictures of backlit subjects, important de-
                                                                          tails are often lost in the shadows. Your camera auto-
FLASH PHOTOGRAPHY                             matically compensates  for these lighting situations.  lf
                                                         the subject is backlit and is about 6 meters (20 feet)
 1.  lf additional light is required, the built-in Flash auto-     from the camera, Auto Back-Light Control (ABLC)will
    matically activates.                                 be activated.   lf the sublect  is within about 6 meters (20
* Recommended Flash Shooting Range                  feet)and theof theshadowscamera,arethelightenedFlash activatesup usingautomaticallyautomatic
(rso 100)                                                    daylight fill{lash. Thus, with backlit subjects, natural-
Wide-angle: 1 m-5.3 m (3.3 ft.-17.5 ft.)                      looking pictures can be taken easily and automatically.
Telephoto: 1 m-3.2 m (3.3 ft.-10.5 ft.)                     (Fis.32)
(rso 400)                                      *  Frame the subject  in the center of the viewfinder to
Wide-angle: 1 m-10.6 m (3.3 ft.-35 ft.)                           activate compensation.
Telephoto: 1 m-6.4 m (3.3 ft.-21 ft.)
* To increase shooting range, use higher speed film
   such as ISO 400.                      FLASH MODES
* To check if the subject is within the recommended                                              The following Flash Modes can be selected by press-   flash shooting range, press the Shutter Release                                                                ing the Flash Button:   Button halfway.
  When Red Flash Monitor turns on steadly,  it is     -   Flash-OffRed Eye Reduction Mode   within the range, and when  it blinks fast,  it warns     -  Flash-On    that the subject  is out of the range.                   -
2. When the Flash is still charging, the Red Flash     -  SlowRed EyeSynchroReduction Slow Synchro   Monitor will blink and the shutter will be locked.     -
                                                                                               25
View original page 26Page 27 · Read text
RED EYE REDUCTION MODE             FLASH.OFF MODE
Minimizing the Red-Eye Effect                         This mode forcibly prevents automatic firing of the
Selecting this mode makes  it possible to minimize the      flash, thus allowing available  light photography  in mu-
red-eye effect that sometimes occurs when taking     seums, churches, etc. where flash photography  is pro-
portrait photographs with flash. Now it's easy for       hibited.
anyone to take superior shots of people.                 1. Press the flash Button until the S) symbol ap-1. Press the Flash Button until the O  symbol ap-         pears on the LCD Panel. (Fig.34)
   pears on the LCD Panel. (Fig. 33)                    2. Press the shutter Release Button and the Shutter
2. Press the Shutter Release Button. The flash system            will be tripped without flash.
    will begin its Pre-Flash Cycle. After a brief delay,       To cancel this mode. Dress the Flash Button until
   the Main Flash will then fire.                               there is a different mode symbol (or none) on the
* Be sure to hold the camera still after pressing the      LCD Panel.
   Shutter Release Button.                                    In dim light, the camera's shutter speed will be
* You should advise your subjects that you are using          automatically reduced. Take particular care in Tele-
   Red Eye Reduction flash and they should wait for a        photo (130 mm) Mode. To prevent a blurry picture,
   second.                                                    hold the camera steadily and press the Shutter Re-
* This mode is not cancelled when the camera  is         lease Button gently.
   switched off.
* To cancel this mode, press the Flash Button again
    for any other selection.

Reducing Flash Output
The Flash adjusts the flash brightness to prevent ex-
cessively overexposed pictures when photographing,                                                                                                                                                                                                                jfor example, fair-skinned subjects at close range. This
function works similarly in any of the Flash Modes.
                                                                                                                                                                                                                                                                                                       x


26
View original page 27Page 28 · Read text
www.butkus.us
FLASH.ON MODE                  SLOW SYNCHRO MODE
This forcibly trips the flash when you want to photo-     Use this mode indoors, at parties and in lighted rooms
graph subjects with sunlight to their side or back.  lt lets    when you want both the subject and the background to
you take more natural looking pictures by softening     be sharp. (Example 6)
harsh shadows.                                          With Auto-Flash and Flash-On modes the background
Example 4: When the Flash-On Mode is set           may be dark because of the limited range of the flash
Example 5: When the Flash-On Mode is not set              light. (Example 7)
1. Press the Flash Button until the 1  symbol ap-     1. Press the Flash Button until SLOW appears on the   pears on the LCD Panel. (Fig.35)                   LCD panel. (Fig.36)
2. Press the Shutter Release Button. There will now    * To cancel this mode. oress the Flash Button until
   be flash every time the shutter is tripped.                   there is a different mode symbol (or none) on the
* The camera  will follow a daytime Synchro-Sunlight      LCD panel.
   Exposure program  in cases of bright light.           *  In dim light, the camera's shutter speed will be
* To cancel this mode, press the Flash Button until         automatically reduced up to 2 sec. To prevent a
   there is a different mode symbol (or none) on the         blurry picture, hold the camera steady and press
  LCD Panel.                                                  the Shutter Release Button gently.
                                               (Take particular care in Telephoto (130 mm)
                                                         mode.)


                                                                                              27
View original page 28Page 29 · Read text
RED EYE REDUCTION SLOW SYNCHRO     * Use this mode to obtain photographs with a con-
MODE                                                    stant image size, even when the distance to the                                                                  subject changes.
Set this mode to take red eye reduced slow synchro     *   lf the Shutter Release Button is pressed  lightly
photography.                                                    again, automatic zooming  will also be repeated.
At the previous slow synchro mode, red eye reduction     * The flash fires automatically  in dim light. A soft flash
does not operate.                                               also fires in sufficient-light conditions.
*  Press the Flash Button until SLOW <Dl symbol ap-    *    lf the Zoom Lever is used after pressing the Shutter
   pears on the LCD panel. (Fig. 37)                      Release Button lightly, automatic zooming will not
* To cancel this mode. oress the Flash Button until         operate.  lt will operate again after the Shutter Re-
   there is a different mode symbol (or none) on the         lease Button is pressed completely.
  LCD panel.
                                  ACTION MODE
CREATIVE MODES                                                    Set this mode to maintain a moving subject in focus.
o  Portrait Mode                                 The camera is set to single auto-focus, and pictures
o Action Mode                                       can be taken continually  for as long as the Shutter Re-
.   Infinity Mode                                            lease Button is pressed
o Super Night Mode                                    1. Turn the Mode Dial to the {.  symbol. (Fig. 39)                                             * The shutter will release continually for as long as
                                                           the Shutter Release Button is oressed.
PORTRAIT MODE                            *  This mode cannot be combined with the Red Eye
                                                           Reduction Mode or the Slow Synchro Mode.Set this mode for shooting  portraits. The camera  is set                                             The camera may not focus on very fast movingto single auto-focus, the zoom sets automatically, and    *                                                                    subjects.the flash fires even in daylight.
1. Turn the Mode Dial to the p,l symbol. (Fig. 38)
2. Press the Shutter Release Button lightly. The
  camera automatically zooms and the flash fires
  when the Shutter Release Button is oressed com-
    oletelv.
28'
View original page 29Page 30 · Read text
www.butkus.us
 INFINITY MODE                                           the flash.                                             *  By doing this, beautiful pictures focused on both the
 Set this mode to take beautiful pictures of distant land-          night scenery and people are possible. (The people
 scapes.                                                have to within 6 m (19.7 ft.)).
 The camera focuses on infinity.                      * When taking pictures of night scenery with no sub- 1. Turn the Mode Dial to the 4   symbol. (Fig. 40)              jects, the camera will focus on o (infinity). The flash * When the Shutter Release Button is pressed, the            will not fire, and the shutter will open for one second
   camera focuses on infinitv and the shutter is re-        (when there is no object within 6 m (19.7 ft.)).
    leased.                                             * When taking pictures of landscapes in bright day- *  In dim light, the shutter speed becomes slow. To            light, the camera will focus on o (infinity) and set it-
   prevent blurry pictures, use a tripod to keep the           self to Auto Exposure.
   camera steady.                                                                     lf people are taken in bright daylight, the camera* The flash does not fire in the lnfinitv Mode.                      will set itself to daytime exposure program which
                                                                                      will set the flash off   .
SUPER NIGHT MODE                             Reference:
With the Super Night Mode, beautiful pictures can be    * To prevent blurry pictures from slow shutter
taken at night. The camera automatically selects the        speeds, we recommend the use of a tripod or
optimum settings for pictures of night scenery, pictures         remote electronic shutter.
of people at night (slow synchro photography), and    * You may wish to advise your subjects not to move
evening or day landscape  pictures. (Example 8)                   until the flash fires, to prevent blurred pictures.
                                                                             your subject sit on a1 . Turn the Mode Dial to the Fi symbol. (Fig. 41)      *  Also, we recommend that* Use a tripod to keep the camera steady.                  bench or lean on a fence etc, to be stable.2. Gently press the Shutter Release Button to take the    *  Use a wide 38 mm position to reduce the possibility
    picture.                                                        of pictures with a blurred subject and to gain flash
   For taking photos of people against a background          range.
   of night scenery, the camera will first focus on -  and open the Shutter for up to 2 second without
    flash. After closing the Shutter, the camera will then
   focus on the people and take another picture with
View original page 30Page 31 · Read text
.  The following shooting modes are automatically  selected depending on lighting of the subject and the shooting
   distance.
   (Using a ISO 100 film speed)

                                                       Brightness of the subject
                             Dark (Less than 5.5 EV)                       Bright (More than 5.5 EV)
 Shooting    Less           (Super Night Mode)                  (Slow Synchro Mode)
 distance     than        (Multiple exposure  in O and @)         Focusing: On the subject        6m         O Night scene photography                   Shutter soeed: Automatic                                                                                             Fires                  Focusing:  Infinity             Flash:
                              Shutter speed: Max. 2 sec.
                                    Does not fire
         @ Shooting people
                  Focusing: On the subject
                              Shutter soeed: Automatic
                                               Fires
            More               (Night Mode)                                 (lnfinity Mode)
              than     Focusing:     Inf inity               Focusing:   Inf inity
        6m        Shutter speed: Max. 2 sec.                    Shutter soeed: Automatic
                   Flash:      Does not fire            Flash:     Does not fire
View original page 31Page 33 · Read text
The camera is focused when the signals from the    (oPTroNAL) DATABACK SETTINGS
                             received.                    Unit                       are            Control  Remote
           power                                        off, either by Auto     Nomenclature of the Date lmprinting Feature (Fig.                      switched                       is         the  When
  Power Off or by the Drive Dial, remote control      4e)
   shooting is cancelled.                O LCD Panel
  Be careful to keep the transmitter of the Remote  @ Month Indication
   Control Unit clean.                @ Oay Indication
  The operating  life of the built-in battery of the RC-3  @ Set Button
    is about 2 years.  lf the camera stops responding to  @ Select Button
   the Remote Control Unit,  it is probably because the  @ Mode Button
   battery has run down. Take the Remote Control                                                        lmprinting mode    Unit to your Ricoh dealer.
   Operating distance is within about 3.5 m-5 m (12     Examples of Date lmprinting (Fig.50)    ft.-16.4  ft.), which varies depending on the angle of  O 1996 November 3rd.                                                                           3rd. 1996                                                   November   transmission to the camera.            @                                                                   1996                                                       November                        @ grO.
                        @ 3rd. 15:59
                        @ No lmprinting
                                             The Date lmprinting Mode can be divided into 5 types:
                                                           Date, Time, and No lmPrinting.
                                                         Selecting lmprinting Mode (Fig. 50)
                                              Each time the Mode button is pressed, the display
                                                    changes as shown below. (Fig. 51)
                         O Date (YearlMonth/Day)
                        @ Date (Month/Day/Year)
                        @ Date (Day/Month/Year)
                        @ Time (Day/Hour/Minute)
                        @ No lmprinting

32
View original page 33Page 34 · Read text
www.butkus.us

                                                                                                                                                                                  1 Resetting the Date and Time (Flg. 52,53, 54)       PROPER CARE OF YOUR CAMERA   ': I'' 1. Each time the Select button is pressed, the flashing
    digits change in the order of Year, Month, Day,     *   lf there is dirt on the lens or Distance Measuring
   Hour and Minute.                                   Windows and in the camera body, do not attempt to
2. When the digits to be reset flash, press the Set But-       remove it with your fingers. Use a blower to blow
   ton until the desired digits appear. When the Set       the dust away, or wipe the surface gently with
   button is kept pressed, the digits change rapidly.          camera lens tissue or a soft cloth. (Fig. 55)
3. lmprinting is not possible when the date and time    * Camera malfunction can be caused by impact, hu-
   are being reset. When resetting is complete, press          midity, salt etc. After using the camera at the beach
   the Select Button until all digits stop flashing.                or places where there is salt spray, high humidity or
                                                               chemicals, wipe  it off carefully. (Fig. 56)
Notes on Date lmprinting Feature                   * Take care not to expose the camera to sudden
* At temperatures below 0'C (32'F), the battery per-       changes in temperature, as that may cause con-
  formance deteriorates. The Date lmprinting Feature         densation on the lens and film or inside the body, or
  may not function correctly and imprinting may         other malfunctions.  (Fig. 57)  become impossible.                            * Do not expose the camera for a long period of time
  When the batteries are replaced, ['00 0 0] appears          to extremely high temperatures, such as in your car
  and blinks in the LCD Panel. By pressing either the         or on the beach, as this may ruin your film, or cause
  Mode Button, Select Button, or Set Button, t1 1 'g5l         other malfunctions.  (Fig. 58)    will be displayed. Reset the correct time and date.     * When using a tripod, do not try to force a long screw
  The date is sometimes illegible if it is imprinted on          into the socket. The screw length should be less
   the following objects.                                      than 5.7 mm (1/4 inch). (Fig. 59)
  (1)"Warm"-colored  objects, such as red, yellow,    * Do not place the camera near equipment  that has
      orange, etc.                                              strong magnetic fields such as a television or radio.
  (2)Objects with details similar in size to the im-         (Fig.60)
      printed date (gravel, leaves, etc.)
  (3)Objects of high luminance (sky, white watt, etc.)
View original page 34Page 35 · Read text
TROUBLESHOOTING
When the shutter does not release or the pictures appear blurry, check the table below.  lf the camera  still does not
function properly, take  it to your nearest Ricoh Service Center.
1. When the shutter does not release
  Cause                  Check                        Remedy                          Page
  The oower is not on.           ls the lens in the storage position?   Turn the Drive Dial to ON to turn the    P.19
                      -The oower is not on.             power on.
  The batteries are              ls the Battery Mark blinking  in the   Reolace the batteries with new ones.    P.18
  exhausted.            LCD Panel?
  The flash is charging.         ls the Flash Monitor (red) next to    Wait until the Flash Monitor turns off.    P.25
                              the Viewfinder  blinking?
  The shooting distance  is    ls the AF Monitor (green) next to    Change the shooting distance.          P.23
  too short.                   the Viewfinder  blinking? Or, is the   (Move more than 1 m away from the
                              subtect in the auto-focus marks       sub.lect.  )
                             nearer than 1 m (3.3 ft.) awaY?
  The film is not loaded        1s "0" blinking  in the Exposure      Ooen the Back Cover and reload the    P.19
  correctlv.                 Counter?                                    film.
  The film is rewinded.          ls "E" displayed on the Exposure    Reolace the film with a new one.        P.19
                           Counter?
View original page 35Related documents and language editions
From the M. Butkus archive. Original publisher and archive notices are retained.
Check the model and edition against your equipment.
PDF verified 2026-10-10.