Film cameras
Canon EOS 620-650 User manual
User manual for Canon EOS 620-650. 47 pages in English. Read the original PDF, download or print a copy without registration.
47 pagesEnglish7.9 MB PDF
Loading your manual…Open PDF directly
Document details
- Brand
- Canon
- Model / document
- Canon EOS 620-650
- Document type
- User manual
- Language
- English
- Pages
- 47
- File size
- 7.9 MB
- Category
- Film cameras
- Document date
- Not specified in catalog
Search available document text
Find a term, then jump to its page in the original PDF. Image-only pages may not be searchable; check the PDF for exact wording and diagrams.
Page 2 · Read text
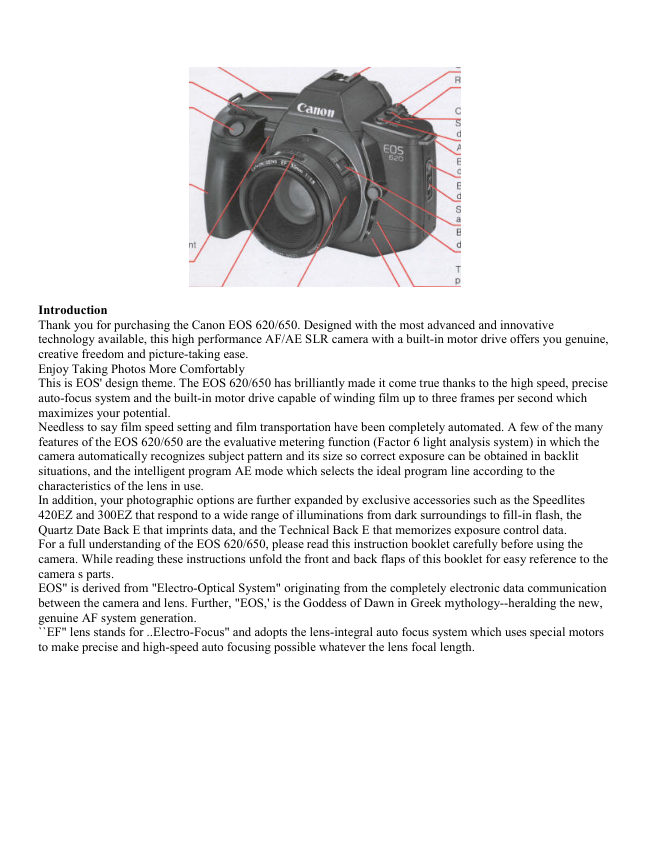
Introduction
Thank you for purchasing the Canon EOS 620/650. Designed with the most advanced and innovative
technology available, this high performance AF/AE SLR camera with a built-in motor drive offers you genuine,
creative freedom and picture-taking ease.
Enjoy Taking Photos More Comfortably
This is EOS' design theme. The EOS 620/650 has brilliantly made it come true thanks to the high speed, precise
auto-focus system and the built-in motor drive capable of winding film up to three frames per second which
maximizes your potential.
Needless to say film speed setting and film transportation have been completely automated. A few of the many
features of the EOS 620/650 are the evaluative metering function (Factor 6 light analysis system) in which the
camera automatically recognizes subject pattern and its size so correct exposure can be obtained in backlit
situations, and the intelligent program AE mode which selects the ideal program line according to the
characteristics of the lens in use.
In addition, your photographic options are further expanded by exclusive accessories such as the Speedlites
420EZ and 300EZ that respond to a wide range of illuminations from dark surroundings to fill-in flash, the
Quartz Date Back E that imprints data, and the Technical Back E that memorizes exposure control data.
For a full understanding of the EOS 620/650, please read this instruction booklet carefully before using the
camera. While reading these instructions unfold the front and back flaps of this booklet for easy reference to the
camera s parts.
EOS" is derived from "Electro-Optical System" originating from the completely electronic data communication
between the camera and lens. Further, "EOS,' is the Goddess of Dawn in Greek mythology--heralding the new,
genuine AF system generation.
``EF" lens stands for ..Electro-Focus" and adopts the lens-integral auto focus system which uses special motors
to make precise and high-speed auto focusing possible whatever the lens focal length.
View original page 2
Page 4 · Read text
Table of Contents

Preliminary Preparations

1. Attaching the Lens 6
2. Loading the Battery 8
3. Checking the Battery 9
4. Loading the Film 10
[Automatic Film Speed Setting] 12

Basic Steps

1. Setting the Main Switch to the "Full Auto" Position 14
2. Holding the Camera 15
3. AF Focusing 16
4. Exposure 17
[Display Panel Illumination] 18
5. Automatic Film Rewind 19
[Rewinding Mid-Roll] 20

Making the Most of Your EOS 620/650

1. Main Switch Functions 22
2. Setting the AF Mode 24
3. Setting the Film Winding Mode 26
4. Setting the Shooting Mode 27

(1) Program AE 28
(2) Program Shift Function 30
(3) Shutter-Priority AE 32
(4) Aperture-Priority AE 34
[Depth of Field] 36
(5) Depth of Field AE 38
(6) Manual 42

5 Partial Metering 44
6. Exposure Compensation 46
7. Auto Exposure Bracketing 48
8. Multiple Exposures 52
9. Difficult Subjects for Auto-focus 54
10. Manual Focusing 56

Other Shooting

1. Self-timer Photography 58
2. Dedicated Flash Photography 60
3. Bulb [Long Exposure] 63
4. Shooting with Infrared Film 64

Accessories 65
View original page 4
Page 5 · Read text
Caring for Your Camera 72

Other Notes 73

Appendix 74

Specifications 82
Carrying the Camera 87

1. Attaching the Lens


1) Turn the rear lens cap in the direction of the arrow until it stops and remove it from the lens.

. To attach the rear lens cap, align its ''O'' mark with the red dot on the lens. Then lightly push it in and turn it
clockwise until it stops.

2) Turn the body cap counterclockwise and remove it.

. To attach the body cap, align its "o" mark with the camera's red dot, then turn the cap clockwise.

3) To mount the lens, align the lens mount positioning point with the camera's red dot.


4) Then turn the lens clockwise until it stops and the lens is locked with a click.

. To remove the lens, turn it counterclockwise while pressing the lens release button.

5) Remove the front lens cap.
View original page 5
Page 6 · Read text
CAUTION


2. Loading the battery


1) Remove the grip with a coin or similar object.

2) As shown in the photo, load the battery so that its terminals face in the direction of the camera. Make
sure the battery is pushed in all the way until it is locked by the orange lever

3) Replace the grip securely.


. When replacing the battery, first push the orange lever upward to remove the dead battery.
· When using a tripod, dismount t the camera before replacing the battery.

3. Checking the Battery
View original page 6
Page 7 · Read text
1 ) Set the main switch to the green "Go", "A" or "(-
                                        )"mark. The display will come on at this time. If the
                                          display does not appear, confirm that the battery is
                                       loaded correctly.


                          2) Open the switch cover on the back of the camera and press the battery
                        check button(        ). Battery power shows in the display panel.


4. Loading the Film


1) To open the back cover, push the back cover latch down while pressing the back cover lock button
2) Insert the upper-flat end of the film cartridge into the film chamber first. The film-load check mark
(OIL) appears in the display panel.

3) Pull the film leader across the shutter curtain until its tip is aligned with the orange index.
View original page 7Page 8 · Read text
CAUTION
                         * Before loading the first roll of film, remove the plastic insert.
                         * NEVER touch the shutter curtain. Its high-precision design makes
                                             it sensitive to pressure. Also, when loading the film be careful that
                               the film leader does not touch the shutter curtain.


4) Make sure that the film has no slack and that its perforations are properly engaged with the sprocket
teeth.
5) Close the back cover. The camera advances the film automatically and stops when "1" appears in the
frame counter in the display panel.
6) During film advance, the film transport bars will appear at the bottom of the display panel moving in
sequence from left to right. However, if the film does not advance correctly, the bars blink after the
camera has stopped and the shutter will. not release. Reload the film.
If the film leader extends past the orange index, take out the film cartridge and manually rewind the
excess film back into the cartridge.
Film becomes soft and tears easily in high humidity. Keep it stored in its canister until loading.
Automatic Film Speed Setting


The camera automatically sets film speed by sensing the DX code marked on the film cartridge. (ISO 25 -
5000 according to DX code standard)

1. The automatically-set film speed will appear in the display panel while the film advances to the first
usable frame.

2.. When using film without a DX code, set the speed manually by following these steps: (ISO6-6400).
1 ) Set the main switch to either "A" or " ((*)) ".
2) Open the switch cover, and press both the blue and yellow buttons at the same time to display the ISO
film speed number.
3) Turn the electronic input dial until your film speed displays.

· Once the buttons are depressed, you can remove your fingers because the ISO display is held on for
approximately eight seconds. To clear this status within eight seconds, press the shooting mode selector.
View original page 8Page 9 · Read text
· The previously set film speed appears and blinks in the display panel to warn you if the film speed has
not been set. Always be sure to set the correct film speed, because the warning stops after film speed
setting.

                                         Basic Steps

1. Setting the Main Switch to the "Full Auto" Position


1) Slide the lens focus switch to "AF"
2) Set the camera's main switch to the "Full Auto" position (the green " 0 " mark).

The following displays will appear:
ONE SHOT: One of the AF modes.
P (Program): One of the AE modes.
S (Single): One of the film winding modes.

For further details on the above displays, please refer to pp. 24, 26 and 27.

2. Holding the Camera


                      Your pictures will not be sharp if the camera
                     moves as the shutter is pressed. This
                     movement is called "camera-shake." To
                         avoid this, try the following camera-holding
                           technique:

                           1) Hold the camera firmly, with your left
                       hand supporting the camera and lens.
                           2) Press your left elbow close to your body.


3) Lightly hold the camera against your cheek or forehead and look into the viewfinder.
4) Spread your feet slightly apart, one foot ahead of the other, and relax.
There is no one correct way to hold the camera, so experiment to find the most comfortable way. If
possible, lean against a steady support such as a tree, wall, or table to help you keen the camera still.
View original page 9Page 10 · Read text
3. AF Focusing


1) Center the AF from ('[ ]" mark) over the main subject.

Do not touch the lens' moving parts during AF focusing.

2) Press the shutter button halfway and automatic focus (AF) starts. When correct focus is obtained, the
green AF in-focus indicator lights up in the viewfinder and the AF focus signal (short electronic beeper
tone) sounds.

· Original focus remains locked, even if the subject or focusing distance changes as long as the shutter
button is held halfway.
· When AF is impossible, the green AF in-focus indicator will start blinking and the shutter will not release.
(see pp. 54 to 56.)

4. Exposure


                                     1) Gently press the shutter button halfway to check the
                                    exposure. Exposure will be correct if the shutter speed and
                                      aperture values remain continuously lit at the bottom of the
                                     viewfinder.

                                                              . Once the shutter button is pressed halfway, the display is
                                    held on for approximately eight seconds.
                                              · When the automatically-set shutter speed is too slow to
                                    hand-hold, the camera-shake warning sounds (long electronic
                                   beeper tone). We recommend using a tripod or a flash.


· If correct exposure is not possible, both the shutter speed and the aperture blink to warn you.
Underexposure warning--Switch to flash photography.

· In underexposure warning, the maximum aperture of the lens in use blinks. (The blinking shutter speed
is always 30".)
Overexposure warning--Use an ND (neutral density) filter.

. In overexposure warning, the minimum aperture of the lens in use blinks. (The blinking shutter speed is
always 2000 with the EOS 650 and 4000 with the EOS 620.)
View original page 10Page 11 · Read text
Display Panel Illumination (EOS 620 Only)


2) Compose the picture and while continuing to    Press the display panel illumination button to
hold down the shutter button gently press the       illuminate the display panel for approximately
shutter button completely to take the picture.       eight seconds.
· The camera automatically advances the film to     · To turn off the illumination within eight
the next frame.                                 seconds press the display panel illumination
· Set the main switch to "L" to turn off the         button again.


This camera is equipped with advanced "evaluative metering" so it automatically recognizes lighting
conditions, subject pat" tern, and even subject size in the picture area. Even when there is a difference in
brightness between the main subject and the background (e.g. backlit photography), correct exposure can
be obtained without exposure compensation.

5. Automatic Film Rewind


 The film automatically rewinds at the end of
                  the roll.


1) During rewind the film transport bars move in   2) Film rewind stops automatically when the
sequence from right to left to indicate the          film has been completely rewound. Open the
function in progress while the frame counter      back cover when the film-load check mark(~)
counts in descending order.                         blinks.
View original page 11Page 12 · Read text
Press the film rewind button (~) to rewind
3) Remove the film cartridge.                     before the roll ends. The function begins
                                                immediately.


                        Making the Most of Your EOS 620/650
                     Detailed explanation of other modes to make picture-taking fun.

 1. Main Switch Functions


The main switch has four positions.         A (ON): Activates the camera. (The electronic
L (OFF): Turns off the camera. Be sure to set at    beeper tone does not sound at this position.)
this position to prevent accidental shutter release
when not in use.
View original page 12Page 13 · Read text
((*)) (ON): In addition to being the same ON        [ ] (ON): Full auto position. The setting will be
position as "A", the electronic beeper tone         as follows automatically regardless of the mode.
sounds in the following cases;                     1) AF mode - ONE SHOT 2) AE mode - P
1) When correct focus is obtained. - AF focus      (Program) 3) Film winding mode - S (Single) 4)
signal (short beeper tone)                          Electronic beeper tone
2) When the automatically-set shutter speed is
too slow to hand-hold.--Camera-shake warning     -short; AF focus signal
(long beeper tone)                                  -long; camera-shake warning


Various AE and AF modes described in "Making the Most of Your EOS 620/650" cannot be set when the
main switch is at the " [ ] " position. Make sure the main switch is set to "A" or" ((*)) " position.
2. Setting the AF mode
This camera has two AF modes and the manual focus mode. ONE SHOT: Normal set position. The lens
stops moving once focus has been obtained. As long as the shutter button is kept pressed halfway, the
original focus and exposure remain locked. This mode is useful when you want your subject to be off-
center.

· The shutter releases only after AF completion.

SERVO: The lens continues to rotate, refocusing every time the focusing distance changes. Use this mode
to freeze subject motion at a certain moment while following a moving subject. Exposure is determined at
the moment of shutter release.

· The shutter releases whether or not AF has been completed.

MANUAL: Refer to p. 56.


                                  To set the AF
                                       mode, follow
                                              these steps:
                                              1) Set the lens
                                            focus mode
                                            switch to
                                        "AF."

                                              2) Open the
                                            switch cover
                                       and press the
                                          yellow AF
                                  mode selector.
View original page 13Page 14 · Read text
. The display will be held on for approximately eight seconds so you can remove your finger. To clear this
status within eight seconds, press the shooting mode selector.


3) Turn the electronic input dial to select either
"ONE SHOT" or "SERVO"

3. Setting the Film Winding Mode
This camera has two automatic film winding modes.
S: Single exposure. The film automatically advances to the next frame upon shutter release.
C: Continuous exposure. Keep pressing the shutter button and the film winds continuously at the
maximum speed of approximately three frames per second.
**image missing: Self-timer position. (see p. 58)


                               To set the film winding mode, follow these steps:
                                          1) Open the switch cover and press the blue film winding
                               mode selector.
                                                    · The display will be held on for approximately eight
                                       seconds so you can remove your finger. To clear this
                                              status within eight seconds, press the shooting mode
                                               selector.


2) Turn the electronic input dial to set either "S" or "C" in the display panel.
View original page 14Page 15 · Read text
4. Setting the Shooting Mode


To set the shooting mode, press the shooting
mode selector while turning the electronic input
dial until the desired mode appears. (The display
moves in the following cycle.)
· Once the shutter button is pressed halfway, the
display will be held on for approximately eight
seconds. To clear this status within eight
seconds, press the shooting mode selector.
AF can be done with the Canon Circular
Polarizing Filter PL-C. When using a linear
polarizing filter, use manual focusing. (see p.56)


(1 ) Program AE
[Purpose]
The camera automatically sets shutter speed/
aperture combinations according to subject
brightness. This mode particularly suits first-
time SLR users or those who prefer to
concentrate on picture composition or candid
snapshots.

[SETTING]
While pressing the shooting mode selector, turn
the electronic input dial until "P" appears in the
display panel.
View original page 15
Page 16 · Read text
When the automatically-set shutter speed is too
                                           slow to hand-hold, the camera will sound a long
                                           beeper tone to warn you. We recommend using a
                                                tripod or flash.

                                       The camera selects the ideal program line
                                           according to the characteristics of the lens in use,
                                                                  i.e., the maximum or minimum aperture and lens
                                                 focal length. This is referred to as "Intelligent
                                      Program AK." For further information on the
                                       program line, please see pp. 79 and 80.

                                             This program AE mode has the same
                                                 characteristics as the one selected when the main
                                              switch is set to the green " [ ] " mark (see p.14).
                                         However, the "ONE SHOT" AF and "S" film
                                          winding modes are automatically set so use the
                                                   setting described on this page when you want to use
                                                the "SERVO" AF mode or "C" film winding mode.


(2) Program Shift Functions (EOS 620 Only)

[PURPOSE]
With the EOS 620, you can change the automatically-set shutter speed/aperture combinations of the
program AE mode. This function is particularly useful when you need a specific shutter speed or aperture
while shooting in the program AE mode.
Be sure to set the main switch to the "A" or "(' ')" position. (At the green " [ ] " position, the program shift
function cannot be used.


[SETTING]
Simply turn the electronic input dial until the desired shutter speed or aperture value appears after
pressing the shutter button halfway to meter the subject. For example, when you need a fast shutter
speed suddenly to freeze a fast-moving subject while shooting in the program AE mode, turn the
electronic input dial to set a fast shutter speed such as 1/500 second.

. Once the shutter button is pressed halfway, you can remove your finger because the display will be held
on for approximately eight seconds.
View original page 16Page 18 · Read text
The "camera-shake" warning does not sound in
                                                   shutter-priority AE.


(4) Aperture-Priority AE


                                    [Purpose]

                                         In this mode, the aperture is set manually and the camera
                                     chooses correct shutter speed for the b lighting conditions
                                           (the opposite of shutter-priority AE). Use this mode for
                                               portraits, landscapes and still-life photography where
                                      depth of field is an important factor. (see p. 36)
                             [SETTING]
                                        1) While pressing the shooting mode selector, turn the
                                          electronic input dial until "Av" appears in the display
                                          panel.
                                        2) Remove your finger from the shooting mode selector.
                                 At this point, the initial aperture setting is always 5.6
                                                (f/5.6). 3) Turn the electronic input dial until the desired
                                         aperture value appears.
View original page 18Page 19 · Read text
When the automatically-set shutter speed is too slow
                                                  to hand-hold, the camera-shake warning sounds. We
                                     recommend using a tripod.


Depth of Field


When your subject is in focus, there is a certain area in front of
it and behind it which will also be in focus. This range of
sharpness is called "depth of field".
Depth of field has the following characteristics:
1) The smaller the aperture, the wider the depth of field and vice
versa. 2) The shorter the lens focal length is, the greater the
depth of field, provided that aperture and shooting distance are
the same. 3) The farther the shooting distance, the greater the
depth of field..
4) Depth of field is generally greater in the background than the
foreground by a ratio of two to one.
View original page 19Page 20 · Read text
To check the depth of field (1)                To check the depth of field (2)
Push the depth-of-field check button and the       Press the shutter button halfway and note the
camera will stop-down the aperture to either the    aperture value. Find the two aperture values on
automatically-calculated value (e.g. shutter-        the depth-of-field scale on the lens which
priority AK), or the one set manually (e.g.         correspond to that value. Then draw imaginary
aperture priority AK). As you look through the     lines from those two values to the distance scale.
viewfinder with the button pushed in, you can     The effective depth of field lies between those
see the range of sharpness, i.e. the depth of field.   two distances. For example, using a standard
                                 50mm lens focused at 5m with the aperture set
It is impossible to check depth of field when the     at f/11, depth of field extends from approx. 2.7m
main Twitch is set at the green " " [ ] " " mark      to 10m (approx. 8.8ft to 32.8ft) away. Any
                                                    subject from 2.7m to 10m away will be in
                                                reasonably sharp focus.

                                             There are some lenses which have no depth-of-
                                                          field scale so follow (1).


(5) Depth of Field AE (EOS 650 Only)


                            [PURPOSE]
                                      This mode makes everything from a certain point in the
                                      foreground to the background in focus, using both the AF
                                        function and the depth of field. The camera automatically
                                             sets the correct aperture value and corresponding shutter
                                     speed for the lighting conditions. Use this mode for
                                       landscapes and large-group commemorative shots.
View original page 20Page 21 · Read text
[SETTING]
                                       1) While pressing the shooting mode selector, turn the
                                         electronic input dial until "DEPTH" appears in the display
                                        panel.


2) Compose the picture first.
3) Focus the subject in either the ONE SHOT or
SERVO mode.
4) Center the AF frame ("[ ]") over the first
point in the foreground (see illus. A). 5) Press
the shutter button halfway to focus the "A" point
and remove your finger from the shutter button
when the AF in-focus indicator lights up.


                                        The display after the first "A'' point is focused.

                                                  6) Focus the second "B" point of the background
                                                    (see illus. B as you would for step 4)


                                        The display after the second "B" point is
                                                  focused.

                                                  7) Press the shutter button halfway once again.
                                          At this time, the correct aperture value and
                                               corresponding shutter speed are displayed.


                                                  8) Gently press the shutter button completely to
                                                  take the picture.


When shooting continuously, it is not necessary to focus the same subject again provided you keep
pressing the shutter button halfway after exposure. (To clear, press the shooting mode selector after
you remove your finger from the shutter button.)
View original page 21Page 22 · Read text
[VIEW FINDER INFORMATION]
Correct exposure- Exposure will be correct if continuously lit values display.


Underexposure - Both the shutter speed of 30" and the lens maximum aperture start blinking.


Overexposure - Both the shutter speed of "2000" and the lens minimum aperture start blinking; use an
ND filter.


If it is impossible to get the distance range in focus, the lens minimum aperture value will start blinking.
Exposure, however, will still be correct and you will get the best results under the existing shooting


conditions. (see helpful hints on p. 41)

[Helpful Hints]


1. Move back from the subject and follow steps 2
through 7 again. If the minimum aperture stops
blinking, the distance range will be in sharp focus
and the exposure will be correct.

2. Use a wide-angle lens (or wide-angle side when
using a zoom lens) and follow steps 2 through 7
again. If the minimum aperture stops blinking, the
distance range will be in sharp focus and the
exposure will be correct.


· When you try to focus extremely near and far points the automatically-set shutter speed will be
comparatively slower and the long beeper tone will sound to warn you of camera-shake. Hold the camera
steady or use a tripod.
· When using a zoom lens, do not change the lens focal length after focusing the first point Always be sure
to compose the picture first.
· It is advisable to use a wide-angle lens to obtain maximum depth-of-field effect. (A lens focal length of
more than 200mm is not recommended when you want maximum depth of field.)
View original page 22
Page 23 · Read text
· Depth of field will be shallow if two points are focused at the same shooting distance. When you want to
take a portrait, a telephoto lens is recommended to strengthen the shallow effect.
· In depth of field AE, exposure is determined at the moment of shutter release even if the AF mode is set
at ONE SHOT. (see p:24)
· Depth of field AE cannot be used in flash photography.
· Press the shooting mode selector to clear the depth of field AE while operating.

(5) Manual Override


                               [PURPOSE]
                                         This creative mode allows you to control exposure by
                                                setting both the shutter speed and aperture.

                                [SETTING]
                                            1) While pressing the shooting mode selector, turn the
                                              electronic input dial until "M" appears in the display
                                              panel.
                                            2) Remove your finger from the shooting mode
                                                 selector.
                                                       · At this point, the initial setting is always 1/125 sec. at
                                                    f/5.6.

                                            3) Turn the electronic input dial to set the desired
                                               shutter speed.

                                            4) Press the manual aperture set button.


· At this point, " OP ", " 00 ", or " CL " lights up instead of the shutter speed. (The aperture value remains
unchanged.) The meaning of each display follows:


                                           5) While pressing the manual aperture set button, turn
                                            the electronic input dial until " 00 " displays. The
                                         corresponding aperture value displays.
                                           6) Remove your finger from the manual aperture set
                                             button.
                                           7) Determine the exposure referring to the shutter
                                           speed/aperture combination. You must rely on your
                               own experience for setting the exposure.


. Set a slower shutter speed if "OP" remains lit when the electronic input dial is turned to the lens
maximum aperture.
View original page 23Related documents and language editions
From the M. Butkus Camera Manual Library. Original publisher and archive notices are retained.
Check the model and edition against your equipment.
PDF verified 2026-10-10.