Film cameras
Chinon Genesis II User manual
User manual for Chinon Genesis II. 22 pages in English. Read the original PDF, download or print a copy without registration.
22 pagesEnglish1.3 MB PDF
Loading your manual…Open PDF directly
Document details
- Brand
- Chinon
- Model / document
- Chinon Genesis II
- Document type
- User manual
- Language
- English
- Pages
- 22
- File size
- 1.3 MB
- Category
- Film cameras
- Document date
- Not specified in catalog
Search available document text
Find a term, then jump to its page in the original PDF. Image-only pages may not be searchable; check the PDF for exact wording and diagrams.
Page 2 · Read text
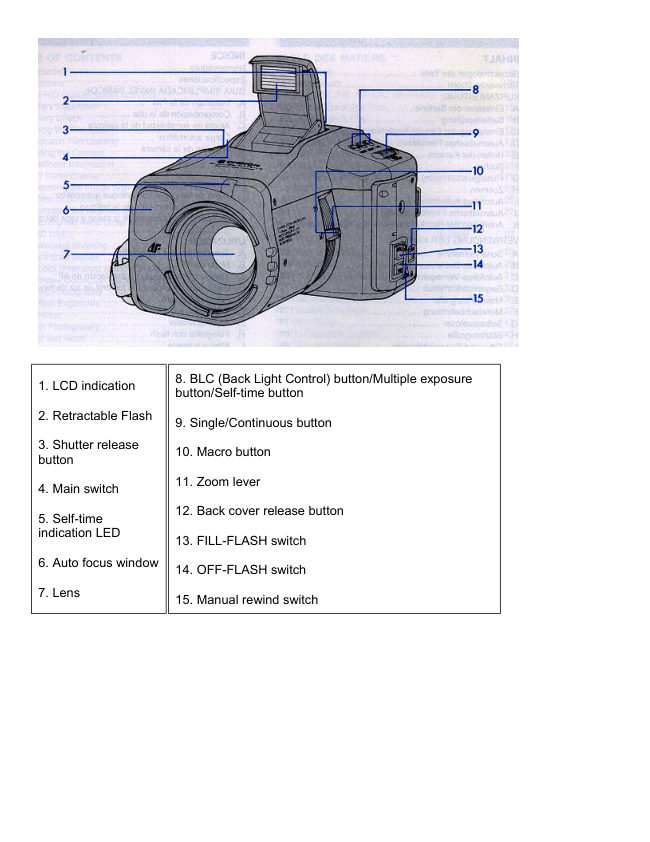
8. BLC (Back Light Control) button/Multiple exposure
1. LCD indication
                         button/Self-time button

2. Retractable Flash
                          9. Single/Continuous button

3. Shutter release
                       10. Macro button
button

                       11. Zoom lever
4. Main switch

                       12. Back cover release button
5. Self-time
indication LED
                       13. FILL-FLASH switch

6. Auto focus window
                       14. OFF-FLASH switch

7. Lens
                       15. Manual rewind switch
View original page 2Page 3 · Read text
16. Viewfinder eyepiece

17. Film rewind shaft
                                             24. Take-up spool

18. Quick return mirror
                                             25. Film tip mark

19. Automatic film speed setting contacts
                                             26. Hand strap

20. Film chamber
                                             27. Battery compartment cover

21. Tripod socket
                                             28. Tele converter/62 mm filter/
                                             lens hood bayonet adapter
22. Film window

23. Film pressure plate


SPECIFICATIONS

Type: Motorized fully automatic 35 mm AF lens shutter compact camera with Single Lens Reflex
viewing system with built-in sensor flash and LCD indications.

Type of film: 35 mm film cartridge.
View original page 3Page 4 · Read text
Film format: 24x36 mm

Lens system: CHINON all glass 35-80 mm F/4.1-6.4 lens with Macro; 8 elements in 7 groups.

Macro: Built-in. (Tele macro type)

Viewfinder: Fixed pentaprism type.

Focusing screen: Matte screen with micro prism.

VF Magnification: 0.8x (50 mm at infinity).

VF coverage: 85% in horizontal and vertical.

Dioptric factor: -1.0 dioptor

VF indications: Flash symbol LED for flash charging and flash firing, AF LED for AF OK and near
distance warning.

Finder mirror: Motorized quick return mirror

Auto focusing: Motorized infrared active servo AF system. Stepless.

Focus lock: Possible with shutter release button. Cancelable.

AF range: 0.85 m (33.5") - Infinity (stepless).

Macro range: 0.5 m (19.7")-0.85 m (33.5") in manual focusing.

AF mode: Continuous AF for continuous shooting and Single AF for single shooting mode.

Shutter: Motorized electromagnetic program shutter

Shutter speed: 1/4 sec. - 1/300 sec.

Shutter release: Focus priority shutter release. Shutter cannot be tripped until focus is completed.

Exposure: Normal program AE and Slow shutter program AE (for Flash kill or Daylight sync mode).

Metering: TTL average metering

Photocell: S.P.D.

EV range: (Normal program) Wide: EV9.5 - EV17 (ISO 100)

 Tele: EV10.8 - EV18.3 (ISO 100). (Slow shutter program) Wide:

 EV6 - EV17 (ISO 100) Tele: EV7.3 - EV18.3 (ISO 100).

 ISO speed: DX automatic setting for ISO 25, 50,100, 200, 400,
View original page 4
Page 5 · Read text
1000 and 1600. Automatic ISO 25 setting for non-DX films

BLC: Built-in for +1.5 EV.

Film loading: Automatically loads film and advances to start position when the camera back is
closed.

Film advance: Automatic power winder for single and 3 frame sequences at approx. 1 fps.

Film rewinding: Motorized fully automatic film rewinding system with auto rewind start at the end of
the film and auto rewind stop upon rewind completion. Mid-roll rewinding of film is possible.

Film counter: Built-in with LCD panel.

Multiple exposure: Up to three exposure, on 1 frame is possible.

Shooting mode: Single frame shooting mode and continuous shooting frame sequences at approx.
of 1 fps.

Flash system: Flashmatic sensor flash system.

Auto recharging: Commences immediately after the flash has been fired. 3 second recycle
time. G. No.: 12 (ISO 100)

Flash range (ISO 100):
   Wide: 0.85-4.0 m (2.8'-13.1') Tele
   Macro: 0.85-2.7 m (1.6'-8.9')

Daylight sync.: Possible with built-in switch.

Flash override: Possible with built-in switch.

Power source: 6 V lithium battery 2CR5.

Battery check: Built-in with LCD indication. The shutter locks at low battery voltage.

Film type window: Built-in.

Tripod screw: Built-in.

Self-timer: Electronically controlled Self-timer with 10 seconds delay, cancelable.

LCD indications: Frame counter/Film transport signal indicator, Picture taking mode indicator, Self-
timer indicator, BLC indicator, Multiple Exposure indicator and Battery check.

External strobe: Attachable with optional slave unit.

Strap: Hand or neck strap attachable.

Filter: Attachable with filter attachment ring.
View original page 5
Page 6 · Read text
Hood: Attachable.

Auto shut off: 30 seconds.

Accessories: 105 mm teleconverter for extreme telephoto use, Slave unit, Dedicated flashes with
built-in slave unit, Neck strap, lens hood.

Dimension: 126 (L) x 84 (H) x 119 (W) mm (4.9 x 3.2 x 4.6 )

Weight: 730 9 (25 ounces).

Simplified Guide (basic level)
A. Battery Installation

1) Insert a pointed object such as a ball-point pen into the battery cover release hole on the bottom of
the camera and slide it in the direction indicated by the arrow to open the battery compartment. (Fig.
1)

2) Place the battery correctly in the battery compartment in accordance with the marks inside and
close the cover. Use a 6 V lithium battery "2CR-5". (Fig. 2)

B. Battery Check Slide the flash-up button (main switch) to the "ON" position. If the film counter and
battery check mark are lighted on the LCD panel at this time, power is being supplied to the camera
circuitry. The marks will stay lighted for 30 seconds until an automatic power shut-off system goes
into effect. (Fig. 3)


NOTE:
* When either of the following occurs it means that the battery condition is too low for continued use
and
should be replaced with a new one.

— The battery check mark is blinking.
View original page 6
Page 7 · Read text
— Nothing appears on the LCD panel.

* Battery life: Approximately 36 24-exp rolls, using 50% flash (Chinon laboratory testing)

(Memory Backup System) This camera uses a condenser as a memory backup. Therefore, even
without a battery, the memory function will work for two to three hours. After that, the film counter will
go back to "0" even in the middle of a roll of film. Replace the battery as quickly as possible to avoid
losing the correct frame number.

C. Setting the Film Speed

Films with DX coding. (Fig. 4)
If a film with DX coding is used' the film speed will be set by the camera automatically Film can be
used with ratings from ISO 25 to 1600.

NOTE:
* For reversal (Slide) film, please use ISO 25, 50, 100, 200, 400, 1000 or 1600.

- For film without DX coding, the camera is set automatically at ISO 25. Only use non-DX film with an
ISO 25
 rating.

* Please keep the camera's DX contact points and the DX information panels on the film cartridges
clean.


D. Automatic Film Loading

The film should be loaded into the camera carefully, without being subjected to direct sunlight.

1 ) Open the back cover by pushing the back cover release button in the direction of the arrow (Fig. 5)
View original page 7
Page 8 · Read text
2) Insert the film cartridge and pull out the film so that the trimmed end lines up with the film tip mark.
Make sure
   that the film lies flat between the film guides.

3) Close the back cover. (Fig. 6) The film will be advanced automatically until the counter on the LCD
   panel shows "I".

NOTE:
* If the frame counter on the LCD panel is blinking "0" after the back cover has been closed, it means
that the
  film has not been loaded correctly. Open up the back cover and insert the film again correctly

The length of the film should not be too long or too short. If too much film was pulled out of the film
cartridge, then rewind some of it back into the cassette so the end of the film reaches the film tip mark
on the back of the camera.

When the back cover is opened, do not touch the inside of the mirror housing.

E. Holding the Camera

Hold the camera in such a way that your elbow is touching your body securely to ensure camera
steadiness and to avoid camera shake. (Fig. 7)


Hold the camera so that fingers carrying straps, etc. will not cover any part of the flash unit, lens, or
the AF measuring windows.

Press down the shutter release button gently. When the telephoto lens is in use, be careful to prevent
any camera movement.
View original page 8
Page 9 · Read text
F. Viewfinder Information


1 ) AF OK signal.

When blinking, this indicator warns that the camera to subject distance is too close for proper focus.
The
camera shutter cannot be released in the single or continuous shooting modes if this condition
occurs.

2) Flash Ready Signal

When the flash is fully charged, the light will glow steadily. While the flash is recharging, the same
light
will blink until the flash recharging is completed.

3) Autofocus Frame/Microprism

This area should be pointed directly at the picture's subject to assure pinpoint focusing accuracy In
the macro
mode, the microprism will assist in achieving sharp focus.

G. LCD Panel Display

1 ) Frame counter

2) Self-timer

3) BLC (backlight control)

4) Battery check

5) Multiple exposure
View original page 9
Page 10 · Read text
H. Controlling the Image Size by Using the Zoom
The through-the-lens reflex viewing of the camera enables the image to be viewed exactly as it will
result on the picture. Use the zoom lever to adjust the desired image size.


     1 ) Telephotography When a telephoto perspective is desired, move the zoom lever in the
       direction of the tele (80 mm) position. (Fig. 8)

       2) Wide Angle Photography When a wide angle or panoramic view is required move the zoom
       lever in the direction of the wide angle (35 mm) position. (Fig. 9)


I. Autofocus Shooting
     1 ) Place the AF mode button to the single AF mode position for most forms of photography
        (Fig. 10)

       2) Position the camera so that the object is set within the autofocus frame of the viewfinder.
        (Fig. 11)

       3) Press the release button gently. Focusing is measured and set automatically. Once the
      focus has been completed, the "AF OK" mark in the viewfinder will light up and the object in
      the autofocus frame will be visible in sharp detail. This is a visual confirmation that the subject
         will be correctly focused on the picture. Press the shutter button all the way to take the
      photograph. (Fig. 12) When the camera-to-subject distance is too close, the AF mark in the
       viewfinder will blink. The camera should then be manually shifted into the macro mode or the
      distance between the camera and the subject must be lengthened. (Accurate AF measurement
        is from 0.85 meters (33.5~) to infinity. When using the camera, the shutter cannot be released
        until the lens has been properly focused. (Fig. 13) The following conditions or subjects may not
     be properly focused.
View original page 10Page 11 · Read text
NOTE: For proper focusing, make sure that the subject completely fill the entire area of the
       viewfinder focusing zone. When focusing on a subject that cannot fill the entire area of the
       viewfinder focusing zone, position the subject at the lower right corner of the focusing zone
        (Fig. 14). This is the area in which the infrared ray is most precisely controlled. Water surface,
      car bodies, glass and similar objects which easily reflect light. Also, objects viewed through
      glass windows or wire netting, etc.


J. Automatic Film Rewinding


1 ) When the entire film cassette has been used, the film will automatically start to rewind within two
to three
seconds. (Fig. 14)
View original page 11Page 12 · Read text
2) While the film is rewinding, the counter will count back wards. When the film is entirely rewound,
the rewind
motor will stop automatically.

3) Check the frame counter on the LCD panel to make certain that the film counter shows "0" before
opening
the back cover.

(Rewinding a partially exposed roll of film)

If a film must be removed before it has been completely used, press the manual rewind button
located next to the back cover release button on the side of the camera. Use a ball-point pen or a
similar object which is not too sharp.

Rewinding will begin automatically (Fig. 15)

NOTE:
After the film is rewound if the frame counter still does not return to "0"' but the frame number is
blinking,
press the manual rewind button again.

K. Attaching the Hand Strap and the Lens Cap

The hand strap and the ions cap can be attached to the camera as shown in the diagram. (Fig. 16)

Applied Use

A. Continuous Shooting

It is possible to take a maximum of three continuous pictures if the camera is in the continuous AF
mode (cons) and the shutter release is kept fully depressed.
View original page 12
Page 13 · Read text
1 ) Set the AF mode button to the Continuous AF Mode (Fig. 17)

2) Press the shutter release button gently. The automatic focus will operate and the subject will come
into focus.
  The AF "OK" signal in the viewfinder will light up. (Fig. 18)

3) After confirming that the AF "OK" signal is lit, take the picture by pressing the shutter release
button all the
  way down.

4) Keep continued pressure on the shutter release button. When three frames have been exposed,
the camera's film advance will automatically stop. (Fig. 19)

B. Auto Focus Modes

(1 ) Single AF Mode (S) The setting is ideal for general picture taking as it incorporates a built-in
focus lock and subject too close warning. When the shutter release button is gently pressed, the
autofocus system operates and the subject comes sharply into focus. Sustained pressure on the
release button will maintain a focus lock. The shutter will not operate until the camera has completed
the autofocusing procedure.

(2) Continuous AF Mode (C) This mode allows the camera to continually refocus as the subject
moves closer to or further from the camera. The shutter will not operate until the camera has
completed the autofocusing procedure. Pictures may not be in exact focus at times, especially for
subjects that are moving very rapidly.


     NOTE: When focusing in the Continuous Shooting mode, always depress the shutter release
      button gently to its halfway position. Make sure that the AF OK LED is lit. Never depress the
       Shutter Release all the way until the AF OK LED is lit. Otherwise, the following may occur:
View original page 13Page 14 · Read text
* In the Continuous Shooting mode if the shutter release button is fully depressed before the
     AF OK LED is lit, the shutter may be released even if the focusing has not been completed.

        * In the Continuous Shooting mode, if the lens is positioned at the minimum focus position and
      the shutter release button is fully depressed while the AF OK LED is blinking, the shutter will
     be locked. If this happens, position your finger halfway on the shutter release button so that the
     camera will be able to focus properly.

C. AF Lock (Prefocus) and Cancellation

When the main subject is located "off-center" in the view finder, or when it is difficult to focus on the
subject, the
focus lock is invaluable. (Fig. 20)

     1 ) Set the single/continuous advance switch to the single AF mode. (Fig. 21 )

       2) Look into the viewfinder and point the autofocus frame on the center of the subject that is to
     be in focus. Press down gently on the shutter release and confirm that the AF signal in the
       viewfinder (green) lights up. (Fig. 22)

       3) Without losing tension on the shutter release button, recompose the picture in the viewfinder
     and then take the photograph by pressing the shutter release button all the way down. (Fig.
      23)


NOTE:
* The photo lock feature can be cancelled by removing your finger from the shutter release button.
Thus, you
can repeat this technique a number of times without having to take a picture.


D. Exposure Correction (backlight control)

When the main subject has less light falling upon it than the surrounding area, the subject may be
underexposed or silhouetted. The backlight control compensates for the light imbalance and enables
the subject to be more favorably exposed.
View original page 14Page 15 · Read text
When the backlight control (BLC) button is pressed, the BLC indicator will appear in the LCD panel.
When the shutter release button is depressed the exposure will be corrected automatically. (Fig. 24)

NOTE:
The exposure correction will be cancelled automatically after the picture has been taken. The
backlight compensation can be cancelled without taking a picture by either pressing the backlight
control button again or by
closing the main power switch.

When taking a photograph at close distances, it is recommended that the daylight flash sync function
be
activated.


E. Macro Photography

Fascinating macro close-ups of subjects can be taken at distances between 50 to 85 cm (19.5" to
33.2").


     1 ) Set the zoom lever to the tele (80 mm) position. After pressing the shift button rotate the
     zoom lever to the macro focusing area. (Fig. 25)

       2) The lens must be manually focused. The camera's autofocus system is inactive when the
       lens system is shifted into macro. Ensure that the camera-to-subject distance is within the
     macro parameter and then focus by using the zoom lever to achieve sharp focus. (Fig. 26)

       3) Press the shutter release button all the way down to take a picture. Move the position of the
     camera backward and forward as needed to assist in focusing the subject. The camera's flash
      system operates at a fairly bright level. Some light colored objects may tend to be overexposed
        in the case of macro photography. After completing any desired macro photography, be sure to
       return the zoom lever to the normal 35-80 mm picture taking position, since the camera's AF
      system will not function in macro.
View original page 15Page 16 · Read text
F. Multiple Exposures

By pressing the multiple exposure button, the film will not advance automatically after taking a picture.
Up to three scenes may be photographed (multiple exposures) on the same frame.


Multiple (Two) Exposures in Single Mode

     1 ) Set the Single/Continuous Switch to the SINGLE position. (Fig. 27)

       2) Press the multiple exposure button. The LCD's counter frame blinks, indicating that the
       multiple
        exposure mode is activated. (Fig. 28)

       3) Take the first photograph by pressing the shutter release button. The film will not advance at
        this time.

       4) Remove your finger from the shutter release button and decide on the composition of the
      second picture, to be recorded on the same frame as the first picture. When the second
      image's composition has been selected, press the shutter release button to take the second
       picture. At this point the film will advance the counter frame will stop blinking and the multiple
      exposure mode is automatically cancelled.

Multiple Exposures (Three) in Continuous Mode
     1 ) Set the Single/Continuous Switch to the CONT. position. (Fig. 29)

       2) Press the multiple exposure button When the counter frame on the LCD panel starts to
        blink, the multiple exposure mode is activated. (Fig. 30)
View original page 16Page 17 · Read text
3) After composition has been determined, press and hold the shutter release button and take
      the photograph. (Fig. 31)


NOTE:
        * 1 Reversal (slide) film is not recommended for use with the multiple exposure feature. Prior to
      developing and printing the film, the photofinisher should be advised that multiple exposures
      have been taken. Otherwise, the negatives may not be printed, or printed improperly The
       multiple exposure technique is suitable for capturing fireworks displays or night scenes or
     when using the flash in a dark area. In daylight, it may result in overexposed negatives.

        * 2 Single and Continuous Multiple Exposure Modes The multiple exposure mode will remain
        in effect after the first shot has been taken, even if the main switch has been set to "OFF". The
      next picture will be superimposed on the first picture because the film will have not advanced.

        * 3 Continuous Multiple Exposure Mode In this mode, all three shots will be taken in rapid
      succession. Your finger should only be removed from the shutter release button upon the
      completion of the third shot.


G. Self-timer

The camera has a built-in electronic self-timer It enables everyone to get into the picture and also
helps to avoid
camera shake in slow shutter speed situations, provided the camera is placed on a tripod or other
firm surface.

1 ) Compose the picture using the reflex viewfinder

2) Press the self-timer button. The self-timer marking will appear on the LCD display panel as
confirmation that
  the self-timer mode has been activated.

3) Press the shutter release button. The picture will be taken about ten seconds after the self-timer
indication
  on the front of the camera lights up. The LED will start blinking about three seconds before the
shutter is
  released to provide an advance warning of the shutter release.
View original page 17Page 18 · Read text
(Self-timer Cancellation)


The self-timer can be cancelled by pressing the self-timer button again or by setting the main switch
to "OFF".
The self-timer will be cancelled automatically if the shutter release is not pushed within 30 seconds of
originally activating the self-timer system.

During self-timer operation the sensor flash will be activated exactly as during normal use. Please
consult the
automatic sensor flash mode' off flash mode, and fill in flash mode sections of this booklet for other
techniques.


Flash Tips for avoiding red eye in color flash pictures


Sometimes peoples eyes may appear red in color flash pictures. The red is caused by reflections
from the retina of the eye. Although your camera is designed to reduce this effect by placing the flash
as high as the camera design allows this effect may be still evident especially in young subjects who
have a light complexion and blue eyes, or when your subject is in dimly lighted surroundings. To
minimize the problem, turn on additional room lights or have your subject look directly at one of the
lights' causing the pupils of the subject's eyes to contract slightly.


H. Flash Photography

(Automatic Sensor Flash Mode)

The camera is designed to measure ambient light intensity and then activate and fire the built-in flash
when needed. If the "lighting bolt " mark in the viewfinder lights up or blinks when the release button
is pressed gently, the automatic flash mode is in operation. (Fig. 32)
View original page 18
Page 19 · Read text
The "lighting bolt " flash mark will light when the shutter release is depressed in the following cases:

1 ) When the mark glows constantly, the flash is fully charged and the subsequently exposed picture
will be
   exposed by electronic flash.

2) When it is blinking, the flash is in the midst of charging.

NOTE:
In the single shot mode, the shutter cannot be released. In the continuous mode, pictures can be
taken prior to the flash being fully recycled.

(Effective Flash Distance)


ISO    35 mm            80 mm

        0.85~ 4.2 m        0.5~ 2.7 m
100
         (3 - 13 feet)          (1.5 - 7 feet)

        0.85~ 8.3 m        0.5~ 5.1 m
400
         (2.5 - 13 feet)        (1.5 - 15 feet)


     NOTE: When taking color flash pictures, people's eyes sometimes appear red. The red is
      caused by the reflections from the retinas in the subject's eyes. To minimize the reflection, turn
     on the room lights and have the subject face the lights.
       Position the camera at an angle to shiny objects like windows or mirrors. Otherwise light from
      the flash can reflect from the shiny surface and produce a bright spot on your photograph.

(Off-Flash Mode) Although the camera fires the flash automatically in accordance with the brightness
of the surrounding lighting conditions, there are times when it might be preferable to take a picture
without flash to capture a special mood. Slide the flash mode switch downward and release the
shutter release button while keeping the switch in that position. The flash unit will not fire and the
resulting image will be exposed with available light only. When this mode is utilized, the flash symbol
will not be illuminated in the viewfinder (Fig. 33)
View original page 19Page 20 · Read text
(Fill-in Flash Mode <daylight sync>) Under some available light conditions (deep shade or backlit
situations) a picture may result where the subject is too dark. The use of the flash for daylight flash fill
will enhance the picture tremendously under these conditions. Fill flash is achieved by sliding and
holding the "flash mode switch" upward and then pressing the shutter release button. The flash
symbol in the viewfinder will light as a confirmation that the daylight flash system has been activated.
(Fig. 34)

NOTE: When using flash-off or fill-in flash, shutter speed may be as slow as 1/4 sec. (Slow Shutter
Program), use of a tripod is recommended in low light situations.


I. Filter and Hood

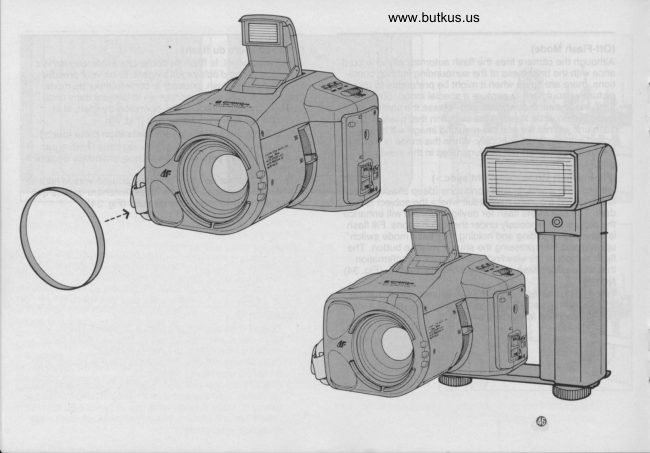
Use the filter ring which is designed specially for the camera. It enables 62 mm filters to be used with
the camera. Attach the filter after the adapter ring has been fitted to the camera. When taking
photographs in back lighted conditions, use of the lens hood exclusively designed for this camera is
suggested.
The lens hood has two flanges on its circular mounting base. Align these horizontally with the front of
the lens on
the camera and rotate clockwise until the hood is firmly seated in place. Remove the flash for flash
photography to assure full frame flash coverage.

NOTE: (Try to find one of these adapters, it's a very rare item)

When filters such as multi-imaging, etc., are used with the camera, slight vignetting may appear in the
corners of the pictures.
View original page 20
Page 21 · Read text
J. External Flash Unit


The external flash unit (Auto GS-320) can be used to extend the effective flash range of the camera
when using
ISO 100 or 400 negative films. Using the Auto GS-320 is recommended when the subject is beyond
the effective flash range of the camera's built-in sensor flash. The Auto GS-320 flash unit will also
permit bounce flash photography.

How to operate:

1 ) Attach the Auto GS-320 to the camera and turn the slave switch on the flash to "ON".

2) For ISO 100 negative film, select the automatic position of A1 (A2 for ISO 400 negative film). Set
the zoom head of the flash according to the following table and the picture can be taken.


Lens focal length
                            Flash zoom head position
35 mm
                          28 mm position
50 mm
                          50 mm position
80 mm
                          50 mm position
105 mm
                          105 mm position
(w/Tele Converter)

Effective flash range
ISO 100 negative film
35 mm                    ISO 400 negative film
(0.85-7 m; 2.8'-23')             (0.85-13 m; 2.8'-43')
50 mm                         (0.85-13 m,2.8'-43')
(0.85-7 m; 2.8'-23')             (0.85-10 m, 2.8'-33')
80 mm
(0.85-5 m; 2.8'-16.4')
View original page 21Related documents and language editions

From the M. Butkus archive. Original publisher and archive notices are retained.
Check the model and edition against your equipment.
PDF verified 2026-10-10.