Film cameras
Chinon Genesis IV User manual
User manual for Chinon Genesis IV. 35 pages in English. Read the original PDF, download or print a copy without registration.
35 pagesEnglish1.4 MB PDF
Loading your manual…Open PDF directly
Document details
- Brand
- Chinon
- Model / document
- Chinon Genesis IV
- Document type
- User manual
- Language
- English
- Pages
- 35
- File size
- 1.4 MB
- Category
- Film cameras
- Document date
- Not specified in catalog
Search available document text
Find a term, then jump to its page in the original PDF. Image-only pages may not be searchable; check the PDF for exact wording and diagrams.
Page 2 · Read text
This manual is a mixture of the Genesis III and any different images from the IV manual.
                          Image numbers may jump but none are missing.

ENGLISH
View original page 2Page 3 · Read text
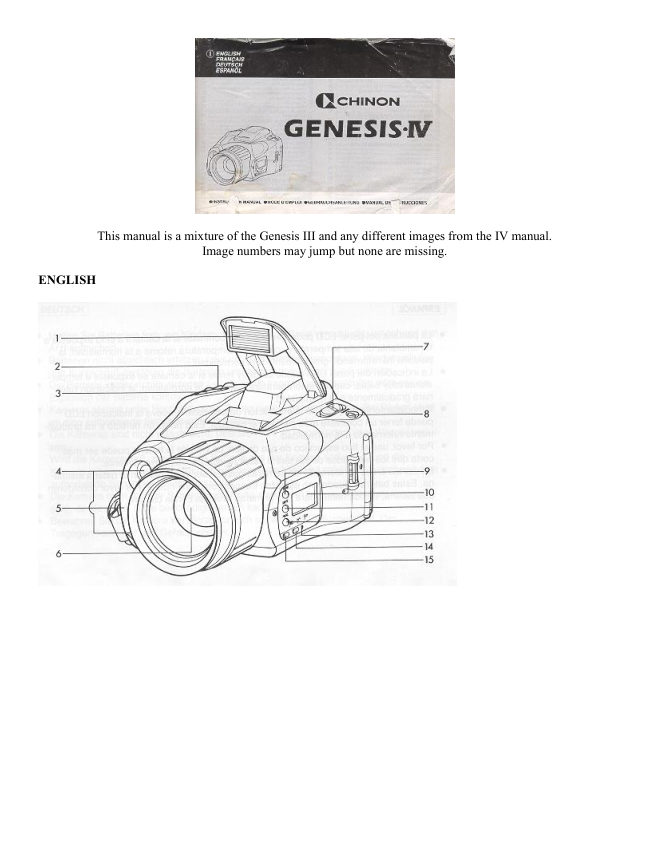
NOMENCLATURE1. Retractable flash      14. EV compensation button
2. Manual zoom button                      15. Flash mode select button
3. Shutter release button                     16. Film window
4. Auto focus window                       17. Film pressure plate
5. Self-timer indication LED                 18. Take-up mark
6. Lens                                     19. Film tip mark
7. Main switch/Flash pop-up switch/Fill-     20. Viewfinder eyepiece
flash switch                                 21. Quick return mirror
8. Spot AF button                           22. Automatic film speed setting contacts
9. Zoom select button                       23. Film chamber
10. LCD panel                              24. Film rewind shaft
11. Drive button                            25. Hand strap
12. Program select button                    26. Tripod socket
13. Manual rewind button                   27. Battery compartment cover


SPECIFICATIONS


MAIN FEATURES:                   Exposure range:

-35 mm TTL type zoom camera                Wide: EV4-EV19 (ISO 100); Tele: EV5

-38-135 mm zoom lens                  EV20 (ISO 100)

-Multi Auto Zoom Program                                               Film speed sensing: DX film sensing for ISO 25-
                                            3200
-Dual Mode AF
                                             (ISO 25 setting for non DX films)
-Triple Program AE
                                               Exposure compensation: Built-in (+/-2.0 EV w/0.5
View original page 3Page 4 · Read text
-Fully motorized film transport              EV increments)

-Built-in sensor flash w/Red-eye reduction            Flash program shutter speed: 1/38-1/100 sec.

-Exposure compensation                TRANSPORTATION:

-Tele converter mode                             Film loading: Automatic loading

-Wide angle converter mode                             First frame setting: Automatic setting

FILM TYPE: 135-size film                  Film winding: Motorized winding

PICTURE SIZE: 24x36 mm                Film rewinding: Motorized rewinding

LENS:                                      Rewinding actuation: Automatic

                                             Rewinding stop: AutomaticAperture ratio: F/4.0-5.6

                                           Rewind button: Built-in for midroll rewindingFocal length: f/38 mm- 135 mm

                                           Frame counter: On LCD panelLens construction: 13 elements in 10 groups

                                                 Shooting mode: 2 modes: Single/Continuous (1.5Macro capability: Possible (Macro Focusing
                                                    frame/sec)distance 1:4.5)

Zooming operation: 4 modes: a) Programmed Auto  FLASH: Type: Flashmatic type Sensor
Zoom, b)                                       flash

Manual Power Zoom, c) Tele Converter Zoom, d)    Flash GN: G No. 14 (ISO/100 meter)
Wide angle Converter Zoom
                                             Effective range: Wide: 0.85-5.9 m (33.5~-
Auto zoom cancellation: Possible by Manual Zoom
                                                    19.4'),Button
                                             Tele: 0.85
FINDER: Type: TTL finder
                                            4.1 m (33.5"--13 4')
Finder screen: Fine matte screen
                                        Recycle time: Approx. 4.0 sec.
Magnification: 0.8x (50 mm inf.)
                                        Off flash: Yes
Coverage: 90% in horizontal and vertical
                                    Slow synch: Yes
Diopter: -1.0 diop.
                                                Pre-flash: Yes
Finder indications: Multi AF OK signal, Spot AF
OK signal,
                            OTHER FEATURES: Power source:
Near distance warning, Slow shutter speed warning,
Bulb                                            Lithium battery pack 6V

                                                    Battery checker: Built-inmode signal, Flash sync. signal, Flash recharging
signal
                                               Film door window: Built-in
Finder mirror: Motorized quick return mirror
View original page 4Page 5 · Read text
FOCUSING SYSTEM:                      Tripod screw: Built-in: U-1/4~

Type: Dual Mode AF combines TTL                  Self-timer: Built-in with LED indication,
                                                      cancellable
phase-differential detection AF and Multi AF
                                                    Multiple exposure: Built-in
Focus lock/Cancellation: Possible
                          LCD PANEL INDICATIONS:
Shooting range: 0.85 m (33.5") to infinity         Frame counter: Film transport/Frame
                                    number
Spot AF: Possible
                                             Flash: Fill/Off/Pre-flash/Hash charging
SHUTTER:
                                         Photography: Multiple Exposure/SeH-
Type: Electromagnetic focal plane shutter          timer/Continuous Shooting

Type of shutter release: Electromagnetic release                                         Exposure: Normal/Action/Creative
                                     ProgramShutter speed range: 1-1/1 200 sec. plus Bulb

                               Zoom Mode: Auto Zoom/Tele/WideShutter release: Focusing priority
                                         Converter
EXPOSURE METER:
                                           Other: Exposure compensation, battery
                                        checkType: TTL metering system

                                     Auto power shut off: Built-in for 60 sec.Exposure control: 5 modes:

                                              Strap: Attachablea) Normal Program AK,

                                       Dimension: 140 (W)x86 (H)x126.5 (D)b) Action Program AK,
                        mm (5.5x3.9x4,9")
c) Creative Program AK,
                                        Weight: 745 9 (26.07 ounces)
d) Slow Sync Program AK,

e) Flash Program AE

Photo cell: SPD (divided)
View original page 5Page 6 · Read text
Simplified Guide

A. Battery Installation


                       1 ) Insert a pointed object such as a ball-point pen into the battery cover
                            release hole on the side of the camera and slide it in the direction
                            indicated by the arrow to open the battery compartment. (Fig. 1 )

                           2) Place the battery correctly in the battery compartment in accordance
                         with the marks inside and close the cover.

                      Use a 6 V lithium battery of the "2CR-5" type. (Fig. 2)

                         B. Battery Check

                           Sliding the Main switch to the first position turns the camera ON. Then,
                             sliding the Main switch to the end pops the flash up. After the flash has
                       popped up and the finger is released from the Main switch, the Main
                          switch will automatically slide back to the first click position. (Fig. 3)

                         When any of the following occurs, it means that the battery
                                    condition is too low for continued use and the battery should
                                be replaced with a new one.

                                  --The battery check mark is blinking.

                                  --The battery check mark is blinking and the shutter is locked.

                                  --Nothing appears on the LCD panel.

                                    Battery life: Approximately 24, 24-exposure rolls, using 50%
                                         flash. (CHINON) Laboratory testing)

                         When a new battery is correctly installed and the LCD
                                      indication is still not displayed correctly, remove the battery
                               and reinstall it again.

                     A memory back up system memorizes the frame counter as
                                   well as the film speed for a short time even without a battery.
                               However, it is recommended to replace the battery as quickly
                                    as possible.
View original page 6Page 7 · Read text
C. Setting the Film Speed


                         Using films with DX coding is recommended. In this case, the proper
                             film speed will be set by the camera automatically Film can be used
                           with ratings from ISO 25 to 3200. (Fig. 4)


                          Note:
                          For reversal (slide) film, please use ISO 25, 50, 100, 200, 400, 1000 or
                           1600.

                          For films without DX coding, the camera is set automatically at ISO
                             25. Only use non DX film with an ISO 25 rating. However, if non-Dx
                             films with ratings of ISO 50 or 100 are used, the camera can be
                             adjusted for them by using the built-in exposure compensation system
                           (See page 50 in the Applied Use section for exposure compensation
                                instructions).

                            Please keep the camera's DX contact points and the DX information
                            panels on the film cartridges clean. (Fig. 5)


D. Loading a Film: Automatic Film Loading

The film should be carefully loaded into the camera, without being subjected to direct sunlight.

1 ) Turn the Main Power Switch to the "OFF" position.

2) Open the back cover by pushing the back cover release button in the direction of the arrow. (Fig. 6)


                                 3) Insert the film cartridge and pull out the film so that the
                            trimmed end lines up with the film tip mark. The length of film
                                 pulled out shouldn't be either too short or too long against the
                                  position of the film tip mark. If it was pulled out too much, adjust
                                                  it by rewinding the film back into the film cartridge so that the
                            trimmed end lines up with the film tip mark. Make sure that the
                                 film lies flat between the film guides.


                                 4) Close the back cover. (Fig. 7) The film will be advanced
                                 automatically to the first frame. Turn the Main Power Switch to
                                  the "ON" position and make sure the counter on the LCD panel
View original page 7Page 8 · Read text
shows "1".

                              Note:
                                          If the frame counter on the LCD panel is blinking "0" after the
                             back cover has been closed, it means that the film has not been
                               loaded correctly. Open up the back cover and insert the film
                                   correctly again.


* With non-DX films or ISO 25 DX films, if the "0" remains lighted on the LCD panel after the back cover has
been closed, it also means that the film has not been loaded correctly Open up the back cover and insert the film
correctly again.

* Always set the Main Power Switch to "OFF" while loading the film.

* The focal plane shutter system is a reliable, yet delicate component of the Genesis IV. Never scratch or touch
the shutter curtains. Extreme care should be taken, especially when you load a film cartridge into the camera.

E. Holding the Camera


                                                       Hold the camera in such a way
                                                                         that your elbow is securely
                                                               touching your body to ensure
                                                         camera steadiness and to avoid
                                                                   the possibility of camera shake.
                                                                      (Fig. 8)

                                                       Hold the camera so that your
                                                                        fingers, the carrying strap etc.
                                                                      will not cover any part of the
                                                                      flash unit, lens, or the AF
                                                           measuring windows.


Gently press the shutter release button. When the telephoto lens is in use, be particularly careful to avoid any
camera movement.

When the camera is not in use, always return the Main Power Switch to the "OFF" position.
View original page 8Page 9 · Read text
F. Viewfinder Information


                                                1 ) Viewfinder frame

                                                         2) Autofocus frame

                                              The TTL AF mode and the central spot
                                                         of the Multi AF focus areas.

                                                         3) Evaluative metering central
                                                measuring area.

                                                         4) Flash Ready Signal

                                        When the flash is fully charged, this light
                                                             will glow steadily. While the flash is
                                                          recharging, the same light will blink until
                                                          the flash recharging is completed.


5) AF OK signal
When blinking, this indicator warns that the camera-to-subject distance is too close for proper focus. The
camera shutter cannot be released in either the single or continuous shooting modes if this condition occurs.

6) Slow Shutter Speed Warning
When blinking, this indicator warns that the automatically selected shutter speed is too slow for non flash
photography or slow flash sync photography. When it glows steadily, the bulb exposure mode will be utilized
upon releasing the shutter. The flash will fire, even in the bulb mode, if the flash is in the open position. In both
instances, a tripod is recommended to avoid blurred pictures.

G. LCD Panel Display


                                 1) Image Program
                                                                   6) Exposure Compensation
                           Mode/Program
                                                                     Indication

                     AE indication
                                                                   7) Battery Check Mark

                                 2) Prewash Mode
                                                                   8) Tele Converter Mode/Wide
                                                         Angle Converter Mode
                                 3) Self-timer Mode

                                                                   9) Auto Composing Mode
                                 4) Frame Counter

                                 5) Continuous Shooting Mode
View original page 9Page 10 · Read text
H. Auto focus Photography

The camera incorporates an auto focusing system combining both a TTL Passive AF and an Infrared Active
Multi AF systems: the Dual Mode Auto focusing System. Depending upon the subject situation, the optimum
AF system will be automatically selected for pin-point auto focusing accuracy.


                      1 ) Position the camera so that the subject is set within the auto focus
                       frame of the viewfinder. (Fig. 9)

                          2) Press the release button gently. The focus distance will be measured
                       and set automatically. Once the focus has been completed, the "AF OK"
                     mark in the viewfinder will light up and the subject in the viewfinder will
                       be visible in sharp detail. This is a visual confirmation that the subject
                            will be correctly focused in the picture. (Fig. 10)

                          3) When the camera-to-subject distance is too close, the AF OK mark in
                           the viewfinder frame will blink and the shutter release will be locked. In
                              this case, position the camera further away from the subject and focus
                           again. (Fig. 11 )


                           4) Once the AF OK mark is lighted and focus is visibly confirmed by
                            the viewfinder, press the shutter release button all the way down to take
                            the photograph.
                             (Fig. 12)


Note:
Since the TTL viewfinder enables a visible focusing confirmation, when your main subject is not sharply in
focus in the viewfinder, press the shutter release button halfway again for refocusing.

Never push or turn the lens as the camera's micro computer always detects and memorizes the exact position of
lens focusing each time the focusing is completed. If the lens is accidentally pushed or turned, turn off the
camera by sliding the Main Power Switch to "OFF" to initialize the camera's memory before shooting again.
View original page 10Page 11 · Read text
If the camera-to-subject distance is closer than 85 cm (33.5 inches), the AF OK mark will blink and the shutter
release will be locked. The camera should then be positioned further away from the subject so that the picture
can be taken.


                                           I. Multi Image Program Shooting (for basic snap shooting)

                        The camera utilizes a Multi Image Program shooting mode. By
                               selecting either the Standard Image Program Mode, Sport/Portrait
                         Image Program Mode or the Landscape Image Program Mode,
                           depending upon the subject situation, an optimum composing angle
                                will be automatically selected along with an optimum programmed
                           exposure setting.

                        The Following is the procedure for the Standard Image Program
                     Mode which is designed for general picture taking situations and
                             provides the best results for snap shooting.

                         1 ) Press the Zoom Mode Button (Fig. 13) so that the LCD panel

                         shows the Auto Composing Mode      indication.

                              2) Press the Program AE select button. (Fig. 14) Each time that this
                             button is pressed the Program AE indication mark on the LCD panel


                                will change.                       Press the Program AE select
                             button until the LCD panel indicates P . (Fig. 15)

                              3) Look through the viewfinder and point the camera at the main
                              subject and gently press the shutter release button halfway. The
                          camera will then automatically compose the picture by zooming the
                               lens as well as precisely setting the focus. (Fig. 16)

                              4) Once the composing and focusing is completed, press the shutter
                               release button all the way down to take the picture.


Note:

* For more details on Multi Image Program shooting, see the applied use section.

* Never push or turn the lens as the camera's micro computer always detects and memorizes the exact position
of the lens each time the focusing is completed. If the lens is accidentally pushed or turned, turn off the camera
by sliding the Main Power Switch to "OFF" to initialize the camera's memory before shooting again.
View original page 11Page 12 · Read text
* The LCD indication will automatically disappear after 60 seconds upon completion of picture taking. Pressing
either the shutter release button (half way), Zoom Select button, Drive button, Program AE select button,
Manual Zoom button or Flash button will automatically reset the zoom lens to the Wide Angle Position (38
mm) and the LCD indication will be activated again.

* Selected shooting mode will be inputted into the camera's memory and retained for the next shooting
opportunity even after the Main switch is turned OFF.


                                            J. Shooting with Manual Power Zooming

                        When you wish to control the picture composition yourself, set
                                   the camera for the Manual Power Zooming mode.

                             1 ) Press the Zoom Mode button so that the Auto Zoom mark " *
                                   " on the LCD panel disappears. (Fig. 17)

                                  2) Lens zooming can now be controlled by pressing the Manual
                        Zoom buttons (Tele or Wide) on top of the camera. (Fig. 18)

                                  3) Look through the viewfinder and compose the picture by
                                  pressing the Manual Zoom buttons. Once the desired picture
                                composition is completed, press the shutter release button all the
                         way down to take a picture. (Fig. 19)


                                Note:

                             * The when the Manual Power Zoom Mode is selected, unless it
                                           is changed back to the Multi Image Program Composing Mode
                            by pressing the Zoom button, it shall remain in effect for the next
                                 shooting occasion even after the Main switch is turned OFF.

                             * When you wish to change from the Manual Zoom mode to the
                                Multi Image Program Composing Mode, press the Zoom button

                                so that the Auto Composing Mode symbol      appears on the
                      LCD panel. (Fig. 20)


* Turning the Main Power Switch to the "OFF" position and then back "ON" will also change the Manual
Power Zoom mode to the Auto Composing Mode mode.

* The LCD indication will automatically disappear after 60 seconds upon completion of picture taking. Pressing
either the shutter release button (half way), Zoom Select but ton, Drive button, Program AE Select button,
Manual Zoom button or Flash button will automatically reset the zoom lens to the Wide Angle Position (38
mm) and the LCD indication will be activated again.
View original page 12Page 13 · Read text
* When the camera is set for the Manual Power Zoom Mode, the following three different types of Auto
Exposure Programs can be selected by pressing the Program AE select button.


1. "P" Normal Program AE The normal Program AE mode is ideal for general picture taking. Shutter speed and
aperture changes are adjusted according to the varying light level at an equal rate. It will maintain a fast enough
shutter speed to avoid camera shake while an adequate depth of field will also be implemented to assure razor
sharp pictures.

2.    Action Program AE

The Action Program AE is designed for portrait or spot/action pictures. In this mode, the camera will select a
wider aperture and the faster available shutter speed to freeze the motion and reduce camera shake.

3.     " * Creative Program AE

The Creative Program AE is ideal for scenery picture taking because in this mode, the camera is programmed to
select a smaller aperture to provide greater depth of field.

                       The camera utilizes an Automatic Sensor Flash system which is
                           designed to measure ambient light intensity and then activate and fire
                              the built-in flash when needed. The sensor flash of the camera works
                             automatically only when the flash is in the open position. (Fig. 21 )

                        1 ) Slide across the flash button to pop up to the flash into its
                             operating position. (Fig. 22)

                             2) Gently press the shutter release button half way. If the flash is

                             necessary, the "         " mark in the viewfinder lights up or blinks to
                               signal that the automatic sensor flash mode is in operation. (Fig. 23)


                             3) If the "         " mark lights up continually, it means the flash is
                                fully charged and ready to fire. Press the shutter release button all the
                      way down to take a flash picture. (Fig. 24)


                             4) If the "         " mark blinks, it means the flash is being charged.
                            Flash charging takes approximately 4 seconds. Immediately upon

                           completion of the flash charging, the "         " mark will light up
                              continually and the camera will be ready for flash photography.

                          Note:

                    When the flash is in the closed position and the "         " mark in
                              the viewfinder blinks, the flash is needed. Slide across the flash button
                               to pop the flash up and then take the picture.
View original page 13Page 14 · Read text
The flash can be charged even if the shutter release button is fully
                             depressed. In this case, immediately upon completion of the flash
                             charging, the shutter will be released. Therefore, to avoid accidental
                             exposures, it is recommended that the shutter release button not be
                                fully depressed during flash charging.

                      Flash effective range.

        Film speed                ISO 100                   ISO 400
                                         0.85-4.0 m                        0.85-8.0 m
       Tele                                        33.5"-12.3'                       33.5"-26.2'
                                       0.85 - 5.1 m                      0.85-10.0 m
     Wide                                        33.5"-15.7'                       33.5"-32.8'


L. Automatic Film Rewinding


                       1 ) When the entire film cassette has been used, the film will
                           automatically start to rewind within two to three seconds.

                           2) While the film is rewinding, the counter will count
                         backwards. When the film is entirely rewound, the rewind
                        motor will stop automatically.


                           3) Check the frame counter on the LCD panel to make
                              certain that the film counter shows "E" before opening the
                        back cover. (Fig. 25)
View original page 14Page 15 · Read text
(Rewinding a partially exposed roll of film.)

                                     If a film must be removed before it has been completely used, press
                              the manual rewind button      located on the side panel. Use a ball-
                              point pen or a similar object which is not too sharp. Use only a light
                           touch to initiate the partial film rewinding. Too much pressure could
                           cause internal damage to your camera. Rewinding will begin
                              automatically. (Fig. 26 )


Note: After the film is rewound, if the frame counter still does not return to "E" but a number is blinking, press
the manual rewind button again.


Applied Use


                            A. Multi Image Program Composition Shooting According to your
                               photographic purpose and the desired image effect, select either
                                 the Standard Program Mode, Sport/Portrait Program mode or
                            Landscape Program mode. The camera will automatically compose
                                 the picture and select an optimum exposure setting.

                                   (1) Standard Composing Mode This mode is ideal for general
                                  picture taking. When this mode is chosen, the lens focal length will
                             be automatically controlled so that the main subject or subjects
                                   will always be within the picture area. Since the standard program
                    AE will always accompany this composing mode, it will maintain
                              a fast enough shutter speed to avoid camera shake while an
                              adequate depth of field will also be implemented to assure razor
                               sharp pictures.


                                        · Set the camera for the desired Multi Image Program Mode by
                                pressing the Zoom Mode button until the "do" mark appears on the
                    LCD panel. Press the Program AE Select Button until the "P" mark
                               appears on the LCD panel. Partially depress the shutter release and
                                 the camera will automatically control the lens zooming and
                              exposure for general shooting occasions (snap shot photography).
                                   (Fig. 27) (2) Landscape/Group Program Mode This mode is ideal
                                   for scenery since the picture will be composed with wider focal
                                length selections with an automatic exposure setting that provides
                                  greater depth of field. It is also ideal for pictures of people in
                              groups since the camera will adjust the image size to include
                             everyone in the gathering.
View original page 15Page 16 · Read text
· Set the camera for the desired Multi Image Program Mode by pressing the Zoom Mode button so

 that the      mark appears on the LCD panel. Press the Program AE Select Button until the      mark
appears on LCD panel. Partially depress the shutter release and the camera will automatically control the lens
zooming and exposure for landscape or group photographs. (Fig. 28)


                                   (3) Sport/Portrait Program Mode+Auto Close-up This mode is
                              designed for portrait or sports/action pictures. In this mode, the
                            camera will select an optimum lens focal length and exposure
                                   setting emphasizing a greater telephoto magnification along with a
                              wider aperture and faster shutter speeds to better frame a portrait
                            image but also to increase the potential to freeze the motion and
                              reduce camera shake.·

                                Set the camera for the desired Multi Image Program Mode by

                                pressing the Zoom Mode button until the      mark appears on
                                 the LCD panel. Press the Program AE Select Button until the

                               mark appears on the LCD panel. Partially depress the
                                   shutter release, and the camera will automatically control the lens
                           zooming and exposure for portrait or sports photography. (Fig. 29)


                               (3-1) Automatic Close-up Photography

                              In the Sport/Portrait Image Program Mode, when the subject is within
                            0.85 to 1 meter (33 5" - 39 4") from the camera, the Auto Close-up
                      mode will be activated.

                         1 ) Set the camera for the Sport/Portrait Image Program mode. (Fig.
                            30)

                             2) Press and hold the TTL SPOT AF button. Look into the viewfinder
                          and point the camera at the subject. Gently press the shutter release
                             button halfway to actuate the focus. If the camera-to-subject distance
                                     is within the 0.85-1 meter (33.5 - 39.4") range, the camera will
                             automatically set the focal length for extreme telephoto (110 mm) to
                          emphasize the close-up effect. (Fig. 31)

                            Note:  If the subject is not in the close-up distance range (0.85-1
                             meter, 33.5"~39.4"), the lens focal length will not be set at the
                           extreme telephoto (135 mm) position.
View original page 16Page 17 · Read text
Zooming adjustment for Multi Image Program Mode


                     You can override the automatic composing feature set by the camera's
                            Multi Image Program Mode by using the Manual Zoom Button as
                              follows:

                                 1. Press the center of the Manual zoom button so that the * symbol
                        mark on the LCD panel blinks for approximately 4 seconds. (Fig. 32)


                                 2. While the      symbol mark on the LCD panel is blinking, press
                                either the "T" or "W" side of the Zoom button to adjust the
                         composing angle to your preference. (Fig. 33)

                            Note:  If the center of the Manual Zoom Button is not depressed prior
                                to using the manual override zooming feature, manual override
                        zooming adjustment will not be possible unless above steps (1 & 2)
                              are taken again.


B. Memory Function


                                The following shooting modes and functions will be
                                  memorized and held even if the Main switch is turned-off.
                                         In other words, once a preferred shooting mode is
                                            selected, these shooting modes will remain unchanged
                                              until a new setting is chosen.

                                 Frame Counter
                                Zooming Mode
                                      Multi Image Program Mode
                                     Sensor Flash/Preflash Mode
                                    Film Transport Mode
                                    Exposure Compensation Mode
View original page 17Page 18 · Read text
Clearing the Memory

                            When you wish to clear the memory to return to the
                                    normal shooting mode, turn the Main Power Switch "ON"
                                      while the SPOT AF button is pressed. Now, the camera
                                           will return to the normal shooting mode as follows (Fig.
                                        34, 35):

                                 Standard Shooting Mode:


                                  * Zoom Mode - Auto Composing       Standard Image
                                  * Program AE - Standard Program P Program Mode
                                  * AF Mode: Single Single Shooting Mode
                                  * Film Transport Mode: Single


C. Auto Focus Modes

(1) Dual Mode Auto focusing

The camera incorporates a Dual Mode Auto focusing System which combines both TTL passive AF and
Infrared Active AF Systems into one system. This system eliminates the inherent disadvantages of each AF
system to permit virtually any subject to be properly focused under the widest possible variety of lighting
conditions. Depending upon the subject situation and the lens focal length in use, the camera will automatically
select an optimum AF system from either the Multi AF or TTL Passive AF systems.

<Multi AF>

The Multi AF system utilizes triple infrared beams which provide a wider focusing area instead of a single,
central beam of a conventional infrared AF system. Therefore the Multi AF system eliminates the need for a
focus lock even if the subject would be positioned off-center. In the Multi AF mode, the actual focusing area
will be wider than the AF frame in the viewfinder. (Fig. 40)
View original page 18Page 19 · Read text
<TTL Passive AF System>

The TTL Passive AF System is ideal for telephoto pictures that require increased focusing accuracy. In the TTL
Passive AF System, the focusing area is precisely what the AF frame in the viewfinder covers. (Fig. 41 )

Note:

Although the camera automatically selects the optimum AF system for each subject situation and shooting
condition, if the viewfinder image on the main subject does not appear to be sharp upon completion of focusing,
focus again by pointing the AF frame precisely on the main subject.

(2) Spot AF Mode

In the Spot AF Mode, the focusing area will be precisely what the AF frame in the viewfinder covers.

1 ) Point the AF frame in the viewfinder directly on the main subject. (Fig. 42)

2) Press and hold the Spot AF button and gently press the shutter release button halfway. (Fig. 43)

3) "The AF OK" LED in the viewfinder will light up in red and the focusing will be locked on the main subject.
Once the focusing is locked on the main subject, the focusing will be locked as long as the shutter release button
is halfway pressed, even if your finger is lifted from the Spot AF button.

4) Gently press the shutter release button fully to take a picture. (Fig. 44)

Note:

When the "AF OK" LED blinks, it means the camera-to-subject distance is too close. The camera should then
be positioned further away from the main subject to allow focusing to be completed.

Center-weighted Spot AE metering will only be effected if the picture is taken while the Spot AF Button is
pressed.


(3) Focus Lock (Prefocus) and Cancellation

When the main subject is located "off-center" in the viewfinder, or when it is difficult to focus on the subject,
the focus lock is invaluable. (Fig. 45)

1 ) Look into the viewfinder and point the auto focus frame on the center of the subject that is to be in focus.
Gently press the shutter release button and confirm that the "AF OK" LED in the viewfinder lights up. (Fig. 46)
View original page 19
Page 20 · Read text
2) Without losing tension on the shutter release button, recompose the picture in the viewfinder and then take
the photograph by pressing the shutter release button all the way down. (Fig. 47)

Note:

The focus lock feature can be canceled by removing your finger from the shutter release button. Thus, you can
repeat this technique any number of times without having to take a picture.

The focus lock functions with both the Dual Mode AF and Spot AF modes.


D. Flash Photography

(1) Automatic Sensor Flash Mode

1 ) Press the flash button so that the flash will be properly positioned for automatic flash photography. A built-
in sensor will fire the flash only when necessary.
(Fig. 48)


2) Gently press the shutter release button halfway to confirm that the flash ready light "         " in the
viewfinder lights up. If the flash ready light does not light up, that means the flash is not necessary for a
properly exposed picture. The flash will not be fired when the picture is taken. If the flash ready light blinks, it
indicates that the flash is charging.  During the flash charging period of approximately 4 seconds, the shutter
cannot be released. Wait until the flash ready light glows constantly and then take a flash picture by gently
pressing the shutter release button all the way down. (Fig. 49)

(2) Off-flash Mode

Although the camera will fire the flash automatically in accordance with the brightness of the surrounding
lighting conditions (when the flash is in its operating position), there are times when it might be preferable to
take a picture without the flash to capture a special mood. Off-flash photography is achieved with the following
procedures.
View original page 20
Page 21 · Read text
1 ) Gently press the flash down until it is returned to its storage position in the top of the camera. When the
Main Power Switch is slid to "ON", the Off-flash mode will be activated. (Fig. 50)

2) Gently press the shutter release button halfway If the Slow Shutter Speed Warning LED " ~ " blinks in the
viewfinder, it warns that the shutter speed is possibly too slow for handheld picture taking. Hold the camera as
securely as possible or use a tripod in order to avoid camera shake and subsequently blurred pictures. If the

Slow Shutter Speed Warning LED "         " glows constantly while pressing the shutter release button
halfway, it means that a bulb exposure will be taken. In this case, a tripod must be used. (Fig. 51 )
View original page 21
Related documents and language editions
From the M. Butkus archive. Original publisher and archive notices are retained.
Check the model and edition against your equipment.
PDF verified 2026-10-10.