Film cameras
Edixa Mat User manual
User manual for Edixa Mat. 7 pages in English. Read the original PDF, download or print a copy without registration.
7 pagesEnglish1.2 MB PDF
Loading your manual…Open PDF directly
Document details
- Brand
- Edixa
- Model / document
- Edixa Mat
- Document type
- User manual
- Language
- English
- Pages
- 7
- File size
- 1.2 MB
- Category
- Film cameras
- Document date
- Not specified in catalog
Search available document text
Find a term, then jump to its page in the original PDF. Image-only pages may not be searchable; check the PDF for exact wording and diagrams.
Page 2 · Read text
INTRODUCTION
The Edixa Reflex is a single lens reflex camera which uses 35-mm film, both color and black and
white. The picture size is 24 x 36 mm or approximately 1 x 1 1/2 inches. A wide variety of
emulsions and speeds are available in 20 and 36 exposures daylight film cartridges.
The Edixa Reflex offers you all the latest innovations of photographic progress - including focal
plane shutter with speeds from 1 second to 1/1000th, coupled film transport and shutter winding,
double exposure prevention, automatic and preset diaphram lenses, interchangeable lenses,
interchangeable viewfinders, single lens reflex optical system, freedom from parallax, prism
viewfinder, flash synchronization for flash bulbs and electronic strobe units, rapid lever wind for
sequence pictures, and many other outstanding features.


Also with the Edixa Reflex you have available a choice selection of Wide Angle and Telephoto
lenses ranging from 28-mm. to 1000-mm. focal length and as fast as f/1.5. Extension tubes,
microscope adapters, bellows extensions, and many other accessories are available too. Write to our
distributor for complete price list.
View original page 2
Page 3 · Read text
Successful photographic results depend largely upon the careful operation and handling of your
camera. It is advisable therefore, to first practice using the camera without film, following the
instructions for the use of the camera in the pages which follow. After you have gained the full
knowledge of its operation,
you may start to take pictures.


INSERTING THE FILM


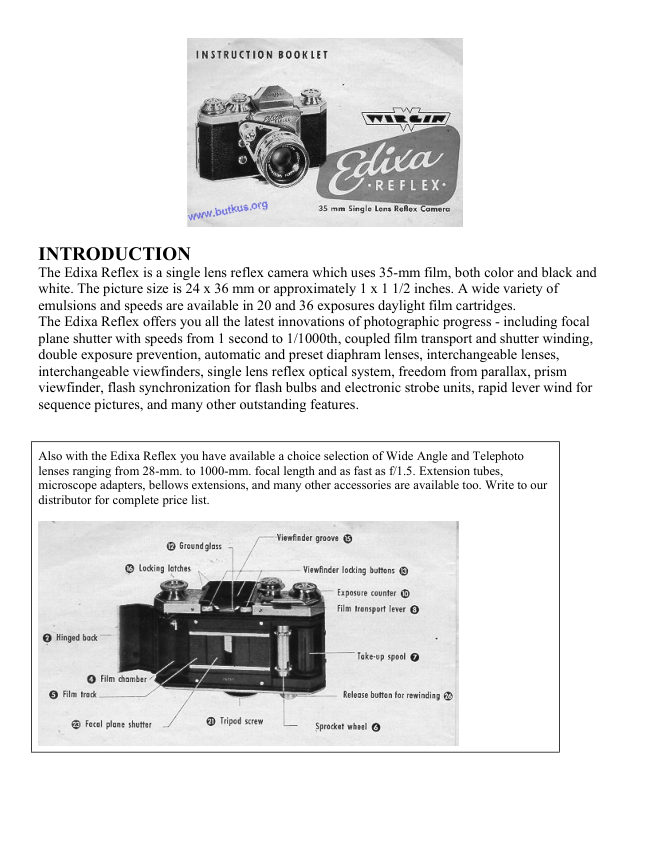
                                    To open the camera back, pull the latch (1)
                                               outwards. Pull out rewind knob (3). Place the
                                                   fresh film cartridge into the empty film chamber
                                                    (4) with the film leader in the direction of the
                                               take-up spool (7). Push the rewind knob down,
                                                 thus engaging the film cartridge. Pull the film
                                          from the cartridge and place the tongue into the
                                                                  slit of the take-up spool (7). Then turn the take-up
                                               spool by hand without using the lever, wrapping
                                      some film around the spool.


Be sure that the teeth on the sprocket wheel (6) engages both top and bottom rows of perforations
on the film, before closing the camera back, and see that the film lies evenly on the film track (
Close the back of the camera and pre latch down to secure. Turn lever fully, then set exposure
counter (10) direction of arrow) on number 36.
View original page 3Page 4 · Read text
The indicator (exposure marker) is t triangle
                                    engraved on the lever (8). Pre shutter release
                                       button (9). Make two blank exposures by
                                   winding lever and pressing shutter release
                                       button The exposure counter will point to
                                    exposure No. 1, and the camera is ready for
                                    your first picture. You can be sure that the film
                                          transports in your camera properly if the rewind
                                 knob (3) turns counter clockwise as you turn the
                                         lever (8) to the right.


TO OPEN & CLOSE WAIST-LEVEL FINDER


                                               Press the small button on the back of the finder (on
                                          back of camera) and it will open automatically. To
                                                    close, just press down any of the walls of the
                                                  finder till the cat( clicks To bring the magnifying
                                                 lens into position, press the small lever next to the
                                                     lens. The image viewed on the ground glass (after
                                        you wind the shutter) will be reproduced on film,
                                                   in the same size. As you turn the focusing ring on
                                                 the lens, the image on the ground glass changes.


                                                      It will appear sharp. At the same time you are
                                  composing your picture, and controlling the
                                     depth of field. For critical focusing, use the
                                        magnifier, keeping it close to your eye. Before
                                        closing hood, be sure to fold the magnifier
                                 down.


The waist level viewfinder can be interchanged with the Prism View Finder. To remove the finder (waist-level
or prism finder) from the camera, proceed as follows. Push buttons (13) outwards, the finder will lift upwards
and can easily be removed. To install either finder into camera, insert the front end of the finder into the open
groove (15) of the view
finder section of the camera (on top of camera, 15) then push rear end down until it clicks into position.
View original page 4Page 5 · Read text
THE PRISM FINDER


                                    The Prism Finder is used for eye-level focusing,
                                      holding the ocular lens of the finder close to the
                                        eye. You see a laterally correct, upright image
                                           for both vertical and horizontal shots. The
                                          direction of movement seen in the finder is the
                                same as that of the subject. This finder,
                                           therefore, is ideal for sport and action
                                    photography (horse races, track meets, tennis
                                   matches etc.) because you can move the camera
                                           in the same direction as that of the subject. The
                                    Prism Finder can be installed and removed
                                  from camera in the same way as the Waist-
                                    Level Finder.


SHUTTER AND FILM TRANSPORT


                                       The shutter winding and film transport are coupled, and
                                                             is done by winding the lever (8) fully until it stops,
                                                     therefore, there is no danger of double exposures. The
                                                   lever automatically snaps back to its neutral or normal
                                                     position. If you don't wind the lever fully (complete
                                                     rotation to the right), you won't be able to press the
                                                    shutter release knob. If this should happen, just continue
                                                     to wind the lever till the end. Please note: The image
                                               appears on the reflex ground glass only after the lever
                                                     (8) is turned fully (complete rotation of lever to the
                                                   right).The shutter is released by pressing the shutter
                                                   release button (9).
                                               Release gently to avoid blurring the picture.
View original page 5Page 6 · Read text
TO SET THE SHUTTER SPEEDS


                                 The speeds are set by means of adjusting knob (17) and the
                              Knob (18). The engraved figures on the Knobs (17) and (18)
                                           indicate fractions of seconds: for example,50 means 1/50 of a
                                       second, 5 means 1/5 of a second etc.

                          EDIXA REFLEX S (Standard) with shutter speeds: 1/25 -
                                1/1000 of a second:
                           To set the shutter for the selected speed lift the setting
                              knob (17)- either before or after winding the shutter - and
                                     turn it until the speed number is placed next to the red
                                   dot on the inside of adjusting knob, and let knob drop
                              down.

                 EDIXA REFLEX with shutter speeds:
                              1 sec. - 1/1000 of a second:
                                   a) Fast speeds: To set the shutter for fast speeds, turn
                              knob (18) till the dot points to zero. Then lift knob (17)
                                       either before or after winding the shutter, and turn it until
                                     the speed number you select is placed next to the red dot
                              on the inside of Knob. (17), and let it drop down. For
                                  time exposures use the setting "B" on Knob (17), be sure
                           Knob (18) is set on zero. Shutter will stay open as long
                                    as shutter release button is pressed down (9). An Edixa
                                Cable Release with locking device should be used for
                                  time exposures of long duration.


b) Slow Speeds: To set shutter for slow speeds lift Knob (17) and turn it until the the speed "25"
(1/25 of a second) is placed next to the red dot on the inside of Knob (17). Then turn Knob (18) to
the selected speed, (for instance 1 second.)

IMPORTANT: Before setting slow speeds always set the red "25" next to the red dot on the inside
of Knob (17).

FOCUSING, DIAPHRAGM, PRESET & AUTOMATIC LENSES
A separate instruction sheet is provided for standard lenses, preset diaphragm lenses and fully
automatic lenses, included with the lens.
View original page 6Page 7 · Read text
FLASH SYNCHRONIZATION


                        The EDIXA-Reflex is fully synchronized for regular flashbulbs
                          and electronic flash. On
                              the front of the camera are two contact sockets. The top socket
                          (marked M on the side of the lens mount) is used for flashbulbs.
                        The bottom socket (marked X) is used for strobe and electronic
                                flash .

                   USE ELECTRONIC FLASH AND STROBE at 1/25th of a
                           second ONLY. See special instruction for use of flash bulbs.


UNLOADING FILM FROM CAMERA


                                        After all the pictures have been taken, the film must be rewound
                                           into the original cartridge. This is done by pressing
                              down on the button (26) located on the bottom of the camera,
                                   and at the same time turning the rewind Knob (3) clockwise (to
                                         the right). As long as film is still in the camera, you will feel the
                                              effort of winding, which stops as soon as all the film is back in
                                         the cartridge.


Then open back of camera (2), pull rewind Knob (3) upwards, and remove cartridge with exposed
film.

Film Reminder: On the rewind Knob (3) is an engraved scale (22) with speeds of most films. Set
this scale on the number corresponding to the speed of the film which you loaded your camera.
When you transport the film, watch the red dot on the rewind knob. When it turns counter
clockwise the film in your camera is loaded correctly. If it does not turn, the camera is either empty
or the film slipped out of the taking spool.
View original page 7Related documents and language editions

From the M. Butkus archive. Original publisher and archive notices are retained.
Check the model and edition against your equipment.
PDF verified 2026-10-10.