Lenses & filters
Mamiya/Sekor ZE lenses User manual
User manual for Mamiya/Sekor ZE lenses. 14 pages in English. Read the original PDF, download or print a copy without registration.
14 pagesEnglish1.8 MB PDF
Loading your manual…Open PDF directly
Document details
- Brand
- Mamiya
- Model / document
- Mamiya/Sekor ZE lenses
- Document type
- User manual
- Language
- English
- Pages
- 14
- File size
- 1.8 MB
- Category
- Lenses & filters
- Document date
- Not specified in catalog
Search available document text
Find a term, then jump to its page in the original PDF. Image-only pages may not be searchable; check the PDF for exact wording and diagrams.
Page 1 · Read text
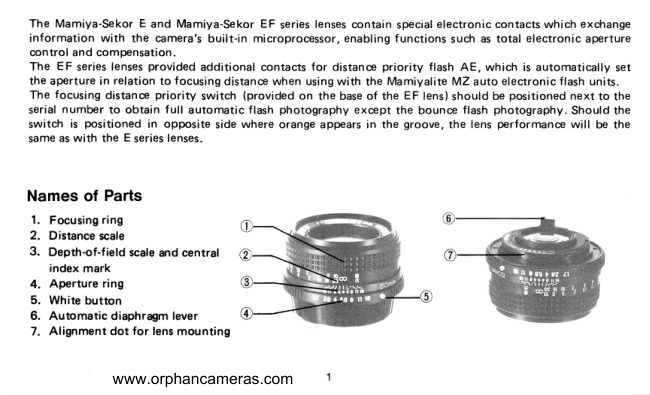
The Mamiya-Sekor E and Mamiya-Sekor EF series lensescontain specialelectronic contact
information with the camera's built-in microprocessor,enabling functions such as total el
 control and compensation.
The EF serieslensesprovided additional contacts for distance priority flash AE, which is
the aperture in relation to focusing distancewhen using with the Mamiyalite MZ auto electr<
The focusing distance priority switch (provided on the baseof the EF lens) should be posit
serial number to obtain full automatic flash photography except the bounce flash photogr
switch is positioned in opposite side where orange appears in the groove, the lens perforr
same as with the E serieslenses.


Names of Parts
 1. Focusingring
 2. D istance scale
3.  Depth-of-field scale and central
    index mark
 4. Aperture ring
 5. White button
 6. Automatic diaphragm lever
 7. Alignment dot for lens mounting

          www.orphancameras.com
View original page 1Page 3 · Read text
Digitally signed by mike butkus
                                                                                                      cn=mike butkus,                    mike              DN:o=orphancameras,                                                                                                                         ou=29,
                                                                                                            email=mike@butkus.org, c=US
                                                                                                                     Date: 2019.12.12 17:31:14 -05'00'                     butkus


To rerp\e  the lens from your camera, push in on    Match the red dots on the lens and camera body,
the Lens Release Button, securely grip the lens by    then rotate the lens in the direction of the arrow
the lens barrel, give it a short (approximately 45")     until it clicks into position.
twist  counterclockwise, and  af ter  the  lens stops,       lf  the white button  (S) is set at the central index
rrerely lift  it straight out of the bayonet rnount.        mark, the aperture ring cannot be turned. In this
                                                    case, rotate the aperture ring anay from the index
                                                       rnark while depressingthe white button.

          www.orphancameras.com
View original page 3Page 4 · Read text
ffiffi                                             Depth-of-field
                                    *ffi- -:3              Stopped-downWide-oPenapertureaPertut.,*J*H
                                                                                                   'tij':"':
        tu         ++fA
When the camera is focused on a subject, a crrtain     detail  against a purposely  blurred background or
distance in front and back of the subject is also in    foreground.
relatively sharp focus. This  is called the depthof-    The depthof-field  range can be determined using the
field and increases as the lens aperture is stopped    depth-of -f ield  scale of  the camera lens. Once the
down  while  it decreasesas the lens is opened up to    desired aperture  is selected, the corresponding fig-
larger apertures.                                      ures on both sides of the center index mark indicate
To render a background in sharp focus, or to allow    the depth-of-field  for  that aperture on the distance
snap-shooting without  the bother of pinpoint focus-    scale.
ing, the lens can be stopped down  to increase the    For example, if the carera  is focused at 15ft (5m) at
depth-of-focus. Opening up the lens aperture appro-   an aperture of  t 111, the range from approximately
priately enables a subject to be rendered in sharp     l0ft  {3rn) to 30ft (10m} will also be in sharp focus,
          www.orphancameras.com
View original page 4Page 8 · Read text
Th is lens is designed to  provide a high resolving   Macro Spacer ZE made particularly for  this Macro
power to the edges of your photographs not only in    E lens, you can go up to life size from  the half life
ordinary picture taking but particularly in close-up    size magnification. This spacer is coupled to  the
photography and copying.                      AE mechanism so, you are able to take pictures in
You can focus up  to 112 life size with  this lens    the same manner as you do with ordinary lenses.
without  aid from any accessory. By applying Auto


Names of Parts
 1. Magnification scalefor using
    with Auto Macro Spacer
 2. Magnif ication scale for using
    the lens alone
 3.  Distance scale
 4. Aperture ring
 5. White button
 6. Alignment dot for lens
 7. Aperture ring couPler
 8.  Lens releasebutton
          www.orphancameras.com
View original page 8Page 9 · Read text
Using the lens alone                                  Note:
      1. There is not any special focusing technique with     All the magnification numbers  are expressed by
      this  lens. Focus through  the   f inder as you  do    inversionsof the actual image magnif ication for easierI     normally.                                          read out. In other words, 20, 10 or 7 actually means
      2. The  image magnif ication  is  indicated on  the   112O,1l10 or 1 17 of the actual subject size.
     focusing ring right in front of the distance scale.       To predetermine the image magnification, turn thet
                                                          focusing ring and set  it to the desired value on the
     Applying the Auto Macro Spacer                        magnification  scale. Then move the camera or the
      1. Mount  the spacer between the camera and the    subject back and forth to adjust the focus.
    Macro lens. (Read the instruction for how to mount
     the Auto Macro Spacer in the folf owing section.)
      2. Focus through the f inder as you do normally,
      3. The image magnification is indicated at the front
    end of the fucusing ring.
I


             www.orphancameras.com
View original page 9Page 10 · Read text
Before attaching the spacer to the lens or camera,     1. Pressthe spacer'slens releasebutton and turn the
position the aperture ring coupler in the center of its    lens counterclockwise until   it stops. Then remove
travel range. lf the coupler is located at either side,    the lens.
the spacer may not attach properly.                        2. Press the camera body's lens releasebutton and
1. Match the red alignment dot of the spacerwith     turn the spacercounterclockwise until  it stops. Then
the red dot of the camera body and insert the spacer   detach the spacer (lt does not matter  if you reverse
to the mount. Turn  the spacer clockwise until   it    the order of steps 1 and 2).
locks in.                                                                                         .   This auto macro spacer is designed especiallyfor
2.  Prior to mount the lens, press the white button     the 50mm  t13.5 Macro E lens. lf you use it with
and  rotate the aperture ring away from  the index    other lenses, you  will  not be able to perf orm AE
mark so that aperture can be set freely.                photography.
_3. Then, align the red dot of the lens with the red
dot of the spacer mount. Insert the lens to the spacer
mount and turn the lens clockwise until  it locks in.
(lt does not matter  if you reverse the order of steps
1 and 2.1


          www.orphancameras.com
View original page 10Page 12 · Read text
Rrsh-pull type zoom lens operation
Taking advantage of zooming capability of the lens,   To  achieve the  extremely  fine performance and
you can focus far accurately than regular lenses.       handling in photographing wide variety of subjects,
Set your zoom ring to the longest focal length. You    this light weight and compact zoom lens offers you
can get a larger image and narrov\rerdepth-of-field.    the one-touch zooming operation and very close
Now focus on the subject by turn ing the  f ocusing  minimum shooting distancewithout switching to the
ring, Finally, set back the zoom ring to desired focal   special close-focusingmechanism.
length or image size.                             The smooth thrusting and rotating movement of the
Of course you can focus in regular manner merely   double action zoomingffocusing ring will give you
operating focusing ring without having an aid from    ultimate perspectiveeffect of the wide angle optics.
the zooming ability of the lens.                  Zoom 2&5omm tl3.&4.5 and 3$7omm f/3.$4S
                                             The variable maximum aperture of the lens which is
                                                      the  result  of  the  special optical composition  to
                                                           realize the high performance of the respective lenses,
                                                      are clearly color coded on the barrel. Set the aper-
                                                         ture to the orange or green alignment dot according
                                                               to the color-marked focal fength set by the zooming.


          www.orphancameras.com
View original page 12Page 14 · Read text
Fitting over the master lens,the lens hood is a highly   o  Nerrer store lenses in  extreme  heat  or  areas
effective attachment  for strong lighting situations   where humidity is high. Salt water and salt air could
such as when shooting against the light   lt cuts out    seriously damage a lens. After using at the beach or
harmful light rays and aids in the prevention of ghost   near the sea, be sure to wipe the lens clean and dry.
imagesand flare.                                      Protect the lens with the front and rear caps when
The 35mm/50mm  lens hood and the 28mm  lens   not in use.
hood both have the same 49mm diameter threads.   o  Wipe away dust and other particles which have
However, do not use the 35mm/50mm  lens hood   accumulated on the glass surfaces of a lens with a
with the 28mm lenses. Becauseof the greater length   blower or camel's hair brush.lf additionally cleaning
of the 35mm/50mm  lens hood, image cut-off will     is necessary,wipe VERY GENTLY   in a circular
result if  it is used with the 28mm lens.                motion with high quality lens cleaningtissue,using a
Hoods for  the  telephoto  lenses are  built  in. To    small amount of lens cleaning solution if necessary.
extend the hood, simply pull  it out alf the way. The   When the above methods fail to remove the dirt, the
hood will extend smoothly if you rotate it while you    lens should be brought to an aproved service center
pu ll.                                                      or dealer for professionalcleaning.


         www.orphancameras.com    1 3
View original page 14Related documents and language editions
From the M. Butkus archive. Original publisher and archive notices are retained.
Check the model and edition against your equipment.
PDF verified 2026-10-10.