Film cameras
Nikon F3 AF User manual
User manual for Nikon F3 AF. 76 pages in English. Read the original PDF, download or print a copy without registration.
76 pagesEnglish6.4 MB PDF
Loading your manual…Open PDF directly
Document details
- Brand
- Nikon
- Model / document
- Nikon F3 AF
- Document type
- User manual
- Language
- English
- Pages
- 76
- File size
- 6.4 MB
- Category
- Film cameras
- Document date
- Not specified in catalog
Search available document text
Find a term, then jump to its page in the original PDF. Image-only pages may not be searchable; check the PDF for exact wording and diagrams.
Page 7 · Read text
FOREWORD
Congratulations! You now own one of the most advanced,
easy-to-use cameras on the market today.
Thanks to a TTL image displacement detecting system utiliz-
 ing two SPD's built into the AF Finder DX-1, this camera offers
you through-the-lens autofocus control with either of two AF-
Nikkor lenses, the 80mm f/2.8 and the 200mm f/3.5 lF-ED.
Thus, you can shoot fast-moving action while the subject
remains in sharp focus. And like the regular Nikon F3, the
shutter speed is set automatically to match the f/stop in use,
so you never have to worry about getting the correct exposure.
The F3AF also gives you focus-aid operation with the vast
majority of Nikkor and Nikon Series E lenses having a maxi-
mum aperture of f/3.5 or faster, while regular manual
focusing using the matte portion of the screen is possible
with any lens.
Before actually taking pictures with the F3AF, you should
familiarize yourself with its basic operation as presented in the
first section. For more detailed explanations and special
picture-taking situations, refer to the rest of the manual. A few
minutes wisely invested now will pay off later in years of re-
ward   i ng photographic experiences.
To insure proper service, make sure the Nikon Warranty Card
is enclosed in the camera box.
View original page 7
Page 9 · Read text
www.butkus.us
L  Remove the battery         tr  Load the batteries into        fi   Reattach the lid.T'   chamber lid  i froli the    v'  the finderts battery         v!   While applying pressure to the bat-
finder.                      chamber.                                    teries with the lid, slide  it on until it cticks
Apply pressure to the battery chamber lid   Load two AAA-type batteries into the bat.     into olace.
located at the side of the viewfinder to    tery chamber, making sure the positive
slide  it off    .                             and negative (+ and -) terminals match
                                                the diagrams inside the holder.
                                                Caution: NiCd batteries shou/d not be used as
                                                   they might cause an explosron.
View original page 9Page 12 · Read text
BASIC OPERAT ION - continued     www.butkus.us


                                              Insert the film leader in the takeup             Install the film              {                            2   AD                                                                          I re       r-r                                                  r          cartridge.                      spool.
      Drop the film cartridge into the film car-     Pull the leader across the camera and insert it into one of the
       tridge chamber ?9 so that the film leader    slots in the film takeup spool. Advance the takeup spool slightly
      points towards the takeup spool nrl, and    with your finger to engage the film's perforations with the teeth
     oush the rewind knob back down into     of the takeup spool and sprocket  ts,.
       prace.
        lVotes.'
          1) Any 35mn film cartildge can be used.
    D Handle film in the shade to avoid direct ex-
         posure to sunlight.


\     12
View original page 12Page 13 · Read text
1A  Wind the film advance     { E  Glose the camera rrf I      lever ,: to advance        rvr  back.                          I 6 . I;I;,,",r""ffi  ,T,1,ilx1?l-1;
film onto the takeup spool.      Make sure that the perforations are oer.   and rotate it in the direction of the arrow
Wind the film advance lever and depress    fectly meshed with the sprockets and     until it stops. Then fold the crank back in.
the shutter release button until the film     that the film is set between the film guide
sprockets engage the perforations on the     rails zs. Then, close the camera back until
edqes of the film.                                                         it snaos shut.


                                                                                                                                                          IJ
View original page 13Page 14 · Read text
BASIC OPERAT ION -  conti nued    www.butkus.us


                                                                                                                                                                                                                            f ilmiZ   Make blank exposures until the frame                      { Q  Set the ASA,ISO  l                                                                          llJr  speed.     counter rn reaches frame one.
To drspose of the first few frames exposed during film loading,                                     Lift up the ASA/lSO film speed dial zz and
continue to alternately advance the  f ilm and depress the shutter                            rotate it in either direction until the white
release button until the counter reaches   f rame one (the   f irst dot                         dot :r is opposite the ASA/lSO film speed
past 0). While making blank exposures, check that the rewind                                in use. Also make sure that the exposure
knob is rotating, indicating the film has been loaded correctly                        comoensation index :r is set to the red 0.
and is being advanced.  lf the knob does not rotate, reload                       This programs the camera's exposure
the  f ilm.                                                                  meter so that rt may provide a proper
Notes.'                                                                            exposure for the type of  f ilm being used.
 1) When making blank exposures, sel lhe shutter speed dial 72 to A or to                         Note: The film speed is printed on the film
   1/125 sec. or above, and the shutter wrll be released at 1/80 sec. wtth                             carton and cartndge. Details on setttng the dial
  80 or M 80 displaved by the LCD in the viewf inder.                                           to intermediale selllngs can be found on
2 Do not take pictures prior to the first   f rame, as the meter does not                          page 29.
   function until the counter reaches one.


14
View original page 14Page 16 · Read text
www.butkus.us  BASIC OPERAil ION- continued-


    ,D    Hold the camera steady.                    O a  Compose the picture.             t As vou look throuqh the viewfinder. use vour left hano                      ivr    Look through the viewfinder,     --       to cradle the camera, with /our fingers wrapped aiound the lens                    compose your photo with the main sub-
     and your thumb beside the focus lock button ru, while your                             ject (if possible, a subject's vertical line)
     elbow rs propped against your body for support. Use the index                            in the center of the focusing frame to
       finger of your right hand to depress the shutter release button                         assure correct focus and exoosure.
     and your thumb to wind the film advance lever. Wrap the other
      fingers of your right hand around the camera body. You can
      adaot this basic oosture to both horizontal and vertical format
      shooting. To hold the camera steady,  it is advisable to lean on or
      against something strong and stable (e.9., a wall).


       to
View original page 16Page 18 · Read text
www.butkus.us


   D R  Take the picture.                                          rerease  26. $*:,1""fri:i:l'rlver to 27. f[i,"#T,".rewind     -vr    Depress tne snutter
      button all the way down; apply light but    transport the film to the next frame.       When the film reaches the end of the roll,
     steady pressure with the ball of your                                              the film advance lever will stop working.
       index finger to avoid camera shake which                                             Then, turn the camera uoside down and
      might result in a blurred image.                                                         press the film rewind button, so that the
                                                                                   exposed film can be rewound back into
                                                                                                                                       its cartridge. You do not have to continue
                                                                                            depressing the button.


      1B
\
View original page 18Page 20 · Read text
FOCUS                                            www.butkus.us
The Nikon F3AF features a through-the-lens autofocus system   Usable Lenses
which takes the guesswork out of focusing: just point the camera
at what you wanl to photograph, depress the shutter release                                                                                                AF-Nikkor 80mm 112.8, AF -Nrkkor 200mm f/3.5
button @ halfway, and watch the subject literally snap into sharp                            IF.ED
focus.   . . automatically.
The system consists of three parts: the special F3AF camera      Focus-aid operation   Nikkor (including AF-Nikkor) and Nikon Series                                                                             E lenses with a maximum aoerture of f/3.5
body, the AF Finder DX-1, and an AF-Nikkor lens, either the                             or faster
BOmm   f l2.B or the 200mm f/3.5 lF-ED. The AF Finder DX-1 is                                                                                                    Nikkor (including AF-Nikkor) and Nikon Seriesinterchangeable and covers approx. 920/o of the image area of
the actual photograph, meaning that the final photograph will                     E lenses
be larger than the image seen in the viewfinder. The focusing     Notes.'
screen is built into the bottom of the viewfinder and cannot be     1) Even with lenses slower than f/3.5, the focus indicators  witl tight up
interchanged. However, when other Nikon F3 interchangeable      when the shutter release button is depressed halfway. This indication,
viewfinders are used with the F3AF, you have a choice of 20      however, is not reliable.
interchangeable focusing screens (refer to page 55).         D Although the following Nikkor /enses have a maxrmum aperture of f/3.5                                                                         or faster, they cannot be used for focus-atd operation: 16mn f/3.5,
Nikon's autofocus system is unique in that  it features exception-     20mm f/3 5,28nm f/3.5, 135mm f/3.5, Micro 55mm f/3.5, PC 28mm
ally quick response, allowing you to keep up with active, fast-         f/3.5, PC 35mm f/2.8, PC 35mm f/3.5 and Zoom 35105mn f/3.5-4.5;
moving subjects.                                                         the Micro-Nikkor 55mm f/2.8 cannot be used at closer than 2B0mm.
The Nikon F3AF offers you three different ways of focusing:     9 When the Nikon Teleconverter TC 14, 200 or 300 is attached to the lens
1) autofocus, 2) focus-aid operation (using the focus indicators     and it makes the lens' effective aperture slower than f/3.5, the
inside the finder), or 3) manual focus (using the matte portion of      camera's autofocus and focus-aid operatton cannot be used.
                                                                                          fotlowing /enses cannot be mounted on the F3AF with the DX-1the focusing screen). As shown in the following table, however,  4 fne                                                          13mn                                                                            Nikkor                                                                                                                 f/5.6, Reflex-Nikkor 500mm f/8, and Reflex-only AF-Nikkor lenses are usable for autofocus. With other lenses       Finder:                                                                                                                                                                                                                                                                        f /11   .                                                                               Nikkor 1000                                                    mm
having maximum apertures of f/3.5 and faster, you can use the  0 Certain  filters cannot be used for autofocus/focus-aid ooeration. (Forfocus indicators as a guide in focusing as you manually rotate        delails, please refer to page 64.)
the lens focusing ring @l.
Note: Because of the cropping which occurs in the case of mounted
s/ldes or regular snapshot-size  prints, the actual picture might come out
slightly smaller than the image seen in the viewf inder.
View original page 20Page 24 · Read text
www.butkus.us
-FOCUS-continued


   Focus-Aid Operation (Using the Focus   I ndicators  )
     With the AF-Nikkor's A-M switch or) set at M, or with other Nikkor    ring until both arrows are lit, indicating sharp focus.  lf only the
      or Nikon Series E lenses having a maximum aperture of  f /3.5 or    far-focus arrow ({) remains  lit after the ring has been rotated
      faster (as listed on page 2O), you can use the focus indrcators     fully counterclockwise,  thrs means the subject  is closer than the
     as a guide as you rotate the lens focusing ring. First, center the    closest focusing distance of the lens. lf the sublect is much
     main subject  (if possible, a subject's vertical line) within the    closer than the closest focusing distance of the lens, the red X
      focusing   f rame;then depress the shutter release button halfway     will light up continuously.
      to make the red arrows light up (focus information stays on for     In case the red X blinks or lights up continuously and does not
     16 sec. after removing your finger).  lf only the far-focus arrow    disappear even after the focusing ring is turned, this indicates
      ({ ) lights up, this indicates that the lens is focused behind the    that the focus-aid indication system does not function well with
                                                                                                                   (please refer to page      subject, whereas the near-focus arrow ()) rndicates that the    the particular subject or shooting sitr.ration
      lens is focused in  f ront of the subject. These red arrows are very   26 tor  f urther details).
      convenient, because they tell you in which drrection to turn the    Note: While shooling  f ast'moving sublecls, one or both of the red arrows
     focusing ring:1ust turn in the direction of the arrow. When the   may blink to show that the image ts quite close to the tn'focus zone; for
     image is in focus, both red arrows light up continuously.              ordinary snapshols, taking the shot even rn this situatton can produce
    When there is a big difference between the actual camera-to-    satisfactory resu/ls. However,  rf sharp locus ls mandalorY, continue to
     subject distance and distance set on the lens, the focus-     rotate the focusing ring until both red arrows light up continuouslY.
      impossible warning appears. In this case, turn the focusing ring
        until one of the red arrows lights up; then continue to turn the

     24
View original page 24Page 25 · Read text
Manual Focus (Using the Matte Portion of the Focusing ScreenlManual focus is required in the following cases: 1)when the   Note: With the AM switch on the AF.Nikkor /ens sel at A. you cannol
batteries in the DX-1 Jinder are exhausted, 2) when you are   shiftthelensdistanceselling  byturningthefocusingring
using a lens which cannot provide autofocus or focus-aid oper-
ation, 3) when the focus-impossible  warning blinks or lights up
continuously, or 4) when you simply want to focus the lens your-
self. With an AF-Nikkor lens, set the A-M switch os to M; then
turn the lens focusing ring until the image on the matte portion
of the screen inside the viewfinder looks sharp and clear. With
all other lenses, rotate the focusing ring in the normal manner.


                                                                                                                   25
View original page 25Page 26 · Read text
www.butkus.us
-FOCUS-continued   Special Situations    The F3AF provides autofocus and focus-aid operation in the   Dark subject (lllust. 1)
      majority oJ cases, including such diflicult situations as fast-   The red X blinks to show insufficient scene brightness. In this
     moving sports events, subjects seen through glass, or scenes    case, {ocus manually, or perform autofocus/focus-aid operation
      containing point light sources, such as the flame from a candle   on an alternate subject at the same distance which is lighter
      or a streetlight at night. However,  if the overall subject is dark in     in tone.
      tone (e.g. when the illumination level is less than EV 4 at ASA/
     ISO 1OO), low in conlrast, or lacks a distinct vertical line' the   Low-contrast subiect (lllust.2), small or  f inely
      focus-impossible warning blinks or glows continuously to inform   detailed subiect (lllust. 3)
     you that the camera's TTL image displacement detecting sys-   The red X lights up continuously.  In this case, focus manually, or
     tem will not work. In this case, you can set the lens' A'M switch    Derform autofocus or focus-aid operation on an alternate sub-
      GE to M and focus on the main subject manually using the matte    ject at the same distance which has more contrast or is larger.
      portion of the focusing screen. As an alternative, perform auto-
      focus or focus-aid operation using another subject'  iJ available'   Subject with no vertical lines (lllust.4)
     which is located at the same distance as the one you want to   The red X glows continuously.  In this case, turn the camera ver-     photograph; then, with the focus lock button depressed on                                                                                          tically and perform autolocus or Jocus-aid operation' or focus
      autofocus or without changing the distance setting in focus-aid    manually; alternatively, perform autofocus or focus'aid oper-
      operation, point the camera at the original subject and take    ation using an alternate subject at the same distance which has
      the picture.                                                              vertical lines.
                                                            Subject with high reflectivity (lllust. 5), backlit
                                                               subject (lllust. 6), or scene with both far and near
                                                           subiects (lllust. 7)
                                                                              ln these cases, both red arrows or the red X light up contin-
                                                                            uously.  lf the red X appears, focus manually.  lf both red arrows
                                                               are lit, use the matte portion of the screen to check focus.  lf
                                                                      your desired subject is out of focus, then focus manually.  lf it is
                                                                                                      in focus, take the shot.

t    26
View original page 26Page 30 · Read text
www.butkus.us
-EXPOSURE-continued


   Setting the Aperture                    Setting the Shutter Speed
     The second factor in determining exposure  is the shooting aper-    Shutter speed, or the length of time the shutter remains open,
      ture. Aperture, or the opening formed by the diaphragm inside    also determines the amount of light allowed to strike the film.
     the lens, controls the amount of light allowed to pass through   The Nikon F3AF offers automatic stepless shutter speed conlrol
     the lens and strike the film, it also controls depth of field (see    over the range from 1 I2OOO sec. to 8 sec., plus full manual con-
    page 36 for more information). In low light, you are generally      trol with a choice of 1B settings, including B, T, and X. All shutter
      required to use large apertures (indicated by f-numbers which    speeds, except T, are electromagnetically  controlled.
     are low in numerical value, e.g. t12.il, while in bright light, small
     apertures are called for (e.9., f/16). The aperture ring @ features
      click-stops at whole l/stops but is continuously variable through-
      out its entire range. With the exception of a few special lenses,
     Nikkor and Nikon Series E lenses enable full-aperture  light
     measurement regardless of the aperture setting. These lenses
     have automatic diaphragms, meaning that the diaphragm stops
    down to the preset aperture only at the instant of exposure. To
     keep you fully informed, the aperture in use appears in the ADR
     window O inside the camera's vieMinder.


     30
View original page 30Page 31 · Read text
The shutter speed dial ta has the following settings:                T(Time): At this mechanical setting, the shutter stays open until
A (Auto): Provides aperture-priority automatic exposure con-    the dial is rotated to another setting, making it ideal for really
trol in which you first select the shooting aperture, then the    long time exposure. To avoid unnecessary battery drain, follow
camera sets the corresponding shutter speed for correct    this procedure: turn the power switch @ off and make certain
exposure.                                                       the LCD is not displayed in the finder, then trip the shutter using
1/2000^,8 sec.: 15 discrete settings give you full manual con-    the backup mechanical release lever @.
trol of the shutter speed. The numbers engraved on the dial in  X (X-sync): Provides 1/BO sec. speed, the proper synchro.
white are reciprocals,  for example 2000 means j 12000 sec. 60,    nization speed for any electronic flash unit.
also a reciprocal, appears in red arrd indicates the highest    To set the shutter speed dial, rotate it until the desired setting
manual shutter speed for proper synchronization  with electronic    click-stops opposite the index line ro,; the dial is locked at the
flash (with the exception of X). Numbers engraved in orange   A and X settings to prevent accidental shifting of the setting. To
represent actual shutter speeds, for example an orange B   move the dial off a locked setting, push the locking bulton zr as
means B sec.                                                you rotate the dial. Intermediate settings should not be used.
B (Bulb): The shutter remains open as long as the shutter re-
lease button ,ru is deoressed.


                                                                                                                                       Q1
View original page 31Page 32 · Read text
www.butkus.us


                                          Use a larger aperture or slower --    5tr,D                                    shutter speed.          M    -
    tPS                                   shutterUse a smallerspeed. aperture or faster       Fl    - J

                                                  Within +114 EY. ifrt5o                 JFo

Manual Exposure Gontrol
 In the manualexposure mode, you can shoot at any combination     Intermediate settings on the shutter speed dial cannot be used
of f/stop and shutter speed from 1/2000 to 8 sec., enabling you    while those on the lens aperture ring @ can be. Therefore, stop
to select your desired shutter speed. Manual exposure is also   the lens aperture down or open it up to the appropriate inter-
required when stop-down exposure measurement  is necessary   mediate setting when fine adjustment of the exposure is
or when you want to use the B, T, or X setting.                      necessary.
Except at the B, T, and X settings, the shutter speed you set is   When making blank exposures with the shutter speed dial set
shown in the viewfinder immediately after the shutter release   between 11125 and 112000 sec., the shutter fires at 1/80 sec.
button qo is depressed halfway. As before, the - symbol at the    with h/ 80 displayed until the  f rame counter reaches one.
upper right of the number indicates shutter speeds from 1 to 8    At the B or T setting, an M- appears in the viewf inder.
sec. Also the letter M appears to the left of the number, indicat-    At X, an M. 80 appears. However, the + does not mean over-
ing the manual exposure mode. Above the M, the following    exposure, because the meter does not function at this setting;
symbols appear: -, +, and - + which indicate underexposure,   as soon as a dedicated Nikon Speedlight is attached to the
overexposure, and correct exposure, respectively. To obtain   F3AF and turned on, the + disappears from the display, leaving
correct exposure, simply turn the shutter speed dial oer and/or     just M 80.
aperture ring until the - + symbol appears. The LCD stays on
approx. 16 sec. after you remove your finger from the button.
View original page 32Page 33 · Read text
I


                                                                                                                                                                                                                                                                                                                                                                                                                                                                                                                                                                                                                                                                                                  I
Relationship Between Shutter Speed and Aperture
The amount of light reaching the film plane is determined by a  The best combination  will depend on the results you want. Use
combination of the shutter speed and the lens aperture. A   fast shutter speeds to freeze motion; use slow speeds to pro-      t
shutter speed of 11125 sec. lets in twice as much light as a set- duce a deliberate blur. Also, small apertures give greater depth
ting of 1/250 sec. and only half as much light as 1/60 sec. An'  of field, while large.apertures  restrict the zone of sharp focus to
aperture setting of l/11 lets in twice as much light as f/16, half  the main subject. (For more detailed information about depth
as much as f/8. Thus, if the correct exposure for a particular  of field, refertopage36.)
picture-taking  situation is 1/125 at  f /11, then 1/250 at  f /8 or 1/60 A good rule to follow in preventing camera shake is to select a
atf/l6willgivethesameexposure.               minimum shutter speed which is the reciprocal of the focal
The table above illustrates lhe interrelationship between shutter length of the lens in use. For example, when using a normal        I
speed and aperture.                           50mm lens, select a speed no slower than 1/60 sec. (the closest
                                                    number to 1/50). For a 200mm super-telephoto, use no less
                                                                than 1/250 sec. and so forth.
View original page 33Page 34 · Read text
www.butkus.us


A fast shutter speed freezes                         By panning the camera, a slow one allows
 the rider and background.                                        the background to blur.
View original page 34
Page 35 · Read text
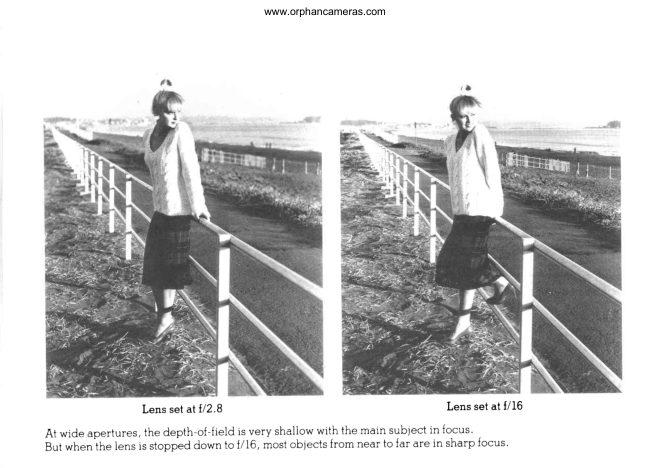
Depth of Field
When you shoot at a certain aperlure and focusing distance,     3) The longer the focal length of a lens, the shallower the depth
you will find that not only the main subject but objects in a cer-       of  f ield at each f/stop; the shorter the focal length, the deeper
tain distance range in front of and behind  it will be sharp in the       the depth of field.
final photograph. Objects beyond this range become increas-     4) There is greater depth of field behind the main subject than
ingly out of focus. This "in-focus zone" is known as depth of         in  f ront of  it.
field. When this zone of sharpness  is large, the depth of field is    The depth of field at each aperture  is indicated on the lens by a
said to be deep; when it is small, the depth of field is said to    set of color-coded lines @ (corresponding  to the colors of the
be shallow.                                                     f-numbers on the aperture ring) which are used in conjunction
The following is true of depth of field:                               with the distance scale @. The range is indicated by the dis-
 t )me smaller the shooting aperture (i.e. tne larger the numeri-    tance between the lines.
   cal f-number), the deeper the depth of field; the larger the    Note: Certain Zoom-Nikkor and special-purqse Nikkor /enses do not
   aperture, the shallower the depth of field.                           have a depth-ot-field scale.
2) The farther away the subject is from the lens, the deeper the
   depth of field becomes; the closer to the lens, the shallower
   the depth of field.


36
View original page 35
Page 36 · Read text
www.butkus.us


Depth-of-field preview button @
When a lens with an automatic diaphragm  is used, the image in   To illustrate depth of field, the following photos were taken with
the vieMinder is viewed with the lens at maximum aperture.     the AF-Nikkor SOmm f/2.8 lens at a focused distance of 5m; the
However, by depressing the depth-of-field preview button,    only difference is that they were shot at various apertures. Con-
the lens will be stopped down to the aperture set, enabling you     trol of depth of field enables you to create photos having selec-
to examine depth of  f ield before shooting. The image in the view-    tive focus (where the major subject stands out from the back-
finder darkens according to the selected  f -number: the smaller   ground and/or foreground) or overall sharpness (in which all
the aperture (i.e., the larger f-number), the darker the image.    elements in the picture appear sharp). Depth of field imparts to
Components of the picture that appear in focus when the button    your picture a character all its own.
is deoressed will be in the zone of sharo focus.
Note that the button should be depressed  all the way.
Note: When shooting in the automatic exposure mode with an Al lens,
do not release the shutter while depressing the preview button; improper
exposure may result.


                                                                                                                   37
View original page 36Page 38 · Read text
www.butkus.us

                                 Suggested Applications for Exposure Compensation


                                                                 + 2 White background, snow scene
                                                                 -    1 White background occupying half of viewing area

                                                                          -1  spotlighted subject, black background occupying
                                                                            -          half of viewing area                                              \_  _2  black background

Exposure Compensation
In the vast majority of cases, the F3AF provides the correct    To make exposure compensation, push the locking 5u119n ros as
exposure on automatic. However, certain situations require a   you rolate the exposure compensation  dial. lt is graduated in
deviation  f rom the automatic exposure setting. For this purpose,    one-third sloo increments: -1 and -2 indicate one and two
the F3AF features both an exposure compensation dial zr and    stops less exposure, whereas + 1 and + 2 indicate one and two
a memory lock button G..                                          stops additional exposure. At ASA/lSO 6400, the compensation
                                                               extends to only -1, at ASA/ISO 12, up to + 1. After use make
Exposure compensation dial                                sure to reset the dialto "0."
This dial adjusts the exposure by increasing or decreasing the   The recommended exposure compensation settings for various
automatically selected shutter speed. When the scene is un-    subjects and picture-taking  situations are shown above.
usually light or dark in tone (e.g., a snow scene), exposure com-     Note: Because lhe LCD shows only discrete shutter speeds, a slighl
pensation must be made to prevent over- or underexposure.     adjustment of the exposure compensation  dial, such as + 1/3, may not
Or under normal conditions, you can intentionally over- or under-    be ref lected in a chanqe in shutter speed
expose the shot to create special "high-key" or "low-key" effects.


                                                                                                                   39
View original page 38Page 39 · Read text
EXPOSURE-continued-                                                                                                               I--  ;":,o-:   ----l I


                                                                   rF
   Memory lock button
    Another way of making exposure compensation with the F3AF
    on automatic is to use the exposure memory lock button. When                                           J
     there rs a substantial difference in brightness between the main
                                                                                                             l---;|     ,_,Lr--7'1 I     subject and the background, such as a strongly backlit subject,    the camera's exposure meter is ltkely to be fooled, resulting     E
     in under- or overexposure (Fig. 1). To compensate for this,
    center the main subject in the viewfinder or move in close to
     the subject, depress the memory lock button and hold  it in; then
    recompose and shoot \Fig.2).
     Note: ln autofocus operation, you must a/so depress the focus lock
     button when recomposing with lhe subiect off-center to keep tt in                         li
      sharo focus                                                                                  -,llr
                                                                                       a        i.:i
                                                             f,,


    40
View original page 39Related documents and language editions
NikonPDF
NIKON F3
User manual
48 pages · EnglishRead →
NikonPDF
Nikon F3 — part 2
Product booklet
27 pages · EnglishRead →
NikonPDF
Nikon HIGH EYEPOINT F3
User manual
47 pages · FrenchRead →
NikonPDF
Nikon F3
User manual
46 pages · GermanRead →
NikonPDF
NIKON F3 HIGH EYEPOINT SINGLE FILE
User manual
48 pages · Not specifiedRead →

NikonPDF
Nikon F3 — combined booklet
User manual
98 pages · Not specifiedRead →
NikonPDF
Nikon F3 — part 1
Product booklet
51 pages · Not specifiedRead →
NikonPDF
Nikon F3 — part 1
Product booklet
27 pages · Not specifiedRead →
NikonPDF
Nikon F3 — part 2
Product booklet
22 pages · Not specifiedRead →
From the M. Butkus archive. Original publisher and archive notices are retained.
Check the model and edition against your equipment.
PDF verified 2026-10-10.