Film cameras
Rolleiflex 3.5F - 2.8F User manual
User manual for Rolleiflex 3.5F - 2.8F. 24 pages in English. Read the original PDF, download or print a copy without registration.
24 pagesEnglish2.3 MB PDF
Loading your manual…Open PDF directly
Document details
- Brand
- Rollei
- Model / document
- Rolleiflex 3.5F - 2.8F
- Document type
- User manual
- Language
- English
- Pages
- 24
- File size
- 2.3 MB
- Category
- Film cameras
- Document date
- Not specified in catalog
Search available document text
Find a term, then jump to its page in the original PDF. Image-only pages may not be searchable; check the PDF for exact wording and diagrams.
Page 2 · Read text
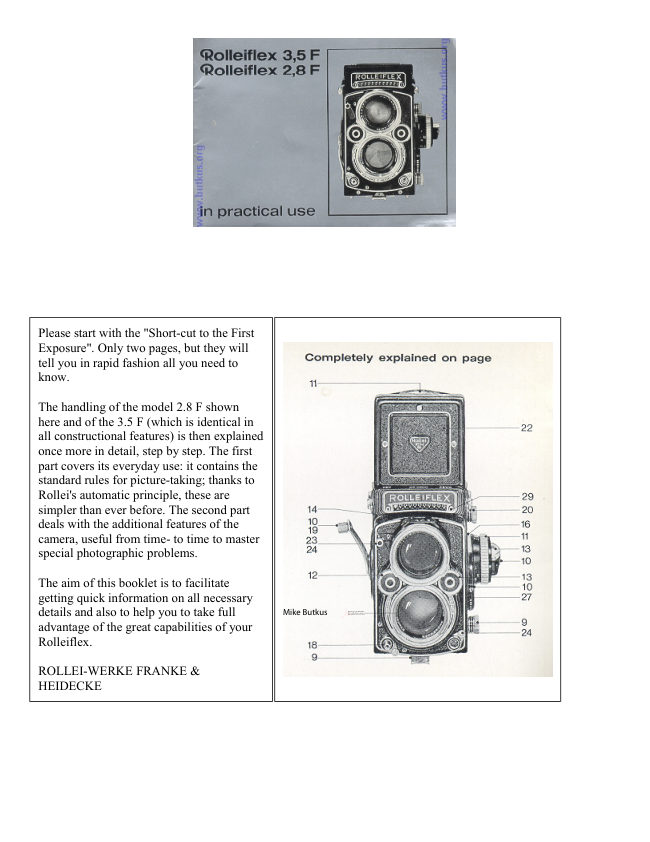
Please start with the "Short-cut to the First
Exposure". Only two pages, but they will
tell you in rapid fashion all you need to
know.

The handling of the model 2.8 F shown
here and of the 3.5 F (which is identical in
all constructional features) is then explained
once more in detail, step by step. The first
part covers its everyday use: it contains the
standard rules for picture-taking; thanks to
Rollei's automatic principle, these are
simpler than ever before. The second part
deals with the additional features of the
camera, useful from time- to time to master
special photographic problems.

The aim of this booklet is to facilitate
getting quick information on all necessary

                                                                                                                                                                                                                                                                                                                                                                                                                                                                                                                                                                                                                                                                          DigitallyDN:Date:cn=Mike2023.05.17signedButkus,by16:03:15Mikeo=ButkusButkus-04'00'camera manuals, ou=butkus.org, email=mike@butkus.org, c=USdetails and also to help you to take full           Mike Butkus
advantage of the great capabilities of your
Rolleiflex.

ROLLEI-WERKE FRANKE &
HEIDECKE
View original page 2Page 3 · Read text
www.butkus.us


                                        II. Special Applications
I. The Rollei In Everyday Use

                             Page

                                Sports Finder 22
Page

                                  Self-timer 23
Short-cut to the First Exposure
4 - 5
                              Tripod 23

Ever-ready Case 6
                                Flash Shots 24 - 25

Lens Cap 7
                            Diaphragm 26

Neck Strap 7
                            Double Exposures 26

Loading the Camera 8 - 10
                           Use of Filters 27

Focusing for Sharpness 11
                                Correct Exposure (Reflected
                             and
Setting the Exposure 12 - 13

                                  Incident Light Measurement)
Selecting the Shutter Speed 14
                            28 - 29
- 15

                               Adjusting the Exposure Meter
Depth-of-Field 1 6 - 1 7
                            30

Releasing Shutter 18
                             Exposure Value 30

Film Transport 19
                            Changing the Magnifier 31

Shutter Tensioning 19
                            Changing the Back 31

Unloading the Camera 20
                                 Rolleikin 32

Care of the Camera 21
                                  Rolleiflex Accessories 33 - 34


The designations left, right, forward, back, above, below apply to camera
in normal operating position.
Accordingly: left = focusing side, right = crank side, etc.
View original page 3Page 4 · Read text
Short-cut to the First Exposure

                                                           (I) DIN—ASA Setting

                                             Immediately after loading the camera: gently
                                                   press knurled knob and set to the DIN or ASA
                                                value of the film used in camera—important for
                                                    getting correct exposure.

                                                 Set filter scale to zero ( --> page 27).

                                                     (2) Focusing

                                               Raise rear edge of focusing hood.

                                            Composition and sharpness can now be
                                          examined on the focusing screen; turn the
                                                focusing knob until principal object appears with
                                    maximum sharpness. For more critical
                                                 observation of the image, raise magnifier by
                                                 gently pressing the direct view finder panel.
                                                  Direct view finder ~ page 22.

                                                     (3) Pre-selecting Shutter Speed

                                           Turn speed selector wheel, using right thumb,
                                                        until the desired shutter speed (red figures)
                                                appears in the center of the peep window.
                                                  Selecting Shutter Speed ~ page 14.


Lens Cap

To remove: lift the lower part by the tab at the lower edge and fold it against the upper part; remove
cap from the bayonet by turning it counterclockwise (4).

To attach: fit the folded cap into the viewing bayonet and fold down after a short turn (5).

Neck Strap:
To attach: insert the retaining prongs at the ends of the strap into the strap holders ton camera or
ever-ready case) and they will immediately snap into position.
View original page 4Page 5 · Read text
www.butkus.us


To release: press the retaining prongs together and pull strap (6).

The leather loop and snap buttons on the left side of the ever-ready case serve to hold the protective
leather cover for the light meter in place. It is necessary to un-snap the lower left button before
opening the case, when the meter cover is used.


Loading the Camera

Please do not try to insert your first film until you are fully familiar with the handling of the camera. Otherwise
continue on page 11.

The Rolleiflex uses 2 3/4 x 3 1/2" roll film No. 120 or 220* (B II 8) giving 12 or 24* exposures "2 1/4 x 2 1/4''.

The Film Pressure Plate inside the camera back can be adjusted for 120 roll film as well as for 35 mm film
(using Rolleikin, ~ page 32): when using roll film, the inscription 2 x 2 1/4" must be visible.

Never change film in direct sunlight! Utilize, at least, the shadow of your own body!
View original page 5
Page 6 · Read text
To open camera: turn the safety back lock clip at the tripod socket (I), lift back lock lever (a) and
pull back open.

To adjust film guide plate: press the plate against the back, push it up or down until it stops 0 and
let spring forward into the normal plane.

Inserting new film spool: pull out film spool knob of lower spool chamber (4), insert film, right
side first, and allow film knob to return to position.

Tear off tape seal.

Thread the beginning of the backing paper C printed side outwards C through the rollers of the film
feeler mechanism (5) and push the paper leader into the long slot of the take-up spool (using the
crank for correct positioning) (6). Tighten the backing paper by one half turn of the crank, while
braking the full spool with the thumb (7).

To close camera: press the back with the palm of the hand, fold down the back lock lever and
secure (8).


Adjusting to DIN/ASA speed ratings (1): determine the speed of the film used (to be found on the
packing or an accompanying instruction sheet), which will be indicated in DIN or ASA values.
Gently press and turn knurled knob until the corresponding speed rating appears above the indicator
mark in the DIN or ASA window. (The dots correspond to intermediate film speeds, ~ page 27.)
This setting has to be adjusted whenever a different speed film is used. Setting the filter factor (a):
Under normal shooting conditions, turn setting button to zero.

Set the corresponding filter factors only when using filters requiring a prolonged exposure (--> page
27). Setting the film type (as a reminder) (2): Turn the knurled knob at the focusing knob to set the
film type—black and white, color artificial light, color daylight, color negative. Advancing the film
to No. 1: Turn crank continuously until it stops—past a slight resistance during the last turn, when
the counter mechanism engages—and then in opposite direction until it stops again A). The crank is
now locked in its starting position. The film frame counter indicates No. 1, shutter is wound, film is
in correct position and ready for the first exposure.
View original page 6
Page 7 · Read text
www.butkus.us


Focusing for Sharpness

To open the focusing hood:
lift rear edge of hood 0 and
raise cover. To close: fold in
both sides A).

To raise magnifier: press
direct viewfinder panel
inward, following this simple
method: grip upper edge of
hood with two fingers,
pushing the panel gently
inward with the fingertip (a).
Always hold magnifier close
to the eye.— To close: push
magnifier support down Q).

Focusing: Turn the focusing
knob until the picture is pin
sharp, or until the two halves
of the image meet in the
Rangefinder Wedge (Center
of the view finder).
View original page 7
Page 8 · Read text
Setting for Correct Exposure


                                                    If you select the shutter speed first:

                                          turn the speed selector wheel kob, until the
                                         desired instantaneous shutter speed (red figure)
                                       appears In the center of the indicator window,
                                   and then adjust the diaphragm opening:

                                   Turn the diaphragm wheel (left), until both
                                     exposure meter pointers are lined up — you
                                    can always be sure: the exposure will be
                                             correct.

                                      This is an easy rule. All you have to do is to
                                   watch two pointers. Thus Rollei clearly
                                            signals:

                                 The exposure is correct, when both pointers
                                         are aligned.

                             Any sudden change in light intensity —
                                         indicated by the moving meter needle — can
                                    be noticed instantly and can then be
                                    compensated for by the proper pointer
                                        adjustment. With the camera ready to shoot,
                                           correct exposure is kept under constant
                                            control, even up to the actual moment of
                                       exposure.
View original page 8Page 9 · Read text
www.butkus.us


This automatic exposure control covers an
extremely wide measuring range, it is
limited only by the poorest illumination,
which will not allow the thin meter needle to
leave the area of the red reference mark.

The exposure meter is directly cross-coupled
to the speed and stop settings. Adjustment
according to the meter automatically sets the
depth-of-field indicators well. This
facilitates focusing even further. Now you
can also pre-select the diaphragm opening,
without checking the diaphragm setting,—
depending upon whether you prefer a faster
shutter speed (A page 14) or a greater depth-
of-field (A page 16). The correct speed/stop
relationship is positively controlled by the
two pointers.


                                   Selecting the Shutter Speed

                             The red section of the scale denotes instantaneous,
                                      shutter timed speeds, in fractions of a second (500
                           = 1/500th sec., 1 = 1 sec.). Intermediate values
                                between clicks cannot be used therefore: always set
                                      shutter so that desired speed figure is in the middle
                                    of the indicator window. This rule also applies
                            when pre-selecting depth-of-field. Only after
                                     clicking the speed into position can the final
                                  adjustment of the exposure meter pointers be made
                                  with the diaphragm control wheel. The green
                                     section of the scale is for time exposures only and
                                      indicates the required exposure time in full
                                   seconds. It is used only when unfavorable lighting
                                    conditions require greater exposure, while at the
                             same time further stopping down in order to gain
                                       depth-of-field. After lining up the exposure meter
                                       pointers, the green numbers indicate, in full
                                   seconds, the time the shutter has to be kept open (A
                                 time exposures, page 18). Intermediate values can
                                be used in the green shutter speed section.
View original page 9Page 10 · Read text
What Shutter
Speed?

Selecting a
sufficiently short
shutter speed is an
important factor in
getting a sharp
picture.

First rule: in hand-
held shots, use fast
speeds to avoid
camera movement.
The longest                  As a guide: sport scenes 1/500, running children 1/250, quick
permissible shutter                      marching pedestrians 1/125, people walking leisurely 1/60 or—
speed is 1/30 sec.                     from some distance—1/30. To eliminate the possibility of
Safer and most widely                         blurred scenes, remember this. general rule: the danger of
used: 1/60 and 1/125                         subject movement is greatly reduced by increasing the taking
sec.                         distance and shooting as nearly in line with the direction of
                      motion as possible, in other wards, rather from the front than
Second rule: In scenes                     from the side.
involving motion, the
faster the objects
move, the shorter the
exposure has to be, to
prevent a blurred
picture.


                               What About Depth-of-Field?

                          A sharp focusing screen image indicates
                                                 that the camera is focused correctly on the
                                     main subject.

                                       But both before and behind the plane of
                                           sharp focus there is always a sufficiently
                                           sharp zone. The range of this "depth-of-
                                                  field" is shown by a white band on the
                                           focusing knob: the length of the white
                                      band indicates on the distance scale the
                                               depth-of-field available.

                                    The indicator band changes when the
                                       diaphragm selector wheel is turned,
                                            permitting a quick and direct coordination
View original page 10Page 11 · Read text
www.butkus.us


                                            of shutter speed and depth of field. The
                                                  faster the film, the easier is it to take care
                                            of special needs calling for short shutter
                                          speeds and great depth-of-field.

                                    The zone of definition does not break off
                                               abruptly, but gradually changes to
                                           unsharpness. Therefore it is difficult to
                                             define the exact limits of the depth-of-
                                                     field. Maximum definition always prevails
                                                   at the focusing distance.


When Does One Need Depth -of- Field ?        Landscapes with foreground: to extend the
                                                     depth-of-field as far as possible into the
Extended depth-of-field becomes very helpful      foreground, do not set the camera to 00, but turn
when taking surprise snapshots sport scenes with   the focusing knob until the no mark is opposite
constantly changing subject distance and           the end of the indicator band.
subjects with extended depth.
                                                  Subjects with great depth: focus separately on
Snapshots with the camera pre-focused to the       the nearest and farthest point bracketing the
anticipated distance: work with extended depth-     subject. Turn the focusing knob so that the white
of-field to compensate for changes in the         band reaches both distance figures. If necessary,
focusing distance. (Sports Finder page 22.)        extend depth by turning selecting wheel.
View original page 11Page 12 · Read text
Up to the moment of exposure all camera
settings are kept under perfect control:
sharpness, framing, exposure, shutter speed
and depth-of-field. They can be readjusted
instantly if the subject so requires.

To unlock shutter release: move release
guard from locked Id, to lower unlocked (I)
position.

Snapshot Exposure (1/500 - 1 sec.): press
shutter release gently, selected speed goes
off automatically.

Time Exposure (" B", over 1 sec.): press
shutter release and hold for required time.
Shutter will close when you let go.

Long Time Exposures ("B"): press release
and lock with safety guard Terminate
exposure by releasing lock. (Caution: Do
not shake camera! Shield the lens with your
hand when opening and closing the shutter.)

Cable Release: insert in cable release socket
with safety guard locked.
View original page 12Page 13 · Read text
www.butkus.us


Film Transport and Shutter Tensioning]\

After each shot: swing out crank, turn it forward with one
continuous swing, until it stops and then again to stop.

The shutter is now automatically wound. The crank will turn
only after releasing shutter. Double exposures or blank
frames are positively eliminated. If the crank can be turned, it
must be turned—forward and back to lock. Only if it is
locked the camera is ready to shoot. (Exception: double
exposures, ~ page 26.)

The crank need not be folded down after each shot when
shooting in rapid sequence.

When using the Rolleikin: the film transport for the 35 mm
film is accomplished in exactly the same manner as above.

When using the Plate Adapter: turning the crank by one half
turn will suffice to wind the shutter.


                                     Unloading the Camera

                                            After the 12th or 24th* exposure the film is finished: the
                                          crank is no longer locked and can be turned freely again.

                                 To remove the film: roll up remaining backing paper with
                                              three full revolutions. Open back in subdued light. Pull out
                                         upper spool knob and remove film from the left. Fold
                                         backing paper (for convenient tearing when developing)
                                       and fasten down with sticker. Keep the exposed film away
                                      from light and return it to original packing.

                                 To transfer the empty spool: pull out lower film spool knob
                                       and lift the empty spool out of the lower spool chamber.
                                                 Insert the spool into upper spool chamber, fitting the slotted
                                       end over the winding key on the right side.

                                    Load the camera with a fresh roll of film avoiding direct
                                                sunlight. Use your own body's shadow for protection.

                                         *with 24 exposure set
View original page 13Page 14 · Read text
A Few Words about the Care of Your Camera

Your camera deserves careful handling—dependable performance will be your reward.

Sparkling cleanliness, especially of all the optical parts, is a pre-requisite for maximum sharpness. In cleaning
all optical surfaces (lenses, focusing screen, reflex mirror, magnifiers), use a camel's hair brush to remove dust,
then wipe off fingerprints with a soft cloth or doeskin. On the contoured undersurface of the focusing screen,
use a clean soft brush only; avoid touching the screen. To prevent a dust-attracting electrostatic charge, breathe
onto the surfaces before and after cleaning and let moisture evaporate, do not wipe off.—Incidentally, the lenses
have abrasion resistant anti-reflection coatings. The reflex mirror, too, is covered with a special protective layer
to withstand scratches and corrosion. However, any cleaning should be done carefully and only when necessary.

Do not forget that moisture, dust, sand, strong sunlight, a hard blow or fall can be harmful to a precision
camera. If possible, always use the ever-ready case, for heavy duty operations the stronger and tightly closing
metal ever-ready case. Carry camera around neck and when riding in your car, keep your camera in a safe spot,
well protected against the hot sun and bumpy roads. In a nutshell: be kind to your Rolleiflex!

And please remember: Rollei-Werke Franke & Heidecke always maintain their interest in the welfare of your
camera. The international Rollei Service will always gladly take care of any special technical problems that
might come up during your photographic practice.
<<< Rolleiflex went bankrupt in 2015, so parts and repairs are a real problem. >> >


                                      Using the Sports Finder

                                           Sport scenes and fast moving objects can be framed
                                    more conveniently through the direct view finder. Only
                                          a slight raising or lowering of the camera is needed to
                                                 alternate between observing the center portion of the
                                           focusing screen (to control sharpness) and the full open
                                      view in the direct finder.

                                 To open sports tinder: press panel inward all the way
                                                    (1). To close: tap both sides of the hood gently (2)
                                    Always use the direct view finder close to the eye,
                                          looking directly at the subject without tilting the
                                         camera.
View original page 14Page 15 · Read text
www.butkus.us


Exposures with Self-timer

If you photograph a group of people or take a remembrance
snapshot and you also want to appear in the picture, wind
the self-timer before releasing the shutter. When pressing
the shutter release, the shutter will open for the previously
selected exposure time after a delay of approximately 10
seconds.

The self-timer can be used with all instantaneous speeds
1/500 - 1 sec. (red section of speed scale) and also for flash
shots with the ,l contact setting. It operates only when the
shutter is wound.

To operate self-timer: wind the shutter (film transport),
move self-timer tensioning lever 0 in the direction of the
arrow until it stops. Release shutter as usual.

Shutter and self-timer may be left tensioned even when
camera is not in use—spring strength will not deteriorate.


Tripod Pictures

Length of tripod's screw must not exceed the normal 3/16"
(4.5 mm)—if necessary, use a spacer of proper thickness. A
reducing bushing is available for use with English thread
(1/4"). More practical: the "Rolleifix" for instant mounting
of camera to tripod.
View original page 15
Page 16 · Read text
Flash Shots

Modern flash technique permits taking snapshots even under
lighting conditions which do not allow instantaneous
exposures with a hand-held camera.

The Synchro-Compur shutter is fully synchronized. It fires
high-speed electronic flashes as well as the slower flash
bulbs at exactly the right moment to permit the fastest
shutter speeds in both cases with the appropriate
synchronizing setting.

Connecting the flash cord: insert the plug into the flash
connector socket on the camera. When disconnecting flash
cord: swing locking lever at the socket downward and pull
out plug.


Setting the contact to     (X-contact) or (M-contact): pull
out the small knurled knob and swing synchro lever of the
desired position.

The X-setting (for normal use) utilizes the full light output
of the flash with the prescribed shutter speed and can also be
used for shots with the self-timer. The M-setting is for flash
bulbs only and synchronizes the fastest speeds, up to the top
speed.


  The correct exposure depends on the light output of the
   flash and the distance between flash and subject.
   Therefore, it cannot be determined with an exposure
   meter. Exact data regarding choice of proper contact,
  exposure time and diaphragm may be gathered from the
   instructions furnished by the lamp manufacturers.

   Adjusting the exposure (as per instructions supplied by
   the flash manufacturer): Using peep window, select
   shutter speed first, then set diaphragm opening (A page
   26). The exposure meter pointers are disregarded
   completely.
View original page 16
Page 17 · Read text
www.butkus.us


Diaphragm

In practical use, observation of the diaphragm is necessary only when
shooting without measuring the exposure (flash shots, dim light, night
exposures).


Higher number diaphragm figures indicate smaller openings and increased
depth-of field (A page 16), but closing down to each succeeding stop cuts
the light passing through exactly in half, requiring double the exposure of
the preceding stop.

The correct diaphragm opening is indicated in the center of the peep
window. Intermediate values can be used (f/3.5 is a midpoint stop between
f/2.8 and f/4 in the international diaphragm scale).

To permit the use of the entire diaphragm range when taking manually
controlled time exposures (over 1 sec.), keep the shutter speed scale set to
the value "2" of the green section of the scale.


Double Exposures at Will

For intentional multiple or trick exposures the double exposure prevention mechanism can be switched off
(possible only with roll-film loaded camera): after exposure move release ring at base of crank in direction of
arrow and then turn crank through one complete backward revolution until it stops. This operation winds the
shutter for a second exposure without advancing the film. After releasing the shutter, repeated tensioning in the
described manner for multiple exposures is possible. An absolutely firm tripod is a pre-requisite for this kind of
work.


Use of Filters
Filters absorb light and therefore usually require a prolonged exposure. The
necessary correction for each filter is indicated by the filter compensating
number (A page 33) and is automatically taken care of when measuring the
exposure by means of the filter compensating scale.

Adjusting the filter scale: turn the indicator knob until the corresponding
compensating number of the filter used is opposite the reference mark. Adjust
the exposure meter pointers as usual.

When removing the filter: return filter scale to zero!

In special cases (flash, high filter compensating numbers over—3) the filter is
compensated for by decreasing the film speed by 3 DIN for each full value.
View original page 17
Page 18 · Read text
Three Ways to Correct Exposure

                                   With the Rolleiflex, even difficult light conditions are no
                                     problem as long as you keep the following in mind:

                                                 Is there a great contrast in illumination between the main
                                           subject and the rest of the picture area? The choice of the
                                        proper measuring method depends on the correct answer to
                                                 this question.

                                  Normal object measurement

                                         covers the average case: this is an evenly illuminated
                                              subject, with front lighting or the light partially from the
                                               side, well balanced differences in light and shade and no
                                     heavy shadows. (When shooting color, only front lighting
                                             will produce the most saturated colors.)


Detail measurement of the object becomes very helpful in special cases: when either very light or dark areas
prevail and there is a great illumination contrast between main subject and background. Example: a sun-tanned
face in front of bright clouds— what is wanted is correct exposure for the head, but as camera position
measurement also includes the sky, an average reading, resulting in under-exposure of the face, would be
obtained.

For proper measurement of detail in such cases, move the Rollei towards object until only the main part of
subject appears in the focusing screen. Set camera to the reading now obtained and return to original camera
position.
View original page 18Page 19 · Read text
www.butkus.us


Incident light measurement (with diffuser)

This method gives a correct reading in those special cases
of high-contrast subjects, where detail measurement
cannot be achieved. Main uses: against-the-sun shots,
objects with brilliant background (snow, water, beach)
and close-ups of small objects with contrasty background.
To get correct reading, point camera in opposite direction
to measure the illumination received by the subject. Place
diffuser in position over holding knobs on the photo cell
and aim towards the light falling on the subject from the
direction of the intended camera position

Incident light measurements are taken at the subject or at
a position identically illuminated. The reading
corresponds to an average subject brightness. According
to whether the important part of the scene is darker or
brighter than the average, the diaphragm should be
opened or closed by 1/2 stop.


A general rule in strong sunlight:

Give preference to whichever measuring method that does not expose photo cell to direct rays of the sun.

When not in use, the photo cell need not be covered. The diffuser is kept in the front flap of the ever-ready case.
A protective cover can be placed over the focusing knob. The shockproof exposure meter is ruggedly built;
duration and intensity of the light falling on the cells will not effect its accuracy.
View original page 19
Page 20 · Read text
Re-adjusting the Exposure Meter

When the photo cell is completely covered, the indicator needle should be in
zero position, pointing to the red reference line (a). If it is off this position,
perhaps due to prolonged and heavy shaking, the meter can be re-adjusted as
follows:

Loosen both screws on the front of the meter (I), until it can be removed
from the focusing knob.

Turn adjusting screw on back of instrument (a) until meter needle points to
the red reference mark 0.


IMPORTANT: Before re-inserting instrument: first set camera to DIN/ASA
value 12, filter factor 0, shutter speed 1/500th sec. and diaphragm f:22, then
insert exposure meter and tighten screws.


Table of Exposure Values

In case you are interested in knowing which exposure value corresponds to a
given speed/stop combination, the table on the camera back provides this
information: determine diaphragm and shutter speed the camera is set to and
the exposure value will be found where the respective diaphragm and speed
columns cross; for example: for f :5.6 and 1/30th sec. the exposure value 10.
View original page 20
Page 21 · Read text
www.butkus.us


Changing Magnifier to correct for Faulty Vision

For critical focusing without glasses, interchangeable magnifiers within
the range from + 3 to -3 diopters are available. (Specify prescription for
glasses.) If you want to change the magnifiers yourself:

Upper Magnifier: with the direct view finder open, grasp lens from
above and below, pull it back and then lift it up and out (a). To insert:
push magnifier forward against retaining spring and let snap into place.
For convenient cleaning: fold down magnifier with the direct view
finder open.

Rear Magnifiers: remove and open focusing hood (A page 32). Use both
thumbs to grasp, from the inside of the rear wall, the two retaining clips
on either side of the rear peep window and pull back retaining lever 0.
After changing magnifier, push retaining spring forward until it snaps
into place Clean magnifier with soft cloth.


Exchanging the Back: (to use the plate adapter)

To exchange camera back: open back fully, turn the safety latch below
the right back hinge in the same direction 6) and remove back. To
attach: with the safety latch in upper position, insert back first into the
left, then into the right back hinge and close.
View original page 21
Related documents and language editions
From the M. Butkus archive. Original publisher and archive notices are retained.
Check the model and edition against your equipment.
PDF verified 2026-10-10.