Industrial sewing machines
Singer 13K — User manual
User manual for Singer 13K. 12 pages in English. Read the original PDF, download or print a copy without registration.
12 pagesEnglish3.0 MB PDF
Loading your manual…Open PDF directly
Document details
- Brand
- Singer
- Model / document
- Singer 13K
- Document type
- User manual
- Language
- English
- Pages
- 12
- File size
- 3.0 MB
- Category
- Industrial sewing machines
- Document date
- Not specified in catalog
Search available document text
Find a term, then jump to its page in the original PDF. Image-only pages may not be searchable; check the PDF for exact wording and diagrams.
Page 1 · Read text
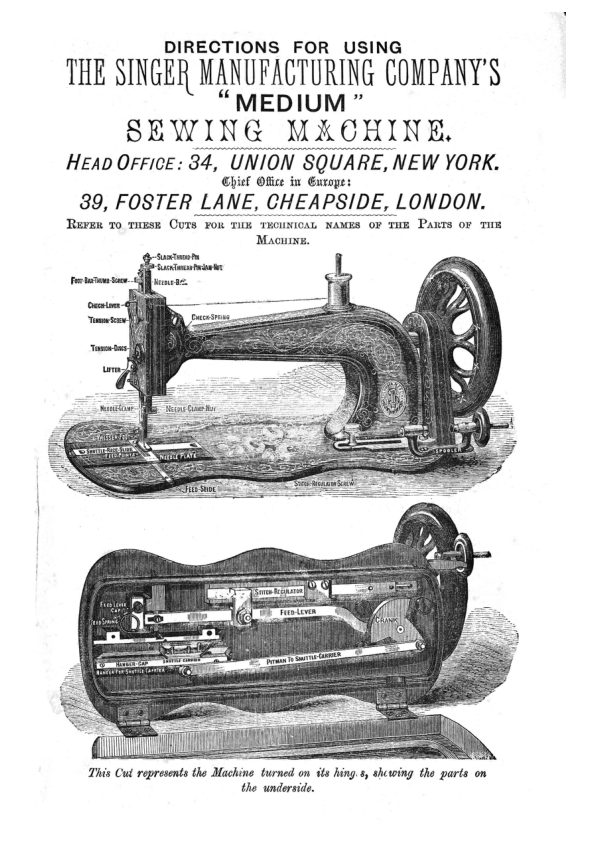
DIRECTIONS FOR USING

THE SINGER MANUFACTURING COMPANY'S
MEDIUM ”

SEWING MACHINE.

HEAD OFFICE: 84, UNION SQUARE, NEW YORK.

Ghief Office in Europes

39, FOSTER LANE, CHEAPSIDE, LONDON.

Rerer To THESE Curs FoR THE TECUNICAL NAMES OF THE Parts or THE
Macuinz.

This Cut represents the Machine turned on its hing.s, shcwing the parts on
the underside.
View original page 1
Page 2 · Read text
2

Ip Tue TALE Yor THE MACHINE I8 RECEIVED DISMOUNTED, PUT IT TOGETHER
IN THE FOLLOWING MANNER :—

Hold the two supports of the table upright, Raving to the right the one with the
Tole for the band-wheel azle, the other to the left, and the projections at the top
inward; the treadle being fiwed upon its traverse-bar, place it between the supports,
aving from you the arm to which the wooden pitman is to befastened. Insert the two ends
of the traverse-bar into the supports and put on the screw-nuts, turning them only two
or three times round; put the cross-brace upon the traverse-bar, with the metal washers
on the side towards the treadle, insert the two screw bolts through the supports and the top
extremities of the cross-brace ; put on the screw-nuts, tightening them and those of the
traverse-bar firmly ; fasten the band-swheel in its place, connect the pitman with,the wheel
‘and treadle, screw the wood top upon the supports, and the machine to the table, then fie
the leather band upon the wheels.

{<r In learning to use the Machine, first out the thread just above the eye
of the needle, then raise the lifter, remove the fabric, and proceed as
hereinafter directed.

CAUTION.—Be sure the shuttle slides are closed before
the Machine is put in motion.

THE TREADLE MOTION.

Place the feet lightly upon the treadle; then tum towards you the
wheel on the top of the machine, allowing the feet to move freely with
the motion thus given; continue this motion, by pressing with the
heel and the toe alternately, until a regular movement is acquired.

TO THREAD THE NEEDLE.
Pass the thread from the reel through the eye at the top of the

arm, downward under and between the tension discs, upward through

the eye of the check-lever, then through the hole in the needle-clamp,
and through the eye of the needle.

TO THREAD THE SHUTTLE.
Put the bobbin in the shuttle by inserting one end towards the
shuttle point, pressing the other end down to its place, having the
thread to draw from the side of the shuttle in which are the

two slots; pass the thread out through the lower slot, in through

the upper slot, and out through the tension-hole nearest the round
end; then through as many holes as may be necessaty to obtain the
View original page 2Related documents and language editions
SingerPDF
Singer 11w6 & 11w8
User manual
13 pages · EnglishRead →
SingerPDF
Singer 144w204, 144w304
User manual
28 pages · EnglishRead →
SingerPDF
Singer 145w103, 145w203, 145w303
User manual
24 pages · EnglishRead →

SingerPDF
Singer 16-188
User manual
45 pages · EnglishRead →
SingerPDF
Singer 17-22 & 17-23
User manual
12 pages · EnglishRead →
SingerPDF
Singer 29-4
User manual
17 pages · EnglishRead →
SingerPDF
Singer 29-4 (black and white scan)
User manual
7 pages · EnglishRead →

SingerPDF
Singer 29-4 parts list
Parts list
18 pages · EnglishRead →

SingerPDF
Singer 29K parts list
Parts list
34 pages · EnglishRead →
SingerPDF
Singer 29k58 & 29k62
User manual
33 pages · EnglishRead →

SingerPDF
Singer 31-19 & 31-47
User manual
20 pages · EnglishRead →

SingerPDF
Singer 32-64
User manual
12 pages · EnglishRead →
From the ISMACS International. Original publisher and archive notices are retained.
Check the model and edition against your equipment.
PDF verified 2026-10-11.