Film cameras
Weltaflex User manual
User manual for Weltaflex. 12 pages in English. Read the original PDF, download or print a copy without registration.
12 pagesEnglish2.7 MB PDF
Loading your manual…Open PDF directly
Document details
- Brand
- Welta
- Model / document
- Weltaflex
- Document type
- User manual
- Language
- English
- Pages
- 12
- File size
- 2.7 MB
- Category
- Film cameras
- Document date
- Not specified in catalog
Search available document text
Find a term, then jump to its page in the original PDF. Image-only pages may not be searchable; check the PDF for exact wording and diagrams.
Page 3 · Read text
www.butkus.us


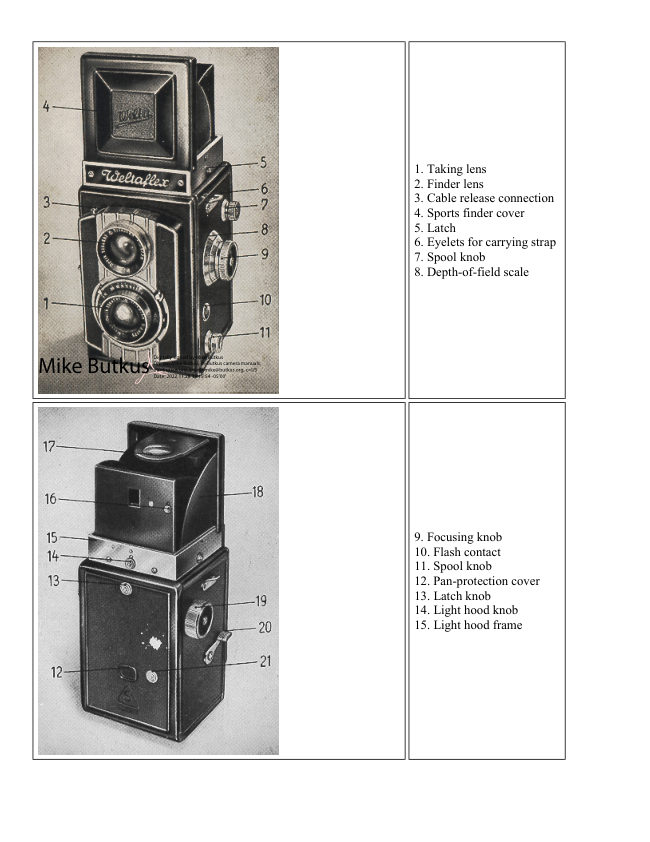
                                                                       16. Knob
                                                                       17. Focusing magnifier
                                                                       18. Light hood
                                                                       19. Film transport knob
                                                                       20. Body shutter release
                                                                       21. Pan-protection knob
                                                                       22. Brake spring
                                                                       23. Hinge pin


WELTAFLEX 6X6

The Weltaflex is a twin-lens mirror reflex camera.
Special feature of this camera is the use of a separate lens, with the same aperture as the taking lens, for
focusing the image on the ground glass. Continual viewing and supervising of the subject is thus possible.
Whether amateur or professional, you will always find the Weltaflex a valuable asset.
I f you want to derive genuine pleasure from your camera, first study the Instructions for Use thoroughly and
practice using the camera without a film in it.
The Weltaflex takes the usual 2 1/4;< 2 1/4"(6 X 6 cm-.) - B II - 8 film, and divides this film into 12 exposures.

A: Inserting and changing the film -


                                                 1. To open the camera back

                                     Hold the camera in your left hand, with the lens
                                         towards the palm. Do not touch the glass surface
                                             of the lens for fear that you might damage the
                                               coating. Press the latch knob (13) on the camera
                                       back to the left with your right index finger and
                                              fold the back away from the camera body (Fig.
                                                   1).
View original page 3Page 4 · Read text
The camera back is removable in the following
manner:
(Fig. 2).

Take hold of the camera back with your right
hand, push back the hinge pin (23) on the inside
of the back with your index finger and lift the
back off. To replace the camera back, do these
performances in the opposite order, making sure
that the back clicks in accurately.


                 2. Inserting the film spool.

            Take the camera into your right hand,
                pull out the lower spool knob (11) and
                fasten it by a slight turn to the left. Place
               the full film spool into the camera with
               the colored (red) surface of the unrolling
               film facing outwards, loosen the lower
              spool knob (Fig. 3) by a short turn to the
                 right, press the full film spool against the
              brake spring (22) with your thumb until
            you hear the spool knob snap into the
              hole in the disc of the film spool. The
              paper tongue of the film leader must now
             be drawn across the guide roller and
View original page 4Page 5 · Read text
www.butkus.us


                                                   pushed into the slit of the empty spool in
                                                            the upper spool chamber (Fig. 4).

                                                  Turn the film transport knob slightly
                                                         forward, in order to tighten the film, at
                                                            the same time making sure that the paper
                                                                    strip is lying perfectly straight.


 For NEWER version that do not have red window. There is a small lever cam at the bottom that MUST be
against the bottom "automating" pin when you close the back. That pin sets the "auto-number" counter on the
side of the newer version. Fire shutter, press in pin with hand and roll on the roll from the bottom to top spool
stopping the arrows at the bottom rollers. Make sure the arm and pin are touching and that will set the auto
framing. wind the shutter, then wind to the first frame.
It will stop automatically (if everything is working right ! ) After you fire.. set shutter, wind.


                                                                3. Closing the camera
                                                     Fold down the camera back and press it to
                                                           the camera body. Latch knob (13) must
                                                              click in audibly (Fig. 5).

                                                                4. Opening the pan-protection window
                                                 Push up the pan-protection knob ('21) on
                                                           the left-hand side of the pan-protection
                                             window (12). The protective paper on the
                                                          film now becomes visible, and the light
                                                                 circle which you see when the pan-proof
                                                      cover is closed, disappears.


5. Film transport
Rotate film transport knob (19) until, after the caution sign, the number "1" appears in the pan-protection
window.

6. Closing the film window
Push the pan-protection knob (21) downward, whereupon the light circle appears in the pan-proof window, and
the camera is ready for picture-taking.
Performances 4 to 6 are repeated after every exposure, i.e. 12 times with each film.
View original page 5Page 6 · Read text
7. Removing the film
You have already been told in paragraph 1 how to open the camera back. Having opened the camera, you pull
out the upper spool knob (7) and fasten it by a slight turn to the left. Remove the exposed film carefully and
paste down the gumstrip.
Take the empty spool from the lower spool chamber immediately and place it into the upper spool chamber, so
that the camera will always be ready to receive a new film. Take care to make the slotted disc of the empty
spool catch the driving shaft of the film transport knob.

B: The technique of exposing


                                                                    1. Opening and closing
                                                         the lighthood


By pushing up the light hood knob (14) on the light hood frame (15) causes the light hood (18) to jump into
working position.
To close the light hood, push the cover down towards the back, and the rear flap will fold in automatically. The
lighthood closes with an audible click. Make sure that the focusing magnifier (17) has been swung in
beforehand.


                                                           2. Focusing
View original page 6Page 7 · Read text
www.butkus.us

Focusing is performed by means of the focusing knob (9) on the left side of the camera.
The image is visible on the ground glass screen and can be focused at distances between infinity (00) and 1
meter (3' 4") The camera mechanism guarantees absolutely even sharpness between finder lens (2) and taking
lens (1).
You will find two scales on the focusing knob (9)
a) the rotatable distance scale with figures indicating feet, or meters,
b) the firmly attached depth-of-field scale (8) showing the diaphragm numbers. The latter are in symmetrical
order (Fig. 6).
For critical focusing, you have the focusing magnifier (17) in the light hood (Fig. 7).


                                      This magnifier is swung up by pressure on the magnifier
                                    mount, in the direction of the arrow. To get the magnifier
                                             up.. looking from the back, slide the magnifier to the left
                                             side, it will pop up. Press it back down and it will snap into
                                           place. Having focused your image and set the diaphragm
                                            stop, you will immediately be able, on the depth-of-field
                                             scale, to determine within which range of distance your
                                           picture will be sharp.
                                     For example: At a distance of 20' (6 meters), with the
                                    diaphragm at f/8, the sharpness reaches from 12' to 55'.


3. How to use the sports finder
The sports finder in the light hood gives you the choice of focusing either by means of the ground glass image
or in direct-vision.
On opening the light hood you will, at first, always see the ground glass image.
If you intend using the sports finder, you have to push in the cover (4) bearing the factory sign until you hear it
click. First make sure that the focusing magnifier is not swung up.

The eyepiece of the sports finder is provided with parallax compensation - adjustment by means of the little
knob (16) on the rear flap. Before closing the light hood, do not forget first to fold back the cover (4) with the
factory sign. This is done by pressure on the rear flap from the inside, whereby the little cover jumps
back to its original position (Figs. 8 and 9).
View original page 7Page 8 · Read text
4. The light hood
                                   The constructive arrangement of the light hood (18)
                                         allows for future attachment of supplementary
                                        equipment. For this purpose there are the latches (5)
                                     which hold the light hood in place and have to be pushed
                                      back so that the light hood can be taken off.
                          We would draw your special attention to the fact that the
                                                 light hood should be removed only when, at a later date,
                                            the other accessories are available.


                                                5. Setting the shutter speeds

                                                6.1. The Vebur Shutter
                                   The Vebur is a between-the-lens shutter with speeds
                                         ranging from 1 sec. to 1/250 sec. and B (any desired
                                           length of time) (Fig. 10).

                                         Instant exposures - (meaning the shutter is open less
                                      then a second )
                                     Turn the milled ring (R) until the desired number stands
                                        under the (K) mark, wind up the shutter by pressing the
                                             lever (Sp) downwards as far as it will go. The film is
                                      exposed by pressure on the body shutter release (2).


Time exposures
Turn the milled ring (R) until the "B" stands under the (K) mark and press the lever (Sp) downwards as far as it
will go. Pressure on the body shutter release (20) will open the shutter which closes again as soon as the release
lever is liberated. It is required to use a tripod and a cable release for time exposures. (most film has estimates
on time exposures on the package)
The Vebur shutter can also be released by means of any one of the commonly marketed self-releases.
View original page 8Page 9 · Read text
www.butkus.us

6. Setting the diaphragm
The diaphragm lever (B) is designed for setting the diaphragm stops between the
largest aperture f/3.5 and the smallest f/22.
Important: The smaller the diaphragm,
the longer will have to be the exposure. But also: the smaller the diaphragm, the greater will be the depth o f
field (see depth-of-field scale).


                                                7. Releasing the shutter
                                   The shutter is released, as already described, by pressure
                                    on the body shutter release (20).
                               You will find it most convenient to release the shutter
                                        with your right thumb, holding the camera firmly between
                                       your right and left hands (Fig. 11) and so protecting it
                                     from unsteadiness. You can also make the exposure by
                                   means of a wire release. The connecting piece (3) for the
                                        wire release is on the right-hand upper front of the camera
                                               (Fig. 11). To avoid faulty exposures, always depress the
                                    body shutter release as far as it will go.


8. Prevention against double exposures
At the moment the shutter is being released, the device preventing double exposures coupled to the shutter starts
operating. The shutter cannot be actuated again before the film has been advanced by rotation of the transport
knob and the shutter-winding lever (Sp) has been wound up. The camera is ready for the next exposure as soon
as the following film number appears in the pan-protection window (12).

9. The flash contact
The flash connection (10) is situated on the left sidewall of the camera and is joined to the shutter by a cable.
The synchronous flash contact built into the Vebur shutter (X contact) permits flashlight exposures, also instant
shots, with flash bulbs, flash tubes (electronic flashes) and flash powder.
In the Vebur shutter, the electric circuit is closed at full opening of the shutter (X contact). This makes the use
of electronic flashes (without delay) possible with all shutter speeds. Flash bulbs, on the other hand, can be used
only with the shutter speeds named in the chart. The shortest shutter speed for electronic flashes with delay is
'/so sec.

In order to obtain shutter synchronization with powder flashes for instant exposures, you will need an electric
kindling device. Advice regarding shutter speeds is given by the manufacturers.
View original page 9Page 10 · Read text
Flash Bulbs                          Shutter Speed    Remarks

                                   1/50 sec. orOsram: AP
                                    longerRFT: F 19

Osram: F 1; F 2; S 1; S 0; X 0
.RFT; F 20; F 32; F 40; DF 40
                                   1/25 see' or
Philips; Pf 14; Pf 3; Pf 25; Pf 60                         or other flash bulbs
                                    longer
USA Bulbs: Press 25; 40; 50
No. 0; 2                                             with suitable

Osram: S 2                                                 characteristics
RFT: DF 20; DF 70 N               1/10 sec. or
Philips: Pf 100                      longer
USA Bulbs: No. 3; 50

                                  1/100 see. or
USA: SM and SF
                                    longer


For the general use of powder flashes without shutter synchronization, the shutter has to be set at "B" and
released by means of a special cable release which is fastened automatically when the shutter opens and is
unlocked on second pressure.


                                 The Prontor SVS shutter

                                    The Prontor SVS shutter is a between-the-
                                              lens shutter with built-in delayed-action
                                             device, X and M contact (Fig. 12).
                                       Exposure speeds range from 1 sec. to
                                         1/300 sec. (instantaneous) and time
                                          exposures of any desired length in the "B"
                                                   setting.
                                                Instant exposures
                                      Turn the milled ring (R) until the (K) mark
                                            stands underneath the desired number.
                                 Wind up the shutter by pushing the lever
                                           (Sp) upwards as far as it will go. The
                                         exposure is made by pressure on the body
                                                shutter release (20) on the right hand side
                                             of the camera. Always make sure that the
                                             film has been advanced beforehand. From
                                     1 sec. to 1/100 sec., also in-between
                                          speeds may be selected (e. g. between 1/,
                                       and 1/l0 sec.), for the shutter speed rises
View original page 10Page 11 · Read text
www.butkus.us


Time exposures
Turn the milled ring until the (K) mark stands underneath the B. Again, push the lever (Sp) upwards. The
shutter is opened by pressure on the body shutter release and closes again as soon as the release lever is
liberated (after any desired length of time). We advise using a tripod and a wire release for time exposures. A
tripod socket is built into the bottom of the camera.
The X and M contacts are set by means of the transfer lever (U).
X or M exposure is exclusively determined by the position of the transfer lever (U) as follows:

1. Exposures without flash: M or X setting.
2. Exposures with flash: Setting according to chart.
3. Exposures with self-timer: V setting.

Self-timer exposures with flash are subject to the same rules as the X setting (see chart).
When making your preparations for the exposure, besides winding up the shutter and setting diaphragm stop
and shutter speed, you need only to adjust the transfer lever.

Very important feature: It does not matter in which sequence you accomplish these performances. Also the
transfer lever may be adjusted either before or after the shutter has been wound up; this means that you can
change its position as often as you wish!

Setting the diaphragm
The desired diaphragm stop is set by swinging the diaphragm lever (B) on the lower part of the shutter in either
direction.
The smaller the diaphragm stop, the longer will have to be the exposure.
But also : the smaller the diaphragm stop, the greater will be the depth of field (see depth-of-field scale).
Strap holders
A carrying strap can be fastened to the eyelets (6) on the right and left of the camera body, should you wish to
carry the camera without a case.
A few hints concerning the exposure
1. Do not forget to advance the film after each exposure !
2. Exposure time and diaphragm stop are closely related. The more light you take/ away by stopping down to
f/8, f/11, or further, the more you will have to increase the exposure time.
For example: A speed setting of 1/100 sec. at f/5.6 will give the same result as f/8 and 1/50 sec., or f/11 and
/25sec. These figures can be continued in either direction as desired. The only difference will be the depth of
field.
View original page 11
Related documents and language editions

From the M. Butkus archive. Original publisher and archive notices are retained.
Check the model and edition against your equipment.
PDF verified 2026-10-10.