Film cameras
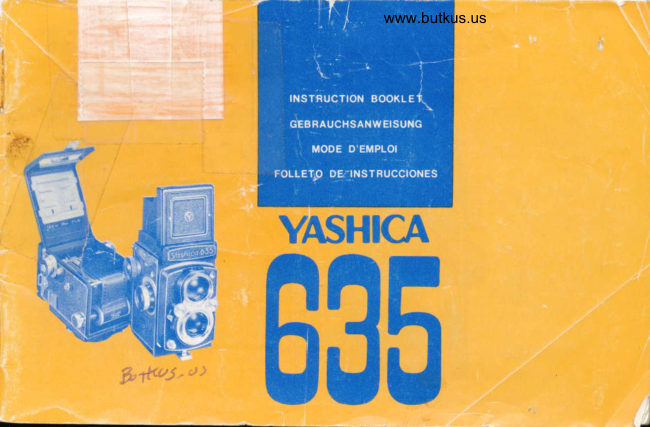
Yashica 635 User manual
User manual for Yashica 635. 14 pages in English. Read the original PDF, download or print a copy without registration.
14 pagesEnglish1.6 MB PDF
Loading your manual…Open PDF directly
Document details
- Brand
- Yashica
- Model / document
- Yashica 635
- Document type
- User manual
- Language
- English
- Pages
- 14
- File size
- 1.6 MB
- Category
- Film cameras
- Document date
- Not specified in catalog
Search available document text
Find a term, then jump to its page in the original PDF. Image-only pages may not be searchable; check the PDF for exact wording and diagrams.
Page 4 · Read text
HOW TO REMOVE CAMERA FROM ITS
CASE

As a preliminary step in film loading, take out
the camera from its case.

1. Open the front cover and detach it by
unfastening the three snaps on the base.

2. Pull out the Slide Locks on both sides.

3. Spread out the sides of the case and take out
the camera.

To return the camera into its case, follow the
foregoing procedure in reverse.
View original page 4
Page 5 · Read text
www.butkus.us


FILM LOADING

1. Open the Back Cover by turning the Back Cover
Release Ring around the Tripod Socket in the
direction of "0" (Open) .

2. After opening out the Back Cover, remove the
Take-up Spool from the lower Film Chamber by
pulling out the lower Spool Stud Knob.

3. While pulling out the upper Spool Stud Knob,
set the Take-up Spool in the upper Film Chamber.

CAUTION: Before loading the film, make sure
the 35 mm Film Rewind Release Button (27} is
reset all the way into its original position.


    4. Pull out the lower Spool Stud Knob and
    place a new roll of film (standard 120 roll
    film) into position in the lower Film Chamber.

    5. Pull the film leader gently and insert it into
    the slot on the Take-up Spool in the upper
   Film Chamber. Make sure the film leader is
    inserted into the wider one of the two slots and
     its edge is set flush against the spool flange.

    6. Turn the Film Advance Knob until the
   arrow "start" mark on the film leader aligns
    with the triangular mark on the edge of the
    picture frame. Then close the Back Cover.
View original page 5Page 6 · Read text
7. To lock the Back Cover, press it against the
camera body and turn the Back Cover Release Ring
in the direction of "C" (Close).

8. In the course of film loading, the Exposure
Counter automatically resets to "S" (start) position.

9. Therefore, wind the Film Advance Knob until the
figure "1" appears in the Exposure Counter Window.

10. After making an exposure, push the Film-stop
Release (20) and wind the Film Advance Knob. The
Exposure Counter will register the number of
exposed frames and the Film Advance Knob will
lock automatically.


 EXPOSURE SETTING AND SHUTTER
 RELEASE

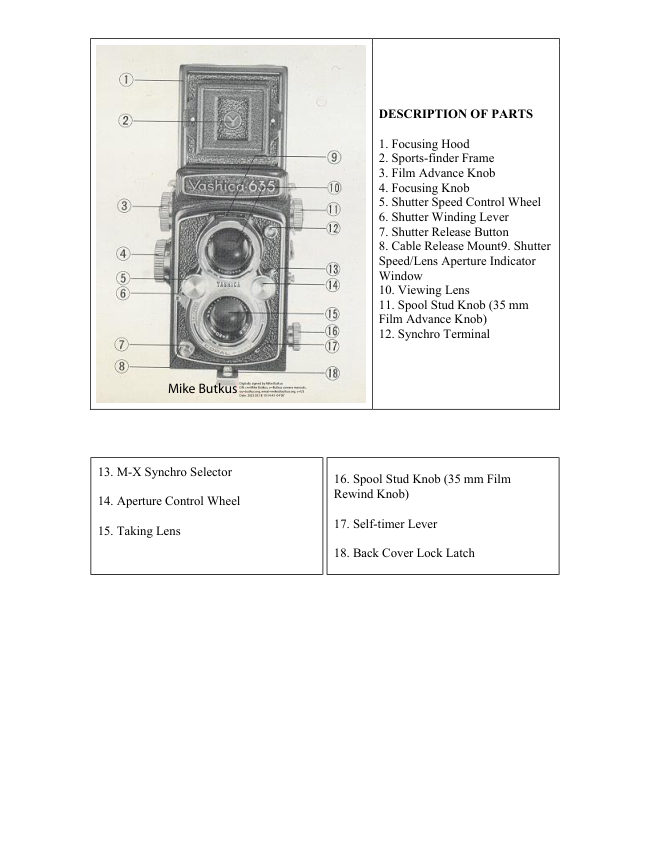
 1. Turn the Shutter Speed Control Wheel
 (right) and Aperture Control Wheel (left) in
 either direction with your thumbs and
 position the desired settings in the Shutter
 Speed/Lens Aperture Indicator Window.

 2. Make sure the shutter speed setting is
 aligned properly with the indicator stub on
 the window frame. As for the aperture setting,
  it can be set at any in between settings, as
 required.

 3. Push the Shutter Winding Lever all the
 way down. To make exposure, press the
 Shutter Release Button gently.

 CAUTION: Avoid resetting the shutter
 speed after the Shutter Winding Lever is
 pushed all the way down.
View original page 6
Page 7 · Read text
www.butkus.us


FOCUSING AND PICTURE COMPOSITION

Your Yashica 635 is a twin-lens reflex camera. It
features a pair of perfectly matched lenses,
enabling you to focus and compose your pictures
most effectively through the viewing lens
positioned directly above the taking lens.

1. Lift and open the Focusing Hood, as illustrated.

2. Turn the Focusing Knob until the image of
your subject on the ground-glass viewing screen
appears sharply defined. The clear focusing spot
at the center of the screen will enable you to
secure critical focus.

The viewing screen shows the exact field covered
by the taking lens. Therefore, compose your
picture within the viewing frame.


MAGNIFIER

For critical focusing, use the magnifier
incorporated in the focusing hood.

1. To set the magnifier to viewing position,
press the center of the Focusing Hood half-
way as illustrated. Place your eye as close
to the lens as possible and secure critical
focus.

2. Before closing the Focusing Hood, fold
away the magnifier by pressing the frame
down as shown in the illustration.

.
View original page 7
Page 8 · Read text
SPORTSFINDER

Use the sportsfinder incorporated in the focusing hood when shooting moving subjects.

1. Push the center of the Focusing Hood all the way until it locks into folded position. Then, hold the camera at
eye-level and sight your subject through the small square hole.

2. To reset the Focusing Hood to its original position, push the release button, as illustrated


                FILM UNLOADING

           After the twelfth and final frame has been
           exposed, wind the Film Advance Knob about six
           times to take up the film leader. Then, open the
          camera Back Cover and take out the exposed film
           as illustrated. Paste the seal securely and send the
           film out for processing.


                                      FLASH EXPOSURE

                                 Your Yashica 635 features built-in M-X synchronization. Set
                                          the Synchro Selector to either M or X position, depending on
                                          the type of flash in use. Then, plug the PC cord of your flash
                                            unit into the Synchro Terminal.

                                        Correct exposure setting for flash photography can be obtained
                                           readily by referring to the guide number of the flash bulb o'
                                           electronic flash. For color photography, use the proper type of
                                            flash bulbs, or else, use color compensation filter.

                                      Consult your dealer for the proper type of flash unit for your
                                      camera.


                    Selector
              M    X     X
                    Position

                 Bulb
              M type  F type    Electronic Flash
                  used

                   Shutter   Any     1/60 or  Any Speed (When using slower Self-
                 Speed     Speed   slower    timer)
View original page 8Page 9 · Read text
www.butkus.us


               SELF-TIMER

To include yourself in the picture or for delayed action shots,
use the Self Timer and proceed as follows:

a. Advance the film by winding the Film Advance Knob.

b. Set the shutter speed, charge the shutter by pushing down
the Shutter Winding Lever and move the Self-Timer Lever all
the way in the direction of the arrow.

c. Press the Shutter Release Button-- the shutter will be tripped
about 8 sec. Later.

            CABLE RELEASE

The use of a cable release to trip the shutter will prevent
camera shake in close-up shots and long exposures.

Use a standard "screw-on" type cable release. Unscrew the
ring around the Shutter Release Button and set the cable
release securely over the Shutter Release Button. Consult your
dealer for the proper type of cable release.


          LENS OPENING

 The lens opening or aperture forms one factor
  for controlling the intensity of light transmitted
  through the lens and reaching the film plane.
 Your Yashica camera features an ultra-sharp
 Yashinon lens with aperture settings of f/3.5, 4
  5.6, 8, 11, 16 and 22. The maximum aperture is
  f/3.5, while the minimum is f/22.

 To adjust the lens opening, rotate the Aperture
  Control Wheel with your thumb and set the
  desired setting in the Shutter Speed/Lens
  Aperture Indicator Window. The lens opening
  can be set at any in-between settings, as
  required.
View original page 9Page 10 · Read text
SHUTTER SPEED

The shutter speed controls the length of exposure of the photosensitive emulsion of the film to light.

Your Yashica camera is equipped with a precision engineered Copal Shutter with speed settings of
1, 1/2, 1/4, 1/8, 1/15, 1/30, 1/60, 1 /125, 1/250 and 1/500 sec.. and B.

The B setting is for exposures longer than one second. At this setting, the shutter remains open as
long as the Shutter Release Button is kept depressed.

At 1/15 sec. or slower speeds. mount your camera on a tripod and use a cable release to trip the
shutter in to prevent camera shake.


HOW TO HOLD YOUR
CAMERA


                                     2. Hold your camera overhead,
                            and focus and compose as         3. For low angle shots, place
                                       illustrated, when shooting over   your camera on the ground.
                                fences and other obstacles.


1. Normally, hold your camera
at chest-level, with your
elbows pressed against your
body to provide extra-steady
support, and press the Shutter
Release Button gently.
                                     4. Your knee will provide
                                steady support when shooting                                                                         5. Use the sports-finder for
                           low subjects.                                                               shooting at eye-level or
                                                             photographing moving subjects.
View original page 10Page 11 · Read text
www.butkus.us


          DEPTH OF FIELD

 The depth of field is the area in front and behind
  the subject on which the subject is focused, within
  which all objects will also appear acceptably sharp
  in the picture. It varies with the aperture and is
 more extensive (a) when the lens is stopped down,
  (b) when the camera is focused on a distant
  subject, and (c) in the background rather than the
  foreground.

 The depth of field can be determined by referring
  to the depth-of-field scale around the Focusing
 Knob. With the camera focused on a subject at 10
  meters and an aperture of f/16, the depth-of-field
  will be from about 5 meters to infinity or, in other
  words, the range enclosed by the number 16 on
  both sides of the distance index mark (3.5).


     FILM LOADING (35 mm film)

1. Pull out the 35mm Film Rewind Release
Button (R) and give it a slight twist in either
direction.

2. Install the 35 mm Picture Frame by proceeding
as follows: After making sure that the sprocket
end of the frame is set toward the upper Film
Chamber, fit the spring bar into the lower edge,
and, while pushing the frame in the direction of
the arrow, install it properly into position.

3. Reset the 35 mm Film Rewind Release Button
to its original position by turning it in either
direction.

4. Screw the Spacer Ring on the threaded mount
around the right spool stud in the lower Film
Chamber.
View original page 11Page 12 · Read text
1. 35 mm Take-up Spool

2. Sprocket Wheel

3. 35 mm Picture Frame

4. Pressure Plate Guide Socket

5. Pressure Plate

6. Spring Bar
                                                9. 35 mm Film Cassette
7. 35 mm Film Leader
                                           10. Spacer Ring
8. 35 mm Spool Stud Adapter
                                           11. Pressure Plate Guide Pin


       5. Insert the Spool Stud
     Adapter into the spool
      spindle of the Film
      Cassette.

       6. Place the Film Cassette
      in the lower Film
     Chamber by pulling out
      the Spool Stud Knob as
       illustrated. Then, pull out
      the film leader gently.
View original page 12Page 13 · Read text
www.butkus.us


 7. Set the 35 mm Take-up Spool in the upper
Film Chamber. First, fit the cut-out on the right
 into the right spool stud. Then, while pulling
 out the 35 mm Film Advance Knob (Spool
Stud Knob), set the spool into position. Reset
 the Film Advance Knob to its original position
and wind it until it locks automatically.

 8. Insert the film leader into the slot on the
Take-up Spool and, after pressing the 35 mm
 Film-stop Release located directly below the
Film Rewind Release Button (R), wind the 35
mm Film Advance Knob.

 9. After making sure the perforations on the
 film properly engage the sprocket teeth, set the
 Pressure Plate by matching the Guide Pins
 with the Guide Sockets and pressing it firmly
 against the 35 mm Picture Frame.


10. Close and lock the Back Cover. Then, press
the 35 mm Film-stop Release and wind the 35
mm Film Advance Knob. Repeat this
procedure three times to advance the exposed
frames.

11. Turn the 35 mm Exposure Counter in the
direction of the arrow and align the figure "1"
with the index dot.


     FOCUSING AND PICTURE
         COMPOSITION

1. Focus in the manner indicated previously in
this manual. For picture composition, use the
red rectangular frame on the viewing screen.
The four short lines are for parallax correction.

2. Use the 35 mm Sports-finder Mask when
shooting at eye-level (See illustration).
View original page 13Page 14 · Read text
FILM REWINDING

1. After the full length of the film has been
exposed, rewind the film into its cassette.
First, pull out the 35 mm Film Rewind
Release Button (R) and give it a slight twist in
either direction.

2. Rotate the lower Spool Stud Knob
clockwise in the direction of the arrow until
the film is returned completely into the
cassette.

3. Open the Back Cover and remove the
cassette by pulling out the Spool Stud Knob.
View original page 14
Related documents and language editions
From the M. Butkus archive. Original publisher and archive notices are retained.
Check the model and edition against your equipment.
PDF verified 2026-10-10.