Sewing machines
Gritzner Saxonia H — User manual
User manual for Gritzner Saxonia H. 38 pages in English. Read the original PDF, download or print a copy without registration.
38 pagesEnglish25.7 MB PDF
Loading your manual…Open PDF directly
Document details
- Brand
- Gritzner
- Model / document
- Gritzner Saxonia H
- Document type
- User manual
- Language
- English
- Pages
- 38
- File size
- 25.7 MB
- Category
- Sewing machines
- Document date
- Not specified in catalog
Search available document text
Find a term, then jump to its page in the original PDF. Image-only pages may not be searchable; check the PDF for exact wording and diagrams.
Page 11 · Read text
THE HEMMER.   In  mitlu      .l tin-nu   llLll’lZ  Attach the hemmer  to'
the presser-bar:  Iilt   llll  1m                                        Itml  (w mmncc the hem by  folding  it at-             \u
the end, attach     .'l thu ml  to  n   \\lll|  l  lllllllt,  tll‘il“  the thread andtheflbtie
into the hemmer (or pass the  «all.,.  ml  tln  Izilnit  into the hemmer with];
a thread), lmui tht 1mN r lnnt ind wnnntnce to sen, guide the edge of
the fabric uith  lllt  fig/if lmml  lllx‘lllf‘  (.ll'(  that the fabric  entirely  fills  nu".
mouth of the  ht'Jlellllll  // Ill: mfg:  III(/i’/l/.l m! if  l/lc' lit/”mengmdl 1h           ,
10  1/1! rig/ll, if It _fil/l/\  In.“  llllll/l m/u  1/1:  //¢1/11/11! guide:  I! [a 11m 107.
     To make  a bread  114 m.   5st tln nide adjustable Hemmer as
dia ram.  fold the  lnhrii  the  (lulsll'ttl lirendth (including  the  plait) and
it   rough the hemmer  in the saint nay.
     To make a broad hun “ith a thicker fabric, use the ordinary                 v
foot,  fold the fabric twice tn tht desired  breadth  bringing theunder the presser-foul.       m
View original page 11Page 13 · Read text
THE ADJUST/Xian".  i'llxiviny‘i        --1     "l('rlllllll'l;,‘f  towels   napkins,
tablecloths and  utht'l‘ run    ”lbw a  fulfil:  :;  llu' upcrator  (0 make hems Of
various widthx  Adjust  tlu- hummu  in  l'uhl  llu'  llt'Sll‘Cll width  of hem, fix
it firmly to the machine “1th  the thnmlvxcrmv, then  turn down  the  edge
of the fabric one  l'nld only, and  pilxs  it into the hemmer with a. double fold
to complete the hem    If the sewing  is not on  the edge of the hem, loosen
the screw and mow:  tln: hemmvr  n  little  to the right or  left, until   it  is  in
the right position
View original page 13Page 15 · Read text
r'                                                              '    v. a
                                                                                                          - THE QUILT


    THE  QUll.'I'll\l‘u   lii‘ll)l~.      ‘\1l.n'll  thv guide as shown by the en-
graving, mnlu      .l  alunglii  lml  “pun  lln    l.ll\llC  nith  clmlk  or by  creasing,
and  stitch upon  n,  llu n  mljuwl  the  galle—ill‘lll  to the  required distance for
the next  line ml  rgiilrlling,  ziml  Quillc the  fabric with the line  already sewn
directly under  lln- gaugzfiirm   This wvmnl  line serves  in  like manner 88      ,
a  glliflr'   I‘rn'  iln~  lhirtl and 50 on.                                              "
View original page 15Page 19 · Read text
to avoid co               .               SteWwinder. If the “finder  tom
bobbin is f        le vertical screw under the eate
down slightly. and  if the bobbin overfills without being   11
this screws ould be screwed up, a ver   little  is sufficient,
          .     The same directions apply to the    rider ofthe Saxoni'a
instead of pressing against button  4, press firmly against the
the left hand side of the  11in1|er  as above  illustrated,  to  brin
cogwhecl  in connection with the toothed inside rim of the Hywheel.e
          5. TO THREAD THE NEEDLE  Place the reel containing the 1 1
thread on one of the pins.  Thence pass it through the eyelet 29 at the'
ol the face-plate, under and between the discs  (18) on the front of_thef
plate, so  that  it runs up11nr1ls:to the eye  in the  check-lever  (33) thr-
it, and through the hole  in  the needle clamp and lastly from you through
eye  111 the 111c11101\l11111t four inches of them] should  he drawn  thro
the eye of the needle.                                                                                                                                                                                                                                        ~
         6. NEW SELFTHREADING SHUTTLE.  Method  of thram'
Hold the shuttle  in  the  lett h:1n1l point  1111111111ards and  11ith  the  flat      "1
lacing _\11u,inse1t a  [11111l1i11  at  th1.|111int  11111 and press the other end
its placc,\1ith the  th11n1l  cr11nin1r  oft th1  l111l1l1i11 from the back to the l;     ;
lead the thread behind  th1’1111inl of the spring a, and then across the flat.  "1                1
of the shuttle into the notch  in  the spring  I1; then  1lr1’1wit tight towards   -  1"
shuttle point, and pass   it  into   1111-  11111111   111‘  the  spring  outside.  Now      "
shuttle  will  111: ready   1'111' 11V    11111  15111111   11min};  off under the Spring ont
left side of the  ~h|1ttl1                                                                                                                                                                                                                                                                                                                                                                                                                                                                                    '


        T1,  l<1111111111g   1111   'l'111<111;1                                                                                                                            .          »   ~-1.11111   l1_\  11111111111 the small screwl‘
                                               111   111   1l11   11:31:    ’1~|’   1_.1‘/~(//11"'1 tension.  Aspecmls-       -'{11  ill it‘ll  lol   J1    ‘1/111/(‘11‘
scre11—1l1i111  is  11r11\'i1l11|   1111“  [his  11111111151   \\h1n an chn  tension  is on
obtainnl   it  \\ill  «11111111  111111111  .1l11~1':1111111      .\l'l1'1‘  thr1-111li1111 the  shuttle,    -
the temiun In drawing1  1111  1I111111l  11111.11115  1111 Hunt 1;n1l;1litdrawsfig
without l1r11ki11g,   it  is iiuhl  f111 ‘l1(11l\  111  111111 11x11111;  thin, soft goods req1
3. looser  11:1isi1111.   l11  11I11;1i11  11i1111  111  |1>s  l111si0n,  tiflhten or slacken1
screw  l“ which  1111x-  11111111   1I111   ll:11  spring   I1.
View original page 19Page 20 · Read text
ill      73
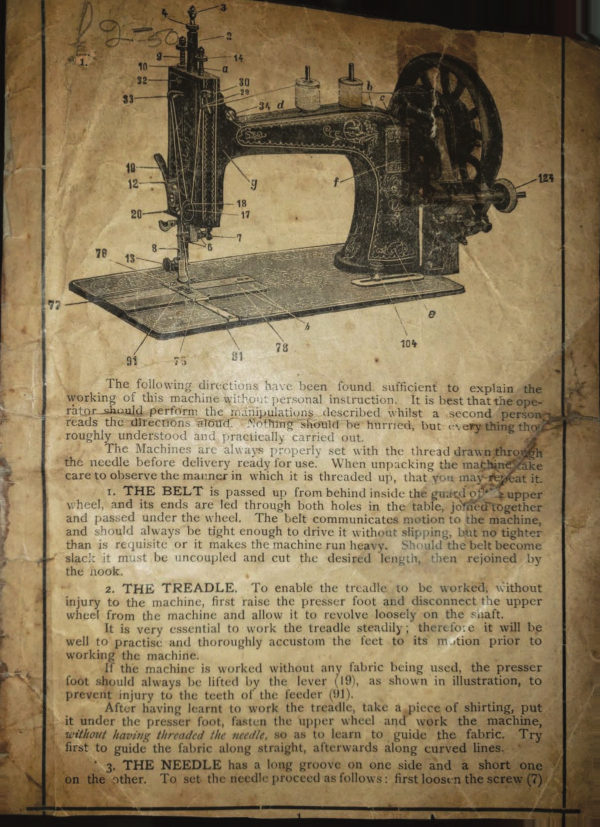
      0                                                            '  I‘he_followin;,{ direction; h or been  found  sufficient  to  explain  the
              working oi  this machine wifl'o-.' pcrsonal instruction.    It is best that theoped v     131“)er perform the inanipulations  described whilst  a  second  pers
                roads the directmns atom,   filoimng‘iw'h'dulri he hurried, but may thing th
 V         roughly understood  znuz  ill'flijlitiill)  carried out.                                                                              ..
                   The Mnrhiuu: an    :lI-u.l_\-s-  ]‘.'"rirk‘l'l_\  sct with the ihrmd drawn thro       ,   -
                the needle before delivery rcady for use.  When unpacking the inagbinef‘ake
                care to observe the manner in which  it  is threaded up, that you may net at  it.
                                       I. THE BELT  is passed up from behind inside the guamlo‘“ guppor
                    olive]. and  its ends are led through both holes  in the table, janed'mgcthcrTa?               and  pas;.rd undcr the  \\'ll(‘Cl.  The belt communicates motion to the machine,
               and  ~ltuulll always be  tight enough to drive it without slipping. but no tighter W         than  is   rt. luisilv or  it makes the machine run heavy.  S‘wuld’the bclt becmm.
                     slacI:    ll  111.4 bc uncoupled and cut  the  desired  length,  then  rcioincd   ixv
 T          thc nook.                                                                                                                                                                                                         '                                                                              '
                                2. THE TREADLE.  To enable the  trt-adle  to  be worked. without
                  injury to the machine,  first  raise the prcssur foot and disconnect the upper
                   whcr-I from  the machine and allow  it to revolve loosely on the shaft.
                                    [t  is very essential to work the trcadle steadily;  therefor:   it will be
                  well  to practise and thoroughly accustom the  feet  to  its  in ition  prior  to
              working the machine.
                            If the machine  is worked without any fabric being used.  the presscr
 /,.                       i'oot should always be  lifted by  the  lever  (l9‘l,  as shown  in  illustration,  to
                prevent injury to the teeth  ol' the feeder  (ill).
                       After having learnt to work the trcndlc, take a piece of shirting, putVfivww                           it under the prcsscr foot, fastrn tho uppcr wheel and  work  the  machine,
               wit/mm liar/”y Il/n'm/nl  {ln- ”mi/z, so as to learn  to  guide  the  fabric.  Try
                  first to guide the  fabric along straight, afterwards along Curved                                                                                                  lines.                                  3. THE NEEDLE has  a long groove on one side and  a  short one ‘i
                  ‘  ion the      . other.  To set  tlu- nccdln- procccd as follows: firstloosrn the   _ screw l:(7)!
View original page 20Page 21 · Read text
.             c the nccdlebar S!) to  its highest point.  Then                                                            i
“  white                              ‘              through the ncc  lc, which  is to heheld(v'ithiul-       '
     W:  t                  icruti/r»  Inc-tween  the thumh  and  fin cr  oi  the
    lid. pl                pin"! down through the hole  in the!  mat-plat   '   ,‘
bld  it  f               turn the “MC!  gt'ntlv towards vuu,  until  the  n ,-     5
bar (2)             ml  run  that the needle  is guided-mt”thcgrmivc unde
 the clam                 r ihirml with  th-- thumb and  first  finger of the  let
 hand on                   itc  in  A straight linc from you. thus bringing  the  c_\'
 of the n                        li-vt-I with the  surface   ul’  the  throat-plate  t75),  tur
                                                                                                                                                                                                                                     i the “NN                                 \'  until  the gauge mark   in  diatmct  linc  engraved
 the (run                              i'  Inn. near  itx tup   rt-sts  low-l ur  fully above thc to
 of the   t.                                    I M‘rv“  up  tight   Fur linen and  silk the gauge mark
 must n.                    itirh  higher   (HM-nt-  that   tlit'  nuccllc passes dawn               1

                                                                                                                                                                                                                                                                                                                                                                     .' exactly                  ut  tlu-  llii'niit-plxitc limit and that  it.~ lung groove exactly


lam \nn      It the ncnll.    |..  “l  h...   h...“  «nhcr  the  shuttle  cannot  pass     .
 illruugh  lhl'  IUH'L  iir   it  “I”  lint  t'nli  r ”I, limp  fn't‘h'.  and  the  thread  will
 lc-  (‘lll      ll   illt'  lit't'tlli-  Iu‘  scl (m.  11.“_ my [amp  will in" (nu large and twist,
 the  xhlllllt’ “l”  lht'n  “('('(|\lll|l.‘|"\ mi“  IL And stitches  will  he  dropped.      it.
 ;\ most  lln|mflil‘m  in mi ”N  nunllr  (‘url'l'l'lis'-
      The  culitllllfln and mun-Input ”f (m-  n'ccdlc shuuldhc examined daily.
and  if  tht'.|mllll_  l'c  ltllmt or rough.   it should be  replaced  by  a new  one.
The machmc W'" "0ch sew satisfactorily with a needle  that  is  not     v
and clean.                                                                                '                                                                                       '
View original page 21Page 25 · Read text
~. «Mammy-{w'                    “-                                                         .12‘~.v~           ,_ '.       ~
                                                                                                                                                                                                                    .                    No.”
                                           After each  stitch the'        '          p       l. m, LENGTH OF STITCH.       the fabric forward the ten  h of a stitch.  At the baseot'thelfi't
    found a thumb-screw  (IO-l).   o  lengthen  the  stitch,  this thumb-m
      be loosened slightly and moved to the  right:  the  reverse movement
                        ‘ shorten the stitch. llaving ohtaint d the right stitch tighten the thumb-screw.
         9. REGULATION OF THE THREAD- LEVER  is seldom neces-
          it  is dom b\ a SCrC“°Sl)lllt"t  in the top of the  net-rdh bar.
         If _\ou find  that the thread breaks or makes loops, loosen the nut Hi
    the regulating pin  (3) and lower or  raise  it  by  turning and  so vary the
    .'  of thread.  until the  fault  is remedied, then  re-tighten the  nut.
         lo. THE PRESSER BAR serves to guide the  fabrics  to  be  sewn.
            -  tly on  the needle plate and the feeder.  Thick and hard  fabrics require
  stronger pressure of the presser  bar  than  thin  and  soft  material.  To
   tease the pressure turn  the large screw  (9) behind the needle bar to the
v t, to diminish the pressure turn  this screw to the  left.
        ll. SEWlNG.  After having threaded the needle and the  shuttle  as
 are described proceed as followx.  Place  the  shuttle  within   its  carrier.
 n  the point  to the  right hand Ie:ning about three inches of thread pro-
   rig, then  di m  almut  lnur inihes  (bl the upper thread  through  the  eye
   the nee.dlt ind with  the  l( ft hand hold  its end loosely;  turn  the  wheel
  1  tly to“.tlll\ you  until  thi  nee-dlr mines down and up again to its highest
' tint  thix  mil bring  tln-  \lll.lttlt: thread up through the hole  in  the throat-
   tei  thl  l!  L" H"   ‘im \:l1e needle lllltdd and the shuttle thread will appear;
    '   a p“ ”m      "'    ul of the shutth thread through the holein the throat-
 _> tc,  la}- tw   '.       m units   1   the  left across the feed points; place th  fabric
  a ext};   tlrt      ll     1  -!   luau  ilit if“  "r-lnut upon  it, and commence     sew.
    . exam   it  i.ttllt;..\~ luck-«Mun  m-  tn  it that
        rz. THE TENSlON  is  {t|\\':t)'> properly  regulated. which means that
   ,   tension of the upper or needle thread shall invariably be  as  strong  as
    »  of the shuttle thread. A perfect stitch shows the same appearance on
   upper did the lows!  sides  ti: “chm.


     The  “t“                                                               i   ';,.- w  l'll'  tliiigrl   |>  obtained  in  turning the thumb-
   .. w  (14; 1m  in mp           :  1~.-  lat'r—pl -l'  lakt hold of the lhl’tiltl Juct abme
l   needle and 1mm    ll  tlwulitxanf lrum  lllt  >|Nl0l  and  tontinue  to  turn
   thumb-xi it \\   llliill  the thread  'll.t\\~  tighll} “ithout breaking.   Forthin.
  'g00dg  ll4- u”.-             '   til   .i]t]1llt'\   ll'l   lllt'   IIre‘r/f:  d\   ltll‘  lht'  I/IlI/f/z'-"'IF:"I.
      After    ,.    |. gg'g‘QM“mt.  llt  \ are tninml   «stop and examine them
       5/1011 1/  [11111     11,   Ant/n pain/111i m  a   thrift/11   h’11..1.l  up!”  Mr  Inn(1
Wfacr, m  lf/h'l'r  /111 11  Ill,  Ill/1111/1- nun,  In  [lg/I’d 11   l/J't hummer Mfum'li/ 111mm
1  ”It ”111ml 11“   .":i/1.11i111  11/M11  [In ”My 1 ”11/21“  (ll l»Jun.  '111 11 1/1, fill/"1'-1rat
~ 0. you,  l? /.'.mu  //11 Ann w  '/  I/If  11.r'1//¢  Ill/(“WI


                                                                                                                                                                        '                            ,L  _,J\_.__-          k                                .       PA.“-A“.            iit‘iti’i
     The secret of perltet  st “in” he s  in  “l adputnw tht  tension   ')l  (ht
    ”thread that  it equals the  lt‘llstflll  ol  the shuttle thread.  The adjust-
    .,0f either may be regulated as before described.

                                                                             .._..
View original page 25Page 26 · Read text
'~|'             '.       - ..  ,|      -'   \                                             -n.~"                                                                           '.    .¢                                                                                      .i             .                                                                                      '                                                                    <                                                              ll        I
                                                                                                                                                                                                       ,                                                                           >                  '          -‘“$15er workuthia-wm
      When scwin  over bard  places d' across seams.  the              '
  should be cautiousll  turned by hand or the needle  will break or                         ‘
      To remove the work,  raise the needle to  its highest point,
  presacr-ftmt by which means the tension  will be disconnected autom-
  and draw the  fabric with the  left hand from the   left  side  upwards          -
  three inches, then cut both threads.
                It  in removing the work the lower thread breaks, take out the shuttle,
  draw out some thread and liroceed again as above described.
                It may be athanlagcous here to describe  the  manner  in  which  the
  stitches ate produced by  this machine:
       The needle passing through  the  fabric  leads part  ol the upper thread
  below the needle-plate.   In  rising.  it forms a small loop  in the thread which
   is caught and spread by the point of the shuttle passing  the  needle.  This
  loop, through which the lower thread  is carried by the shllttlt:, is then taken
  up by the thread-lewr. and tightened by the formation  ut  the  next  stitch.
            13. TO CLEAN AND OlL THE MACHINE.    If you constantly
  Use the machine.  it should be cleaned twice a day and  well  oiled.   Before
   oiling.  raise the presser-foot,  rtfnttltt‘ the shuttle, and hating  oiled,  run the
  machine rapidly a minute, then wipe  off  all superfluous  oil  with  a piece of
   rag.   lie sure. that every part  is clean, before commencing  to  st u.
        There are nine small holes made for oiling. one in the  front  of  the
  face plate mar the needle-liar  12), three on the top of the arm. one atcach
  end ofthc shatt and one near the spool-pin, two at the base of the arm (near
  the trade mark) and  tl‘rt  t: near the throat-plate  l'T-Bi.  To oil the crank which
  works the  slmttlv   turn  the machine slowly  until the small end of the crank
  appears  in  sight though the lung  sin: n the  hast-  where the thumb-screw
  (104)  for  altt MIL;  the  stitch  acts. nor.  oil  it.  A  little  oil must be put upon
  the needle-bar  13'. also at the lldt‘l: (if theshuttle-carrier, anda very little on
  the joint  ot  the meek-lever    It‘s). m  ~l\fi()ll r-spindle must he oiled,alsothe
  point of the  In)! bin than being filled.  The face of  the  shuttle should be
  oiled at  least mm  a day  The parts of the stand to he oiled are: the band.
  wheel  huI-; both  t-ndc of the pitmrtn and each end of the treadle.
             lf the machiiu    l‘lllt‘    l; owl   :.'Iu'/v~ in Ht” some place requires oiling.   if
   it runs hard. u/m- swu       '      ,                   ,     ’I"     H  ‘r           '     the  a  little petroleum or ben-
  zme  in place  oI  oil, on                                           '         '?:--  rim-h.  m-I then  .v/   it'll/t  Ila: but fro-
 par”! r/w/u  -'//.  ulvu h   -llt/‘ "l   J             l't   ..-ul.   lo make sure of procuring
  good  oil, buy   it  where  to:            ;l't  tln  machine.
        With  tart-lid running.   it gular  cleaning  and  oiling.  the  machine  will
  wear but  slightly, and the pruiupal pans should  last a  life-time.
        But   ll  is possible that some of the small parts  in the course of years
   will wear out.    l'lie manufacturers furnish, through their agents. intercham
  gable parts which may  beset  in  by  the  owner,  the  construction  of  the
  machine being very simple,
           liut   it the owner cannot put the machine  in ordcr. he should unscrew
   it from the table and send   it  to the  agents  with   all  the  fittings  togetheg:
  with a statement of the  difficulty experienced.                                                                                                                                             '
View original page 26Page 27 · Read text
u‘          er
                                                                  Sh-    we“        very machine  1- tent on alto-tuna”“been well tried.|Jbe found not to new well. the can-c will 9      y  arise  from an improper
use.   It is therefore recommended  not  to  attempt  any  alteration  to  the
machine. befurr' being asxured that the needle in properly not and the tension
regulated.
          Should the lower thread break:
            l, The tensinn  in  the  shuttle may Iw tun great, at
         2. There may be  u sharp edge  in  llN'  ”innit-plate, or there  is         3.  :\ rough edge un  the shuttle                 '
                                                                                                              e
Should the upper thread break, the reasOn may be that:
           I. The tension  is too  tight, or
              ‘2. The needle  is tun  line for the thread, or
         3‘ The lung groove of the needle  is not placed luringthe rqwmtur  ..,
               it  is set too high or too low. or
          4, The needle  tlnt's nut pasx centrally thruugh the hole  in the i'mum-
           plate, so that   it tnuches, or                                                                                    .
              I). The throat-plate  is incorrectly placed.   In Chan ving the thrunpplatr'
         care should be taken that after having screwc    it downnit   \\'lll be
           freelv passed by the needle and that the needle  in passmg  llnwn
           .      does-not touch the  shuttle.  To  ascertain  this,  press  the  lll't‘lllt,
        when down, gently with the screw-driver towards  the  shuttlr.      it
               it then  lightl}~ tnuches the shuttle the position  is  right.
             Observe that  in using a thick needle for linen or other mane
          thread, the thn-at-plate with the large hole shuuld be used.  (III, the
          needle be re! a xiv/awl]: qf an inch lower Hum usual.
         6. The eye of the needle  is  sharp  or the point  blunt.  The  former
            is very probable  if you find the needle unthreaded.
         7. The feeder dms  nut mnve the fabric regularly. its free acti- m being
         hindered by  (hr:   wees nf thread, nr want  ul‘  oil.

Should there be skipped or long  stitches  at intervals,
                the reason may be that:
                                                 . The needle  ix  set hm high nr too low, at
                             . The needle hm hecomc bent away from the shuttle, or
                        . The long grown of the needle  is not placed facing the operatur, or
                             . The needle  is tun fine, or                    our-wrec—.The machine has an irregular  action  in  consequence  oi  dirt  or
        want of oil.
                   If in spite of the above drup-stitches appear in starched goods.
        wash the goods at rub the surface, where  ll  is to  be sewn,  with.
        hard wln'lr soap.  Curd soap  is best.                                                                                                                    '
View original page 27Page 29 · Read text
Directions for using the attachments.
     The attachment-s should not he used  llt'ftlrc thorough profincicncy in
ordinary sewing with the machine has been acquired.  The various film
                                                                             Cfor other work an: an carefully  ticscriliccl  aml  accurately  dcptctcd m   t
lollouing pages, that lcarnrrs “I“ cxpcricncc nu difficulty in the use of them.

            THE BRAIDER.


    THE BRAIDER  is n presscr-ftmt which has a  slot  in  trout  of  the
 needle hnlc.    It  is to be attached to thc prcsscr-bar.  Awoodon spool upon
 which the braid  is evenly wound  is placed upon one of the pins,  The _cnd
ml the braid  is passed through the eyelet. then through the slot in the bmder
 and drawn hack, so that  it  lies  right under the nt‘t'tllc.    lt  is only‘nccesury
 to guide the fabric properly to sew down the   lll’t’lltl  to  any  previously  dc'
 signed pattern.
View original page 29Page 30 · Read text
THE HEMMER.


    THE HEMMER.   'ln inakr  n mum“  hL-m:  Attach the hammer t0'
the presser—bar:  lift thL  litt"~_\'(t’-lii1tl  (OlllllllnCC the  hurt by  folding  it  at
the end, attach    .'l thread to  it “ith   .l  nLLLIlL, Llr.m thL thread and the fabric
into the hemmcr (ur pass the  l(l"(' ut  ihL- fabric  into  this hemmer  without
a thread), Imwr thL presserl“()[and  Lninmcncc tn sen, guide the edge of
the fabric with thL  rig/r! hilml  tnkin-v  (le'(  that the fabric  entirely  fills the
mouth of thL hmeLr.  [f 1/1: “lg: unfu/dr out if [In In111111” guide kaabn':
Ifl[lie  rig/ll; if x! fu/i/L  I.”  ”II/Ill min I/n  lie/11111“ mid:  11 [0 ”It Iffl.                                 '
     To make u  lM'UL'Hl lth: [St thL  uiLlL- adjustable Hemmer asshownh
diagram, fold the  labriL  thL-  LIL-sirLLl  lirL-athh LincluLling  the  plait) and put
it through the hemmer  in  tltL samL “ay
     To make a broad hLm  \\ith a thicker lubriL, uSL the ordinary pres-an
foot  fold the fabric (win in  thL-  LIL-sired  hreadth  bringing  the  inner                m
undLr the prLssL--r fmit.                                                                                                                                        '
View original page 30Page 31 · Read text
THE FELL-SEAM-FOOT  is  attached and used similarly to the
   ,.      ing hemmmc   'lu makv a fell-seam, join the two edges of the  fabric
‘Tiy a seam about thn-c eighths of an inch from  the  edge.  then  open  out
 - M mm. turn out into the hemmcr (0 turn the  fell.
View original page 31
Page 32 · Read text
THE ADJUSTABLE HEMMER.


    THE ADJUSTABLE HEMMEL.   fur  humming  towels   napkins,
                                                                                                       s-  f'llilllll's the operator to make hems oftablecloths and other um”   "vtlnil
various widths.  Adjust the hemmur to  fold the desired width  of hem, fix
it firmly to the machine with  the thumb-screw, then  turn down  the  edge
of the fabric one  fold only, and pass  it into the hemmer with a double fold
to complete the hem.   If the sewing  is not on the edge of the hem, loosen
the screw and move the hemmer a  little  to the right or  left, until   it  is  in
the right position.


     "azfi": \,  -.\'
View original page 32Page 33 · Read text
THE ADJUSTABLE BINDER  serves  for  binding  cloths.  hats,
shoes, mantles  etc., and  is used with the ordinary prcsser-foot.  Adjust the
binder to the desxred width of binding.  fix  it  firmly  to  the  machine  with
the thumb-screw; place the edges of the binding  under  the  clips and   its
end over the leed points;  then  place  the  fabric  between  the  clips.  and
guide  it against the binder.   if the sewing  is not on the judge  of  the  bin-
ding, loosen the screw, and move the binder a  little  to  the  right  or   left.
until   it  is  in  the  right  position;  the  under-clip  may be adjusted to fold
the binding wider on the under than on the upper side of the fabric
View original page 33
Page 34 · Read text
THE QUILTING GUIDE


    THE QUILTING GUlDE.  Attach the guide as shown by the en-
graving, make  u  straight  line upon the  fabric  with  chalk  or by  creasing,
and stitch upon  it, then adjust the gauge-arm to the  required distance for
the next line of stitching, and guide the  fabric with the line  already sewn
directly under the gauge-arm.  This second line serves  in  like manner  as
a guide  for the third and so on.‘%
View original page 34Page 35 · Read text
THE STRAIGHT GUIDE    i.\  fastened  to  the  plate by a thumb-
screw  if a seam  i> tn  lu- made parallel to an  rdgt:    l'he  straight edge  of
this guide  is fixed m  far from the  Ill‘t'tllc  that  the stitching  is  formed  the
desired distanu- from  Iln-  edge  of  the  fabric.  This  guide  also  serves  to
sew  frills and  lilil'dl'l‘s, aim tn saw  in  a  xtraight line and at an equal distance
from other Minus,     it my“ the  ll'tlllllll' of drawing lines
    THE SMALL PRESSER-FOOT OR EDGE STITCHER.   This
stitcht'r sen/rs  tor xmnng  l'uux of stitrhing running thmc  along  the  edge.
It  IS the same kind of apparatus ax the ordinary,  wn‘ingd‘oot,  unl)  one  of               1
the small prongs on the night hand side  is  lclt  out. whereby  the edge  of tho  .
cloth can he seen while so“ mg.     It ran also he used with advantage lorse
very narrow rows of stitching.  “l""i'l‘n’ film“: ”W “ll!“ “W Whit“ purpon t.“      '
guide also should he used.
View original page 35Page 36 · Read text
The following extras are supplied with each improved
                  Family Machine:
    to Needles                                                                            t Small p resser-foot
    6 Bobbins for shuttle                                               l Straight guide
          | Fell-scamer                                                                  1 Screw for straight guide
         1 Adjustable llindcr                                                  | Braidcr
     1 Adjustable Hemmer                                             | Screw-driver
         | guilter                                                                    r Throat-plate with large hole
          I  emmcr                                                                 l Oil-can
            l Presser-foot                                                                  l Instruction book
          1 “lide Hemmer


    Accessories given with each Saxonia Machine:
   6 Needles                                                                               r Quilter
    4 Bobbins                                                                    r Straight guide with screw
     1 Presser-toot                                                    r Throat-plate with large hole
       1 Fell-seamer                                                            r Screw-driver
       r Braider                                                                               r Oil-can
         1 Small pres.“ r-t'oor                                                    i instruction book


   The machine possessea     following advantages:
        Wheel nickelplated.
         Feet nickelplatetl.
        Automatic lmbbiirwimler, reliable and regular injits working.
        The most simple loose-wheel-apparatus.
         lnch measure on table.
         Casters on stand.
        Opening tension discs.
         Choice wood work.
          indestructible cog-wheels.
         Extra size driving wheel.
          Shuttle lever.
        improved shuttle etc. etc.
View original page 36Page 38 · Read text
" __’—————_—_m——-—_           1“   ’..
         Take care that the thread be always evenly andtightly,
    bobbin, until  it  is  full.  Very much depends upon the proper windil‘lg    =
    bobbin  thread.  Do not pass knots  in  the thread.    It  is  advisable  to     -
    ‘several bobbins together to avoid constant interruption of the work.
        To adjust the winder:  It the winder throws  out of gear before
    bobbin  is  full the  little  vertical screw under  the  catch  should be scre                     -
   down  slightly. and   it" the bobbin  overlills without being thrown out Of g-          t
     this screw should be screwed up. a very  little  is sufficient.

                                                                                                                                                                                                                                                                                                                                                                  .         The same directions apply to the Winder of the Saxonia Machine, 0
    instead of pressing against button  4, press firmly against the  little knob
    the  left hand side of the  winder  as above  illustrated,  to  brim,y  the  s
    cogwheel  in connection  with the toothed inside rim of the flywheel.                                          <
               5. TO THREAD THE NEEDLE.  Place the reel containing the up
    thread on one of the pins.  Thence pass it through the eyelet 29 at the     '
    of the  face-plate, under and between the discs  (18) on the front of the fa
    plate, so  that  it runs upwards: to the eye  in the  check-lever  (33)  thro
       it, and through the hole  in the needle clamp and  lastly from you through
    eye of the needle.  About  four inches of thread should  be drawn  throu
    the eye of the needle.                                                                                .‘
              6. NEW SELF-THREADING SHUTTLE.  Method  of threadi
   Hold the shuttle in  the  left hand. point downwards and with  the  flat        '
    facing you, insert a bobbin  at the point end and press the other end    i
     its place, with the thread coming off the bobbin from the back  to the le    :
    lead the thread behind the point of the spring a, and then across the flat si
   of the shuttle into the notch  in the spring b; then draw it tight towards
    shuttle point, and pass  it into the notch of  the  spring  outside.  Now tk
    shuttle  will be ready for  use. the thread coming 05 under the spring,1r on the
     left side of the  shuttle.                                                                                                                                                                                                                                                                                                                                                                                                                                                                                  ‘


        To Regulate the Tension.     -    this  is done by turning the small screw F
    to the  left for a J/arl'rr or to the  right  tor ajl'g/m'r tension.  Aspecialsmd
    screw-driver  is provided  for  this purpose.  When an even  tension  is  once
    obtained  it  will seldom require  alteration].    .\l'ter threading the  shuttle,   ti",
    the tension by drawing the thread towards the blunt end;  it'it draws tigh
    without breaking,  it is right for goods of firm texture;  thin. sot‘t goods requi
    a looser tension.  To obtain more or  less tension,  tighten  or  slacken   t     ,.


                                                                                                                                                                                                                                                                                                                                                                                                                                                                                                                                                                                                                                                                                                                                                     4   screw F which acts upon the  flat spring   In.
View original page 38Related documents and language editions
From the ISMACS International. Original publisher and archive notices are retained.
Check the model and edition against your equipment.
PDF verified 2026-10-11.