Film cameras
Konica Autoreflex T — first version User manual
User manual for Konica Autoreflex T — first version. 41 pages in English. Read the original PDF, download or print a copy without registration.
41 pagesEnglish13.9 MB PDF

Loading your manual…Open PDF directly
Document details
- Brand
- Konica
- Model / document
- Konica Autoreflex T — first version
- Document type
- User manual
- Language
- English
- Pages
- 41
- File size
- 13.9 MB
- Category
- Film cameras
- Document date
- Not specified in catalog
Search available document text
Find a term, then jump to its page in the original PDF. Image-only pages may not be searchable; check the PDF for exact wording and diagrams.
Page 8 · Read text
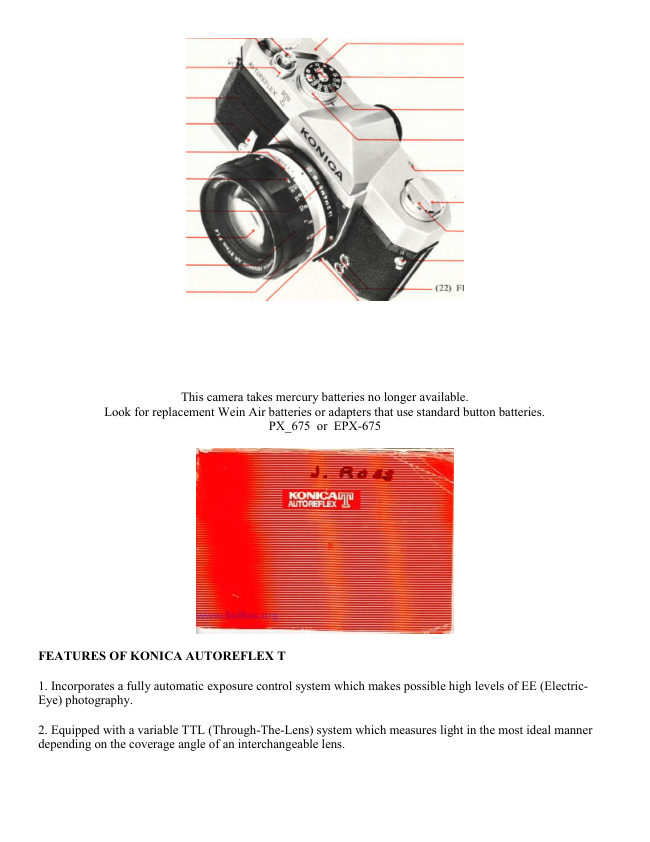
www.butkus.us                                                      KONTCAqF                                                                      3      MAJOR SPECIFICATIONS FOR KONICA AUTOREFLEX                                                                                                   ''T''                  AUTOF?EFLEX                                                                                                                          IT
F           Comero Type:   Precision, professional 35mm SLR with metal focal plane shutter and fully automatic CdS
                 Through-The-Lens (TTL) exposure meter operation.                                                                                                                                                                                                                                                                     L.ov
                                                        (LttxL-L/2tt).                                24 x36mm                         Size:               Picture
                            35mm                                           cartridges,                                                 20 or 36 exposure.                                                                                                           chT                 F                                              i I m: Standard
             Stondord  (Normo!)  Lenses:   Hexanon sTmm f/1.2 (7 elements in six groups); Hexanon 57mmf./1.4
                  (6 elements in five groups); Hexanon 52mm f/L.8 (6 elements in five groups). All focus from infinity to 18 inches.                                                                                                                                                                                                           mII            Lens Mount:  KONICA bayonet mount Type II. Diameter 47mm. Flange to film distance, 4O.5mm.                                                                                                                                        C)
               Diophrogm    Action:     Fully automatic diaphragm. Automatic EE lenses reopen to full  aperture for focusing
                 @anualaperturecontrolandDepth-of-Fieldpreviewbuttonprovided.
       I              Shutter:    Hi-Synchro Metal Copal Square S. "E|"  (Bulb), 1 to 1/1000 second, in even 1:2progression. Shutter                 speed dial on top of camera.                                                                                                                                            Ioz
                                X - synchro for electronic flash fo l/125 second;                                                    Ch
                             M - synchro for flash-bulbs to 1/1000 second.
                 Viewf  inder:     Eye-level pentaprism. Extremely bright. Has central Micro Diaprism area surrounded by plain
                 ground glass circle. Balance is fine, almost invisible  fresnel ground glass area. Meter needle,f,/stops and safety
                  signals visible next to focusing area.   I
               Mi rro r Action:     Vertical travel, instant return.
               Exposure    Metering:     Center weighted dual CdS, Through-The-Lens  (TTL). KONICA EE,(Electric-Eye)   i            lenses stop down automatically after shutter release is depressed. No need to match needle to a mark. Focusing,
                 metering at full  lens aperture. Meter system coupled to film and shutter speeds.  With manual and preset
                  lens operation,  lens is stopped-down or Shutter Speed Dial (10) turned until meter needle reaches index mark
                   (opposite  t/I.4)  in Viewfinder. Battery check visible  in Viewfinder.
            EE  Coupling   Ronge:  Ev 2.5 to EV 18 at ASA 100.
                 Film   Sen'sitivity    Ronge:  ASA 25 to 1600 (DIN 15 to 33).
                    Filp   Wind:   Single stroke lever, cocks shutter and transports film. 154o stroke. In operation lever stops 20o
                   from body position for fast shooting without removing eye from camera.
                 Film   Counter:    Resets self to "Start"  automatically as camera back is opened. Indicatesnumberofshots
                                      DCDI.l t" .-der glass, protected against dust and dirt.                    "-p"rea:
                 F i I m R e w  i n d:  Film rewind crank. Rewind Button (35) in base of camera remains depressed during rewinding.
            Dimensions ond Weight:
                                          with f/ 1.8 lens:  5-314u (wide) x38/4n (high) x 3-l/2't (deep). 33 ozs.
                                          with f,/1.4lens:  5-3/4" (wide) x 34/4tt (high) x g-1./2tt (deep). 36 ozs.
                                          with f/1.2 lens: 5-3/4" (wide) x 3-3/4u (high) x 3-3,'4" (deep). 43 ozs.
                                                                                                7

                                                                                                                                                                                                                                        id--r        !r&!
View original page 8Page 9 · Read text
INSERTING AND CHECKING BATTERIES
      w

 I NS E RTI NG BATT E RI ES             BATTERY CHECK

The compound CdS meter of the KONICA Autoreflex     The batteries are checked in the followinq manner:3'T"  operates on two Mallory No. PX-675 1.3V
mercury batteries. Handle batteries by edges to     Remove automatic lens by depressing Lens Release
keep current conducting surfaces clean. If soiled,       Button  (6),  grip lens by  silver-colored band and
wipe clean with soft, dry cloth.                             rotate  it  counterclockwise.  It  is not necessary to
                                                     remove manual or preset (non-EE) lenses for battery
Turn the cover of the Mercury Battery Chamber (32)      check purposes.
counterclockwise with a coin and detach it  from
the chamber.                                                             Lift  outer ring surrounding Shutter Speed Di.al (10)
                                               and turn  it to set ASA 100 in Film Soeed Indicator
Insert the two cells into the Mercury Battery Chamber,      Window (23).
       side up, according to the figure printed on
the seal inside the chamber.                               Set Shutter Speed Dial at 1/125 sec.
After the cells have been put into position, put the
cover on the chamber and screw it tightly.
View original page 9Page 11 · Read text
FILM LOADING


     The KONICA Autoreflex ..T" takes standard 35mm              Pull  the Back Cover Lock (30) and open the       film cartridges.                                                         Back Cover (37) of the camera.
    When loading avoid  direct  sunlight.  Try  to load
     camera in the shade.  If no shade is available, use            Place  the  film  cartridge  in  Film  Cartridge
      your own body to shade the camera.                         Chamber (29) as shown in illustration  (above,
                                                                                      right).


l0
View original page 11Page 12 · Read text
.lt . \
                                              www.butkus.us
                                                            3
                                                          o
                                                                                                                                                                               Izo


Draw film leader across film gate and insert          After closing the camera, turn the Film Re-
tip into any Slit (38) in the Fi.lm Take-up         wind Crank (15) gently clockwise to take up
Spool (IGL)  (Insta-Grip Loading) (39). The          the slack of the film in the cartridge.
film will be gripped instantly as you

Wind one turn of film onto the Take-up Spool
(39) by turning the Film Transport Lever (20).
Make sure that the Sprocket Holes in the film
engage the Sprockets (40) in the camera
before closing the camera back.


                                                                                                                                   ll
View original page 12Page 13 · Read text
-l

         a
          .3                                                                                                .,!l)         ':.\                                                                 \./              www.butkus.us                0v€8 ilor                                             -Er*g  -                                    h:i  ;

         To wind off the exposed film leader, operate   TO CHECK FILM ADVANCE
            the Film Transport Lever (20) several times,
             alternately  depressing the Shutter Release
           Button (1) until No. 1 appears opposite the     Movement of the Film Rewind Knob (16) may be
          mark in the Film Counter Window (21).             observed to check  if  film  is moving through the
                                                        camera. First  the slack must be taken out of the
                                                                               film,  as described on page 11.  If  film  is moving
                                                            through the camera, the Film Rewind Knob (16)
    A  single stroke of the Film Transport Lever (20)         will  rotate counterclockwise.
     moves the film one frame forward, cocks the shutter,
     and advances the film counter. The latter indicates
      the number of pictures  that have been taken. At
      the end of shooting,  after the  film has been re-
     wound,  opening the camera back  automatically
      returns the film counter to "S"  (Start) position.


12
View original page 13Page 14 · Read text
www.butkus.us     KONTCAqtrSHUTTER AND APERTURE                                                AUTOREFLEX JI
                                          F-number Lzl.4 Ls 2    2.8          5.6         ll    r6                                                                                                                                                                                                                                                                                                                                                                                                                                                                            CNIc{{ma
                                                                                                                           z0
                                                   Amount-of-
                                                       Light Ratio                    2 1+++++,+rThe KONICA Autoreflex "T"   is equipped with an     Intermediate speeds cannot be set on the Copal                          !mv-{cIall-metal, Hy-Synchro Copal Square S focal plane    Square S shutter. However, speeds may be changed    m
shutter.  It controls the length of time that light  is     before or after cocking the shutter.
permitted to enter the camera and expose the film.
A unique feature of the Copal Square S shutter    The amount of  light  that  is  allowed to enter the
mounted in the KONICA Autoreflex "T"   is that the    camera and strike the film  is controlled by the iris
Shutter Speed Dial  (10) is  located on top of the    diaphragm. The  relative  size  of  the opening or
camera, where shutter speeds are changed with the     aperture is usually indicated by the use of f/stops.
camera at eye level  for more convenient operation.    The  larger the  f/stop  number the less  light  ad-
The Copal Square S shutter  is noted for extreme     mitted. Thus f/16 admits less light than  f /4.split second accuracy. Shutter speeds are linearly
proportional as follows:  L,  L/2,   l/4,   l/8,   l/15,    When a KONICA  "Electric-Eye"   (EE)  lens  is                                                                                                     ttT"                           L/5OO,                                             second,                  L/25O,                              and 1/1000t/30,      1/60,             l/125,                                                                                                                                                                                                                                                                                   i s                                                     on the                                                                                             aperture                                             mounted                                                                          Autoreflex                                                                                                                                                 , the      t'B"            (Bulb),                                                 thanplus               used                            for                         exposures                                          of more                                                        automatically                                                                  closed                                                                                    to the correct                                                                                                      f/stop                                                                                                               after the
1 second duration.                                       shutter  release  is  pressed. The needle  in  the
The Copal Square S shutter  is  synchronized for    window indicates the f/stop  to which the aperture
electronic  flash speeds up to l/125  second. This      will   close  at  the moment of  exposure by  the
figure  is marked in red on the Shutter Speed Dial   KONIMATIC TTL (through-the-1ens) exposure meter
(10). Expendable flash bulbs  of "M"  and "FP"      system. It  is not necessary to match the needle totypes may be used at all speeds up to and including    a mark when the EE lenses are used.
1/1000 second.                                                    Preset and manual diaphragm lenses may also be
The "8"   (Bulb) is used to make exposures longer    used with the KONIMATIC metering system. With
than 1 second. A tripod or other support should be     these,  the diaphragm is  stopped down manually
used  for  t'8"  and for  all  shutter speeds slower      until  the meter needle is  opposite the mark near
than 1/30 second.                                      the  f /L.4 setting in the finder.                        r3
View original page 14Page 15 · Read text
KONIMATIC TTL METERING AND CONTROLS
     The Autoreflex "T"  is the world's first professional      Through-The-Lens (TTL)  metering 35mm Single
     Lens  Reflex camera to have fully  automatic
     KONIMATIC exposure control. The KONIMATIC
      meter system establishes contact to all KONICA EE
   -   lenses by means of a meter-actuated coupling lever.
     When the shutter release is depressed, the spring
      loaded aperture in the lens is tripped to close to
      the limit determined by this coupling lever. This
       limit is the precise aperture required for a perfect
      exposure at that instant when you press the button.                                                     Stopped-Down Exposure Metering: With KONICA
      With a KONICA Hexanon EE lens installedinyour      and other lenses having manual or preset diaphragm       Autoreflex ttTt' there is no need to waste time be-      (not EE), as well as with extension tubes and
      fore shooting to match the needle to a mark. You      bellows, the Stopped-Down method is used. Here
      only need to focus and compose, then press the      the exposure is read at the actual aperture used to
       shutter release -  remaining assured all the time     make the picture. The needle in the Control Center   ,    that correct exposure is being taken care of. Full       is then simply brought to the Index Mark opposite
       concentration can thus be made on the spontaneous           tll^e f/1.4 figure. This can also be done by changing
      or esthetic needs of your photography. In actuality,      the shutter speed setting. Literally thousands of
      the KONICA AutorefIex "T"  offers not one b-ut      lenses can be used with this system. In addition to
       three optional methods of arriuing' at the correct or     KONICA Auto-Reflex lenses, lenses in mounts for
        desired. exposure.                             KONICA FP, Pentax/Praktica, Exakta/Topcon and
                                                            Nikon/Nikkormat can be used for the Stopped-Down
     KON IMATIC TTL Meterins: With a KONICA Hexanon      metering with the Autoreflex "T" via their respective                                                KONICA Lens Adapters.    @your                        Autoreflex "T",  the      needle in the viewfinder serves only to let you know
      at which f/stop the fully automatic metering system      Monuol Exposure Settings: Should you have some
       will make the picture for you. Shutter and diaphragm                                  nd, you need oniy move
       are cross-coupled. Thus if you choose a high shutter      the diaphragm ring  of your KONICA Hexanon EE
      speed to stop action, the diaphragm will be set for      lens from the EE setting to any f/stop desired. Thus,
     a wider opening automatically. On the other hand,       with  this and the other metering systems just  dis-
      should you need a smaller stop for greater Depth-      cussed, exposure with the KONICA Autoreflex .3T',
       of-Field, simply turn the Shutter Speed Dial (10) to     becomes a versatile tool which gives you freedom to
     a slower speed. The needle in the information        exploit  its automation or to choose other exposure
r ,    center of the Viewfinder will keep you informed.          methods.t4                                                                                                                                                                                                                                                                                                                                                                                                                                                                                                                                                                                                                                                                                                                            I
                                                                                                                                                                             '.                                           -\,,- -- ."-                                                             ,,,:                                II
View original page 15Page 23 · Read text
HOLDING YOUR CAMERA


                     t|"


       Hold the Comero securely - comfortobly for your hond

    One secret  for  getting ultra-sharp pictures  is  to        Vertical  shots add variety to a series of pictures.
      prevent accidental camera movement. To do this  it      They are especially  desirable when making head
        is  suggested that you hold the camera firmly,  as      and  shoulder  portraits  and  architectural  shots.
     shown in the picture above, cradling the body of      Hold  the camera as shown abcve. This  position
      the Autoreflex  "Ttt  against the face. Depress the       prevents  accidentally  pushing the 'lens  release
       shutter release firmly but gently. Do not punch the       button.
       shutter  release  but  squeeze the  exposure  off
      smoothly for t'jar-freett  operation.

22
View original page 23Page 28 · Read text
FILM REWIND                                                 www.butkus.us                               I

                                                                                                                                  :0
                                                                 m
                                                                                                                                                                                      =zI


                       "Je


After  all the pictures on the ro11 have been taken,        Depress the Film Rewind Button (35). Once it
the film must be rewound into the cartridge before         is depressed, the button remains in place.
opening the camera back. Otherwise the film  will
be completely exposed and useless.
                                                     Raise the Film Rewind Crank (15) and turn  it in
                                                          the  directi.on inscribed on  it,  turning not too
                                                                rapidly and in one continuous motion.
Ari occasional look at the Film Counter (21) will
help keep you posted as to when you are coming to
the end of the ro11 and prevent your accidentally       When tension on the Film Rewind Crank eases,
tearing the film out of the cartridge.  If you should        the film has been fully  rewound. You can now
come to the end of the film while the camera is  at       open the camera back and effortlessly  remove
your eye in shooting position,  the Film Transport         the  cartridge by  tipping   it  towards yourself
Lever (20) will  tighten and refuse to advance even        and letting  it drop out of the bottom opening.
if  the shutter has been released.  If  this happens
do not t'arca it.t Instead, depress the Film Rewind
Button (35) and at the same time move the Film   The  Film Rewind Button  returns  to  its  original
Transport Lever as far as  it  will  go.  It  will  then    position  once the Film  Transport Lever  is again
snap back into its normal position.                        actuate d.
                                                                                                27
View original page 28Page 29 · Read text
FLASH PHOTOGRAPHY

     The all metal Copal Square S focal plane shutter is
      synchronized for use with flash bulbs and electronic
       flash. These light  sources are useful  for making
      action-stopping  photos  in  dim  light.  Their high
       light output makes it possible to produce negatives
      that have good Depth-of-Field  too, and an overall
     sharpness Flash and electronic flash are also used
      outdoors to lighten or fill  in deep shadows.


                                                                                        www.butkus.us


                                         Two starrdard 'rPC" flash outlets are provided on
                                                              the front of the KONICA Autoreflex '3T". The uppery'                                                       or "Mt t outlet, is for use with expendable flash
                                                         bulbs or flash cubes. The lowe1, or "Xtt outlet, is
                                                                          for use with electronic flash.


                                           The  "M"  Out|et:    This is for use with the
                                                           standard "M" type flash bulbs or focal plane type                                                            bulbs or flash cubes. A11 speeds to  l/ 10OO may be
                                                              used. ("M" delay is 18 milliseconds.)

                                                                      r'X"                                           The        Outlet:    This is for use with the
                                                               electronic flash units. The Copal Square S shutter
                                                              synchronizes these at all shutter speeds up tol/125
                                                             second. ("X"  delay is -0- milliseconds.)28
View original page 29Page 31 · Read text
CHANGING LENSES


    To Remove fhe Lens                   To Mount your Lens
    {rom th e 'Com ero:                       on the Comero:
     Depress the Lens Interchanging Button (6), grip the           If the lens is to be left off the camera for any length
       silver  portion of the lens barrel,  turn lens barrel        of time, protect the camera interior from dust and
      counterclockwise until the two red dots (one on the      moisture by use of a KONICA Body Cap. Where
      camera body and the other on the lens barrel) align.         this  is not available, keep the camera in a case
     The lens will then come off the camera.                    or dustoroof container.

    NO T E5:
    When the lens is removed, do not touch any part
       of the interior of the camera.
     To mount a KONICA lens on the Autoreflex  "7",
       line up the red dot on the lens barrel lvith the red
      dot on the camera body. The lens will  "seat"   into
      the camera body easily. Then grip the silver part
      of  the  lens  barrel and turn the lens clockwrse
       until  it clicks  into place.
30
View original page 31Page 33 · Read text
USING PRESET OR MANUAL LENSES


          o
                                                        t,octxo          o     gH               E'
       D

    The f/stop settings in the Viewfinder are not used
    when the stopped-down method of exposure de-
     termination is employed. Occasionally the Meter
     Needle will not come to rest opposite the stopped-    When o monuol preset  I ens    down Index Mark, no matter in which direction the     Aperture Ring (14) is turned. In this case, adjust      is to be used
     the Shutter Speed Dial (10) until the needle lines     up with the Index Mark.                             For convenience with preset diaphragm lenses, set                                                     the preset selector ring to the smallest aperture.
     In photomicrography the Meter Needle is brought to      This will then allow the diaphragm setting ring to
      the Index Mark by adjusting the light and the shutter        ride free to any desi.red setting in the lens' range.
      speed.
     When using Hexanon reflex minor optics lenses, the
     Meter Needle is brought to the index by bringing
     the appropridte neutral density filter into place, or
    by adjusting the shutter. speed. These lenses do
      not have an iris diaphragm.
     When stopping a lens down for close-ups, keep your
    eye against the Viewfinder ey'epiece to protect the
      latter from the entry of strong light.
32
View original page 33Page 37 · Read text
ACCESSORIES
      Len s Hood s               KONI CA L ENS MOUN T ADAP T E RS
     Prevent stray light from striking    KONICA Adopter
      lens   surfaces  and  causing     Permits use of KONICA F, FS, FP, FM lenses with
     unwanted    reflections.   Each      "match-needlet t expo sure automation.
    KONICA Lens Hood is  specific-
       ally  calculated  and shaped to
      give maximum protection to the      Exokto  Adopter
      lens on which it is used.             Permits use of Exakta lenses with "match-needlett
                                        exposure automation.
                                Praktico Adopter
                                        Permits use of Pentax,/Praktica lenses with "match-
                                             needlet' exposure automation.
                                  N ikon Adopter
                                        Permits use of Nikon lenses with "match-needlett
                                        exposure automation, Q
                                Close-Up Attochment - Len s ll
                                    The No. 1 permits close-ups in a range from
                                          25" to I2y2"; the No. 2 from 14" to 11r'. Both
                                may be combined for a range of  1LL/2" to 9",
                                     They screw into the lens like a filter. Foruse
                                              with normal lenses. No change in exposure Q In         is necessary.
                    .A,yl  fffi
36        YQ O
View original page 37Page 39 · Read text
ACCESSORIES
1 Auto Ring ond                     {* Eyesight Correction     e Angle  Finder    ll
  Double Coble Releose          Lenses                  The Angle Finder is useful for
                                                             low  angle photography, for
'When Hexanon EE (Electric-Eye) lenses    Eyesight  correction lenses      ttsneaktt shots with the camera
are u sed with extension tubes or bellows,   make  it possible for near or    held sideways, and for con-
the Auto hing plus the Double Cable     far-sighted persons'to see the     venient viewing and focusing
Release    provide    semi-automatic     focusing screen clearly without    when the KONICA Autoreflex
diaphragm operation and permit "wide    wearing glasses. They  are      t'T"   is mounted high on aopen" viewing and focusing. The Auto     available in + 1, +2, and * 3      tripod or a copying stand.
Ring containS the diaphragm stop-down     and -2.5 diopters. They screwactuating  mechanism.  The  Double     directly into the Viewfinder
Cable Release  is  connected to  the
Auto Ring and the Shutter Release:
Pressure on the plunger releases the
diaphragm, then the shutter, in proper
 sequence.    ^s    sxo          C'-
                     S KONICA
                              Coble Releose
                             Use of a KONICA Cable Re-
                                   lease when the camera is
                                   mounted on a tripod or other
                                           support helps make rock-steady
                                    exposures even at very slow
                                             shutter speeds.

                                                                                                    |*GWr"'"                                 ,-\
View original page 39Related documents and language editions

KonicaPDF
Konica Autoreflex T (Ver 1)
User manual
40 pages · EnglishRead →
KonicaPDF
Konica Autoreflex T 2
User manual
35 pages · EnglishRead →
KonicaPDF
Konica Autoreflex TPublic Relations Booklet
Product booklet
20 pages · EnglishRead →

KonicaPDF
Konica Autoreflex T 01
User manual
72 pages · German, French, SpanishRead →
From the M. Butkus archive. Original publisher and archive notices are retained.
Check the model and edition against your equipment.
PDF verified 2026-10-10.