Film cameras
Konica Autoreflex T 2 User manual
User manual for Konica Autoreflex T 2. 35 pages in English. Read the original PDF, download or print a copy without registration.
35 pagesEnglish1.3 MB PDF
Loading your manual…Open PDF directly
Document details
- Brand
- Konica
- Model / document
- Konica Autoreflex T 2
- Document type
- User manual
- Language
- English
- Pages
- 35
- File size
- 1.3 MB
- Category
- Film cameras
- Document date
- Not specified in catalog
Search available document text
Find a term, then jump to its page in the original PDF. Image-only pages may not be searchable; check the PDF for exact wording and diagrams.
Page 2 · Read text
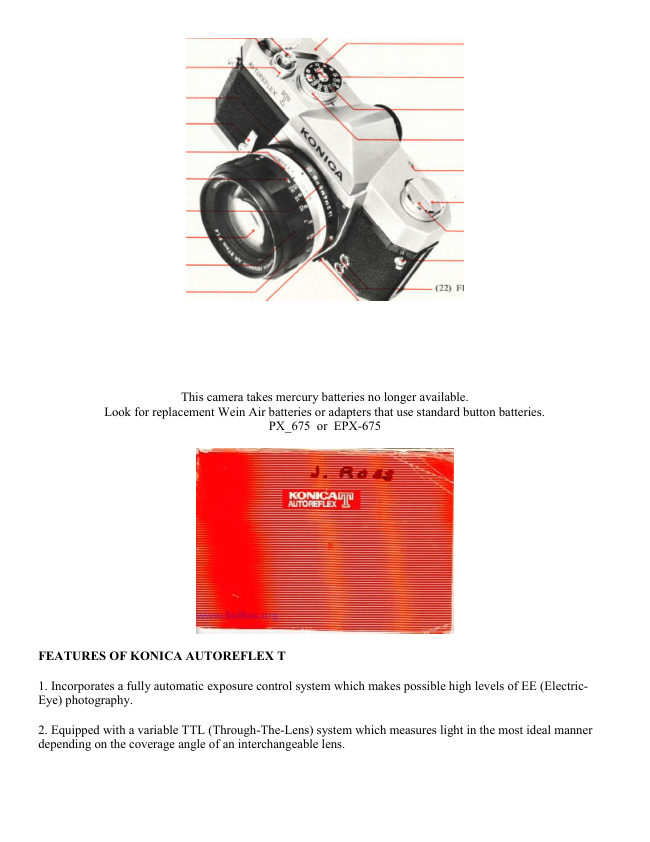
This camera takes mercury batteries no longer available.
          Look for replacement Wein Air batteries or adapters that use standard button batteries.
                                 PX_675 or EPX-675


FEATURES OF KONICA AUTOREFLEX T

1. Incorporates a fully automatic exposure control system which makes possible high levels of EE (Electric-
Eye) photography.

2. Equipped with a variable TTL (Through-The-Lens) system which measures light in the most ideal manner
depending on the coverage angle of an interchangeable lens.
View original page 2Page 3 · Read text
3. The viewfinder is bright and the light metering system is of the full lens opening type. The lens may be
stopped down for light metering, wherever necessary.

4. Incorporates a polymechanical viewfinder which makes it possible to check all data for photographing at an
instant.

5. Color Dynamic Coating which gives fully display to excellent effects.

6. A system camera which makes possible multipurpose photographing with an ample series of interchangeable
lenses and accessories.


CONTENTS


                                                (Manual Picture-Taking)
Basic Manipulation for EE Photographing ......... 6
                                                      Training of Camera . .,
Major Specifications of KONICA Autoreflex T ....... 9
                                                  Focusing . . . .. . . .
Name of Each Part ..................... 10
                                               Depth of Field .....
Loading of Mercury Battery Cells
                                             Use of Self-Timer . .
   (Meter Switch/Check of Batteries)
                                                 Film Rewind ...............
Film Loading
                                                     Synchroflash Photography ......
  (Set Film Speed)
                                   B (Bulb) Exposure . .
Shutter
                                                Lens Interchange . . .
Aperture
                                                   Photographing in Stopped-down Metering System
Metering Systems of TTL Meter . . .
                                 HEXANON Interchangeable Lenses .......
Looking at Meter inside Viewfinder .
                                                     Accessories . . . .. . . . . . .. ...
Electric-Eye Photography
                                                 Maintenance of Camera and Lens .
View original page 3Page 4 · Read text
.

BASIC MANIPULATION FOR EE PHOTOGRAPHING

1. Insert mercury batteries and put ON the meter switch.


2. Insert film and set the film sensitivity speed.


3. Set your camera to the EE mark.
View original page 4
Page 5 · Read text
4. Determine a shutter speed. (1/125 sec. for outdoor shooting and l/30 sec. for indoor)


5. Focus and frame.
View original page 5
Page 6 · Read text
6. Check the exposure.


7. Depress the shutter button to take a picture.


8. After a roll of film has completely be taken rewind the film.


MAJOR SPECIFICATIONS OF KONICA AUTOREFLEX T
Type: 35mm SLR equipped with focal plane shutter and TTL-EE system.

Film: 35mm film in cartridge, 20 or 36 exposure.

Picture Size: 24 x 36mm. (1" x 1-1/2").

Standard Lens: HEXANON AR 57mm f/1.2 (6-group and 7-element), AR 57mm f/1.4 (5-group and 6
element), AR 57mm f/1.8 (5-group and 6 element). Equipped with EE lock and closest taking distance 1-1/2R
(0.45m),  Color Dynamic Coating.

Mount: KONICA Mount 11 of bayonet type, diameter 47mm, flange back 40 .5mm.

Aperture Device: Fully automatic EE aperture, smallest aperture f/16. Equipped with a manual aperture device
for checking depth of field.
View original page 6
Page 7 · Read text
Shutter: Up-and-down running metal focal plane High Synchro shutter "Copal Square S" with speeds of B 1 to
1/1000 sec. Speed scale calibrated in equally graduated 1: 2 progression, single-spindle, non revolving dial,
built-in self-timer, M and X synchro. M, FP and MF coupled to all speeds with M and electronic light to 1/125
sec. with X.

Viewfinder: Eye-level viewfinder using pentaprism. Fresnel lens also used. Built-in rangefinder focusing lens
with Micro Dia Prism of real-image dispersion alignment type. Polymechanical Viewfinder in which shutter
speed scale, aperture scale, meter needle, exposure warning marks, mark indicating f-number at full lens
opening, manual indicator mark, index point for stopped-down metering and battery check mark are all visible.

Exposure Adjustment: Variable TTL system using 2 super high sensitive compound CdS cells. Fully
automatic EE aperture lens (light metering at full opening): preference given to shutter determination for EE
picture-taking. For manual picture taking in automatically controlled correct aperture system, film speed, shutter
speed, correct aperture coupled to f-number at full lens opening are read. Manual pre-set aperture lens (stopped-
down metering): shutter speed, film speed and aperture are set to index points (zero method). Two 1.3V
mercury batteries used as electric source, battery switch and check device.

EE Coupling Range: EVI. 5 (f/1.2 with 1/2 sec.) EV18 (f/16 with 1/1000 sec.) with ASA 100 for f/1.2 lens.

Film Sensitivity Range: ASA 25 to 1600, DIN 15 to 33.

Film Loading: KONICA EL Type (patented Konireel Used).

Film Wind: Film wound with top lever in one action (winding in are of 162 degrees with 30 degrees play),
double exposure prevention.

Film Counter: Automatic return type indicating number of pictures exposed.

Film Rewind: Crank type. Rewind button automatically returns.

Dimensions and Weight:  With f/1.2: 5-3/4"(w)x3-3/4"(h)x3-3/4"(t), 43ozs.
With f/1.4: 5-3/4"(w)x3-3/4"(h)x3-1/2"(t), 36ozs.
With f/1.8: 5-3/4',(w)x3-3/4"(h)x3-1/2"(t), 34ozs.
Without lens: 5-3/4"(w)x3-3/4"(h)xl-1/4"(t), 26ozs.

The KONICA Autoreflex T's TTL meter takes two 1.3V mercury battery cells as its electric source. Wipe the
separately enclosed mercury battery cells with a piece of dry and clean cloth and put them into the mercury
battery chamber.

(Webmaster: this is a mercury battery, not available for sale in the U.S.
Check my web page for Mercury Battery Replacements.
There are several options.

1. Turn the cover of the Mercury Battery Chamber (39) counterclockwise with a coin or something alike and
detach it from the chamber.

2. Insert the two cells into the mercury battery chamber the "+" side up, as indicated in the figure printed on the
seal inside the chamber.
View original page 7
Page 8 · Read text
3. Turn the cover of the mercury battery chamber clockwise and make sure that it has been screwed tightly.

Meter Switch

The meter-switch will be put ON when the Lock Lever (3) placed under the Shutter Button (1) is turned so that
it comes in alignment with the red index point.


Unless pictures are to be taken, set the lever to "L" and the switch will be kept put OFF, preventing the mercury
battery cells from accidentally running down. At the same time, the shutter button wi be locked. Use this system
when the camera is to be carried around with the film winding lever wound.


Check of Batteries

The expected span of serviceability of a mercury battery cell will be over one year in normal use. With the span
of its serviceability getting to a close, its voltage will suddenly diminish. The degree to which the cells have run
down may be checked while pictures are taken, but it will also be possible to check it in the following manner.
View original page 8
Page 9 · Read text
1. While the Lens Interchanging Button (23) is depressed, turn the lens counterclockwise and detach it From the
camera. (Refer to Page 54.) There is no need to dismount your lens, if it is not an automatic aperture one with
an EE mark.

2. Grip and lift up the place outside the Shutter Speed Dial (17) and set the film speed to ASA 100.

3. Turn the shutter speed dial and set it to 1/125 sec.

4. While looking into the viewfinder, depress the Battery Check Button (27) on the bottom of your camera. The
capacity of the battery cells will be adequate if the Meter Needle (45) is found to be swinging under the Battery
Check Mark (46). If the meter needle is no longer able to reach the mark, replace the battery cells with new
ones.


As mentioned above, every index point for the battery check is indicated in red. In a word, the essential thing
will be for the meter needle to swing under the red mark after the film and shutter speeds are aligned with the
red marks.
View original page 9
Page 10 · Read text
The meter takes two 1.3V National H-C, Mallory PX-675 or Eveready EPX-675 mercury battery cells. Care
must be exercised in selecting the cells as there are cells which look identical in shape but differ in stipulated
voltage, such as battery cells. Make sure the battery cover has holes in it. The replacement require "air" to
operate !
See this link on a Wein Air replacement battery.

In the event that your camera is not to be used over a long span of time, take out the mercury battery cells and
keep them in a place free from moisture.

FILM LOADING

The KONICA Autoreflex T takes 35mm rod film, which comes in a cartridge. For film loading, avoid the direct
sunlight and do it in the shade. If there is no shade, one way would be to use the shadow of your body.


1. Put the Back Cover Lock (24) and open the Back Cover.

2. Put a film cartridge into the Film Chamber (26) as though it skid into the chamber at a slant from above the
underside.

3. Pull out the film while the cartridge is lightly pressed down and then choose any slit of the Film Take-up
Spool (32) into which the film tip may be inserted with ease and insert the film into the slit.
View original page 10
Page 11 · Read text
4. While lightly pressing down the cartridge, turn the Film Winding Lever (13) and take up the film on the
spool. Ascertain that the teeth of the Sprocket (31) are in gear with film perforations before the back cover is
closed. Depress the back cover with a finger tip, and it will be closed with ease.


5. Flip up the Film Rewind Crank (19) and turn it in the direction indicated by an arrow mark on it to reduce the
slack of the film.
View original page 11
Page 12 · Read text
6. Turn the film winding lever until it does not move further and depress the Shutter Button (1). Repeat this
action tin the figure "1" comes in alignment with the index mark in the window of the Film Counter. (2). If the
him is transported in the correct manner when the film winding lever is turned, the Film Rewind Knob (20) will
revolve counterclockwise.


If it does not turn counterclockwise, rewind the film (see Page 48) and turn the film winding lever until it does
not move further and the film will be transported by one frame and the shutter charged at the same time. The
mirror and the automatic aperture will also be set. Simultaneously, the film counter will advance by one
reading.
View original page 12
Page 13 · Read text
7. Set Film Speed (ASA)

The ASA and DIN scales visible in the film speed indicator window indicate the degrees to which film is
sensitive to light. The film speed of your film is indicated on the box in which it is contained and in its
instruction booklet. (Figures in brackets refer to intermediate points of sensitivity.)

SHUTTER

A shutter is designed to control the amount of light reaching the film surface in terms of time and
photographically to fix an image of a subject on it. The shutter speed scale has calibrations of B and I to 1/1000
sec. and the denominator of each speed is indicated on the shutter speed dial. The shutter speed may be adjusted
simply by bringing a reading in line with the index mark

Shutter speed calibrations are also visible in the viewfinder, thus making it possible to ascertain the speed while
looking through the viewfinder.

"B" stands for bulb exposure and is used when there is the need for the exposure of over one second. (Page 53)

The red figure of "125" is the maximum shutter speed for synchronization with an electronic light.

Do not turn the shutter speed dial when the shutter button is depressed.


APERTURE

The lens aperture is designed to control the amount of light reaching the film surface in terms of area and the
depth of field (see Page 40). Your camera's EE system will automatically determine the correct aperture value,
once the EE mark on the aperture ring is aligned with the index mark. Manual aperture is also usable (Page 35).
In either event the fully automatic aperture system will work and the lens will be stopped down to a determined
f-number only during the split moment when the shutter is depressed and then automatically return to the full
opening after a picture has been taken.
View original page 13
Page 14 · Read text
The amount of light going through the lens will reduce in proportion to a rise in the aperture value. The
correlation, as indicated in the above figure, is such that the brightness of the lens reduces by half in proportion
as the aperture enlarges by one reading.

The lens having the EE Release Button (12) at its aperture ring is equipped with an EE lock. In the event that
the camera is released from the electric eye system and used for manual aperture, depress this button and turn it.


The aperture is continually variable, and therefore an intermediate point between readings on the aperture ring
is usable.


METERING SYSTEMS OF TTL METER

The KONICA Autoreflex T's TTL meter not only measures light reaching the film plane through the lens but
also incorporates a variable metering system in which the spot metering method, the center spot metering
method and the all-frame average metering method are automatically selected, depending on the coverage of the
lens. This system makes it possible to measure light with the lens kept at its full opening while looking through
the bright viewfinder and to measure light with the lens stopped down to a desired f-number.
View original page 14
Page 15 · Read text
It is the most ideal metering system in which deep hoods are fitted to the two compound CdS.cells on both sides
of the viewfinder . eyepiece and the light intake device is slanted inwards and in which the brightness of a
subject whose image is formed on the focusing glass plate as indicated in the figure is measured while a
curvature of the


NOTE: The KONICA Autoreflex T does not take any fully automatic EE aperture lens prepared for the
Autoreflex as it is. Make sure that you use it after it has been remodeled into a lens for use on the Autoreflex T
(with f-numbers). Remodeling work is quite simple.

Sensitivity distribution invariable metering system
View original page 15
Page 16 · Read text
LOOKING AT METER INSIDE VIEWFINDER

F-NUMBER FOR CORRECT EXPOSURE: When the Meter Needle (45) stops within the range of correct
exposure, the f-number on the aperture scale (47) to which the meter needle points is the aperture to which the
taking lens will be set when the shutter is released for a shot.

CORRECT EXPOSURE RANGE: For an AR lens which is not f/1.2 in brightness, the Mark Indicating the F-
number (44) at the Full Lens Opening shows the f-number at the full opening of the lens used on your camera.
If the meter needle is aligned with this red mark, pictures will be under-exposed. The mark indicating the f-
number at the full opening of the lens win move down if the meter is not coupled. In other words, the mark will
also show the range where the meter is coupled. In EE picture-taking, therefore, the area sandwiched between
the upper and lower red marks is the correct exposure range.

INDICATION OF SHUTTER SPEED SCALE: The speed at which the shutter will be released is indicated
on the Shutter Speed Scale (42) in the lower part of the viewfinder


MANUAL INDICATOR MARK: When the EE device is released and the camera is set to manual picture-
taking or when the stopped-down metering system is used, the Manual Aperture Indicator Mark (43) "M" will
appear over the meter window, showing that a picture is not to be taken under EE system.

INDEX POINT FOR STOPPED-DOWN METERING: For stopped-down metering, the meter needle will
be brought in line with the Index Point for Stopped-down Metering (41) to secure a correct exposure. (Refer to
"Stopped-down Metering" on Page 57.)

BATTERY CHECK MARK: The Battery Check Mark (46) is used to check the serviceability of the mercury
battery cells which serve as the electric source of the meter. (Refer to 'Battery Check" on Page 16.)
View original page 16
Page 17 · Read text
ELECTRIC-EYE PHOTOGRAPHY

(Light Metering at Full Lens Opening)

This method is commonly used when pictures are taken under the EE system with an AR lens having the EE
mark.

1. Set Your Camera to EE Mark.

Turn the Aperture Ring (11) arid bring the EE Mark (4) in line with the index point. The EE lock will click into
position.


2. Determine Shutter Speed.

Turn the Shutter Speed Dial (17), select a reading on the Shutter Speed Scale (16) suitable for your subject and
bring it in line with the index mark. In normal circumstances, it is convenient to set the shutter speed to 1/125
see, for outdoor shooting and 1/30 sec. for indoor picture-taking.
View original page 17
Page 18 · Read text
3. Look Through Viewfinder.


Train your camera at the subject look through the viewfinder, focus the lens, flame your subject and look at the
Meter Needle (45) in the viewfinder. If the meter needle is not aligned with the upper or lower red mark
(exposure limit mark), You will always be able to secure correct exposure.


(Webmaster: depending on the lens installed, the top red mark will cover more of the larger F-stops.  In the
overexposure image note the red meter arm in the bottom of the metering range in the red. Most other camera
makers have the overexposure at the TOP of the metering range)

When the meter needle indicates an under-exposure, choose a slower shutter speed. When it indicates an over-
exposure, select a faster shutter speed. Correct exposure may be secured as long as the meter needle is not
aligned with the upper or lower red mark.

In the event that you want to give priority to the selection of a lens aperture over a shutter speed because of a
desired depth of field, turn the shutter speed dial and make an adjustment so that the needle will indicate the
desired f-number. No intermediate points between shutter speed readings are usable, so make sure that the
shutter speed dial clicks into position.
View original page 18
Page 19 · Read text
It will be quite meaningless even if the meter is visible within the correct exposure range with the shutter speed
dial set to the "B" reading. Do not use this method.

(Webmaster: in real English - In BULB the meter does not work. It's experience and using the setting off
the film box time to get a correct exposure.)


Manual Picture-Taking

When a picture is to be taken while using the manual aperture button in ascertaining a depth of field or when it
is to be taken with a flash light, release the EE system and set your camera to manual aperture. While the EE
release button is depressed, turn the aperture ring, detach the EE mark from the index mark and determine an
exposure according to the Manual Aperture Scale (8).


Hold Your Camera Tight

To take a sharp picture, the important thing is to hold your camera in a stable manner to prevent it from being
jarred when the shutter button is depressed. Hold your camera in both hands and make it stable by holding it
against your face and pressing the elbow of your hand supporting the camera against your body.

Particularly, it is more difficult to hold the camera, the long side up than to hold it, the long side down. It would
be advisable to get yourself accustomed to the vertical holding of your camera.
View original page 19
Page 20 · Read text
In taking pictures at slow shutter speeds or with a telephoto lens, the camera is likely to be jarred -if it is held in
the hands. Here, the use of a tripod and a cable release is advisable. The tripod win be fixed to the Tripod Tap-
hole (38) of the underside of the camera and the cable release to the tap-hole of the shutter button.

Focusing is done by turning the Focusing Ring (10) and watching the Micro Dia Prism (49) at the center of the
viewfinder. When the lens is not focused, the image on the micro die prism looks rugged. The image is clearly
visible, however, when the lens is accurately focused. The image of the periphery is also clearly visible. When
an interchangeable lens, long in focal length, is used, it is difficult to observe the Micro Dia Prism. For
focusing, it is advisable to use the Mat Plane (50). To ensure the accurate focusing of the lens, it is necessary to
correct the eyesight of the viewfinder. Eyesight adjustment lenses are available for short- and long-sighted
people.


The viewfinder is of the single-lens-reflex real-image type. Regardless whether the taking distance is far or
short and whether or not a lens is interchanged, the image visible in the field of view is the same as that exposed
on film.
View original page 20
Page 21 · Read text
DEPTH OF FIELD

When the lens is focused on a subject at some distance, not only the subject but also a certain area around the
subject will be sharply delineated in a photograph, and this area is known as a depth of field and has the
following features.

a The bigger the f-number, the larger the depth of field,
b. The further the distance at which the lens is focused, the bigger the depth of field is.

c. When the lens is focused on a subject the depth of field is bigger for the section in Wont of the subject than
the area behind the subject

d The shorter the focal length, the bigger the depth of field


The depth of field may be ascertained either with the depth-of-field scale or with the manual aperture, As for
details, reference is made to the table of depths of field.

Using Table of Depths of Field: The Depth-of-Field Scale (6) is so calibrated that readings identical to those of
the lens aperture are provided on both sides of the Distance Index Mark (51). For example, let us assume that
the distance between the film plane and the subject on which a 57mm f/1.4 lens has been focused is 30 feet. The
depth of field will be 22 to 46 feet for f/4 and 13 feet to on (infinity) for f/16.
View original page 21
Related documents and language editions

KonicaPDF
Konica Autoreflex T (Ver 1)
User manual
40 pages · EnglishRead →

KonicaPDF
Konica Autoreflex T — first version
User manual
41 pages · EnglishRead →
KonicaPDF
Konica Autoreflex TPublic Relations Booklet
Product booklet
20 pages · EnglishRead →

KonicaPDF
Konica Autoreflex T 01
User manual
72 pages · German, French, SpanishRead →
From the M. Butkus archive. Original publisher and archive notices are retained.
Check the model and edition against your equipment.
PDF verified 2026-10-10.