Film cameras
Minox B User manual
User manual for Minox B. 28 pages in English. Read the original PDF, download or print a copy without registration.
28 pagesEnglish1.1 MB PDF
Loading your manual…Open PDF directly
Document details
- Brand
- Minox
- Model / document
- Minox B
- Document type
- User manual
- Language
- English
- Pages
- 28
- File size
- 1.1 MB
- Category
- Film cameras
- Document date
- Not specified in catalog
Search available document text
Find a term, then jump to its page in the original PDF. Image-only pages may not be searchable; check the PDF for exact wording and diagrams.
Page 2 · Read text
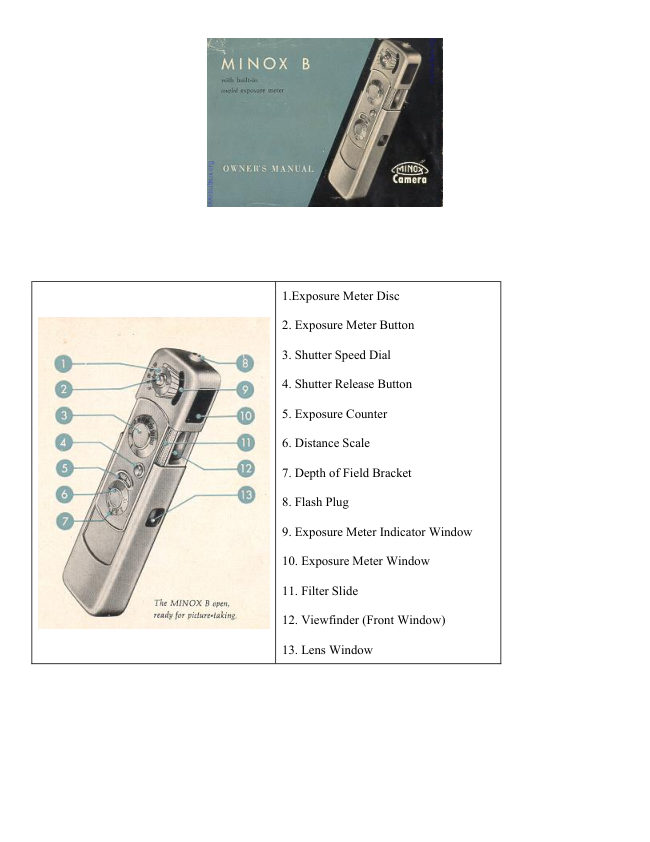
1.Exposure Meter Disc

2. Exposure Meter Button

3. Shutter Speed Dial

4. Shutter Release Button

5. Exposure Counter

6. Distance Scale

7. Depth of Field Bracket

8. Flash Plug

9. Exposure Meter Indicator Window

10. Exposure Meter Window

11. Filter Slide

12. Viewfinder (Front Window)

13. Lens Window
View original page 2
Page 3 · Read text
14. Snap lock for Back Cover

                                                                  15. Film Compartment

                                                                  16. Serial Number

                                                                  17. Viewfinder Eyepiece

                                                                  18. Sliding Back Cover

                                                                  19. Exposure Meter Housing


                             CONTENTS

                                     (Set also alphabetical index on page 48)

How to use the MINOX .............................................................Page

Opening the camera * Telescopic Rapid Wind * Holding the MINOX * Distance setting * Zone of sharpness *
Setting the shutter * Built-in exposure meter * MINOX always works at f/3.s * Viewfinder Exposure counter *
Loading ASA film speeds * Un-loading * Filters * Measuring chain * Take care of your MINOX ........2

Tips for best results

The "best" film * Correct exposure measurement * Steady * Longer exposures Frame your subject * Close-ups
of small things * How to stop moving subjects Flash is easy * It's a colorful world * Copying Changing the film
type . . . 28

What happened? . . . . . . . . . . . . . . . . . . . . . 40

The MINOX Camera Clamp . . . . . . . . . . . . .44

The MINOX Pocket Tripod . . . . . . . . . . . . . 44

The MINOX Slide Projector . . . . . . . . . . . . . 45

The MINOX Enlarger . . . . . . . . . . . . . . . . . . 45

Other MINOX Accessories . . . . . . . . . . . . . .46 - 47

Subject size and depth of field tables . . . . . . . .
View original page 3Page 4 · Read text
Congratulations--with your MINOX B you are embarking on a new, un-burdened kind of picture taking: Your
MINOX B is not only exceptionally small, precise and modern, it is also far easier to use than almost any other
camera. It will give you lots of pleasure!
It's easy to get fine pictures with the MINOX B but, naturally, the more you know about the camera, the better,
more certain, will be the results. This little book wants to show you the way.
Read the various sections carefully--it's time well spent, and will pay off generously in fine MINOX pictures!

The first section explains the best way to hold the MINOX, how to load it and unload it, how to set it.
Part two will help you select the proper kind of film for best results, and tells about color photography, flash,
filters, close-ups, and about some special uses for your MINOX.
The final pages come in handy if something goes wrong; there you will find the cause - usually a minor mistake
which may occur if you have not read the first two sections carefully! And it's so easy to avoid such mistakes.

But NOW--why not get acquainted with the ease of MINOX photography?

HERE'S HOW


                          You are, naturally, anxious to put the first film into
                                 your MINOX and to start shooting pictures. P I e a
                                       s e hold on for little while, and get to know the
                               most important features of the camera while it is
                                                  still unloaded.

                                     You'll be much more confident and sure of success
                            when you know more about the "HOW".
View original page 4Page 5 · Read text
Opening the camera
The camera is closed when you take it out of its leather case. To open it for picture taking, grasp it with both
hands as shown here, and pull it open as far as it will go. This brings out the viewfinder and lens window, and
makes the MINOX ready for shooting.

Telescopic rapid wind


                                                 After you have taken a picture, 'close'
                                                   the camera. Then, for the next
                                                       picture, you pull it open again. That's
                                                   the secret of the telescopic rapid
                                            winding mechanism of the MINOX:
                                         Each time the camera is closed and
                                                 re-opened, the film is advanced for
                                                   the next picture, the shutter is re-
                                          wound, and the exposure counter
                                        moves to the next number, all
                                                  automatically!

                                                  In a hurry? ONE-TWO-your MINOX
                                                              is ready for the next picture. But it's
                                                important to close and open all the
                                     way every time!

                                        The small circle in the lens window
                                                      :indicates that the shutter is wound
                                              ready for the next picture. The circle
                                                 disappears after you have released
                                                   the shutter. That's your signal that
                                          you must 'push-pull' before you take
                                               the next picture. Clear and simple,
                                                                isn't it?


Hold it steady


A steady and firm hold is the best assurance for good pictures with your MINOX.
If the camera moves while you are taking a picture, you are bound to get blurred
results. Hold the camera firmly, yet relaxed, with your hands steadied against the
face. Keep both thumbs under the camera, other fingers on top or at the side so that
the lens and exposure meter window are unobstructed. The illustrations on this and
the next page show the most practical way of holding your MINOX; it's a firm and
steady hold, and nothing covers the lens, viewfinder, or exposure meter window.

It's a good idea to practice this hold in front of a mirror to check yourself, You'll
notice that the same hold is used for horizontal and vertical pictures.
View original page 5Page 6 · Read text
Taking the picture

                       Now that you know the proper hold, look into the viewfinder and
                                 frame your picture in the luminous rectangle; when you're all set,
                                  squeeze the shutter release button gently. A little counter-pressure
                               from the thumb underneath the camera helps to keep the MINOX
                                      steady. The shutter operates so smoothly and quietly--the picture
                                             is taken without effort!

                             The MINOX B requires a minimum of operating steps: Setting
                                     distance and exposure is all that's needed--and easy, too.

                                Above: Correct hold for horizontal pictures

                                    Right: Similar hold for vertical pictures.


Distance setting

                           There are two engraved discs on the control panel of your
                    MINOX; the smaller one is the distance scale. It is
                                calibrated from infinity (oo) to 8 inches, with additional
                           markings 6: 3, 2, 11/2, 1 ft., and 10 inches. A red dot
                                indicates 12 ft., and also serves as a general "snapshot"
                                  setting.


<Setting the distance scale. Arrow points to sharpness zone bracket >

To set a given camera-to-subject distance, rotate the distance dial with your finger on the knurled centre until
the desired distance number is at the black dot of the 'sharpness zone' bracket.

This little bracket is more important than the black dot in its centre:

Let's say you are taking pictures at a picnic, with the distance setting at 12 feet that's (that's the red dot between

    and 6'). The campfire is 12 feet away, some of the guests are sitting at a table 8 feet from the camera,
while one of the youngsters is just bringing an extra log and is now l5 feet away from you. You'll get them all
perfectly sharp in your MINOX picture, because it gives you a sharpness 'bonus' in front and beyond the
focused distance. The zone of sharpness from nearest to farthest distance is also called "depth-of-field". The
bracket along the distance scale tells you the extent of the zone of sharpness for every distance setting.

For most of your pictures, you don't have to set the distance critically. It is sufficient if the main object of your
picture is within the zone of sharpness. The MINOX has exceptionally great depth of field and makes focusing
very simple.
View original page 6Page 7 · Read text
You get the greatest zone of sharpness with the red dot
                             (Snapshot Setting); from 6 feet to infinity (a). This is
                             your ideal choice for all pictures which require quick
                                 readiness, fast shooting. You can shoot groups, games,
                                  travel pictures, races -- whatever comes before your
                              camera--as long as the main point of interest is at least 6
                                   feet from the camera.

                             This snapshot setting (see illustration at top will take
                                care of most of your pictures.

                         Use the snapshot setting for scenery only if an important
                                  part of the foreground is closer than 12 ft. Otherwise,
                            always use the infinity (00) setting for landscape
                                 pictures (sharpness reaches from 12 ft. to infinity).


Two other settings with zones of sharpness from 4 ft. to 11 ft., and from 3 ft. to 6 ft., respectively, are shown in
the illustrations on the previous page. Complete tables showing the depth of field ranges and subject sizes at
various distance settings are shown on page 51. (inside back cover).

As you can see, the zone of sharpness gets smaller at closer distances, and at very close distances it amounts to
inches and less. Therefore, close distances must be set carefully on the distance scale, but that is easy because
the safety chain of your MINOX has small beads for distances corresponding exactly with the close distance
settings engraved on the distance scale. With the chain locked in the camera sod et, held taut and at right angles
from the camera to the subject, the beads are placed at 8,10,12, and 18 inches; the full length of the chain is 24
inches.

To sum up:
You need not set distances beyond 3 feet too critically - make the "sharpness zone" bracket do the work for you.

Set the distance scale so that the important part of the picture is safely within the sharpness zone.

For extreme close-ups always use the measuring chain.

The shutter


                       To produce a well defined, correctly exposed picture, the film must absorb a
                                  definite amount of light. The less light comes from the picture area, the longer
                                    this light must act on the film -- the shutter must stay open for a longer time.
                          Very bright scenes require only a short shutter speed. This length of "exposure"
                                       is regulated with the larger dial on the control panel of your MINOX. You can
                                   set the shutter while the camera is still closed, or after it has been opened,
                            whether the shutter is wound nor not.
View original page 7Page 8 · Read text
To set the shutter speed, place the thumb on the knurled centre of the shutter speed dial while holding the
forefinger under the camera and, with the other hand, turn the camera. (See illustration). It's really very easy.
The engraved figures represent fractions of a second: 2 indicates l/2 second, 1000 is 1/1000 second, etc.

But, don't let these figures worry you--you need not even look at them! Yours is a MINOX B--the built-in
coupled exposure meter does the thinking for you. (See page 29 for some helpful hints on exposure
measurement!)

The built-in coupled exposure meter

The coupled exposure meter distinguishes the MINOX B from the MINOX A camera. You need not estimate
shutter speeds, you don't even have to refer to a table or scale, and then transfer shutter speeds from l/2 to
1/1000 second to the shutter speed dial. The exposure meter is coupled with the shutter speed dial. You simply
match a pointer with an indicator needle --that's all: You have already set the correct shutter speed! Only once--
when you put the first film into the camera --do you set the exposure meter for the 'speed' of the film, and
couple it with the shutter. (see page 20). You need never touch the meter setting again until you use film of a
different speed.

Using the exposure meter is child's play:

Before you take a picture, look at the scene through the viewfinder - just be careful not to cover the front
window of the meter with your finger - and hold down the meter button with the forefinger or third finger of
your left hand. After two or three seconds, let the button go and take the camera from your eye.


Look at the scene through   Turn shutter speed dial until
the viewfinder; hold down   open triangle (upper left
                                          You are are now ready to
the meter button for two or   arrow) points to indicator
                                                          take the picture. Hold the
three seconds: release the    needle (upper right arrow)
                                                  camera correctly!
button and take the camera   along connection line. This
from your eye                 sets exposure automatically

At one end of the camera you will see the curved indicator window of the exposure meter, and next to it--
surrounding the meter button--a flat disc with an open triangle mark and a green dot. The rotating disc and
indicator window are connected by thin black lines. When you turn the shutter speed dial, the meter disc with
the triangle mark also turns: both are coupled. Now turn the shutter speed dial until the open triangle is set to the
black line that connects with the indicator needle. If the needle is between two lines, set the open triangle
between the two lines also.
View original page 8Page 9 · Read text
By thus pointing the open triangle to the line leading to the indicator needle, you have automatically set the
correct shutter speed. If the shutter speed dial happens to be set between engraved numbers, don't worry: The
shutter speed scale of the MINOX B is matched with the exposure meter, providing an infinite range of speeds
between 1/2 and 1/000 second.

If you are using the green filter with black and white film (see page 24), turn the green dot - instead of the open
triangle - to the indicator needle. This setting automatically compensates for the exposure difference required by
the green filter.

The second measuring range


                                          Outdoor exposure with ASA as and
                              ASA so film are usually somewhere
                                          between 1/50 and 1/1000 second.
                                        However, with faster films, and for
                                            very bright scenes (beach in brilliant
                                                sun, glaciers, snow in high mountain
                                                    areas, etc.) even 1/000 second may
                                           produce overexposure.


                         To switch to second measuring range: push filter slide
                                           all the way in.


The shutter speed dial cannot be turned past the '1000' mark to line up the meter disc with indicator needle.
Therefore, a second measuring range has been provided.

If you cannot line up the open triangle with the indicator needle, push the filter slide above the viewfinder
window all the way in (see illustration). This puts a neutral density (grey) filter in front of the lens, and switches
the exposure meter automatically to compensate for the exposure difference imposed by the filter.

After this "switch", proceed as usual: Look at the scene through the viewfinder - hold down the meter button
two or three seconds - turn open triangle to indicator needle. The neutral density filter now puts the exposure
into the normal speed scale.

Whenever the resulting shutter speed is slower than 1/50 second (1/20, 1/10, etc.), remember to brace your
hands with the camera against a wall, tree, or other firm support. Otherwise a blurred picture may result. Of
course, the MINOX Tripod (page 44) is ideal for this purpose; in fact, it is indispensable for longer (B and T)
exposures.
View original page 9Page 10 · Read text
B and T exposures

In addition to speeds of 1/2 to 1/1000 second, the shutter speed dial has the letters B and T engraved. What do
they meant

B: The shutter opens when the shutter release button is pressed down and closes again when you let the button
go;

T: The shutter opens when the shutter release button is pressed down and stays open until the button is pressed
a second time.

Both settings are designed for longer exposures: 'B' for exposures from one to several seconds, 'T' for still
longer exposures. For such extended exposure, the MINOX must be placed on a solid support, or mounted on a
tripod with the camera clamp (page44), and released with a cable release. The MINOX Tripod (page44) comes
already equipped with a cable release.


            The exposure meter does not automatically set
              exposures of more than 1/2 second, but it indicates
              exposures up to 2 seconds.

                     If, after using the meter, the shutter speed scale is set to
                the left '2' (1/2 second) this indicates an exposure longer
               than ah second which must be obtained by using the B
               or T settings.


If the shutter speed dial points to the blue dot between '2' and B (see illustration at left), the indicated exposure
is 1 second; if the dial points to B. the indicated exposure is 2 seconds. (see illustration at right). Exposures
indicated by intermediate positions can be estimated. After you have determined these longer exposures, turn
the shutter speed dial to B or T and hold the shutter open for the required time.

The illustrations show: top -- positions of speed dial after setting meter triangle mark to indicator needle; middle
- setting of dial for making the exposure; bottom - a reminder to use a tripod or other firm support.
View original page 10Page 11 · Read text
Flash Pictures


                         The shutter of the MINOX B is synchronized for flash;
                          you can attach any type of flash unit to the MINOX B:
                               Electronic flash units or flash guns which use flash
                                bulbs. Attach the end of the flash cable to the flash plug
                               of your MINOX. The flash unit is actuated when you
                                press the shutter release button. The built-in exposure
                            meter is not used for flash exposure; the shutter speed
                                scale is set: for flash bulbs -- to 1/20th second or slower;

                            For electronic flash units: to 1/500th second or slower.

                            Small flash units are attached to the MINOX by means
                               of the flash adapter; for larger units use the MINOX
                           camera clamp and a flash bracket, which is often
                              supplied as standard equipment with flash units.


For more complete information on flash light photography, see page 34.


To sum up:

The MINOX B has a built-in exposure meter coupled to the shutter speed dial which regulates shutter speeds
from 1/2 to 1/1000 second; you simply point a triangle mark to the indicator needle of the exposure meter.

When the scene is so bright that even 1/1000 second would produce over-exposure, slide the neutral density
filter in front of the lens. The exposure meter switches automatically to its second measuring range. Shutter
speeds fall within the normal speed range. Exposures of more than 1/2, second are not automatically set on the
shutter speed dial. However, the position of the shutter speed dial after 'matching' the indicator needle indicates
up to 2 seconds exposure which must be obtained by using the B or T setting.

No F-stop setting - an important MINOX advantage

If you are an advanced amateur photographer, you may wonder why there has not yet been any mention of f-
stops. It's simply because the MINOX has no f-stops! The 15mm Complan lens of your MINOX yields such
extreme depth of field and, together with the slightly spherical curved design of the film gate, gives such
outstanding definition over the entire film area that an adjustable lens diaphragm could be omitted --saving you
an extra operation necessary with other cameras. That's another reason why the MINOX is so easy to use!

The MINOX always works at full f/3.5 lens opening.
View original page 11Page 12 · Read text
The viewfinder
The luminous white frame within the large MINOX viewfinder shows you the exact picture area that will
appear on the film. The viewfinder image is automatically corrected, at all distances, to agree with the film
image. (Parallax Compensation). For extreme close-ups (8 -10 inches), the picture area lies a frame-width
within the luminous frame.

The viewfinder eyepiece is so large that even spectacle wearers can observe the full viewfinder area;
furthermore, they may use the MINOX viewfinder without special correction lens.

The exposure counter


                         The curved window next to the distance scale tells you
                      how many exposures you have already made on a film.
                            Before you insert a fresh film, the exposure counter must
                           be set at the red dot between 50 and 0 (see illustration).

                                        If you have just finished a complete 50-exposure film,
                                the counter will already be at this setting. However, if
                          you finished a 36-exposure film, or if the counter is at
                           any other setting, you must set the counter by repeating a
                               1/4-inch 'push-pull' of the camera until it is set at the red
                                  dot.


Loading with film


                               Film cassettes should be shielded from bright
                                      sunlight. Always load - or un-load - the MINOX in
                               subdued light, or in the shade. (If there is no other
                                shade within reach, turn your back towards the sun!)

                             The built-in exposure meter must be set to the speed
                                   of the film when you load your first film into the
                                 camera, and if you change to a film of different
                                   speed. The necessary steps are printed in blue on
                                    these pages.

                                                 If, after completing the first film, you again use film
                                   of the same speed, you can ignore the instructions
                                     printed in blue. Just make sure that the shutter speed
                                       dial is not turned while you are changing films.

                                   Set exposure counter at red dot (see previous page).
View original page 12Page 13 · Read text
Set the exposure meter - while the camera is still
                                   closed - by turning the camera shutter speed dial
                                        until the ASA film speed pointer (solid triangles) of
                                    the meter disc points to the ASA number of the fill
                                      to be used: 25-50- 100, etc. (See page 22 for
                                    intermediate ASA numbers).


                                     Pull the camera 'out'. Press town on crescent-shaped
                                snap lock (white arrow in illustration 2) ant slide
                              open the back cover until both film compartment
                                    are free.

                               Turn camera shutter speed dial to '100' which is
                              marked with a red dot. (Illustration 3).


''Close'' the camera about 1/8 inch to spread the film gate open; this occurs when the snap lock almost
disappears in the camera (illustration 4). You can feel a definite resistance and see the gate open.

The film can be inserter--and taken out-- ONLY with an open film gate!


                              Drop the cassette into the film compartments. (see
                                           illustration 5). (There is only ONE way to insert
                                      the cassette--you can't make a mistake!)

                                  Close the back cover until it snaps shut, and push
                                      the camera closed. 'Pull-push' camera once to
                                 advance the exposed film frame into take-up end
                                     of cassette. (illustration 6). If the back cover
                                   cannot be closed--this is a rare occurrence when
                                      the film take-up core is resting on the teeth of the
                                       transport wheel in the film compartment -- lift out
                                      the cassette, pull the camera open all the way, and
                                      close again until the film gate opens. This
                                  advances the film transport wheel. Re-insert the
                                         cassette, and proceed as described on page 21.


Intermediate ASA film speeds can also be set on the exposure meter by using the short lines on either side of
the solid ASA triangle. as follows:
View original page 13Page 14 · Read text
Engraved numbers: 25 50 100 200 400

LEFT LINE set on engraved number gives correct reading for: 16 32 64 125 250

RIGHT LINE set on engraved number gives correct reading for: 40 80 160 320 640

(Example: To set meter for ASA 32 -- set LEFT LINE on '50').

Un-loading
Watch the exposure counter--so is the last exposures Push-and-pull the camera twice. The exposure counter
should now be at the red dot. Now open the back cover and spread the film gate open (as if to load). See page
21.

The film cassette will drop out the camera with slight tapping, or it may be lifted out by its bridge. Store the
cassette in a film box, or wrap it in black paper until it is developed.

If the next film has a different ASA number, set the exposure meter for the new ASA number before opening
the camera to remove the previous film. This saves you another step later on. (See page 20 about setting the
meter).

* Some films have only 36 exposures -- see film package. After the 36th exposure, push-pull twice until film
counter is at the red line between 37 and 38; then remove cassette. Advance exposure counter to the red dot
between 50 and 0 before inserting a new cassette.
CAUTION: Do not advance films beyond the numbers indicated above, as the film end may be pulled
completely into the take-up side; this may result in light entering through the cassette slit during un-
loading.

To sum up:
Exposure counter must be at the red dot before a new film is inserted. Film gate must be open when film is
inserted or taken out. The exposure meter is properly coupled with the shutter speed dial, if the black triangle of
the meter disc points to the correct ASA number when the camera shutter speed dial it is '100'.

What film is in the camera?
If you have forgotten the speed of the film you have in the camera--simply turn the camera shutter speed dial to
'100' and read the position of the solid black triangle on the meter disc!

Built-in filter
The MINOX B has two built-in filters which can be placed before the lens by means of the filter slide: a grey
(neutral density) filter, and a green filter.
View original page 14
Page 15 · Read text
Both filters have basically different tasks. The
                                  grey filter cuts down the light when even 1/1000
                                 second would produce over-exposure in brilliant
                                   sunshine with fast film. With the grey filter before
                                      the lens, the exposure meter is automatically
                                   switched to its second measuring range. You may
                                   use the grey filter with black-and-white or color
                                        film.

                              The green filter, on the other hand, is intended to
                                improve the tonal reproduction of natural colors in
                                 black and white pictures -- regardless of light
                                      conditions. You will find it particularly helpful in
                                sunny landscapes: Green foliage, lawns, meadows,
                                            etc. will show better modulation in the print, the
                                 sky will be slightly darkened so that clouds stand
                                    out better. But, don't use the green filter with color
                                        film; it will turn the whole scene green!
Filter slide pushed half-way in:
green filter in place.


The green filter absorbs some light and calls for slightly longer than normal exposure: Simply turn the green dot
of the meter disc (instead of the open triangle) to the meter indicator needle; that takes care of correcting the
exposure when you use the green filter.

Make sure that the filter you use fills the lens window completely.

Remember to push back the filter slide after use, if you want to take the next picture without a filter!

To sum up:
The grey filter prolongs exposure if the normal shutter speed range is insufficient. You may use it with black-
and-white or color films.
The green filter is used with black and white film for better landscape and cloud pictures. It must not be used
with color film.
View original page 15Page 16 · Read text
Attaching the measuring chain


                         To protect your MINOX against accidental falls,
                              always keep it on its chain. Insert the rectangular plug
                                      at the end of the chain into the corresponding chain
                                socket of the camera. The spring-loaded dust cover
                                   will recede into the camera. Use the D-ring at the end
                                 of the chain in the manner of a screwdriver, inserting it
                                   into the slot of the plug disc, turn the plug one-quarter
                                  turn to the right. (See illustration). To detach the chain,
                                 reverse these steps; insert D-ring in the slot, turn one
                                  quarter to the left--the plug will jump out of the
                                  socket.


It pays to take care of your MINOX!


                               The optical glass window of the lens should
                                   always be spotless; finger marks and dirt impair
                                        the sharpness and brilliance of your pictures.
                              From time to time- wipe the window gently with
                                    a soft linen cloth wrapped around a small
                              wooden stick or tooth pick.

                               Keep the film compartments free from dust
                                 which may scratch the film; before inserting a
                                        fresh film cassette, blow into the compartment to
                                      dislodge and remove small dust particles.


Beware of sand and salt water! Only a few drops of salt water suffice to corrode the delicate mechanism of the
camera. Should it ever drop into the water, you may perhaps save the camera if you open it and rinse it
immediately after the salt water has entered, under running warm fresh water; then dry it at once near a heater
an open fire. Rush your MINOX to our Repair Department with the notation: SALT WATER DAMAGE. If
sand gets into the camera, try to blow it out before you operate the 'push-pull' rapid wind, if there is the least
"grating", STOP, leave the camera as it is and send it to for cleaning with the notation: CAUTION, SAND IN
CAMERA!
View original page 16Page 17 · Read text
Your MINOX was carefully tested and checked before leaving the factory, and provided with long life
lubricants. Do not attempt to disassemble it, and, above all, do not lubricate any part of it.

The facilities of our Service Department are at your disposal if the camera should ever require adjustment or
repairs.


TIPS FOR BEST RESULTS

The "best" film
MINOX films are available in several different types for black-and-white photography, and for color pictures.
The black-and-white films vary in sensitivity (speed) and grain characteristics. The sensitivity is expressed in
American Standard Association exposure index numbers: ASA 25, ASA 80, ASA 100 and ASA 200, etc. These
numbers are stated on the film package and should be used in setting the exposure meter. (See page 20). ASA
200 film is twice as sensitive to light as ASA 100, ASA 100 twice as sensitive as ASA 50o, and so on. Thus,
under any given conditions. ASA 80 film, for instance, would require only half the shutter speed needed for
ASA 28.

The lower the film sensitivity, the finer the detail it is capable of reproducing in the final print. Therefore, the
fast films--ASA 100 and ASA 200--should be used only when there is not enough illumination for slower films,
or when flash exposures are not feasible (stage photography, candid shots, etc.)

For 90°/o of your pictures, you will find ASA 25 the ideal choice; it has ultra-fine grain and thus gives you
clear, sharp, crisp pictures; it has ample speed for all outdoor pictures and for flash shots. For copying of books,
documents, etc. a special fine-grain film ASA 5 is available. (See page 38).

ASA 200 film and Color film is supplied in 36-exposure cassettes; all other black-and white films are in 50-
exposure cassettes. For information about color film, see page 36.

Correct exposure measurement

You will always get correct exposures with your MINOX B Automatic camera, if you observe a few basic rules.
The front window (cell) of the meter must be completely unobstructed to give a correct reading. Don't let a
finger cover the window--check the correct camera hold on page 4 and s.
Give the meter 2 to 3 seconds to measure the light while you hold down the button. Letting the button go too
quickly may cause the needle to lock before it has reached full reading.

Always measure the important part of a scene.  In a landscape, for instance, the sky which is usually much
brighter than the principal parts of the scene, should not be included in the viewfinder while you are holding
down the meter button. Point the viewfinder downward until most of the sky is no longer visible. Thus, you will
get a correct reading for the fields, trees, houses, etc. which are important for the picture. Of course, when you
take the picture, you may include the sky.

Similarly, when you take snapshots of people in the snow or in front of a light-colored wall, remember that the
people are important, not the background. To get correct exposure, approach with your camera until you see in
the viewfinder only the person or group which you want to snap. Only then should you press down the meter
button to get your reading. After you have thus determined correct exposure, you may step back to include the
background in the actual picture.
View original page 17
Page 18 · Read text
If it is inconvenient to make such a close-up measurement, you can use the "substitution" method of measuring
the brightness of your hand or some object that is similar to, and receives the same light, as the actual subject of
your picture.

Close-up measurement is also used in back-lighted (against-the-light) shots. Measure only the important
subjects which are actually in the shade. Where this is impractical -- mountain scenery, for instance -- use this
rule of thumb: Take the reading by pointing the camera at the full scene; then move the shutter speed scale one
step to the right for taking the picture. (Example: The reading is 1/200. Move the shutter scale to 1/100 second.)
The rules for back-lighted subjects also apply to color pictures. In fact, very judicious measuring is essential for
all color pictures. Whenever possible, use the close-up measuring method for pictures of people. Where this is
not possible, the following modification will be helpful:

Principal subject in the shade . . . use one-half step longer exposure

People in snow pictures . . . . . use full step longer exposure

Scenes with much green foliage
  (except in open landscapes) . ., use one-half step longer exposure

Dull, overcast day . . . . . . . use l/2 to full step longer exposure

Always remember:
Don't cover the exposure meter cell window. Give the meter needle 2 to 3 seconds for correct reading. Measure
the important part of the picture. Use close-up measurement whenever possible. Modify exposure times under
certain conditions.

S-t-e-a-d-y!
Even the best photo-finisher can't give you a sharp print from a blurred film! Therefore, get used to a
comfortable and steady hold of your MINOX during exposure. Some people can hold the camera perfectly still
for 1/5 second; others have trouble even with 1/50 second. Experience will tell you whether you can get steady
pictures at the slower shutter speeds. Generally, you will find it advisable to use a tripod or other firm support
for l/20 second and slower. For all snapshots, use the hold suggested on pages 4 and 5, and make sure that you
"squeeze" the shutter to avoid jarring the camera.

How about longer exposures?
In a pinch, try holding your MINOX steady by leaning your elbows on a table or other firm surface, or against a
wall; better still, place the camera on a support, ledge, etc. It is best, however, to attach the MINOX with the
MINOX camera clamp to a tripod. You will find the MINOX pocket tripod a particularly fine and versatile
accessory. Little larger than a pencil, it opens up into a rock-steady tripod complete with a swivel top; you can
use it on a table, chair, window sill, or lean it against a wall. You can also brace it against your shoulders. As an
extra precaution against jarring the camera, always use a cable release for tripod exposures. The MINOX tripod
comes with its own cable release!

"Frame" your subject
Advance planning of composition saves extra work in enlarging, and gives you precisely the picture you want
every time. Since the MINOX viewfinder shows you the exact picture area, you can easily compose each
picture before you actually take it, you can omit unimportant or disturbing details right at the start, and fill the
picture area to best advantage.
View original page 18
Page 19 · Read text
Close-ups of small things


                                  There is a special fascination in a big close-up. A
                                        frame-filling picture of a single blossom showing
                                       the delicate details of each petal can be more
                                   rewarding than a whole acre of flowers.
                                      Therefore: Get CLOSE to the subject! Your
                       MINOX offers you the great advantage that you
                                  can get as close as 8 inches without any
                                   supplementary equipment or extra lenses. Make
                                       the most of this excellent feature. Always use the
                                  measuring beads of the chain to determine the
                                        correct distance, and set the distance scale of the
                                 camera accordingly; this is important because, at
                                       close range, the zone of sharpness is very limited.

                                   For instance, when the distance scale is set at 1
                                                       ft. the sharpness extends only from 11 inches to
                                13 inches. Now you know why accurate distance
                                          setting is a must for extreme close-ups.
                             Remember also that, at distances between 8 and
                                10 inches, the picture area lies a frame-width
                                     within the luminous frame of the viewfinder.


Hot Weather Precaution


                                   Films are sensitive to high temperatures.

                          Do not store MINOX films or your loaded
                       MINOX in the glove compartment or window-
                                         shelf of your car, where the film may be affected
                                by excessive heat.
View original page 19Page 20 · Read text
How to stop moving subjects
Sports and other fast action call for high shutter speeds -- otherwise your pictures may be blurred. But even
under unfavorable light conditions requiring slower shutter speeds, you can stop motion by using some
professional tricks. For example, it is easier to stop motion of a subject moving straight toward the camera, or at
a slight angle, than it is to "freeze" a subject moving at right angles to the camera. Or, watch for the moment of
"suspense" such as is reaches by a swing at its highest point just before it moves down again, or by a tennis
player during the serve when the ball is at the peak of the toss, and the racquet is about to be swung. Even 1/20
second will "stop" such shots. Here is another well-known professional trick that will help you get fine results
with very fast motion--automobile races, speed boats, skiing, etc.: Keep the car, boat, or skier centered in the
MINOX viewfinder and follow the motion with the camera, releasing the. shutter at any instant during this
panoraming. The background will be blurred, adding to the impression of speed, but the subject stays sharp
even at 1/50 second.

Flash Pictures
The MINOX has built-in flash synchronization, which actuates the flash when the shutter button is pressed. Any
flash unit may be used with the MINOX. There are two basically different types of flash units: Electronic flash
units and units using expendable flash bulbs. Electronic units are equipped with a flash tube. The initial cost of
such units is higher but, generally speaking, the operating expense in negligible. Because of the extremely high
speed of electronic flash, even fastest motion can be "frozen". The MINOX B/C Flashgun is particularly
convenient. This uses AG1 Bulbs. Small flash units may be attached to the chain socket of the MINOX B by
means of the flash adapter. For use with large flash units the MINOX B may be attached to a flash bracket by
means of the MINOX camera clamp (see page 44).

Electronic Flash can be used with any shutter speed up to 1/500 second. The shorter the shutter speed, the
greater the influence of the flash upon the illumination and character of the picture. For electronic flash units of
medium brightness, use films of 13 or 14 DIN. All pictures to about 18 - 25 feet will be well exposed. The
differences in the negative quality are so slight that they do not affect the enlarging ability. For short distances
(less than aft) the effect of the flash can be cut in half by using the green filter (neutral density grey filter should
not be used). Since electronic flash units usually emit very harsh light, the following suggestions will be helpful
in reducing the extreme brilliance:

1. Detach the flash unit from the camera and use it at a greater distance and to the side of the camera. An
extension cord for this purpose is available at your MINOX dealer. Be careful however that the shadow of the
camera does not show in the picture. 2. Hold white paper or thin white fabric (handkerchief, for instance) in
front of flash reflectors; this not only reduces the intensity of the light, but makes it considerably softer.

Flash bulbs can be used at shutter speeds up to 1/20 second. The usual capless bulbs may be used as readily as
the larger types. Flash unite with built-in condensers (B/C) such as the MINOX Flashgun are preferable because
they assure perfect flash timing even after many months use of the same battery.
To reduce the flash intensity with flash bulbs at closer distances, you can use the same methods recommended
for electronic flash above.

It's a colorful world
The 15 mm f/3.5 Complan lens of your MINOX is fully color corrected, and has an anti-reflection coating -- in
other words it is ideally suited for color photography.

If you have never taken color pictures before, keep in mind the following points to help you get fine results:
View original page 20
Page 21 · Read text
Color film yields the best results in bright or hazy sunlight; on overcast days, results are usually disappointing.

The best time for color pictures is mid-morning and mid-afternoon. Around noon, the light is usually bluish,
resulting in very 'cold' colors or an over-all bluish tinge. During the hours just after sunrise, or before sunset, the
light is more reddish, resulting in very 'warm' colors.

Watch for the possibility of color reflections (which may not be noticeable to the eye): A white dress on a green
lawn is never pure white, but faintly green! Color film requires careful exposure measurement; even slight
deviation from the correct exposure may result in false color reproduction. (Read the suggestions about
exposure on page 29).

Under-exposure results in dark colors, over-exposure produces pale pictures with washed-out colors.

As a general rule, color pictures are best taken with the sun slightly to one side behind the photographers back.

Avoid deep shadows on faces, and strong contrasts between light and dark portions of a scene.

If you are seriously interested in all phases of color photography, you will find it worthwhile to read one of the
many comprehensive books covering this field.

For more fun with your MINOX - - read "Small MINOX--Big Pictures" the entertainingly written complete
guide to MINOX photography which explains and illustrates every use of your MINOX and its accessories.
Beautifully printed on coated paper, and bound in linen, this pocket-size book tells the full MINOX story. You
will enjoy reading it, and it will help you improve your own MINOX technique. "Small MINOX--Big Pictures"
is for sale at your MINOX dealer's.


                               Copying of documents, drawings, books, etc. is
                                no problem for your MINOX. By using a tripod,
                       MINOX Copying Stand (see page 46), MINOX
                                Copying Arm, or other means of support, you
                                  can conveniently copy such material, getting as
                                       close as 8 inches for largest possible
                                       reproduction.

                               Use the special MINOX ASA 5 Micro Copy
                                  (Doku-Ortho) film, except when copying
                                            illustrations or photographs containing half-tones
                                         for which the regular ASA 25 film should be
                                      used. (See back flap of this manual for areas
                                   covered at various distances).


                                          Left MINOX copy of an engraving by Marltin
                                   Schongauer. Micro Copy - ASA 5 film.
View original page 21Related documents and language editions
From the M. Butkus archive. Original publisher and archive notices are retained.
Check the model and edition against your equipment.
PDF verified 2026-10-10.