Film cameras
see Praktica MTL3 User manual
User manual for see Praktica MTL3. 12 pages in English. Read the original PDF, download or print a copy without registration.
12 pagesEnglish1.9 MB PDF
Loading your manual…Open PDF directly
Document details
- Brand
- Praktica
- Model / document
- see Praktica MTL3
- Document type
- User manual
- Language
- English
- Pages
- 12
- File size
- 1.9 MB
- Category
- Film cameras
- Document date
- Not specified in catalog
Search available document text
Find a term, then jump to its page in the original PDF. Image-only pages may not be searchable; check the PDF for exact wording and diagrams.
Page 2 · Read text
We wish you all success with this modern reflex camera. You own a camera with the novel metal-blade focal-
plane shutter for maximum shutter speed stability and minimum synchronization for electronic flash
photography. The camera is fitted with a through the-lens light metering system for a coupled determination of
shutter speed, diaphragm numeral, and film speed. Metering is on the center-weighted method and gives
pictures true to the subject.
Before you start snapping away happily will you please read these Instructions for Use carefully. You will avoid
trouble with the camera and disappointments with the pictures.

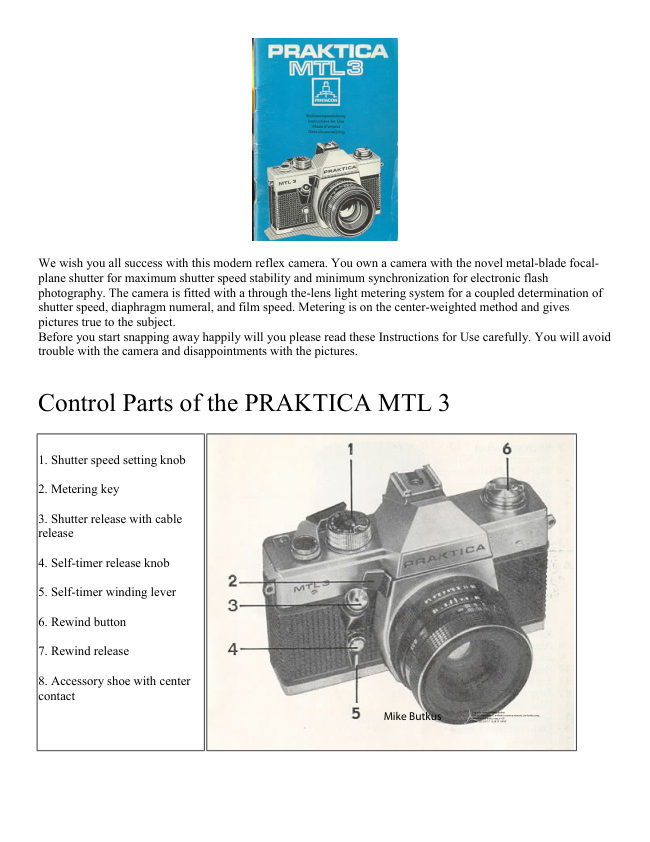
Control Parts of the PRAKTICA MTL 3


1. Shutter speed setting knob

2. Metering key

3. Shutter release with cable
release

4. Self-timer release knob

5. Self-timer winding lever

6. Rewind button

7. Rewind release

8. Accessory shoe with center
contact
                                                            Mike Butkus                                Digitally                                                                                                                                                                                                                                                                                                                                                   DN:email=mike@butkus.org,Date:cn=Mike2023.05.17signedButkus,by13:36:19Mikeo=ButkusButkusc=US-04'00'camera manuals, ou=butkus.org,
View original page 2Page 4 · Read text
26. Eyepiece mount with
                                                                     accessory adapter

                                                                        27. Rewind release

                                                                        28. Battery compartment
                                                                    with battery

                                                                        29. Tripod thread

                                                                        30. Flash socket


In the following instructions the numbers of the above elements are put in parentheses ( ).


Opening the camera back
Pull rewind button (6) upwards to its hard stop, thus the camera back is unlocked and can be hinged
open. Simultaneously, exposure counter (11) automatically returns into its initial position.

Film loading
Insert the cartridge and observe that wire- brackets (25) do not stand upwards. Turn at the knurled
spool disk, if required. Pull the film leader to the green mark (24) and pass it under support (22) so
that the teeth of film sprocket (21) engage in the film perforation.
Should the film be heavily warped, put a wire bracket on it by rotating the spool disk. Push rewind
button (6) in again by rotating it a little, if necessary.
View original page 4Page 5 · Read text
www.butkus.us


Closing the back.

The back locks automatically when you press it to
the camera body at the latch side.


                           Setting and winding the shutter

                           Rapid wind lever (10) has a dead stroke of about 15 deg. till the
                          mechanism engages. This makes for safety at series exposures.
                            Swivel lever (10) to its stop, move it bock and depress shutter
                                 release (3). Repeat the process and finish up by winding the camera
                                again. The automatic exposure counter (11) will now read exposure
                                  1.


                          Film speed setting

                            Automatic exposure control demands setting of the film speed. Pull
                                the knurled ring of the shutter-speed dial (1) up and turn it till the
                      DIN or ASA film index on dial (13) will meet the white mark (12).
                         The rim locks when released.
View original page 5Page 6 · Read text
Shutter speed setting


                                                      for electronic flash photography (about
Symbol f
                                                1/125sec)

                                                      for time exposures; the shutter remains open as
Setting B
                                               long as the shutter release is depressed

                                                  (orange) for low light photography; a tripod is
1 sec. to 1/15 sec.
                                            needed

1/30 to 1/1000                                    (white) for satisfactory light photography


Rotate shutter speed dial (1) till the desired speed matches the orange triangle.

Diaphragm setting


                              Set the desired diaphragm
                         number on diaphragm setting
                                ring (17) of the lens opposite to
                                the mark on the lens mount.
                      When lenses with automatic
                               pressure diaphragm (ADB)-are
                               used, the diaphragm remains
                                  fully open and closes to the set
                              value only when the shutter
                                 release is pressed. The
                           diaphragm opens in the same
                                  instant the shutter has run down.
                      By changing the diaphragm
                               operation selection switch (14)
                           from A (automatic operation) to
               M (manual operation) or by
                                actuating the metering key (2) it
                          becomes possible to check the
                             depth of field already on the
                              viewfinder image.
View original page 6Page 7 · Read text
www.butkus.us


Automatic exposure control system
There are two modes of light metering:

1. Metering by altering the diaphragm numeral at the lens with pre-selected shutter speed (being the preferred
method for general objects in satisfactory light).

2. Metering by altering the shutter speed with pre-selected diaphragm numeral (being recommended for low
light photography with a certain depth of field required).

Metering at pre-selected shutter speed
Set the shutter speed, press metering key (2). Turn diaphragm setting ring (17) until the meter needle, visible in
the viewfinder, will have centered to the circular mark. When the needle stands in the + range, an overexposure
will be obtained while its position in the --range will result in an underexposure. The diaphragm opens and
closes on rotating the diaphragm setting ring correspondingly thus compensation between subject brightness
and the combined shutter speed, diaphragm, and ASA/DIN settings is performed.


Metering at pre-selected diaphragm number
Set the diaphragm numeral, press metering key (2). Turn shutter speed dial (1) until the meter needle visible in
the viewfinder will have centered to the circular mark. When the needle stands in the + range, an overexposure
will be obtained while its position in the--range will result in an underexposure. Don't set any intermediate
shutter speeds between the indexed positions. Should you not succeed in attaining a perfect balance, you can
make a precise correction by the diaphragm setting ring which may, of course, be set to intermediate values,
too.

Metering with lenses without automatic diaphragm system
How to control:
Set the diaphragm to its smallest diaphragm number - focus the lens--balance the system by stopping down.


Functional range of the automatic exposure control system

Outside of the range of the Table below the metering system is switched off. The meter needle is in rest position
below the circular mark in the minus range. Metering cannot be made with the "B" or symbol f .


                    min. and max                                           min. and max
    ASA                              ASA
                        speeds                                                   times

12 to 16          1 to 1 1/25            200 - 330                         1/4 to 1/1000

20 - 32           1 to 1/250             400 to 660                        1/8 to 1/1000

40 - 65           1 to 1/500             800 to 1300                     1/15 to 1/000

80               1 to 1/1000            1600                            1/30 to 1/1000

100 - 165          1/2 to 1/1000
View original page 7Page 9 · Read text
www.butkus.us

Focusing on the microprism screen
Maximum sharpness is attained when the image in the microprism screen is clear and does not flicker. Don't use
the ground glass Fresnel for focusing.


Depth-of-field scale


                             The depth of field attained with a certain diaphragm setting can
                               be read on scale (15).

                               Example: Distance 3 meter, diaphragm numeral 8, depth of
                                        field extends from 2 metes to 5 meters.

                                For checking the depth of field on the viewfinder image, too,
                                   depress metering key (2), set selection switch (14) to M and the
                                  switching lever (of PANCOLAR 50 mm fl1.8) to its lower
                                      position, resp,

                                     Infrared photos require a slight correction in focusing; let the
                                 determined distance meet the infrared mark on the lens.


Releasing and winding


                                   Please note before pressing the shutter release:

                                        1. The signal (must be a red triangle visible when the shutter is
                              wound) is visible in the viewfinder on the left: camera not
                                  ready for snapping - swivel the rapid rewind lever (10) to the
                                       stop.

                                        2. For shutter speeds of '/,s seconds and slower use a tripod and
                                    cable release. Press shutter release (3) smoothly right across
                                     the easy going section. Don't depress suddenly! Prepare for
                                   another snapping by winding again.


Self-timer


                                                  Wind the shutter. Turn lever
                                                                         (5) upwards to its stop. Press
                                                                       release (4)--the self-timer will
                                                 now run for about 8 seconds.
                                              Do not wind the shutter while
                                                                     the self-timer runs.
View original page 9Page 11 · Read text
www.butkus.us


Flash photography


                                 This camera has been designed for synchronization of flash
                                  bulbs and electronic flash units. Flash units provided with a
                                    center contact are pushed into accessory shoe (8). Connect flash
                                     units fitted with synchro cable and flash contact with flash
                                  socket (30). Set the symbol ( f or 0) of the relevant type of flash
                                     unit on the shutter speed dial. The firing circuit is only closed as
                                 long as the shutter is running down.

                              Note the guide number of your flash unit and make the aperture
                                   or distance calculation (use the calculating disk on the flash
                                         unit).


The use of flash bulbs


                                For fast burning flash bulbs the speed dial is set to the symbol or
                             0 to a shutter speed longer than 1/30 sec.


The use of electronic flash units


                               These will be synchronized at setting to the symbol t which
                                  corresponds to a shutter speed of about1/125 sec. Longer
                                      shutter speeds can be set.
View original page 11Page 12 · Read text
Battery replacement


                               The automatic exposure control system is powered by a PX
                                625 mercury oxide element or a corresponding type of 1.35
                                    Volt rated voltage.

                             Open the battery compartment (28) with the aid of a coin.
                                Pay attention for + and -- symbols when loading the battery.
                                          Insert the power source accordingly and then screw in the lid
                                        again.

                                      Life of the power source will be about 2 years.

                                     Don't recharge old batteries, don't put them into the fire!
                                  There is danger of explosion!


Care of the camera
Operation according to instructions and proper care are essential preconditions for trouble free function of this
high-precision instrument. Protect it from shocks, blows, dust, and moisture, clean cartridge and spool
compartments, film track and camera back with a soft brush in suitable intervals. Do not exert any pressure onto
the shutter blades and do not touch them with your fingers. Dust the mirror with a soft brush only if absolutely
necessary. Don't clean the camera with organic solvents, such as spirit, varnish thinner or the like. The camera
will work unobjectionably within the temperature range of +40 °C to -10 °C. Above and below this range for
some reasons the mechanical and electrical and electronically functions may fail. If the camera e.g. undergoes
sudden changes in temperature, condensate will form which will cause damages by corrosion.

Special attention should be paid to the battery and its contact points. Check them in short intervals and clean, if
necessary. Since the battery is susceptible to low temperatures, protect it against cold and remove it from the
camera when not being used for some time.

The PRAKTICA MTL 3 is selectively delivered with or without self-timer.

Please observe the recommendations contained in this booklet and remember, as far as reading is concerned,
that repetition is the mother of wisdom. Handling the camera carelessly or contrary to instructions may lead to
damages which, we regret to say, are not covered by our guarantee.

Our consistent efforts to improve our products may lead to some slight deviations of the PRAKTICA MTL 3
from the present details.
View original page 12Related documents and language editions
From the M. Butkus archive. Original publisher and archive notices are retained.
Check the model and edition against your equipment.
PDF verified 2026-10-10.