Sewing machines
Singercraft Guide Number 2 — User manual
User manual for Singercraft Guide Number 2. 2 pages in English. Read the original PDF, download or print a copy without registration.
2 pagesEnglish1.4 MB PDF
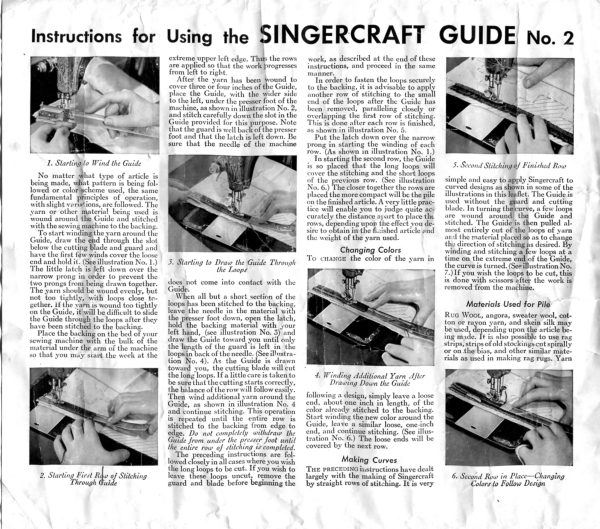
Loading your manual…Open PDF directly
Document details
- Brand
- Singer
- Model / document
- Singercraft Guide Number 2
- Document type
- User manual
- Language
- English
- Pages
- 2
- File size
- 1.4 MB
- Category
- Sewing machines
- Document date
- Not specified in catalog
Search available document text
Find a term, then jump to its page in the original PDF. Image-only pages may not be searchable; check the PDF for exact wording and diagrams.
Page 1 · Read text
Instructions for

1. Startingjfo Wind the Gi

Ne matte “tint tape of article
cing made, what pattern is being fol
lowed or colotigcheme used, the same
iples of operatien,
wth light ve re followed. The
Yarn of other material being used is
‘round around the Guide and stitched
witncseninggaine othe bckin.
start windingthe yarn around the
Guide, draw the end through the slot
below the cutting blade and guard and
Rave the first few winds cover the loose
end and hold it. (See lusteation No. 1)
The litle latch is Jeft down over the
narrow prong in order to prevent the
{wo prongs from being dravn together
‘The yarn should be wound overly, but
not too tightly, with loops close. te-
tether. I the van is wound too tightly
‘on the Guide, iwi be difficult to side
{ihe Guide through the loops after they
have been stitched to the backing
lace the backing on the bed of your
sowing machine with the bulk of the
“al under the arm of the machine
start the werk at the

2, Starting F
Through

it Ale of Stitching

juide

Using the SINGERCRAFT GUIDE No. 2

]
extreme upper lft edge, Tha the rows
are applied so that the work progresses
From left to right a.
After the yarn has been jround to
cover three of four inches of the Guide,
place the Guide, with the wider side
to the left, under the presser foot of the
machine, as shown in tilusteation No. 2,
and stitch carefully down the slot in the
Guide provided for this purpose. Note
that the guard is well back of the presse
foot and that the latch is left d
sure that the needle of the n

5. Starting to Draw the Guide Through
the Loops

does, not come into contact with the

Wien all but a short section of the
loops has been stitched to th
Ieve the seein the material with
the phessee foot down, open the latch,
hold’ the backing material with your
It pe trafion No.3 nd
draw the Guide toward you nfl only
the length of the guard fs eft-in the
Tops back of theneedle (See illustra
Gon No. 4). As the Guide te drawn
foward sou, the cutting blade will eut
the long loops If alittlecareis taken to
bosure that thecutting starts correctly,
the balance ofthe row will follow easily
‘Thea wind additional yarn around the
Guide, ag shown in illustration No, 4
and Gontinge stitching. This oper
iB repeated ‘until the entire row is
stitched fo the backing from edge to
ge, ‘Do nol completely withdraw the
Gitte rom uncer the precrer foot nll
Ue enire row of sltching te completed.
‘The preceding instructions. are fo
lowed closelyin all cases where you wish
{he Tong loops to be cul. Tf yoa wich to
leave these" loops uncut, Temove the
guard and Blade before beginning the

work, as described at the end of these
instractions, nel proceed in the same
Tn order to fasten the loops secure
to the backing, itis advise to apply
nother row of stitching to {
nd of the loops after the G
item removed rating ln
lapping the ist row of sticking.
i done after each row is finished,
a8 shown in ilusteation No. 6
ut the latch down oer the narrow
prong in starting the winding of cach
Pow. (As shown in illustration No. 1.)
Tn starting the second row, the Guide
is s0° placed. that the long’ loops. will
Cover the stitching and the short loops
of the provigos tow. (See Mesteation
No. 6) he closer together the rows are
placed the more compact will be the ple
tin the finished article. A very ite prac:
tice wil enable you to judge quite act
carael the distance apart fo place the
ross depending upop the eflect you de-
tire fo obtain ithe fished articloyind
ihe weight of the yarn used.

Changing Colors
To canoe the color of the y:

4. Winding Additional Yarn jter
Drasstng Down the Guide

following a design, simply Ieave a loose
end, about one inch in length, of the
color already stitched to the backing.

+ winding the new color around the
le, leave a similar loose, one-inch
and continue stitching. (See illus-
tration No. 6.) The loose ends will be
covered by the next row.

‘Making Curves

ue precengoinirutions have dst
largely with the making of Singercra
by straight rows of stitching, Its very

5. Second Stitching @f Finished Row

ingle
Curved design
statis
tsed. thou
blade. Th turning thecurve, a fee loops
mre wound “argundl the ‘Guide “ned
‘tilted, The’ Guideris then pulled
Sut of the loore of

rlncedgh nto chin
= direction of schingd died. By
winding and stitching afew loops at a
{ime on the extreme endiof the Guide,
the curve is (urned.(Seeiustration Nex
PIF you wish the loops to be cut this
fe dod with sclsors sft the work ig
removed from the maghige.

Materials Used for Pile

Rua Woot, angora, sweater wool, cot-
ton or rayon arm, and sei sll may
‘sed, depending upon the article be-
ing made: Tet ao posible Co ue rg
stripe, stripsof old stockingscut spiral
or on the bias, and other similar mate-
Hale as used in malcing tag rugs. Yarn

6. Second Row in Place—Changing
Colors to Follow Design
View original page 1Page 2 · Read text
7. Following a Curse—Culter Removed

cal fom old ulap or jute bags
is should be dyed the de=
fore being used.

Backing Materials

For nucs, mats, hair backs and seat
las articles, Aida cloth,
Ap, njonk's cloth or similar

cambric, soisette or almost any other

iL may be used for
re flexibility. and. softness
are desired. For articles of clothing,
desirable to vse @ backing of the sa
‘color as the yarn which will be applied
For all articles that are to be

FT
Singer Sewing Machines

Standard the world over

VERY one of the 10,000
Singer Shops, scattered
throughout the five continents,
isa local sewing headquarters for
the women of that comniuni
| At the shop or representative
near you, you will find :the newest
‘models of Singer machines of all
types—clectri:, treadle and hand
operated, expert repair service
for all makes of machines, with
an.estimateof the cost before the

work is done; Supplies—Singer
oil, an extra-quality lubricant;
inger fleedles, essential for best

results in all makes of machines
belts and parts for all models of
Singer machines. Instruction in
machigesewing and theuse of the
maching attachments is always
available.

— Ss

a. No, 21908

laundered, be certain that the backing shown in! the colored illustrations on

tnd lining are preshrant these paste.
oP he design to be followed should be
stamped gr deawn on the backing ma:
tert beiore the work iy started: Pat
oF semight Lines, squares, or other
Iiig dent are it ganar ones to
a2 you, become more

ie mith the use of the Guide, vou
mal it quite cary to follow ioral

patterns.

‘A very effective finish may beobtained
in floral designs by working the rows:
at contrasting angles to the background,

the design first, then the su

1g Long Loops and Shearing

be obtained in fin-
2 be leaving the loops uncut, by
utling the loops, or by both cutting
tie loops and shearing the pile. For the
majority of the work, however, the long
inops are cut. Thisis done automatically
ifthe guard
tached 0 ; ‘

ing done. (See illustration No. 6.)
However if you do not find ¢ desirabi
to cut the loops as the work proceeds,
remove the bisdeand guard before start-
ing, After al he Singcreraft has been
Applied to the backing, the loops may
itteut by means of pointed scissors.

‘Ordinarily no. shearing is neces-

us effects m:

Threads to Use

Fon nvgs, and other articles which will
ceive hed wear linen or 40,30 or 0
sargsbutifasmooth- mmercsrized cotton
tr pile effect ir de- Trend should be
sired, shear off the eed on your, ma
iongends thatstand chine: For other
Wie gocers deipred svork, No, 70 cotton
ithis ope ae Berlei
fing grendy sing tory, While the
fythe shearing op- ing will not
Gration. Brushin fsnaturally

fh if brush ecirable fo use a

further enhance thread of» shade
Hp eppentance that will match the

Cutting Both
Loops
A very effective re-

short stitch to, be
Sure of catching
sult is obtained by achstrand of yam,
Eutting both the long and short ioops. The finer the yarn, the shorter should
Tf this method is used, the second row. te the stitch used.
of stitching must be placed on top of
thelist to make it les visible, The long
Tope are automatically cut by the
bade attached to the Guide and the
hort loope are cut. witispefnted scie-
ger etre the next ro is pal
Graduated, shearing. of flower ‘petals
od cloce shearing of leaves makes the
sign stand out prominently

8. Removing Guard and Cutting Blade
"irom Guide

Removing the Guard and
Cutting Blade

For Aut worl where you desire fo leave
theloops uncut for doing curves, orwork
similar to theafghan(coloredillustration
No, 25) the cutting blade and guard
are easily removed before the work is
started. Hold the Guide with the right
hand just below the guard: The guard
is held with the thumb and

of the left hand. (See illustration No.8.)
Press toward you withthe indexfingerof
the right hand on the Guide and away.
azines and are available through your from youwith the thumb of theleft hand
focal stores or direct from the pub- on the guard. ‘This will disengage the
thers. Some of these vpatterns are _ little catch on th hits over
_

SINGER SEWING MACHINE CO.
INCORPORATED

Designs

Many PATTERN companies have created
special designs for Singercraft_ work.
revareshown in pattern books and ma~

‘CopytighéU. 5, A. 1932 and t955,by The Singer Manufacating Co, All Rights Reserved for AU Counties,

9. Placing New Blade in Guard

the end of the Guide, Now slide the
guard toward the havgile of the Guide.
The guard and cutti gblade will then
be loosened from the Guide.

Replacing Cuttigg Blade

Tue curmixc blade will gradually be
dill byes. New bids may be ob
tained at any Singe Shop. Place the
new blade TS the all 2s shri
Itstration ‘No.-0/ahen attach the
guard with the bide place by re
fersing the operatign of removing the
nr Be sae that the bok snd othr
rojcctions on the Som ht into their
corresgoning Bro ithe Guide and
that the catch onthe \uard proper
engages the end ofthe Guide.

For Your Protection
Look for this sign

NEW Singer Sewing Machines
carrying’ the Company's
guarantee aresold only by Singer
Shops and by Singer Salesmen.
the “Red Sis known the world
over as the identifying mark of
the Singer Sewing, Machine
Company.
Look for this sign when you
plan the purchase of sew
chine equipment. Where
J, you will Ue assured of

teed by the Singer Company.
Thus, wher i

Shop or Singer Salesman you
take no chances,

Printed in U.5. A,
View original page 2
Related documents and language editions
SingerPDF
Singer "Famous" Buttonholer Models C and D
Parts list
4 pages · EnglishRead →
SingerPDF
Singer B.U.K. Electric Motor (1930, knee control)
User manual
10 pages · EnglishRead →
SingerPDF
Singer B.U.K. Electric Motor (1931, foot control)
User manual
20 pages · EnglishRead →
SingerPDF
Singer Blind Stitch Attachment
User manual
20 pages · EnglishRead →
SingerPDF
Singer Buttonhole Attachment Model 121795
User manual
16 pages · EnglishRead →
SingerPDF
Singer Buttonhole Attachment Model 121795
User manual
8 pages · EnglishRead →
SingerPDF
Singer Darning Foot Model 121094
User manual
4 pages · EnglishRead →
SingerPDF
Singer Edgestitcher
User manual
4 pages · EnglishRead →
SingerPDF
Singer Flat-Work Darner
User manual
11 pages · EnglishRead →
SingerPDF
Singer Foot-Bar Attachments
User manual
20 pages · EnglishRead →
SingerPDF
Singer Hand Operated Pinking Machine
User manual
12 pages · EnglishRead →
SingerPDF
Singer Needle Threader
User manual
1 pages · EnglishRead →
From the ISMACS International. Original publisher and archive notices are retained.
Check the model and edition against your equipment.
PDF verified 2026-10-11.