Photography reference
Tamron Adaptall Product booklet
Product booklet for Tamron Adaptall. 4 pages in English. Read the original PDF, download or print a copy without registration.
4 pagesEnglish0.7 MB PDF
Loading your manual…Open PDF directly
Document details
- Brand
- Tamron
- Model / document
- Tamron Adaptall
- Document type
- Product booklet
- Language
- English
- Pages
- 4
- File size
- 0.7 MB
- Category
- Photography reference
- Document date
- Not specified in catalog
Search available document text
Find a term, then jump to its page in the original PDF. Image-only pages may not be searchable; check the PDF for exact wording and diagrams.
Page 1 · Read text
TAMRON

INTERCHANGEABLE
CUSTOMMOUNTS
INSTRUCTIONS
The TAMRON Adaptall Custom Mount at-
taches  simply  and  securely  to  your
TAMRON  Adaptall Automatic SLR Lens
becoming in effect, an integral part of the
lens. With the TAMRON Adaptall Custom
Mount System, your lens can be usedwith
virtually  all the most popular SLR camera
by attaching the appropriate mount.


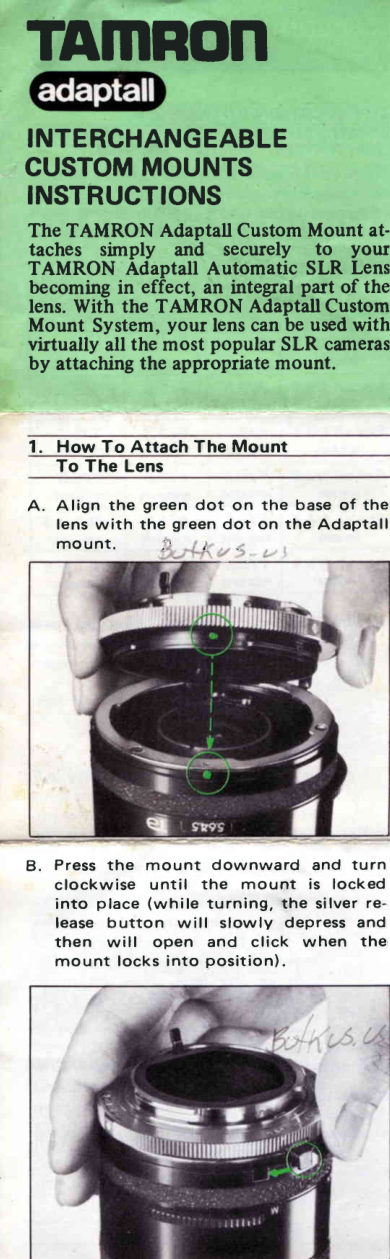
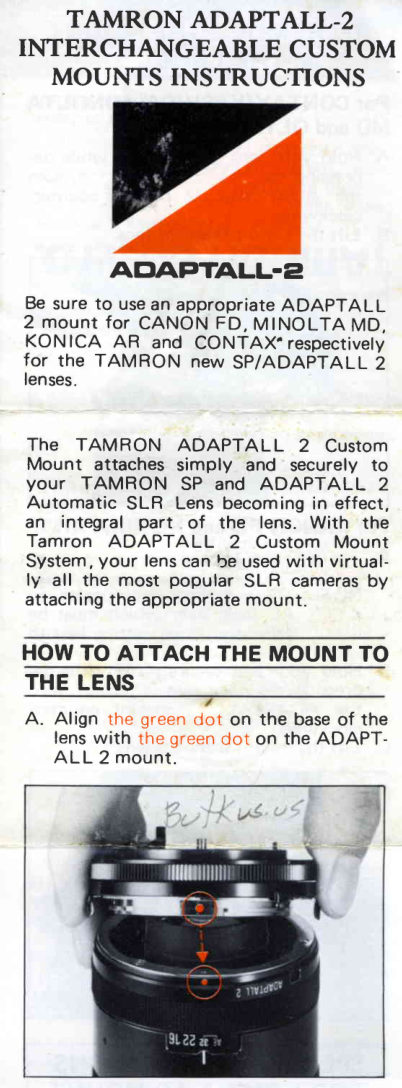
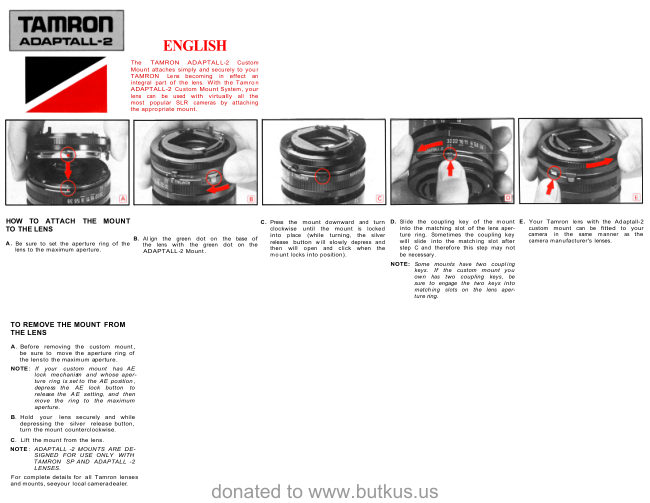
 1. How To Attach The Mount
   To The Lens

A.  Align  the green dot  on the base of the
    lens with  the green dot on the Adaptall
   m o u n t .             : '


B . P r e s s  t h e m o u n t  d o w n w a r d   a n d   t u r n
    c l o c k w i s e  u n t i l    t h e m o u n t      i s    l o c k e d
          i n t o  p l a c e  ( w h i l e   t u r n i n g ,   t h e s i l v e r  r e -
    lease button    will  slowly  depress and
        t h e n  w i l l   o p e n  a n d  c l i c k  w h e n    t h e
   m o u n t     l o c k s   i n t o p o s i t i o n ) .
View original page 1Page 2 · Read text
C . S l i d e   t h e  c o u p l i n g  k e y  o f   t h e m o u n t
     into  the matching  slot on the lens aper
    ture  ring. (Sometimes  the coupling key
     will  slide  into  the  matching   slot  after
    step   8.,  and  therefore   this  step may
    not  be necessary.)  The  lens  is now  set
        f o r    f u l l  c r o s s c o u p l i n g w i t h  y o u r  c a m -
    era's open  aperture  metering  and AE
    control  mechanism.


NOTE:   For  Pentax/Praktica  Thread  type
      M o u n t :
         F o l l o w  s t e p s A a n d B o n l y .
         F o r M i n o l t a M D , N i k o n A l  a n d
        P e n t a x K :
        These mounts  have two  coupling
         keys  and   therefore   both   keys
        must be placed  into  the matching
          slots on the lens.


2. How To RemoveThe Mount From The
  Lens

    S e t    t h e      l e n s  a p e r t u r e    r i n g    t c - r i t s   | n a x  r
         , l r ( . t n ) l ( ) n s o f ) { - r n i n q ( F  n u n t t r g l )
B . H o ld   y ou r        l e n s  s e c u r e l y   a n d  wh ile   d e -
    p res s in g     t h e   s i l v e r    r e l e a se  b u tto n ,    tu rn
         t h e  A d a p t a l l   m o u n t    c o u n te rclo ckwise .
C.  Lift  the mount    f rom the  lens.


                          www.butkus.us
View original page 2Page 3 · Read text
1. fgr CANONFD, KONICA,
  AND MINOLTAMD

When  using your  Adaptall  Custom  Mounl
 for these cameras you must use the mounl
 with  the corresponding maximum  (largest)
 aperture. The chart below  indicates the ap.
 propriate mount  use.

  Maximum    A N O N        M INOL TA
   apertura      F D   KONICA    M D
 For  all f /2.5    F/2.5     F/2.5    F/2.5-4.5
     l€nses     mount    mount    mount
 For  all f/2.8    F/2.A     F/2.A    F/2.a-5.6
 __ lenses _   mount,   mount     mount
 For all f/3.5   F / 3 . 5    F / 3 . 5      F/3.5
    lensos     mount    mount    mount
 For all f/3.8   Frc.A   Frc.A    Frc.A
    lenses    mount    mount    mount
 For   all  f /4.5    F/4.5     F /4.5    F/2.5-4.5
     lenses     mount    mount    mount
 For all f,/5.6   F/5.6     F/5.6    F/2.8-5.6
    l€nses     mount   mount    mount

N O T E :  F o r  a n y  T a m r o n  A d a p t a l l     l e n s
          wit h a v a r i a b l e m a x i m u m  a p e rtu re
        us e  t h e m o u n t    f o r   t h e ma ximu m
        ape rture.
        Fo r exa m p l e : F o r F / 2 8 3 . 9   le n se s
        us e t he F / 2 . 8 m o u n t .
        F o T M I N O L T A M D
                  I n   t h e  s h u t t e r - s p e e d - p r i o rity  A E
        mode,  there  may  be  occasions
       when   the  view_f inder  ind icator
          s h o w s  a s m a l l e r F  s t o p  th a n  th e
        min imu m   a p e r t u r e  o f    t h e
        T A M R O N      l e n s i n u s e .
                  I n   t h is c a s e p r o c e e d a s fo llo ws:
          Either,  increase the shutter speeq
          s o   t h a t    t h e  v i e w f i n d e r  in d ica to r
          s h o w s    t h e  s a m e m i n i m um   a p e r_
.                t u re  a s   t h e     l e n s   F o r  e xa mp le ,
          c h a n g e t 1 / 1 2 5  a t  F / 3 2   to ' l/2 SO
         a t F / 22 .
       P leas e n o t e  T A M R O N   A d a p ta ll
       w ide an g l e  l e n s e s h a v e a min imu m
        a p e rt ur e o t F / 1 6 w h i l e  z o o m  a n d
                 t e lepho t o    l e n s e s h a v e a min imu m
        aperture   of   F/22.  The  cameras
           .  a u t o ma t i c  e x p O S u r e c o n trOl  will
         adjust   to   give  the  correct  ex-
        posure  and  therefore  no  adjust-
       ment   is necessary.
View original page 3Page 4 · Read text
2. For CONTAX/YASHICA

This  Adaptall  mount  requires one  addi
tional  adjustment  after   it  is mounted  or
your  lens. On  the  rear of the mount  (se
diagram below)  there are two  small screw
(B). These screws must be adjusted to se
the correct aperture on the mount.
A.  Loosen  the  two  screws with  the smal
    screwdriver  supplied with  your mount
B. Slide  the  F/value.selector  lever (A)  tc
    the matching  index on the mount.  Thr
   diagram  below   indicates  the  corres
   po n d ing m a x i m u m   a p e r t u r e. Fo r  e x
    ample,   if you  have an F/5.6  lens, th(
    selector  lever should be set as indicatec
    below.
C. Tighten  the two  small screws.
For   c o mple t e  d e t a i l s   f o r  a l l TAMRON
Lenses and Mounts,  see your  localcamer:
deale r.


                             ;Li.i"t
           1 9 F         "..iJ


Manufacturers   of  lenses for  photographic
industrial,  laboratory,   video, and scientifi<
applications.
TAmROn CO.rljrD
Tam r o n  B ld g .  1 7 - 1 1 ,  7 - c h o m e , Ta kin o
gawa, Kita-ku, Tokyo,  Japan.
( Post No . 1 1 4 ) . T e l :  ( O 3 ) 9 1 6 - 0 1 3 1
Cable: "TA M R O N T A I S E I  T O K Y O"
Tefex: 272-2 2 2 0 T A M B O N


                            Printed  in Japar


                         www.butkus.us
View original page 4Related documents and language editions
TamronPDF
Tamron Adapt-A-Matic Mount another
User manual
9 pages · EnglishRead →
TamronPDF
Tamron Adaptall / Adaptall - II
Product booklet
4 pages · EnglishRead →
TamronPDF
Tamron Adaptall-II
Product booklet
1 pages · EnglishRead →

TamronPDF
Minolta tamron adaptall 03
User manual
16 pages · German, French, SpanishRead →

TamronPDF
Tamron Adaptall , Deutsch
User manual
24 pages · German, French, Spanish, EnglishRead →
From the M. Butkus archive. Original publisher and archive notices are retained.
Check the model and edition against your equipment.
PDF verified 2026-10-10.