Film cameras
VOIGTLANDER BRILLIANT V6 User manual
User manual for VOIGTLANDER BRILLIANT V6. 7 pages in English. Read the original PDF, download or print a copy without registration.
7 pagesEnglish1.3 MB PDF
Loading your manual…Open PDF directly
Document details
- Brand
- Voigtländer
- Model / document
- VOIGTLANDER BRILLIANT V6
- Document type
- User manual
- Language
- English
- Pages
- 7
- File size
- 1.3 MB
- Category
- Film cameras
- Document date
- Not specified in catalog
Search available document text
Find a term, then jump to its page in the original PDF. Image-only pages may not be searchable; check the PDF for exact wording and diagrams.
Page 1 · Read text
www.butkus.us
      INSTRUCTIONS
                    lor the use ol the                                        ;:
               -Brilliant V o

                                                 9


                                                               12
                                                          13
       5                                                          15
       6
       7
        14

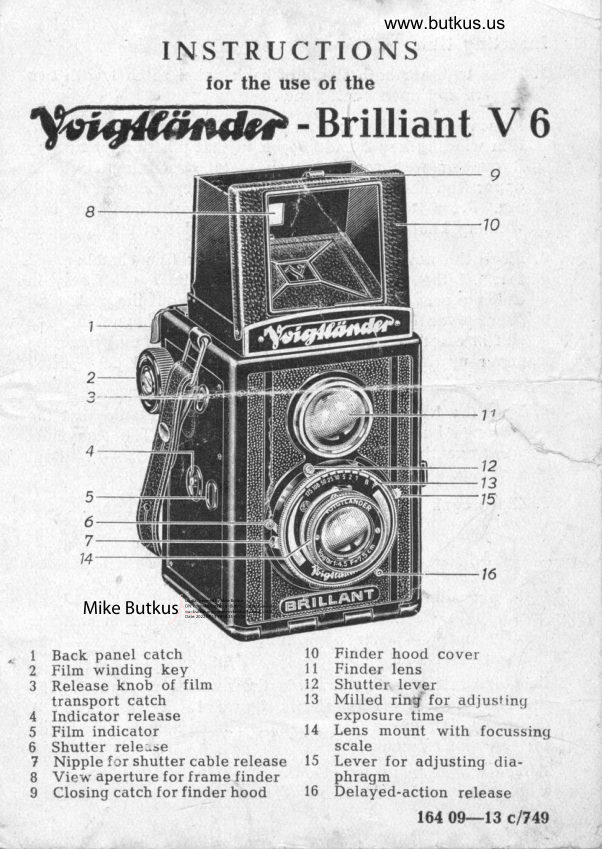
      Mike Butkus    Digitally                                                                    DN:ou=butkus.org,Date:cn=Mike2022.07.13signedButkus,email=mike@butkus.org,by19:18:25Mikeo=ButkusButkus-04'00'camera manuals,c=US            -16
1 Back panel catch           10 Firrder hood cover2 Film winding key              1l  Finder lens3 Release knob of film        12 Shutter lever   transport catch             13 Milled rin$*for adjusting
4 Indicator release                  exposure time
5 Film indicator                 t4 Lens mount with focussing
6 Shutter reletse                        seale7 Nipple fcr shutter cable release  t5 Lever for adjusting dia-
8 Vieir aperture for frame finder       phragrn
9 Closing catch for finder hood    16 Delayed-action release
                                               164 09-13 c1749      .
View original page 1Page 2 · Read text
Inserting flln.
   1, Press together both struts of back panel catch l with two
     fingers and open back panel
  2, Remove empty spool from lower film chamber. Pull out
     tilm winding key 2 and keep it in that position by turning
        it quarter way round. Open metal protecting cover in
    upper film chamber and pl,ace the empty spool on the left
     pin. Press in film metal protecting cover and turn film
    winding knob until it snaps into the slot of empty spool.
  3. Place the new film spool in the lower film chamber and
    tear off the protecting paper. Hold the spool firmly in
    order to prevent it from unwinding. Pull out the protecting
    paper ovel film gliding roll and thread tongue in wide
.    slot in empty spool, with the coloured sicle of the protecting
    paper upwards, as otherwise the film would be inserted
     v,':onglv.
  4. Tu,rn the film winding key twice and make sure ttrat tfre
    paper is being gripped by empty sp,ool. The film must
..-''' wind exactly between the two spool flanges.   Without
    warping.
  5. Close back panel and make it snap into position.

 Adjusting the indicator.
 Open red film window by turning the milled knob at back
 panel to the left. Fush up knob 3 and turn film winciing
 knob 2 until     after a pointing hand and 4 dots    the  figure 1 is visible.-                                               -
 Push indicator knob 4 towards the number window S. The
  indicator automatically shows figure  l.  Release knob 4.
  Close film window at b,ack panel. The camera is now ready
  for the first exposure.
  After each exposure turn on the film winding key 2 until the
 stop, but previously knob 3 should be pressed a  little
View original page 2Page 3 · Read text
www.butkus.us
 upwards and released. The number window 5 indicates how
 many exposures have been made. The fiIm window at the
 back panel remains closed during film transport; it serves for
 adjusting the first exposure only.
Make it a rule to turn on immedlately after each exposure
 as otherwlse double exposures will be inevltable.

Focussing
 The focussing scale is on ring 14 of the front lens mount.
Focus the estimated or measured distance by turning the
 front lens in such a manner that the corresponding  distance
marking appears on the left side of the indicating mark.
oo means "infinity".

Diaphragm
The diaphragm to be adjusted with lever 16 contiols the
exposure time and depth of focus. When reducing the lens_ *,aperture the exposure time is lengthened in such a way that
each stop requires nearly d,ouble the time of exposure of the
preceding .one. If  therefore exposure with diaphragm 4,b
requires l/so sec., diaphragrir 5.6 will  require l/gs sec., aia-
phragm 8 1,/ro sec. etc. At any rate remember: the higher the
stop number, the smaller the light intensity of lens. The
depth of focus covers the zone of full sharpness (from front
to back). The highest diaphragm number corresponds to the
smallest depth of focus, which increases when diaphragm
decreases. There is the following fundamental rule:
The htgier the diaphragm number, the smaller the zone of
depth of locus; but the smaller the dlaphr.agm number, the
more that zone increases.

                                                                                                                                                                                                                                                                                                                                                ;To read the depth-of-focus table on the findlr hood cover,
find the corresponding aone of depth-of-focus for each dia-
phragm number and distance.
View original page 3Page 5 · Read text
Time ol exposure.
The time of exposure is fixed by turning the ring 13. The
figures on the shutter scale mean fractions of  seconds,
 except I (:   I sec,). The shutter must be set (lever 12) before
every adjustment,    3l5e at "B" and "T"     At "8"  the
 shutter opens when- you press down release -!6 and will close
 again when pressure is released. At "T"  (extremely long
 time exposures) the shutter will remain opened. The shutter
will close when you press release again. Into release nipple ?
you may screw a cable release.
The Prontor shutter has a delayed-action release. Before
taking pictures set the shutter and push small red-marked
lever 1i6 to the left until  it stops. Having pressed release 6,
you have lG-12 seconds to get into your position. Never
set delayed-action release when adjusttng to ,,8" and 'T"t

                                                              -Jr      '  s{*L-- --Finder.
_9pen finder hood cover r10 by lifting closing catch 9. Look
vertically down into the finder hood and view the object.
For exposures at eye level and particularly for  sports
pictures use frame finder, for which you press backwards
the middle part of the finder hood cover until  it snaps in.
Press the opening 8 so tightly against the face that all 4
corners of the frame finder are clearly visible. It is essential
 to look straight through the finder and not at an angle from
the right, tire left or underneath. When you pull back the
rear panel of finder hood gently the middle part springs back
into original position.

                                  !.
Unloading
1, After making the 12th exposure open film window at back
   panel, preiss forward indicator release 4 and pull up knob 3
  and hold it  firmly. Turn film,winding key 2 until the
.  protecting paper disappears in the film window.
View original page 5Page 6 · Read text
www.butkus.us
2. Open back panel, remove the full spool. Hold  it firmly
  and secure it with the gummed strip.  It is recommended
   to load and unload the camera in shadow (shadow of body
   being sufficient), but not in full sunlight as otherwise the
   pictures might easily become hazy.


Close-ups.
Voigtliinder Focar Lenses open to you the interesting sphere
of "close-up photography" and enable you to reproduce
small objects on a comparatively large scale e. g. flowers,
butterflies and other small animals, stamps etc. including the
reproductions  of book-pages or small pictures. These lenses
are simply placed over the lens mount With Focar lens  1
you can approach the object as near as I'5rlz" and with
Foca'r 2 even as near as 4'. When ine1155i11g :-ca shouiti
adhere accurately to the following scale and measure care-
fully the distance between the object and the front surface
oi the Focar lens.                                                                    -'"*{

Focussing table:
   By    The pict re is sharp at    By     The picture  is sharp at
 focuss,   Focar  I      Focar 2       focuss.     Focar  1      Focar 2
   on          at              at          on           at             at
 feet m   feet cm             f eet     cm   Ieet m   feet  cm    feet   cm
  oo     2',8" 80      l'5t12" 44r12  8', 2,5  2'   "60V   l'3  "3711"
65' 20   2',6" 77    1'5  " 43Llz  7',2     I'll    " 57        l' 2t  1 s" 36'1 2
               74           l' 4tlz" 42rlz  6', 1,8  l'10 " 55    t'2   " 35rtz o      z',5"
23', 7    z', 4" 72          l' 4112" 42    5',  1,6  l'9  "53    l'2  "35
 16' 5  2'3" 69      t'4   " 41     4,1" 1,4  r'8  "51       l' lLlz" 34
                                                                             r12" 32112 13' 4  t'2" 67       l'3rlr" 40    4',  1,2  t'7  "48      l'
  V      z',r" 61112    l'31/r" 39     3,7" 1,1  l'6  "46      l'      31112
 10' 3   z',t" 63      l'3  "38112  3',I       l' 5ri2" 4411    l'/     3l


                                                                                                          ,,--.1
View original page 6Page 7 · Read text
Yellow filter.
  When taking pictures in the open air especially with blue
    sky or open air portraits you rvill particularly appreciate the
   use of a. yellow..filter: '"Voigtliinder Yellow Filters"' fitting
      to. youi- tamera, car6fully .groupd planoparallel frorn spectro-
    scopically tested glaS3, are available at your dealer's. When
,   using a good ortho-panchromatic film the light filter G tr will   be sufficient for most pictures. But if you like.special clouds
    effects you rnay prefer the dense filter G 2. When  . using
   these filters you should extend the exposure time as
    necessary, i. e,:                                                                                                                                    A,,.
              Yellow Filter G I         lrlz---2 times
              Yellow Filter G 2        3--4 times.
                                                                                        ii   {-lenninq AR coated lenses.
   Wtren looking uittor"  lenses at--bn-?ngi,j )Jd will nedu;e a
    bluisb violet gleam which indicates that they hav'e been
    "sr,ecialil' treated"  i. e. provid,;d with  "Anti-Reflection-.
   Coats". In case of exposures agairrst the light any reflections
   are absorbed by those AR-coajs or reduced to a minimum;
    at the same time they increase the brilliancy of your pictures
   and the clarity of the lens.
   Even those lenses which have not been specially treated
-  require careful, but you should be particularly careful whbn
    cleaning the outer surfaces of AR coated lenses. Though
    these coats are relatively very heavy, they are only about
     1/ro ooo mm. thick, which is  scarcely conceivable.  It   is
    therefore recommended to clean the lens with a fine hair-
   brush or a very'soff. clean cloth. Remove  al,l grease or oil
    spots by careftiily d'abbing them with pure alcohol or ether.


                                                                                   .t
                                          8orek, Bnunschwelg
View original page 7Related documents and language editions
VoigtländerPDF
Voigtländer BRILLIANT F4.5
User manual
29 pages · EnglishRead →
VoigtländerPDF
Voigtländer BRILLIANT V6
User manual
7 pages · EnglishRead →
VoigtländerPDF
Voigtländer THE BRILLIANT F7.7
User manual
28 pages · EnglishRead →
VoigtländerPDF
Voigtlander Brillant F/6,3
User manual
19 pages · FrenchRead →
VoigtländerPDF
Voigtlander Brillant F/6,3
User manual
35 pages · FrenchRead →
VoigtländerPDF
Voigtlander Brillant 6X6 F/4.5 Gebrauchsanleitung
User manual
32 pages · GermanRead →
From the M. Butkus archive. Original publisher and archive notices are retained.
Check the model and edition against your equipment.
PDF verified 2026-10-10.