Sewing machines
Wheeler & Wilson Curved Needle — User manual
User manual for Wheeler & Wilson Curved Needle. 31 pages in English. Read the original PDF, download or print a copy without registration.
31 pagesEnglish3.2 MB PDF
Loading your manual…Open PDF directly
Document details
- Brand
- Wheeler & Wilson
- Model / document
- Wheeler & Wilson Curved Needle
- Document type
- User manual
- Language
- English
- Pages
- 31
- File size
- 3.2 MB
- Category
- Sewing machines
- Document date
- Not specified in catalog
Search available document text
Find a term, then jump to its page in the original PDF. Image-only pages may not be searchable; check the PDF for exact wording and diagrams.
Page 1 · Read text
DIRECTIONS FOR USING


        HIGHEST PREMIUM.

 WHIRLER & WILSONS SEWING MACHINES,


                 Settingup the Table, ete.


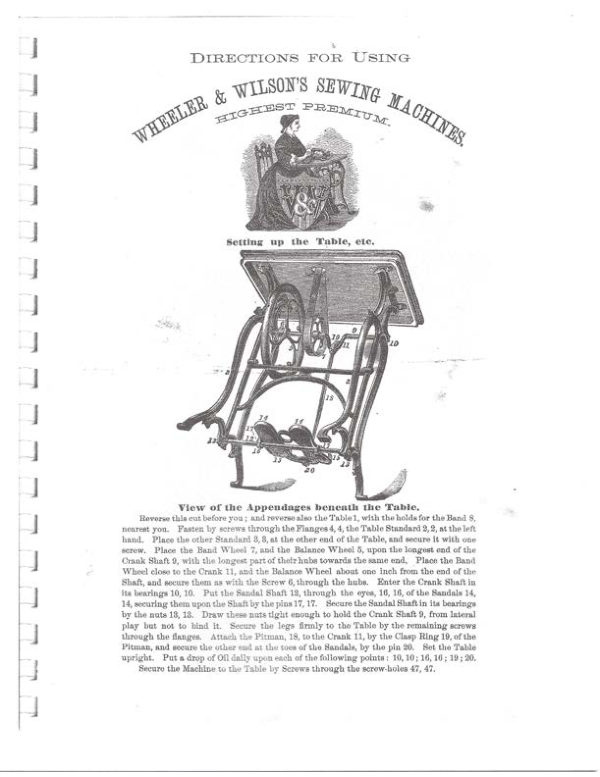
        View of the Appendages beneath the Table.
     Reverse this cut before you ; and reverso also the Table 1, wish the holds for the Band S,

nearest yon  Fasten by screws through the Flanges 4, 4, the Table Standard 3, 9, at the left
hand, Place the other Standard 8, 8, at the other end of the Table, and secure it with one
screw. Place the Band Wheel 7, and tho Balance Wheol 5, upon the longest end of the
Crank Shaft 9, with the longest part of thoir habs towards the same end. Place the Band
 Wheel close to the Crank 11, and the Belance Wheel about one inch from the end of the
Shaft, and secure them as with the Screw 6, through the hubs. Enter the Crank Shaft in
its bearings 10, 10. Put the Sandal Shaft 12, through the eyes, 18, 16, of the Sandals 14,
14, securing them upon the Shaft by the pins 17, 17.  Secure the Sandal Shaft in its bearings

by the nuts 18, 18.  Draw these nuts tight enough to hold the Crank Staß 9, from lateral

play but not to bind it. Secure the legs armly to the Table by the remaining scrowa
through the Hanges. Attach the Pitman, 18, to the Crank 11, by the Clasp Ring 19, of the

Pitman, and secure the other eud at the toes of the Sandals, by the pia 20.

           Put a drop of Oll dally upon each of the following pointa: 10, 10; 16, 10; 19; 20.

    Securo the Machine to the Table by Screws through the screw-boles 47, 47.
View original page 1Page 2 · Read text
View of the Machine ready for Work.


View of the Machine with the Cloth Plate Removed.
View original page 2
Page 3 · Read text
3
              Preparing the Machine for Work.
    Raise the Needle Arm 29 to its highest point. Raise Cloth Presser 20, by lifing the
handle of lever 23.Take out the four screws which fasten the Cloth Plate 46, and slide

 off the Cloth Pinte carefally.
    Loosen Thamb Screw 18.Pull back Bing Slide 17. Take out Bobbin 15. Put a

drop or two of oil in all the oll holes, and on parts which rub against each other.
                                   the ends of the Band 7 evenly.
                                   around the Band-Wheel below, bringing it up

                                       through the holes above the table and around the

                                      leather-covered pulley. Draw the ends of the
                                          belt togethur, and see that it will fit tightly with.
       Lucing the Band.                         If too long, cut a piece off,
     Pierce ench end with four holes. Ince the ends together with a small, strong cord,

                  Be careful not to make the belt any thicker by lacing.

fit tightly. After a few days' wear the belt will stretch, and it must then be tightened.

                                                              The work is moved
                                                         forward under the
                                                          needle by the teeth
                                                           11 of the foed, which
                                                 shown in the
                                                           Cut. At esch revo-

                                                                       Iution of the leather

                                                             covered palley, the

                                                                         teeth are puslied for-
                                                            ward above the face
                                                               of the Cloth Plate,
                                                        carryingthe -wer
                                                            abead of the needie

                                                                      the distance roquired

                                                                   for each stitch. If a

                                                                          short stitch is requir-

                                                                      ed, turn the screw 10
                View of Stient Feed.                 from above, towards
                                         the right hand; if a long stitch, turn the
                                    screw in the sate manner toward the left.
                                                          It the food roguires elenning, lift it out of
                                        the recess. Wipe all the parts elenn, and
                                                  set the feed back in place.


                                 Draw Feed
                                         Points.

                               Two Plate Slides 35 are furnished
                                         with each Machine-one with a small
                                         hole 60 for fine, and the other with a
                                          larger hole for coursework. There
                                                Plates can be changed at will, when the
                    do pants    Cloth Plate is secured to the standards,
                                       by removing the Screw at the side of the
                                                     elide, and drawing it out with the point
                                      on the needle wrench. The slide must
                                       always be carefully pastiedup in the
                                                 grooves in the Cloth Plate.
  View of the Cloth Plate, Reversed.
View original page 3Page 4 · Read text
The Rotating Hook, etc,
   The Needle.                               The Needle-Wrench.


                                                    The point on the needle
                                                        wrench is used for draw.
                                                           ing out the plate slides
                                                                    (80), aml the glasses and
                                            hemmer from the cloth
                                                              presser.

                       Setting the Needle.
     (5, the Rotating Hook ; 4, the Needle; 3, the Loop Chock; 5, the polst of the Hook;
6, the Upper Thread; and 7, the Lower Thread.) Set the Needle 4, with its head or shank
In the Needle Yoke 31, with its eye ranging from left to right, and the couves of its carvo
towarde tle front of the Machine. Secare it by screwing up the nut on the right of the
Needle Yoke (use for this purpose the Necdle Wrench). Set the Needle so that in its
descent it will pass through the centre of the Needle Hole 60, and pass as cloee na possi-
ble to the left of the point 5, of the Rotating Hook, without touching it; and its eye about
onesixth of an inch below the point of the Hook, or so that it will be on a level with the
shield or back part of the honk as the points of the look reaches the needle to enter the
centre of the loop of thread formed at the right side of tho Needle in its rise.
   The Bitstr Loop-Check 8, shoald pross snugly upon the cireamference of the Rotating
Hook 5, but not in the chamfered part. Shoald this Loop-Check become worn so as not to
check the Loop of thread, adjust it by turning the Screw,9.
       Spooling the Thread and Threading the Machine,


   Wind the Lower Thread upon the metallic Bobbin 15, by placing it upon the Spool
Spindle 9, and the spool of the thrend upon the Spool Pis, and work the trendles as when
      (Um the Ueder Thread mlightly finer than the Upper: if No. 70 Thread is used
for the Upper, 80 will be the proper number for the Lower. The Upper Thread shoald be
smooth, and well twisted, and adapted to the size of the needle.) While spooling, raise the
Cloth Premer 20, by drawing the Lever 98, forward. Plnce the Spool 88, upon the Spindle,
nest the hue of the Staulard 3. Pass the thread over the Rocker 94, through the Thrend

Guide 30, once around the Tension Pulley 40, and thence through the Eyelets 33, 33, und

the Needle Bye 35, from left to right, and draw it through four or five inches to the right,

and behind the Cloth Presser 20, Pince the Bobbin 15, In the cavity of tbe Hook 6, with
View original page 4Page 5 · Read text
the thread flowing from its top towards the frant of the Machine. Plaos at its right, the
  Ring 16, upon the Slide Bar 17, close to it, and secure this bar by the Thumb Sere 38

  Draw the end of the Lower Thread forward between the Hook 5, and the Bobbin Rioz 14

  and leave it in the Thread Hold 37, until two or three stitches have been taken.

      The following index denotes the No. of Thread saited to the different sizce of Needle


                                                               44010 T0   89 30 90


                     Overcoats, Il'vy Coats. Cloak Mak-Boyk Cloth- Zine Shirts, Handler.
                                            Tallon in, alie, land halie chiefta


                                                                      Clothing. I
       The Ko, of the seedle is marked in small Agures upon ita shank, that le the fattead part of 1E
                    Operating the Machine.
      He seated before the Machine, with the feut upon the sandale, and the toes under d
 leather straps.  Unthread the Machine by removing the Bobbin 15, and the thread frie
 the needle, and raise the Cloth Presser 20. Learn first tbe motion of the feet. Start the
  Machine by raising or depressing the toes, or if necessary tarn the Balance Wheel 5, with
 the hand to assist. Never turn backwards, but move the band always in the directice
 indicated by the arrow upon it.Continue this motion pressing gently with the heels and
  the toes until a slow or rapid motion can bo produced at pleasure.
    To Sew.-Place the Cloth 45, benenth the Needle and the Cloth Presser 20. Let this
  Presser drop upon it, and hold the end of the Upper Thread, or of both, loosely betwees
  the thunb and forefinger of the right hand, until two or three stätches have been taken
 then relense the oods of both threals. Place the forefingers of the left hand gently
 the work,    I hold with the thamb and fingers of the right hand.
              or hold back with the left, as by so doing the needle is likely to be broken,
 and the stitches made irregular. Hold the cloth amooth.
      THe TENsION, is regulated by the nut at the end of the Volute Spring 41. The point

of interlocking of the two threads elould be in the centre of the fabric, and show both rides

 of the scam alike.Il the Lower Thrend les upon the lower surface, the Tension is too light:

  increase it by turning the nut forward in the direction indicated by the arrows. If the work

  puckers, or the Upper Thread lies upon the upper surface, the Tension is too great; dimin-
  Ish it by turning the nut backwards. Thick work regaires a heavier Tension and longer


      To GarnEn, make a long stitch with a loose tension; gather by drawing up the
  Upper Thread.
                    To Regulate the Stitch.
      The Machine feeds the cloth through itself; the operator guides it. To make a ehor
 witch, turn the Thumb Screw 10, over and toward the right hand. To unke a long

  stitch, torn the Thumb Screw over and toward the left hand.
        The Large Gauge.


                                       The Small Gauge.

              JOL
                                                 For Nos. 1, 9, and 1 Machine.
View original page 5Page 6 · Read text
6

     To use the large Gange, attach it to the fixed Arm 10, by the Thumb Screw, and let
   it extend down over the Cloth Plate, and adjust it according to the width of the seam
  desired. To use the small Gange, attach it to the Screw Hole 44, using the Thumb Screw
 The two Ganges are not used in conjunction.

     Reraore the Clotla Plate daily when the Machine is in use; elesn well shout the
 Rotating Hook, the Feed 18. and the face of the Cam against which the Feed strikes,
 Put a drop of oil on each of the following points: the Arbor 4, at its bearings in each
 Standard 2,9: the Carn 6; the Boontrio Ring 8; the Feed 18; and on the face of the Cam agains which the Feed works; on the bearings of the Feed in Standard 9: the
 Cloth Presser Piston above 21; the Pivote 25, 25, at euch end of the Rocker 24; the Hinge
 37; the Feed Stop 04.                     Hemmers.
         New Style.                           Old Style.


    To adjust the New Style Hemmer, remove the Glass 71, in the Cloth Presser 20,
using for this purpose the Wire Hook, and substitute the Henmer 70. To adjust the Old
 Style Heramer, remove the Cloth Proser 20, by unscrewing the Serew 23, and loosening

 the Fixed Arm 19, by starting out the screw by which it is fastened to the Standard 8.
Pat the Hemmer 48, in place of the Cloth Presser 20. Secure it by the Thumb Screw 22,

and fasten the Arm 10, again to the Standard 8. Use the light Cloth Presser Spring for
 bemming and light work.
              To Hem with the Hemmer.
     To make a arrow Hem 50, roll the cornors of the Cloth elightly; enter it into the
convolution of the Henimer, and draw it along to the Needle.The Hem is then turned,
and stitched as in ordinary sewing.To make a wide Hem, fold the Cloth the width of
the Hem, and pass the edge through the Hemmer. To FELL, seam up the two edges,
one a listle lower than the other; open the Cloth, and fell the edges with the Hemmer.
                   General Directions,
     Set the needle properly; keep the machine clean and well oiled, and the Loop Chock
in proper order, according to directions. Do not make too short a stitch.If the upper

sliread breaks, it is owing to one of three causes:—

    1st, the Tension, or friction, is too great on the upper thread.

     2d, the Loop Check In worn so as not to hold the loop which is passing over the lower

spool until the point of the Hook takes hold of the sacceeding loop on the Needle.

    3d, the Metal Spool hus become roughened on the edge, and wears off the thrend in

passing over it.

     If the thread hangs in loops on the under side of the work, increase the tension on she
upper thread suffleiently to draw she lower thread up into the goods. Should the thread

brenk by inerousing the tension on the upper thread, and still not make a perfect stitel on
View original page 6Page 7 · Read text
the under side, examine the lower spool, and sce if there is any roughness on it, or on the

 book, so an to preveat the thread from presing freely over it. If the thread should break

 in the ander Spool, the end can be foand with the Throad Hook. @

   Never use a pin, needle or sciesors for this parpose or mar the edges of the Spool or Hook.

   The machines are adjusted for all the usun kinds of sewing, and for the ordinany sizes of

 threads; and there is no need of making changes to secure a perfect operation of the Machine

        Extras.                Fucking Gauge.
 TECKISE GADOE        $2.00
                        3,00
 Віхоки,                5.00
 BUTTON HOLE ATTACH'T, 85.00
                        5.00

   Attach the Clamp b to the
 Rocker 24, by ita screw,
 with the arm a extending

 forward of the cloth preseer

 30. Attach the Gange Clamp

 d to the front of the Cloth

 Plate 40, by its thumbscrew
 on the under side. Adjust

 the slide e at the required

 distance from the needle for
 the width of the tuck. Adjust the arm a so that its shot shall come exactly and squarely

 over the point of the gauge e, und fasten it by its screws on the top of the tocker Clamp.
 Fold the finet tack, and the next tack will be creased in the procese of stitebing the first,
 and so on. Tbe Tucking Gauge is used with either of the stitching gauges sent with the
machine.
          Braider.                        Binder.


  Sabatitate The Braider Glass for the ordi.

Bary Glus 71, in the Cloth Presser 30. Pane

 the braid or cord throngh the hole 78, and

 stitch it upon the fabric 45, as in the ordinary
proces of sewing. TO ATTACH THE BINDER,
 remove the Fixed Arm 19, and attach the

 Binder to the Cloth Plate 40, at the Serew Hole 44, by thie Thumb Screw 1, and brace it

by 2,  Raise the Presser 12, by the Thumb Serew 10, and turn it out, so that the pin may
rest upon the Niche 14.  The binding is folded and entered through the Gaide 4, along

 the edge of the Fahrie 5, with the upper edgein the Guide 6, adjusted by the Serew 7, and

 the lower edge in a corresponding Guide below, adjusted by the Screw 8, and also through
theGuide upon the Spring 9, whieh le adjusted by the Screw 10; drop the Presser 19,
and proceed us in ordinary stitching. The Needle 35, passes half way between the Spring

9, and the Presser Puint 11. The Binder Is ndjusted to the varions widths of bindings
View original page 7Page 8 · Read text
by moving backward or forward 15, which in held by the Serew 16. More or less binding

  can be thrown upon the uppor or the lower side of the fabric, by properly adjusting
 the various guides,
                                           Corder.
                                                           Insert the silde 71, of the Corder,
                                                    61, in the slot of the Presser, so that
                                                  the Cord will be delivered from the
                                          end of the Tube 08, In a direct line
                                         with the groove In theslide71,
                                               nearest the needle.Pass the Cord
                                        •67 through the guides upon the
                                               Corder, and through the Tube 68,
                                          and draw it through far enongh to
                                                hold in the fingers. Place the fabrie
                                                 so that the Tabe 68 shall be between
                                                     the folds where the Cord in to be laid,
                                             and stitch as usual.


  Adjustable Hemmer.
   Attach the Adjustable Hen-
 mer to the plate by the serevre

 at the polnts a and 6, as shown in
 she engraving. Take out the
 glass 71, so that the Presser 20
 will test upon the Spring c
 Fold the materials as d, 6, and
bem as with the ordinary Hem-
      To make a wide hem,
 loveen the Screw f, and draw
 out the gradunted Stide, the

reguired distance.

                 Accompanying Artieles.
                       The ou Can.
        Serew Driver.                    Large Wrench.


     Header Clams, with Now. 1, $ and &                             Heavy Spring.

       Mschines,                                    Hermir,
   Hone.                                                     Dozen Needles,
    Needle Wrench,                                              Pear Metal Spools,

    Thread Hook,                                               Quiting aud Tucking Gauges.


     The Oil Can in filled by unscrewing it near ita centre; and Oll is ejected frown its

nozzle by pressing on ite spriag bottom. Use pure Spena Oil, ur Machine OIl of the best
quality.
View original page 8Page 9 · Read text
• DIRECTIONS
       FOR USING
WHEELER & WILSONS


Family Sewing Machines.


  WHEELER & WILSON M'F'G CO.
        PRINCIPAL OFFICES:

 No. 44, 14th Street, New York.
    AND BRIDGEPORT, CONN
View original page 9Page 10 · Read text
*OE, 820 MAIN S14
   DUBUQUH.

     G B. GOLDWOOE, Agent.
   These directions should be carefully studied and
followed by persons learning to operate.
   Any failure on the part of Agents to give instruc-
tions, if reported to us, will receive prompt attention.
    Allow no person interested in the sale of other
Sewing Machines to handle the Machine in any manner
whatever. Allow the Machine to be adjusted or re-
paired by no one but an authorized Agent, or at our
Office.
     If the Machine needs repairing, take it off the
table (by taking out the screws at front and back of
the Machine, and cutting the lacing of the belt), en-
close it, with the ring slide, hemmer and bobbins, in
a small box, with the name and address of the owner
written plainly and tied to it, and send it by Express
to some agency or office for the sale of our machines,
and it will be put in order and promptly returned.
(See 3d page of cover.)
View original page 10Page 11 · Read text
NEEDLES AND THREAD.

     Genuine WHKELER & WILSOX needles are marked W.&*W.
 M/'s. Co., all others are imitations. We cannot warrant machines
 to work well when counterfeit needles are used.
    Needles are numbered on the fat side.
    Buy good cotton and silk. You cannot make a smooth even
 stitch with poor, rough thread.


      SIZES OF NEEDLES AND THREAD TO BE USED.

   SIZE OF                                                    SIXS OF
  NEEDLE,FOR                                        COTTON.

         Undressed Nainsnok and Jaconet Tucking              80 to 150
         Fine Linen Bosoms.                                  80 to 100

               Mushn, Collars, Lawns, Handkerchiefs and Fine
  1                                                             80 to        1 Swiss Muslins.

                                                             60 to
                                                         80 to 70
 3% 1 Pati and Be rein Clothing:                       10040 toto 1511
                                                      30 to 50
                                          40 to 70  3 R Finer Coats, Pants and Vests.
                                                                                                                        | 24 to 40 Cotren.  9½ Coarse and Heavy Cloth                                               760 to 80 Linen.

                   IN SEWING WITH SILK TWIST USE
     FOR                                            SILK
          Fine Silk Goods.                                   000
  2    Dress Waists. Cloaks and Fine Cloth                00 to 0
        Boys' Fine Clothing                          0 to
  3    Cassimere Couts. Pantsand Vests.           A to B
   3½: Uvercoats and Heavy Cloth ..                B to C

    Use the fine plate slide with number 0, 1, 2, and 2½ needles.
Use the coarse plate slide with number 3, 3½ and 4 needles.

   The Heavy Spring is used to obtain more pressure in sewing
thick or hard goods, and is inserted in the place of the lighter one surrounding
the cloth-presser piston in the fixed arm.
View original page 11Page 12 · Read text
1 Cloth Plate,            6 Fixed Arm,            10 Spindle.
2 Cloth Presser.            7 Glass Foot.             11 Tension Pulley.
8 Cloth Presser Knob.      8 Needle Arm.          12 Thread Guide.
4 Cloth Presser Lifter.      D Needle Yoke.           13. Volute Spring.
5 Eyelets
        ALMAZE TURN THE BALANCE WEZEL OVER FROM ZOU.
Get the Needle with
 the flat side to the left.
 The eye of the needle
 should belevel with the
 top of the back part of
thehook, when the
 point of the hook has
 ust reached the needle,
 s in the cut.See that
the needle
fectly true through the
center ofthe needle-
 hole in the plate; if it
does not, bend it until

  The point of the Nee-
dle should enter the
 Needle-hole in the same
 place that the shank of
 the Needle occupies when the Needle is at the lowest point.
   To fli the Bobbin, Raise the cloth-presser and unthread
the needle.Place the bobbin on the spindle and the spool of
thread on the spool-pin; wrap the end of the thread round once
or twice in the bobbin to fasten it: then work the trendie. Hold
the thread only moderately tight, that it many not run too
 cichliv into the bobbin.
View original page 12Page 13 · Read text
3
   To place the Bob-
 bin. Press the Lever, -
 (b) and turn back the
 drop (a).  Place the
 bobbin upon the drop,
 with  its lower edge
 within the cavity of
 the rotating hook, as
 shown in the cut, and
 the thread winding
 from the top of the
bobbin • toward you.
 Turn up the drop till
 secured by the catch.

 * To thread the machine. Place a spool of thread on the
 wire at the back of the machine; pass the thread through the
        guide, pressing is as far back as possible, then upward in
 front of the tension pulley, around the pulley once, then through
 the eyelets in the neecle arm, and through the needle eye about

   To Sew. Turn the balance wheel over from you until the
 needle goes down and up once, pass the screw-driver (or other
 article) between the presser and plate pulling out the thread.
Place the cloth beneath the presser; lowerthe presser and
start the balancewheel over from you with the left hand.
Then placethe left hand gently onthe work to guideit.
Do not pull nor hold back the work.  Stop exactly at the end
of the seam.Do not turn the machine after the cloth has passed
the needle.
  To take out the worl.Turn the machine until the needle
 is at its highest point; loosen the thread between the eyelet and
the tension; raise the cloth presser,and pull out the work, cut
       the upper thread close to the cloth, then cut the under thread.
This leaves the threads in proper position for starting again.
   The Tension should draw the under thread up into the
center of the goods, but never any higher.  It is regulated by
the nut at the end ot the volute spring.  If the lower thread lies
along on ths under side of the cloth, or loops are left, the tension
i8 not ught enough and the nut should be turned forward.
  the work puckers, or the thread lies straight upon the upper
side of the cloth, the tension is too tight and the nut should be
turned backward
   Length of Stitch. For a short stitch move the lever under
the left end of the plate toward you, for a long one move the
lever from you. Have s long stitch when sewing soft woolen
or thick goods.
View original page 13Page 14 · Read text
4

         OILING THE MACHINE.

    Use the best Sperm Oil, to be had of our Agents, and at our

   The machine should be Oiler once a day, when in use.
   Remove the Needle and the Cloth Plate.
  Turn machine till parrow part of Cam is on top, and remove
the Feed Motion and clean it.
   Clean well about the Rotating Hook.
   Then put a drop of oll—-ist, in the oil holes at each end of
the Rotating Hook Shaft.
    2. On the right side, and small part of the Cam.
   S. In the oil hole in the connection to the left of the Cam.
    4. On top of the Cloth-Presser piston where it passes through
the fixed arm.
    5. On the Steel Tongue under the feed point, and on the side
 of the bur between this and the feed point.
    6. In the oil holes at each end of the back part of the Needle
Arm, over the póints of the side serc ws.
   T. In the Slot at the rear end of the connection.
    3. In the oil holes of the Treadle,each end of the Wooden
Pitman,and in the oil holes over both ends of the Balance
Wheel Shaft.


     • Bobbin.               5 Feed sur.            8 Rotating Hook.
   Drush Pad            6 Feed Point.          P Side Screws.
  3 Cam.                  7 Feed Spring.        10 Bobbin Holder,
                                              11Bobbin Holder Screw   4 Connection.
View original page 14Page 15 · Read text
5


  To Hem. Take out the Glass-foot (with the needle wrench)
and substitute the hemmer. Fold the hem for about half an
 inch, and insert it in the hemmer far enough for the needle to
 catch the hem.  The edge of the cloth should pass completely
around the scroll as in the above cut.   If the hemmer does
 not turn the edge of the goods completely under, but leaves a
 raw edge, turn the edge in the left hand a little towards you.
 It too much is turned in, turn it fromyou. To hem bine
worsted goods, hold them stretched.
   If the needle is bent, so that it does not catch the edge of
the hem, spring it from you.  If it strikes too far from the edge
and into the center of the hem, spring it to you.
  To make a wide hem, fold the cloth (once only) the width of
the required hem. Pass the edge into the hommer. as in
making a narrow hem, the extrn width extending back from
the lemmer.
  To fell, sew up the two edges, tle lower extending about an
 eighth of an inch beyond the upper.    A good rule is to have the
hemmer in the cloth-presser, and have the edge of the lower piece
of cloth pass exactly unver the farther edge of the hemmer, and
the edge of the upper piece pass under thie opening in the hemmer
  Nearly the whole secret of felling is in sc wing this seam.
  Then open the goods well, and fell down the projecting edges
with the hemmer, as in the cut below.
View original page 15
Page 16 · Read text
The Large Gauge is used
  for wide tucking, quilting, and
  plaiting shirt bosoms.  It is
  astened by the Thumb screw
  to the underside of the Station-
  ary Arm, as in the cut,
              forward
           according
  with of tuck or plait desired.
             Gauge
  quilting loosen the screw which
 connects the parts, and raise the lower part to allow the goods
 to pass between it and the Cloth-plate; then tighten the Screw.
   The last seam sewed should pass directly.under the Gauge,
 and the next seam will be parallel with it.
  The Plate Gauge, for sewing close to an edge, or for tuck-
 ing, 18 screwed to the Cloth-plate, using    Thumb-screw.
 For sewing a very narrow seam or tuck, use the glass with the
 under side cut away.

   The Braider is of
 glass, with two holes
 in it, one for the braid

 the other for the nee-
 dle f and fits in the
 cloth presser. To
 braid, pass the braid
 through the left hole
 in the braider, and
 draw the end out un-
 der the cloth-presser
to the right, being
 careful to have it pass
under the needle.
   After thefirst stitch
is taken the braid will
be drawnthrough
with the goods by the feed point.

 the Glass Corder is a glass foot withgrooves on the
under side.  Insert the cord between the folds of the goods,
and crease it close to the edge with the needle wrench or scissors.
Place the goods under the Cloth-presser, with the cord in the
groove nearest the operator, and stitch as usual.  If the cord is
held straight it is more easily placed close to the edge.
View original page 16Page 17 · Read text
7
         GENERAL DIRECTIONS.
   Sharpen Needles by grinding them with the emery whee;
 placed on the spindle.   Jave the cloth-presser raised, the needle
unthreaded, and the bobbin removed. Make the point round,
 long and tapering, not short and blunt.
  Use the Thread Hook to get the end of the thread out of
the bobbin, or blow it out; never use a pin, needle, or scissors,
 nor mar the edge of the bobbin.

   Never aliow the bobbins to get rusty.

   Never oil the tension pulley.

  Never turn the various screws in the machine, except as
herein directed.

   Ordinary Seams are easily crossed. If very thick, go slow-
     ly; and if the work is retarded, push it under the presser, when
   the needle is out of the goods, so that all the stitches will be
of equal length.
  Hard and lime dressed goods and stiff brilliants are sewed
better after being rubbed with white soap, where the seam is to
be, or by using the thread oiler, or after
              Why the Thread Brenks.

   When the tension is too tight.
   When the needleis not set right, or is too small for the thread.
   When the bobbin or hook have been scratched.
   The most frequent cause of silk or thread being chafed or
trayed oft, when the tension is not too tight, is that the needle is
 too fine.
   Clean out the thread guide occasionally with the thread hook,
removing ali lint, dirt or knots of thread.
  Skipping Stitches. This may occur when the needle is
too high; or when the point is blunted; or with lime dressect
 goods, which need soaping, or the use of the thread oiler; or if
 the needle does not pass perfectly true through the peerle

hole in the cloth plate.
   If the Machine does Not Feed the Cloth, the stitch is too
short, or the feed points need cleaning.  If the feed motion is
worn so that it does not rise the proper height, it may be raised
by turning down the left screw on the feed point.  It should
lift the hemmer off the plate the thickness of a card only.
View original page 17Page 18 · Read text
8
   Leavy Work, To sew heavy work, put in the coarse plate
 slide and use a coarse needle, and the heavy spring, if nocess-
ary.  For size of needle and thread see first page. Heavy
work needs a tight tension and iong stitch.

  If the Band Slips, and does not force the needle throug!!
the cloth, it needs tightening, which can be done by cutting oft
a small piece and lacing it again. Cut the end perfectly square.
 To Gather. Put No. 24 thread in the bobbin, make a long
stitch with a moderately loose tension and gather by drawing
the under thread.
  If a very elastic bins seam is desired, keep the goods well
stretched while sewing.
   To Purn a Corner let the necille raise half wav
 out of the goods,draw up the thread, taking hold of it just baes
 of the eyelet, and beingcareful not to pull any thread
                                       turn the work, the
nesensedlepulleyactingasasa apietpivot:ithletpress the doth preservord pro-
ceed. Or, raise the cloth presser aud turn the goods when the


phill of the needle in going down has just reached the top of
  The Brush Pad is to detain one loop until the point of the
                             It should press snugly against thehook has entered the next.
outer edge of the rotating hook, but should not be forced against
it sufficiently to divide the bristles, as it will then detain the
thread too long,and cause it to          It should never be
moved unless worn away until it does not touch the look, in
which case it may be moved against the hook.


          Nocdies sent by Mail for 50c, per dozen.
View original page 18Page 21 · Read text
DIRECTIONS
               FOR PRIN
     WHEELER & WILSON'S
   WING


  WI. SUMNER & CO., Agents.

      PRINCIPAL OFFICES.
 CINCINNATI, - - - - Pike's Opera House,
PITTSBURGH,     - • No. 27 Fifth Street.
LOUISVILLE      - No. 1 Masonie Temple.


      BRANCH OFFICES.
Columbus, Ohio, ... H. Crary,..v Agent.
                 A. Il. West,Dayton, Parismon!'          Bell & Co.,
                    Mrs. B. Goshen,
 Xenia.              Dr. S. D. Frost,
 liarion.            P. Phillips,,
 Marietta.           A. L. Haskins,
 ('Lillicobe,                             I. F. Woodside, 1 poster.             E. Foreman.
             C 0. Claflin, •he dignapolis, Ind, Terre Haute.        C. 0. Lincoln,
                    Mrs. J. BowlarLafarvette,
              G. b. Hill,MH                      P. M. Ramsay
                      D. Thompson,
                           J. D. Allen,
R                 James MeCallen,
                  Georgo V. Thompson,'
                  Thompson & Coleman,Ho

        Instruction given at any of the above Offices.

       Winted at the     Nation" Offer, Cincinnati. Ohio.
View original page 21Page 24 · Read text
DIRECTIONS FOR USING


WHEELER & WILSON'S SEWING MACHIN AS


                    Setting up the Table, ete.


          View of the Appendages beneath the Table.

     Reverse this cut before you; and reverse also the Table 1, with the holes for the Band 3,
dearest you. Fasten by screws throoph the Flanges 4, 4, the Table Stundard 2, 2, at the left
 hund. Place the other Standard 3, 3, at the olber end of the Tahle, und secure it with obe
screw. Pince the Band Wheel F, and the Balance Wheel 6, upon the longest eail uf the Crank

Shaßt 9, with the longest part of their babe towarda the same end. Place the Band Wheel

 close to the Crank 11, and the Balance Wheel nhout one luch from the end of the Shalt, and

secure tbem, as with the Serew 6, ferough the hals. Enter the Crank Slut in its bearings

10, 10. Put the Sandal Shaft 17, through the eyes 16, 16, of the Sandals 14, 14, securing them
                                     Secure the Sandl Shaft in Its bourings by the nuts 13, 13.
 upon the Shaß by the pins 17, 17.

Draw these wuts right enough to hakt the Crapk Shal 9, from lateral play has not to biad it
Secure the lege armly to the Table by the remaining serews through the langes. Attach the

Pitman 18, to the Crank 11, by the Cinap King 19, of the Pituna, wad secure the other end at
the toes of the Sandals, by the pin 20.  Sut the Table upright. Put a drop uf Oil daily upon

 each of the following points: 10, 10; 16, 16: 19: 20.
     Secure the Machine to the Table by screwe through the screw-holes 47, 47.
View original page 24Related documents and language editions
Wheeler & WilsonPDF
Wheeler & Wilson A Number 8
User manual
16 pages · EnglishRead →
Wheeler & WilsonPDF
Wheeler & Wilson Adjusting the Curved Needle Sewing Machine
User manual
3 pages · EnglishRead →
Wheeler & WilsonPDF
Wheeler & Wilson Number 3
User manual
9 pages · EnglishRead →
Wheeler & WilsonPDF
Wheeler & Wilson Number 4
User manual
16 pages · EnglishRead →
Wheeler & WilsonPDF
Wheeler & Wilson Number 8
User manual
16 pages · EnglishRead →
Wheeler & WilsonPDF
Wheeler & Wilson Number 8
User manual
17 pages · EnglishRead →
Wheeler & WilsonPDF
Wheeler & Wilson Number 8 (version 2)
User manual
16 pages · EnglishRead →
Wheeler & WilsonPDF
Wheeler & Wilson Number 9
User manual
9 pages · EnglishRead →
Wheeler & WilsonPDF
Wheeler & Wilson Number 9
User manual
24 pages · EnglishRead →
Wheeler & WilsonPDF
Wheeler & Wilson Number 9 (black and white scan)
User manual
12 pages · EnglishRead →
Wheeler & WilsonPDF
Wheeler & Wilson Number 9 Accessory
User manual
12 pages · EnglishRead →
From the ISMACS International. Original publisher and archive notices are retained.
Check the model and edition against your equipment.
PDF verified 2026-10-11.