Sewing machines
New Home Electric Rotary — Part 3, printed pages 26–36 — User manual
User manual for New Home Electric Rotary — Part 3, printed pages 26–36. 6 pages in English. Read the original PDF, download or print a copy without registration.
6 pagesEnglish4.4 MB PDF
Loading your manual…Open PDF directly
Document details
- Brand
- New Home
- Model / document
- New Home Electric Rotary — Part 3, printed pages 26–36
- Document type
- User manual
- Language
- English
- Pages
- 6
- File size
- 4.4 MB
- Category
- Sewing machines
- Document date
- Not specified in catalog
Search available document text
Find a term, then jump to its page in the original PDF. Image-only pages may not be searchable; check the PDF for exact wording and diagrams.
Page 1 · Read text
BIBW==5H1OM3 ATTACHMENT INSTRUCTIONS.

If a transfer pattern is to be used for the design, press the pattern onto
the wrong side of article to be trimmed.

If several motifs are to be duplicated from one design, place as many pieces
of paper under the original design and stitch through design with machine
stitch set at 14

Baste paper patterns to the wrong side of article being trimmed and stitch
over paper. Paper acts as a smoother and can be easily torn from fabric.

‘This method of trimming results in perf
of trimmed article.

appearance on the right side

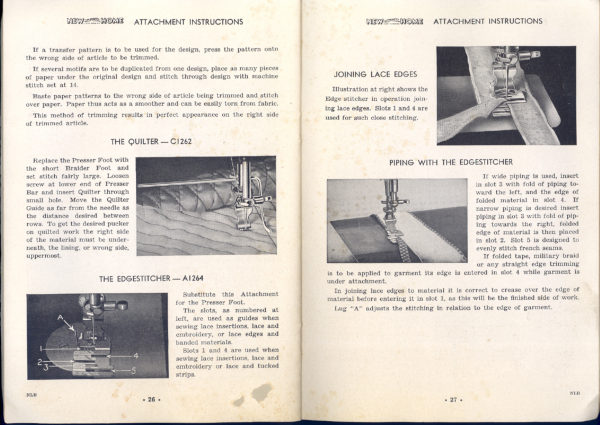
THE QUILTER — C1262

Replace the Presser Foot with
the short Braider Foot and
set stitch fairly large. Loosen
screw at lower end of Presser
Bar and insert Quilter through
small hole, Move the Quilter
Guide as far from the needle as
the distance desired between
rows, To get the desired pucker
fon quilted work the right side
of the material must be under-
neath, the lining, or wrong side,
uppermost.

THE EDGESTITCHER — A1264

Substitute this Attachment
for the Presser Foot.

‘The slots, as numbered at
left, are used as guides when
sewing lace insertions, lace and
embroidery, or lace edges and
banded materials,

Slots 1 and 4 are used when.
sewing lace insertions, Ince and
embroidery or lace and tucked
strips

WIEWZSHOMS ATTACHMENT INSTRUCTIONS

JOINING LACE EDGES

| Iiustration at right shows the
Hage stitcher in operation join-
Ing lace edges. Slots 1 and 4 are
used for such close stitching.

PIPING WITH THE EDGESTITCHER

If wide piping is used, insert
in slot 3 with fold of piping to-
ward the left, and the edge of
folded material in slot 4. If
narrow piping is desired insert
piping in slot 3 with fold of pip-
ing towards the right, folded
edge of material is then placed
in slot 2. Slot 5 is designed to
evenly stiteh french seams.

If folded tape, military braid
or any straight edge trimming
is to be applied to garment its edge Is entered in slot 4 while garment is
under attachment,

In joining lace edges to material it is correct to crease over the edge of
material before entering it in slot 1, as this will be the finished side of work.

Lug “A” adjusts the stitching in relation to the edge of garment.

sare
View original page 1
Page 2 · Read text
ons sey pg do,

og pee

mapoa

Saat een

De teaptie

Deen reg

0g Soy,
a9 dep Sutmdpy seg am

ora pat

aug pe ona simp 0

ows fr

z
E
4
¥
E
i

5

IN}

WORSE

dv3H g1N

PRICE LIST OF ALB and NLB HEAD PARTS

Always order by Part Number, Part Name, and Head Serial No. and
letters (located under Bed Plate in front left corner). Add to total cost
of parts ordered sufficient to cover shipping expense. Minimum order 25c.
‘Always send remittance with order as it is not feasible to ship c.0.d.

nw-Neodles, per dozen,
“Atm, complete with Bis

ings for ALD only ——

SUB IA Arn: complete with Bushings; for NB only Son
NiRonscoArm' Gap ftor Blectrie only), for NLD onky 2

Gg Arm Gab, Gor Trendle only), for NLD only us
SUR Arm Gap Serew C2 used) for NB only w=

XBtei0d.000 Anim Gene Box Cover Plate, (not used wi

Fiber Genr model}, for ALB only
HRI _~Arm, ear Box Cover Blate, «not used with Fibre

"Gear Model), for NLP only -. 2
ALB20

pega ere
Sint cBea Bowell Bin tiwe aed)
Pigii.———-Bed Extension Plate (Hrown Hamiigetioid), for NILE oily.

208 wBed Extension Plate (Back), for NUL
Seni ‘Red Extension Plate Bushing, for Ni
At Hed Gear Caso Cover =
MRTG Bed Gear Cree Cover Gi
Tibre Gear Model eee
corse. Hed Gear Case Cover Screw (@ wed
‘AGz8. ‘Bed Gear Case Plug Sereve, (Not used with

Fibre Gear Model)
Bea 'Serew (three usedy =
“Belt Guard, (for Treadle aly). for NigH oly

‘Relt Guard Screw, (lor Treadte only), for NLB only
Aas. Bobbin. sala
SAEMIBALO Dobbin Cas ia Tinehudos RASA,
"AAS, ABIL and AABINEC)

AABRIA......... Bobbin Case Base assembled, Unchuttas

Aaa eae 2
AAASSA, ‘aaseinbied

includes two AHS. AABISS, four AATS20,

AAWISSD, AABSSS, AAMMS and ARETE) 150
A604 Bophin Case Base Stop Shield Sorew (lwo used) ae
ARISE Bobbin Case Eaten von =
RABG So Bonhin Case Latch Sere TT
RAHNSS Bobbin Case Lateh Speine 5
RAns2e Hobbin Case Lateh Stop Pia
RABI" Bobbin Case /fension Sbring
AABCO oo Bobbin Case Tension Spring Screven

ARHDISAHE OC Bobhin Winder, complete, for ALE 3
nelades ARDS, ATi, AAT. ABS. AY
BSAA Aine AGL and ALLS,
Brown PainmterGhd BM) 2
ACM205AH.....Bobhin Winder, Completa, for, NEB electric any,
includes ACB, AS24, A4TS, AGS, ABOIOA,
Ee Airs, ALIS, Alito, and Aust)
ACLOSAHL......Robbin Winder, complete, for Nig treadie only,
(includes AC308, A28i, Ai7, AgsB, AUS
Abia. C095, ibis, ANLI8, and ANTS)
Ass Bobbin Wirider Aidjusting: Sereyé nea
pit Hobbin Winder Automatic Leck Lever <
pan “Bobbin Winder Automatic Lock Lever Screw
io mate Lock Sprit
“Robbin Winder
‘Bobbin Winder Erame only (Btectrie) Tor X
“Bobbin Winder Brame only ((rreadie) for NUB only
Bobbin Winder Pulley (ate) =
UTHoehin Winder Serew (two used)
ABNGAo Hoon Winder Spindle, ssnembien, iiciedes
‘ABa5 and AUT =
Bn. ler Spin
ct aa

fame only. tor ALD ony

Bobbin Winder Spinale only’ ome
‘Bobbin Winder Spindle Bracket. =
View original page 2
Related documents and language editions
New HomePDF
1881 Light Running New Home
User manual
36 pages · EnglishRead →
New HomePDF
1899 New Home
User manual
28 pages · EnglishRead →
New HomePDF
New Home Attachments
User manual
4 pages · EnglishRead →
New HomePDF
New Home Electric Rotary — Part 1, printed pages 1–13
User manual
8 pages · EnglishRead →
New HomePDF
New Home Electric Rotary — Part 2, printed pages 14–25
User manual
6 pages · EnglishRead →
New HomePDF
New Home Hand
User manual
10 pages · EnglishRead →
New HomePDF
New Home Light Running "Pre A"
User manual
19 pages · EnglishRead →
New HomePDF
New Home Light Running ZigZag Attachment
User manual
10 pages · EnglishRead →
New HomePDF
New Home NH
User manual
28 pages · EnglishRead →
New HomePDF
New Home New National
User manual
10 pages · EnglishRead →
New HomePDF
New Home New National
User manual
10 pages · EnglishRead →
New HomePDF
New Home Series B
User manual
9 pages · EnglishRead →
From the ISMACS International. Original publisher and archive notices are retained.
Check the model and edition against your equipment.
PDF verified 2026-10-11.