Film cameras
Cosmorex SE User manual
User manual for Cosmorex SE. 34 pages in English. Read the original PDF, download or print a copy without registration.
34 pagesEnglish4.4 MB PDF
Loading your manual…Open PDF directly
Document details
- Brand
- Cosmorex
- Model / document
- Cosmorex SE
- Document type
- User manual
- Language
- English
- Pages
- 34
- File size
- 4.4 MB
- Category
- Film cameras
- Document date
- Not specified in catalog
Search available document text
Find a term, then jump to its page in the original PDF. Image-only pages may not be searchable; check the PDF for exact wording and diagrams.
Page 2 · Read text
other lands - with new sources standing on the threshold, ready to meet the increasing needs of the world's
photographers for a broad variety of camera systems. The Cosmorex SE is the latest in a series of 35mm SLR
cameras made in the U.S.S. R. and fully reflects the rugged construction, superb optics, and functional design
which European photographers have prized for years in the products of this increasingly sophisticated and
internationally-respected industry.


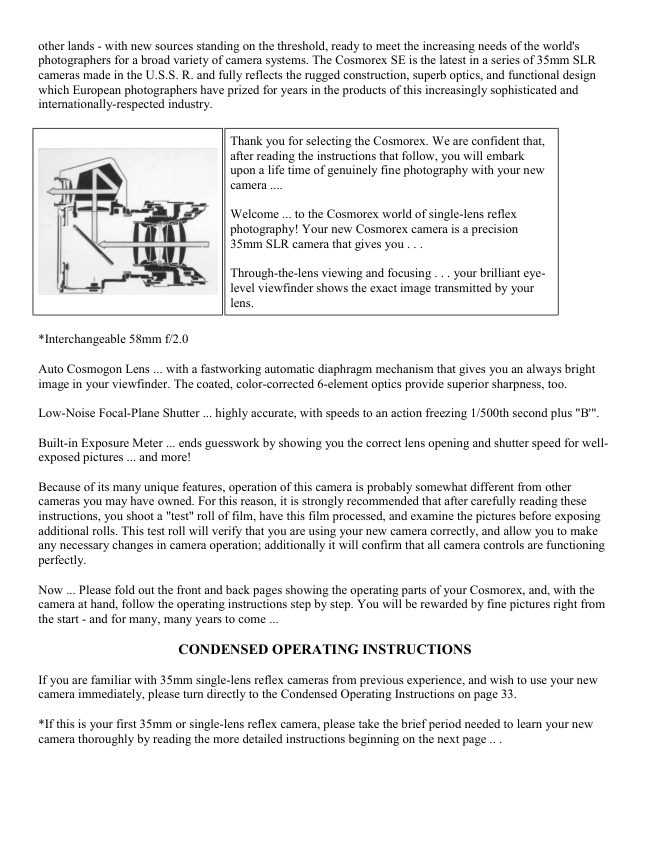
                              Thank you for selecting the Cosmorex. We are confident that,
                                         after reading the instructions that follow, you will embark
                              upon a life time of genuinely fine photography with your new
                               camera ....

                            Welcome ... to the Cosmorex world of single-lens reflex
                                  photography! Your new Cosmorex camera is a precision
                        35mm SLR camera that gives you . . .

                                   Through-the-lens viewing and focusing . . . your brilliant eye-
                                       level viewfinder shows the exact image transmitted by your
                                         lens.


*Interchangeable 58mm f/2.0

Auto Cosmogon Lens ... with a fastworking automatic diaphragm mechanism that gives you an always bright
image in your viewfinder. The coated, color-corrected 6-element optics provide superior sharpness, too.

Low-Noise Focal-Plane Shutter ... highly accurate, with speeds to an action freezing 1/500th second plus "B'".

Built-in Exposure Meter ... ends guesswork by showing you the correct lens opening and shutter speed for well-
exposed pictures ... and more!

Because of its many unique features, operation of this camera is probably somewhat different from other
cameras you may have owned. For this reason, it is strongly recommended that after carefully reading these
instructions, you shoot a "test" roll of film, have this film processed, and examine the pictures before exposing
additional rolls. This test roll will verify that you are using your new camera correctly, and allow you to make
any necessary changes in camera operation; additionally it will confirm that all camera controls are functioning
perfectly.

Now ... Please fold out the front and back pages showing the operating parts of your Cosmorex, and, with the
camera at hand, follow the operating instructions step by step. You will be rewarded by fine pictures right from
the start - and for many, many years to come ...

              CONDENSED OPERATING INSTRUCTIONS

If you are familiar with 35mm single-lens reflex cameras from previous experience, and wish to use your new
camera immediately, please turn directly to the Condensed Operating Instructions on page 33.

*If this is your first 35mm or single-lens reflex camera, please take the brief period needed to learn your new
camera thoroughly by reading the more detailed instructions beginning on the next page .. .
View original page 2Page 3 · Read text
www.butkus.us


TABLE OF CONTENTS
Preface  2
Operating Controls  3
Introduction  4
Loading Your Camera  6
Using Your Camera's Exposure Meter  9
Viewing and Focusing  12
Taking the picture  1a
Unloading  15
Taking Flash pictures  17
Using Long Exposure Times (Time
Exposures).20
Using Self-Timer  22
Changing Lenses  23
Choosing Shutter Speeds and Lens Openings.
.25
Using Depth-of-Field for Greater Sharpness .
.26
Caring for Your Camera & Lenses  29
Trouble Shooting Chart  31
Condensed Instructions  33
Advanced SLR Photography  36


              OPERATING CONTROLS OF COSMOREX SE
View original page 3Page 6 · Read text
5. Twist Rewind Knob counter-clockwise slightly, then
                                       press it down fully and lock in place by twisting clockwise.
                                      Press Shutter Release Button (2).


                                        6. Move Film Transport Lever (1) through two or more short
                                     strokes (letting it return to the starting position after each
                                     stroke) until no further movement is possible. Press Shutter
                                 Release Button (2).

                                        7. Move Film Transport Lever (1) through a second series of
                                     short strokes until further movement is impossible. Now, turn
                               Exposure Counter Dial (4) until the number "0" is shown by the
                                   red Exposure Counter Indicator (34).


8. Once more press Shutter Release (2), and wind Film Transport Lever (1) fully ... and your first film frame is
in position, as shown by the Exposure Counter Indicator (34).

 When moving the Transport Lever as described above, the Film Rewind Knob (24) will rotate counter-
clockwise by itself. This provides positive assurance that your camera is correctly loaded, and that film is being
wound through the camera.

          IMPORTANT "REPEATS" FROM COSMOREX MANUAL

1. When loading, first wind shutter all the way, then set counter to 0 (See Page 7, No. 7). If you don't, counter
will not function properly.

2. To wind shutter properly move transport lever through one long or "two or more short strokes until no further
movement is possible. (See Page 8).

3. Make sure rewind release ring (around shutter button) is turned clockwise all the way (See Page 6, No. 1)

If the Rewind Knob does not rotate as you move the Transport Lever, and you have taken up the "slack" in the
cassette as described in Step No. 4, open camera back to check that film is securely attached to Take-Up Spool.

 Always make sure the Transport Lever (1) has been fully wound. This is easiest when you move this lever in
two short strokes. When the lever stops during the second stroke, you are assured that the camera's film, shutter
and exposure counter are all ready for exposure. Failure to fully wind the Transport Lever may result in a
"blank" exposure.
View original page 6Page 7 · Read text
www.butkus.us

               USING YOUR CAMERA'S EXPOSURE METER

                                           Your Cosmorex SE incorporates a sensitive
                                                           built-in Exposure Meter. It contains a
                                                       photoelectric (selenium) cell (25) that
                                                    converts the light reflected by your subject
                                                        into electrical energy, which activates the
                                              Meter Needle (17). Because the "selenium"
                                                meter cell generates its own electrical energy,
                                            no batteries are needed! Here's how to use
                                                your exposure meter:


1. Adjust Meter for ASA Film Speed. Move the Aperture Indicator Dial (20) until the ASA number for your
film type is shown by the black Index Mark in the ASA film Speed Indicator Window (19).

Your camera's meter has marked numerals for films rated at ASA 25, 50, 100, 200, 400, and 500: this speed
range encompasses virtually all general-purpose black-and-white and color films. Should your film be rated at
an intermediate ASA speed, such as ASA 64 or 80, simply position the ASA Index Mark so that it is between
the next larger and smaller numbers. (For example, for ASA 64 or 80 film position the index mark  `been 50
and 100.) When this is done, your meter will operate well within the tolerances of all film types.

NOTE: If you are using film marked only in "DIN" (European) film speed, enter this number in the DIN Film
Speed Indicator (18). Should the film be marked in an intermediate speed number, position indicator midway
between the next larger and smaller numbers as described above.

See also pages 31 and 32 PLEASE READ ENTIRE OWNER'S MANUAL


2. Aim Meter Cell (25) at your subject. (For a practice "reading", aim meter at a brightly-lit scene or if you are
indoors, at a nearby lamp.) As you do so, you'll note the Exposure Meter Needle (17) moves to a certain
position, then stops. Holding your camera in this position, you now .. .

3. Match the Needle (17) by turning the Shutter Speed Indicator Ring (21) until the Exposure Meter Circle (16)
is centered over the Needle (117).

4. Your light measurement or "reading" has now been taken! Any combination of lens opening (f/number) and
shutter speed appearing in black on the Aperture Indicator Ring (20) and Shutter Speed Indicator Ring (21) will
View original page 7Page 8 · Read text
give a perfectly-exposed picture. For example, in the illustration shown, these scales show that correct exposure
will be obtained with a shutter speed of 1/125th second and a lens opening of f/5.6, or a speed of 1/250th second
and lens opening of f/4, or, any other combination shown on the scales.

5. Now, set the Shutter Speed Dial (5) to the desired speed by lifting the dial and turning it until the desired
shutter speed is indicated by the red dot in the center of the dial. (If the dial won't move in one direction, turn it
in the other direction to reach the desired speed,) Then, let the Shutter Speed Dial return to 'down' position.


6. Turn the Lens Aperture Ring (26) until the indicated lens opening is lined up with the red Distance/Aperture
Index mark (12).

              HELPFUL HINTS FOR BETTER EXPOSURES

  For outdoor photography, a shutter speed of 1/125th second (or, if possible, faster) is recommended whenever
possible. This speed is fast enough to prevent most "blur" due to camera or subject movement, yet is slow
enough to permit picture-taking in a wide variety of lighting conditions with today's sensitive films. If it's
necessary to shoot at

1 /60th or 1 /30th second, hold the camera as steady as possible - ideally by using a tripod, or by bracing your
arms on a nearby table or other support.

*Remember that your exposure meter measures all the light that reaches the meter cell (25). If your subject is
much lighter or darker than the background, it's a good idea to move up to your subject for a "close-up" reading.
This simply means aiming the meter cell (25) as close as possible to the most important part of the subject - for
example: the face of a person whose picture you are taking.


                                    When shooting landscapes or other outdoor
                                                      pictures where a large part of the sky will
                                                    appear, aim your camera's meter cell
                                          downwards slightly when taking your
                                                     "reading". This prevents the exposure reading
                                             from being adversely influenced by the bright
                                                           light of the sky.
View original page 8Page 9 · Read text
www.butkus.us

• In extremely dim lighting, the Exposure Meter Needle (17) may rest near the right hand edge of the
transparent window. Should this occur, place your hand in front of the Exposure Meter Cell (25) and watch the
needle carefully. If the needle moves when you block the Meter Cell, the exposure meter is able to function in
the existing light; remove your hand from the cell, and determine exposure in the normal way. However, if no
needle movement occurs when you pass your hand in front of the Meter Cell, the existing light is insufficient
and the exposure meter cannot be used. In this event, either a time exposure or use of an electronic flash are
recommended.


                     VIEWING AND FOCUSING

Make sure your lens is securely attached to the camera. If not, turn lens clockwise until no further movement is
possible.

• Frame your picture by looking through the Viewfinder Eyepiece (32). You're looking through the same lens
that will actually take the picture exactly as you see it.

•  Focus to bring the image in clearly. To do this, just turn the Focusing Ring (13) in either direction until the
subject is sharp in the viewfinder. (If the image in the viewfinder appears dark, make sure the Auto/ Manual
Switch for Lens Diaphragm [14] is in "Auto" position - so that the green letter "A" is visible on the switch.)


• Your Cosmorex offers two alternative focusing methods. The microprism spot in the center of your
viewfinder is composed of literally hundreds of tiny prisms which accentuate out-of-focus images, then
seemingly disappear into a single, clear image when you're at the point of sharpest focus. (If you aim your
camera at this instruction book, from about two feet away, you'll see how it works.) This focusing method is
best for a majority of subjects and conditions, especially when using your standard f/2.0 lens.

Around the microprism spot is a clear ring of fine ground-glass. This also tends to accentuate out-of-focus
images, showing a clear, sharply-defined image at the point of greatest sharpness. (Again, aim the camera at this
instruction book to see how it works.) You'll find this ground glass area helpful when focusing on subjects
which lack contrast or color; it's quite handy when using wide-angle and long telephoto lenses, too.
View original page 9Page 10 · Read text
The Distance Scale (28) of your lens is
                                                             calibrated both in feet (white numbers)
                                                  and meters (yellow numbers). Generally,
                                                                 there's no need to check distance except
                                            when taking flash pictures (see page 17)
                                                         or when depth-of-field is important (see
                                                   page 26).


 The Red "R" next to the Distance/Aperture Indicator (12) shows the correction required for Infra-red films.
When using infra-red films, first focus in the normal manner, and note the indicated distance. Then, move the
Focusing Ring (13) so that that distance is now aligned with the Red "R". Remember - this is needed only when
using infra-red films, which are sensitive to light rays which focus at a slightly different plane than ordinary
light rays.

                     TAKING THE PICTURE

                                                     Hold your camera steadily, using
                                                           both hands. You'll probably find it
                                                      most convenient to grip the
                                                       camera firmly with your right
                                                            hand, and trip the shutter release
                                                              button with your forefinger; here,
                                                          your left hand can easily turn the
                                                             focusing ring and lend extra
                                                              support at the same time. For
                                                                       vertical shots, you may
                                                           experiment to see in which
                                                                 position the camera feels most
                                                              secure and the controls (focusing
                                                                       ring, shutter release) most
                                                                    accessible.


And now ... press the Shutter Release Button (2) in a smooth, firm stroke. You've just taken your first picture!

                 FOR SUCCEEDING EXPOSURES .. .
View original page 10Page 11 · Read text
www.butkus.us

You are ready for your next picture in an instant - just move the Film Transport Lever (1) until fully wound, and
you're set: just frame, focus, and shoot. As lighting may change, it's a good idea to check the Exposure Meter
Needle (17) from time to time, to make sure it's still lined up with the Exposure Meter Circle (16). If it is not,
just take a new exposure "reading" of your subject, move the Lens Aperture Ring (26) to the new aperture
shown on the Exposure Meter Aperture Indicator (20) - and continue shooting!


                        UNLOADING

When you've finished your roll of film, the film must be re-wound back into the cassette so it may be removed
and processed. Here's how:


1. When you have taken the last exposure (number 20 or 36, depending on the length
of cassette used), turn the Rewind Release Ring (3) all the way to the left so that the
Red Dot points at the "R" engraved on the camera's top. Be sure the Rewind Release
Ring has been moved fully towards the left until no further movement is possible.


(In some instances the film transport lever [1 ] will stop before it has been fully wound to position the last
frame.


                                       This indicates that you have reached the end of the film.
                                    Should this happen, put on the lens cap, supplied with
                                     your camera, and then turn the Rewind Release Ring [31
                                           to the left fully. This will insure that no portion of the last
                                    frame is exposed to light as the shutter is released by the
                                 Rewind Release Ring.)


2. Raise the Film Rewind Knob (24) by gently pressing against the top of the Knob with a counter-clockwise
movement. When the knob springs up, grip it firmly and turn it clockwise tin the direction indicated by the
arrow). While resistance is felt, you are rewinding the film back into the cassette. When film has been fully
rewound, the knob will turn freely without resistance.
View original page 11Page 12 · Read text
3. Lift up the Camera Back Latch (22) and open the Camera Back (38). Pull the Film Rewind Knob (24)
upwards fully , and let the film cassette drop out of the Film Cassette Chamber (30). Your film is now ready for
developing.

4. Push down Rewind Knob and lock in place. Close Back. Move Rewind Release Ring (3) clockwise fully so
your camera's ready for your next roll of film.


                    TAKING FLASH PICTURES

Your Cosmorex single-lens reflex camera operates perfectly with any of the excellent electronic flash units now
available. Today's compact electronic flash units give dozens or even hundreds of flashes on a single set of
batteries; some also permit use of rechargeable batteries. In addition, the most advanced electronic flash models
incorporate a computer mechanism which measures the light of the flash, and automatically regulates brightness
for perfect exposure.

With any electronic flash unit, follow these simple steps:

1. Make sure the Flash Synch Selector Dial (6) has its White Indicator Line pointing to the letter "X" on the
camera top. If Dial is not at "X" position, the shutter will not synchronize correctly with the flash unit.

2. Set Shutter Speed Dial (5) to 1/30th sec.

3. Slide flash on your camera's Accessory Shoe (15). (If your flash is made for use with a separate mounting
bracket, attach bracket screw to camera's Tripod Socket (11 ).


                                                                                4. Plug flash cord into
                                                                     camera's Flash Cord
                                                                        Outlet (7). Push tip of
                                                                   cord in firmly.
View original page 12Page 13 · Read text
www.butkus.us

5. Select correct lens opening for film/flash combination. The short burst of light produced by electronic flash
(often 1 /1000th second or faster) is too brief for your camera's Exposure Meter to measure. For this reason, all
electronic flash units have calculator dials or scales which indicate the correct lens opening.

A. With Computer (Automatic) Flash Units. Set calculator dial of flash to correct ASA film speed. Your flash
dial will now indicate the correct lens opening for photography at a wide range of distances.

Set lens Aperture Ring (26) to the aperture indicated by your flash dial. You can now take pictures at any
distance within the range indicated by your flash without further adjustments.

B. With Manual (Non-Automatic) Flash Units. Set calculator dial of Flash to correct ASA film speed. Your
flash dial will now indicate the correct lens openings for various distances. Focus, and set lens Aperture Ring
(26) to the aperture indicated by your flash for the actual camera-to-subject distance, as shown by your lens'
distance scale (28). All photographs taken at this flash-to-subject distance will be properly exposed.

Different makes of electronic flash units use different calculator dials or scales; for exact information, please
consult the instruction manual for your flash or check with your camera dealer.

•In the event the flash unit does not fire when you press the Shutter Release Button (2), check to see that the
flash cord is securely plugged into Flash Cord Outlet (7), and that On/Off switch of flash unit is in "ON"
position. Finally, make certain the Selector Dial (6) is at "X" position.

 Do not press down on Shutter Release Button (2) unless actually taking a flash picture. Pressing this button
down fully will fire the flash whether or not the Film Transport Lever (1) has been wound. Should this happen,
however, no loss of film will occur.

Always remember to set Shutter Speed Dial (5) to 1/30th second, and Flash Synch Selector Dial (6) to 'X'
position for electronic flash photography. At other speeds or settings, the flash will not synchronize fully with
the shutter.

USING FLASHCUBE OR FLASHBULB GUNS

In general, flashcubes and bulbs are more costly than electronic flash, and less convenient to use as the bulbs
must be replaced after each picture (with flashbulbs) or each four pictures (with flashcubes). Should you wish to
use these light sources, however, follow Steps 1-5 above, with this exception:

  For flashcubes or flashbulbs, move the Flash Synch Selector Dial (6) to "M" position. This adjusts the timing
mechanism of your camera to insure that the shutter opens when the flash of the bulb is at its' brightest. Leave
the Shutter Speed Dial at 1/30th second for all flash pictures.

Determining exposure with flashcubes or bulbs is done the same way as with manual (non-automatic) electronic
flash units, as described above.

            USING LONG EXPOSURE TIMES (TIME EXPOSURES)

Time Exposures are exposures of one second or longer. At these extra-long exposure times, you can photograph
city streets at night, dimly-lit interiors, and many subjects too faintly illuminated for normal picture-taking.

To take a time exposure with your Cosmorex, set the Shutter Speed Dial (5) to "B", press the Shutter Release
Button (2) ... and simply hold it down until the desired number of seconds has elapsed. When you release the
Shutter Button, the shutter will close.       4www.butkus.org/chinon
View original page 13Page 14 · Read text
For extra steadiness, use of a locking Cable Release and a sturdy Tripod are recommended when taking time
exposures.

  In the event a locking cable release is not available, you can keep your camera's shutter open for extended
periods quite simply. With the shutter at "B" position, press down the shutter release firmly. Hold it down, and
rotate the Release Button (2) counter-clockwise (towards the left) until it stops. Now, the shutter remains open
as long as desired. To close the shutter when the exposure is completed, press down on the Release Button and
turn Release clockwise until it stops.

After a time exposure using this method, always make certain the Shutter Release Button (2) and Rewind
Release Ring (3) are both turned fully towards the right: this will insure correct operation of shutter and
exposure counter in subsequent pictures.


•Under certain conditions, your camera's exposure meter may be used when making Time Exposures. First,
make sure that the existing light is sufficient for use of the meter (p. 12); then, "match the needle" and read the
correct exposure time in full seconds from the Red numbers 30, 15, 8, 4, 2, 1, which appear furthest from the
Black numbers 30-500 on the exposure meter Shutter Speed Indicator Dial (21).

The Red numbers 15, 8, 4, 2, appearing next to the Black numbers 30-500, represent fractions of a second: "15"
is 1 /15th second, and so on. These numbers appear for information purposes only, when using your camera's
meter to determine exposure with cameras lacking a built-in exposure meter.

                        USING SELF-TIMER

Your Cosmorex camera is equipped with a built-in self-timer. This trips the shutter after a 10-second delay
(approximate), thus enabling you to get in your own photographs! To use it, here's all you have to do:
View original page 14Page 15 · Read text
www.butkus.us

1. Mount camera on a tripod or other firm support such as a nearby table or shelf, with transport lever fully
wound.

2. Frame, focus, and adjust camera for correct lens opening and shutter speed - exactly as you always do.

3. Move Auto/Manual Switch (14) on lens to "M" position (so the red "M" is visible).

This closes down the lens to the correct aperture, and is required when the self timer is used.

4. Move Self-Timer Lever (10) counter-clockwise until no further movement is possible. (As you move it, you'll
notice the "M" sticker underneath the Self-Timer Lever. This is simply a reminder to move the lens to "M"
[Manual] position as described).


                                          5. Press Self-Timer Release Button (9). You'll hear a
                                     "whirring" noise, which indicates that the timer is
                                       functioning. Now, walk away from the camera into the scene
                                    being photographed - the shutter will fire automatically in
                                    about ten seconds.


* Make sure you have moved the Self-Timer Lever as far as it will go before pressing the Release Button. If the
Lever has not been fully wound, the shutter will not operate. (Should this happen, just move the Self-Timer
Lever downwards again - fully this time - and press the Release Button again.)       4www.butkus.org/chinon

* If you decide not to use the Self-Timer after moving the lever down, simply take your next picture by pressing
the Shutter Release Button (2). Then, before moving the Film Transport Lever, press the SelfTimer Release
Button (9) and the Timer will return to normal position. Do not leave the Self-Timer Lever in "wound" position
for extended periods.

                      CHANGING LENSES


                                     Your Cosmorex SE single-lens reflex camera accepts
                                                       literally hundreds of fine lenses in the popular
                                            "Universal" (42mm) thread mount. To remove your
                                                   lens, just grasp firmly, and turn it to the left (counter-
                                            clockwise) about three turns. To attach a lens, simply
                                         screw it into the camera's lens mount by turning it
                                           clockwise until no further movement is possible.


  After changing lenses, check that the Auto/ Manual Switch (14) is on "A" position before picture taking. This
insures that you will be able to frame and focus easily.

•Always screw the lens in firmly; when it stops, give it a slight extra twist to insure that it is securely attached.
View original page 15Page 16 · Read text
Thread-mount lenses, particularly lenses of different manufacture, may sometimes "seat" with the aperture
and distance scales slightly to the right or left of "center" position. This does not indicate any defect in your
camera or lenses, and in no way affects camera/lens operation.
  Take care not to expose your camera's interior to dust, dirt, or moisture when the lens has been removed.
Always replace the lens on the camera body as soon as possible.

When removing or storing lenses, protect them from accidental damage by placing the lens face down and, if
possible, attaching a rear lens cover (available from your dealer, and usually included with accessory lenses).

Your Cosmorex accepts interchangeable thread-mount lenses from 16mm wide angle to 1000mm ultra-
telephoto.

Standard automatic lenses of this type incorporate a single metal pin (illustrated) through which your camera
actuates the lens' automatic diaphragm mechanism.


                                          NOTE: Thread-mount lenses
                                                                specifically designed for SLR cameras
                                                           of a particular model other than the
                                                Cosmorex may incorporate special
                                                        "keying" levers (illustrated). Such
                                                             lenses should not be used on your
                                                       camera.


CHOOSING SHUTTER SPEEDS AND LENS OPENINGS


For the majority of outdoor subjects, a shutter speed of 1/125th second is suggested. This speed is fast enough
to prevent blur due to slight movement of the camera during exposure, and also fast enough to "freeze" most
normal movement of the subject - people walking, moving cars, etc. For situations when the subject is really
moving fast - children at play, sports events, racing cars, for example - shoot at 1/250 or 1 /500th second if
there's enough light to allow this.
View original page 16Page 17 · Read text
www.butkus.us

Conversely, shooting at 1/60th or 1/30th second is recommended only when there is no appreciable movement
of the subject (a landscape, for example), or when the use of small lens openings (f/11 or f/16) is desired to give
the deepest zone of sharp focus.

Shutter speeds may be selected before or after the Film Transport Lever (1) has been wound. However, always
lift the Shutter Speed Dial (5) before turning it to another speed, and return it "down" before shooting. Finally -
always turn the Shutter Speed Dial (5) to one of the marked speeds (B, 30, 60, 125, 250, or 500). Do not move
to positions between marked speeds.

CHOOSING DIFFERENT LENS OPENINGS


                                  Your 58mm automatic standard lens has openings
                                             (apertures) from f/2 to f/16. At f/2, the greatest amount
                                          of light is transmitted to the film; at f/16, the amount of
                                                light transmitted is least. Each marked number
                                            represents a 50% change in light transmitted.


The Aperture Ring (26) of your lens may be set at any marked lens opening (f/2, f/2.8, etc.) or at positions in
between marked lens openings. If the Exposure Meter Aperture Indicator Dial (20) indicates a lens opening
between two f/numbers (lens openings), turn the lens to the in-between position.

USING DEPTH-OF-FIELD FOR GREATER SHARPNESS

All photographic lenses, when focused on a given subject, will show some objects in front of, and in back of,
that subject more or less sharply. This "zone" of extra sharpness is called "depth-of-field", and varies with
different lenses; it's greatest with wideangle lenses, and least with telephoto lenses. With any lens, you'll find
your depth-of-field is always greater (more things in focus) at small lens apertures such as f/11 or f/16, and
lesser (fewer things in focus) at larger lens apertures such as f/2.8 or f/2.

In most picture taking, this phenomenon is of no particular importance, as the subject will, in most cases, appear
equally sharp at all lens openings. However, the area of sharp focus or "depth-of-field" does become important
in certain situations.


Example: you're taking a picture of a landscape - and you want everything needlesharp from the foreground, all
the way to the background. Your Cosmorex lets you achieve this easily and reliably, in several ways:
View original page 17Page 18 · Read text
A. Using Depth-of-Field Scale (27). Here's how:

1. Focus on the closest object which will appear in the picture. (Example: ten feet away as indicated by the
white number on your Distance Scale [28] .)       4www.butkus.org/chinon

2. Now, focus on the most distant object which will appear in the picture. (Example: "Infinity" as indicated

by your distance scale [28] .)

3. Move the Focusing Ring (13) of your lens until the greatest distance (infinity) and the closest distance (ten
feet) appear in front of the same lens aperture numbers on the Depth-of-Field Scale (27) of your lens. (Example:
f/11). Set aperture ring (26) to this opening.

4. Use your camera's built-in exposure meter to determine the correct shutter speed for an exposure at this lens
opening. (Example: shutter speed of 1/60th second for lens opening of f/11.) Set Shutter Speed Dial (5) to this
speed.

5. Take the picture! Everything between the two distances (10' and infinity) shown by the matching f/11
numbers on the Depth-of-Field Scale (27) will appear sharply.

It's a professional technique - but you don't have to be a professional to use it for better photographs.

The second way:

B. Using Viewfinder at Taking Aperture. Move the Auto/Manual Switch (14) on lens to "M" position. This
closes down the lens to whatever opening has been set on the Aperture Ring (26). You'll be able to see how
distant and nearby objects "sharpen up" at smaller lens apertures such as f/11 or f/16.


                                     Naturally, when the lens is "stopped down," less light enters
                                     the viewfinder, and it is more difficult to see or focus clearly.
                             The principal benefit of this technique is that it gives you a
                                            fast, accurate "preview" of what will and will not be sharp in
                                     the finished photograph - for example, that telephone pole in
                                back of your subject.


If it appears sharply when the lens is "stopped down" to the intended aperture, it will appear sharply in the final
photograph. By 'previewing' your depth-of-field in this way, you'll soon learn to select the aperture required for
the depth-of-field you want .

Either of these techniques will prove valuable in the great majority of picture taking situations. For extremely
critical applications, a printed depth-of-field chart is available on request.

CARING FOR YOUR CAMERA AND LENSES

Your Cosmorex camera is a ruggedly-built camera, designed to provide many years of dependable performance.
To get the longest service, and best performance, always treat your camera and lenses as you would any
precision instruments - carefully!

 Keep your camera within carrying case whenever possible. This protects your camera and lens from dust, dirt,
moisture, and knocks against hard surfaces - the natural enemies of all cameras.
View original page 18Page 19 · Read text
www.butkus.us

The Case is designed to permit all camera functions except loading to be performed while the camera is inside.
So, if you're at the beach, by all means take lots of pictures with your camera - then, as soon as you're done,
close the front cover and your camera is now safely protected from the environment.

Should you prefer to carry your camera outside the case, your dealer can supply you with an accessory
neckstrap, which attaches to your camera's neckstrap eyelets (8) and (23). Be sure to guard the camera from
bumps and jolts when using it outside the case.

* Protect your camera from extreme heat or humidity. Never leave your camera inside a car trunk or glove
compartment - on a hot day, temperatures well over 1000 can build up!

 When your lens is removed from the camera, avoid pressure on the metal pin (at rear) which controls the
automatic diaphragm mechanism by using a rear lens cap and case (available from your dealer) or storing the
lens so that it rests on the front.

  Never touch your camera's mirror directly.

•Protect your camera's Exposure Meter Cell (25) from prolonged exposure to direct sunlight for a period of
several hours or more. When storing your camera, either place it in its case, or put in a drawer or other location
out of the sun. Prolonged exposure to intense sunlight can adversely affect the selenium cell which powers your
meter. Additionally, take care not to damage the meter "windows", which house the meter cell and indicator
needle.


Do not rotate Shutter Speed Dial (5) between "B" and "500", or set at positions between marked speeds.

  Protect the Shutter. Your camera's focal plane shutter (33) is a precision mechanism made to give accurate,
trouble-free operation through thousands of exposures. You'll insure utmost dependability by following these
two simple rules:

a) Never touch the shutter curtains.

b) Whenever storing your camera for an extended length of time (several days or more) always release the
shutter prior to storage. When wound, the shutter mechanism is under strong spring tension; by releasing the
shutter, you've eliminated the tension and the shutter mechanism is completely at "rest".

 When you build a "system", consider a compartment case. Your dealer can show you several different kinds:
any one will hold your camera, several lenses, basic accessories such as your flash, and even filters and film.
When you have your entire outfit with you, you'll probably find yourself using your different lenses and
accessories much more ... and getting better pictures because of it.

                      TROUBLE-SHOOTING

Your Cosmorex camera is designed to give you thousands of pleasurable photographs. Like any precision
instrument, your camera's controls must be operated correctly for best results. Should you at any time
experience any apparent malfunction with your camera, check this handy trouble-shooting chart ... and chances
are, you'll be able to solve your own problem on the spot!
View original page 19Page 20 · Read text
If this happens ...  Here's Why ... And how to correct it .. .
Shutter Release Button   Film Transport Lever  Always operate Transport

(2) does not trip shutter.   (1) not fully wound.    Lever in 2 strokes. It will stop mid-way during the
                                         2nd stroke assuring you that shutter is completely
                                         wound.
Exposure Counter (4)    See Above.           See Above.
"skips", counting in
correctly.
Film Transport Lever (1) Rewind Release Ring  Turn Release Ring (3) and Release Button (2)
does not stop after 2 or or (3) and/or Shutter      completely to the right, till further movement is
more strokes.            Release Button (2) not  impossible.
                         turned fully to right
                          (clockwise).


If this happens ...  Here's Why ... And how to correct it .. .

   In loading, Film       Rewind Release Ring Turn Release Ring (3) and Release Button (2)
  Sprockets (35) do not   (3) and/or Shutter     completely to the right, till further movement is
   turn and film does not   Release Button (2)     impossible.
   take up.                not turned fully to the
                             right (clockwise).

  After loading,         Film Transport Lever  Advance Transport Lever fully before setting
  Exposure Counter (4)   (1) not fully wound    counter to "0".
   skips two or more       before counter is set
  numbers after being set  to "0" position.
   to "0" position.

  Self-Timer does not     Self-Timer Lever    Wind Self-Timer Lever fully until lever points
   trip shutter.             (10) not fully wound.  downwards, with no further movement possible.


  Lens does not close    Auto/Manual Switch  Move Auto/Manual Switch (14)' to "M" whenever
  down to indicated       (14) on lens not set    Self Timer is used.
   aperture when Self-    on "M"
  Timer is used.

  Flash Unit fires when   "X" or "M" Indicator  Move Indicator (6) to "X" position for electronic
   Shutter Release is       (6) not aligned          flash, or "M" position for flash cubes and bulbs.
   partially pressed, or     correctly.
  does not fire.
View original page 20Page 21 · Read text
www.butkus.us


              CONDENSED OPERATING INSTRUCTIONS

                                Load Film

  Press Shutter Release Button (2) and turn Rewind Release Ring (3) clockwise fully. Lift Camera Back Latch
(22) and swing Back open. Push Film Cassette Spindle (29) upwards and drop in film cassette. Insert film end
into any slot on take-up spool (36).

 Move Film Transport Lever (1) to verify that film is advancing and Sprockets (35) are engaged. Close Back;
press Rewind Knob (24) downwards.

When knob is flush with Aperture Indicator Dial (20), lock it in place by pressing down ward with clockwise
motion.

Press Shutter Release Button (2); now, move Transport Lever through two strokes again. Set Exposure Counter
Dial (4) to "0". Release Shutter and wind film again to bring frame number 1 in place.

                               Determine Exposure

*Set ASA Film Speed Indicator (19) to correct speed for film in use.

•Aim Meter Cell (25) at subject. Turn exposure meter Shutter Indicator Dial (21) until meter needle is centered
within Exposure Meter Circle (16).

 Read desired combination of lens opening and shutter speed from exposure meter Indicator Scales (20, 21).


                                                    Set desired shutter speed by lifting Dial (5)
                                              and rotating until speed is indicated by Red
                                                    dot in center.


Set desired lens aperture by turning Aperture Ring (26) until opening is indicated.
View original page 21Page 22 · Read text
Take The Picture!


Make sure Auto/Manual Switch of lens (14) is at "A" position, and that lens is securely attached.

*Look through viewfinder, frame and focus. Gently press Shutter Release Button (2).

Always make sure Film Transport Lever (1) is fully wound before shooting.

                                    Unloading

 When last exposure is made, move Rewind Release Ring (3) counter-clockwise fully. Raise Rewind Knob
(24) by pressing gently in counter-clockwise motion; rewind film, open back, and remove cassette for
processing.

                                  Reminders


Always make sure Rewind Release Ring (3) is turned clockwise fully when taking pictures.

For flash, set shutter to 1/30th second and align Flash Synch Selector (6) line with "X" or "M" Mark.

To use Self-Timer, move Self-Timer Lever (10) counter-clockwise fully; set A/M switch of Lens (14) to "M"
position, and press Self-Timer Release Button (9).

Do not rotate Shutter Speed Dial (5) between "B" and "500" positions, or set shutter to positions between
marked speeds.

        ADVANCED SINGLE-LENS REFLEX PHOTOGRAPHY with your Cosmorex

This section of your owner's manual deals with more advanced photographic techniques and specialized areas
of photography such as close ups. While it is not required reading for genera photography, it contains many tips
you will find useful when you expand your picture taking interests.
View original page 22Page 23 · Read text
www.butkus.us

Taking Better Pictures  37 Choosing and Using Interchangeable

Lenses  40

Taking Close-up Pictures  46

Using Filters and Lens hoods  51

Choosing Films/Processing  54

Technical Specifications  56


                   TAKING BETTER PICTURES

A slight amount of extra thought and effort on your part can often turn an ordinary looking photograph into a
stunningly-attractive one. While there are so many factors concerning this that probably thousands of books
have been written on the subject, here are some basic picture taking tips that will help you take better pictures
starting with your very first roll of film ...

 Move in close to your subject. A tremendous advantage of your Cosmorex single-lens-reflex camera is the
ability it gives you to shoot at close distances, simply and precisely. Wherever possible, use this extended
focusing range of your camera by moving in as close as possible to your subject, thus eliminating extraneous
foreground and background material and concentrating the viewer's interest on the subject.

  Choose backgrounds carefully. A photograph of a person standing in front of a building is seldom as attractive
as a photograph of the same person, kneeling in front of a nearby tree or bush. Choose surroundings and
backgrounds which complement your subject, yet do not take the viewer's interest away from it. If an attractive,
or inconspicuous background is not handy, expose at the widest possible lens opening (ideally, at f/2); usually
this will throw the background out of focus, and make your subject stand out clearly.

  Don't be afraid to experiment. For example, a silhouette of a person watching a sunset can be much more
attractive than an ordinary photograph of the same scene. You can obtain a "silhouette" effect easily by shooting
at a lens opening two or three f/stops smaller than your meter indicates for the subject. (For example, by
exposing at f/16 instead of f/5.6.)

 Ask your subjects NOT to look at the camera. Pictures of people are usually much more natural looking when
the people are doing something, and looking at what they're doing. A picture of a do-it-yourself handyman
absorbed in a project is going to be more interesting - and a better photo - than a picture of the same person
standing up, staring at the camera. (Chances are, his expression will be a lot more relaxed and natural, too.)
When your subject has forgotten about the camera is when you'll probably get your best pictures.
View original page 23Related documents and language editions
KievPDF
Kiev RUSSIAN Camera
User manual
25 pages · German, RussianRead →
KievPDF
Kiev 88 / 88TTL Repair
Service manual
14 pages · Not specifiedRead →
KievPDF
Kiev Keiv 88 / 88TTL parts list
User manual
23 pages · Not specifiedRead →
FEDPDF
FED-MIKRON (In Russian)
User manual
12 pages · RussianRead →
FEDPDF
Fed - 5
User manual
21 pages · RussianRead →
FEDPDF
Fed - 5C
User manual
21 pages · RussianRead →
KievPDF
Kiev 17
User manual
20 pages · RussianRead →
KievPDF
Kiev 30 (In Russian)
User manual
18 pages · RussianRead →
KievPDF
Kiev VEGA (In Russian)
User manual
8 pages · RussianRead →
LubitelPDF
Lubitel 166b
User manual
16 pages · RussianRead →
Various brandsPDF
MOSKVA-2 (In Russian)
User manual
14 pages · RussianRead →
SmenaPDF
SMENA - 8 (in Russian)
User manual
8 pages · RussianRead →
From the M. Butkus Camera Manual Library. Original publisher and archive notices are retained.
Check the model and edition against your equipment.
PDF verified 2026-10-10.