Sewing machines
White Rotary Automatic Series 666 Decorative Stitches — Reference guide
Reference guide for White Rotary Automatic Series 666 Decorative Stitches. 2 pages in English. Read the original PDF, download or print a copy without registration.
2 pagesEnglish0.5 MB PDF
Loading your manual…Open PDF directly
Document details
- Brand
- White
- Model / document
- White Rotary Automatic Series 666 Decorative Stitches
- Document type
- Reference guide
- Language
- English
- Pages
- 2
- File size
- 0.5 MB
- Category
- Sewing machines
- Document date
- Not specified in catalog
Search available document text
Find a term, then jump to its page in the original PDF. Image-only pages may not be searchable; check the PDF for exact wording and diagrams.
Page 1 · Read text
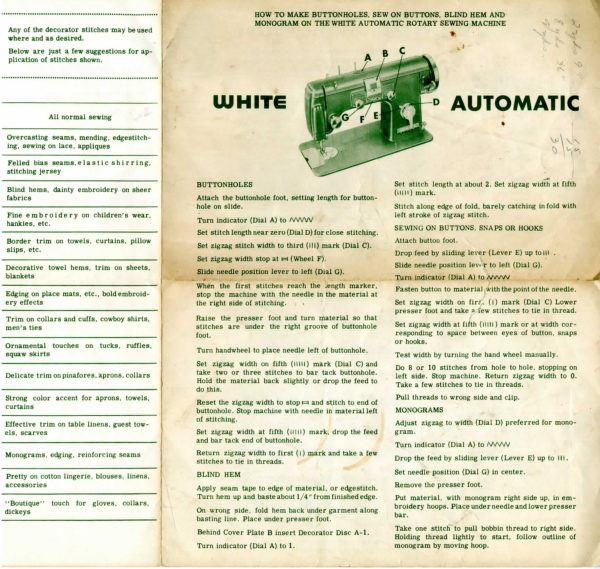
Any of the decorator stitches may be used
where and as desired.

Below are just a few suggestions for ap-
plication of stitches shown.

All normal sewing

Overcasting seams, mending, edgestitch-
ing, sewing on lace, appliques

Felled bias seams,elastic shirring,
stitching jersey

Blind hems, dainty embroidery on sheer
fabrics

Fine embroidery on children’s wear,
hankies, etc.

Border trim on towels, curtains, pillow
slips, etc.

Decorative towel hems, trim on sheets,
blankets

Edging on place mats, etc., bold embroid-
ery effects

Trim on collars and cuffs, cowboy shirts,
men’s ties

Ornamental touches on tucks, ruffles,
squaw skirts

Delicate trim on pinafores, aprons, collars

Strong color accent for aprons, towels,
curtains

Effective trim on table linens, guest tow-
els, scarves

Monograms, edging, reinforcing seams

Pretty on cotton lingerie, blouses, linens,
accessories

“Boutique” touch for gloves, collars,
dickeys

HOW TO MAKE BUTTONHOLES, SEW ON BUTTONS, BLIND HEM AND
MONOGRAM ON THE WHITE AUTOMATIC ROTARY SEWING MACHINE

BUTTONHOLES

Attach the buttonhole foot, setting length for button-
hole on slide.

Turn indicator (Dial A) to WWW
Set stitch length near zero (Dial D) for close stitching.
Set zigzag stitch width to third (iI) mark (Dial C).

Set zigzag width stop at = (Wheel F).

lever to Fe ne G).
When the first stitches reach the ‘ength marker,

stop the machine with the needle in the material at
the right side of stitching.

Raise the presser foot and turn material so that
stitches are under the right groove of buttonhole
foot.

Turn handwheel to place needle left of buttonhole.

Set zigzag width on fifth (\\\\1) mark (Dial C) and
take two or three stitches to bar tack buttonhole.
Hold the material back slightly or drop the feed to
do this.

Reset the zigzag width to stop = and stitch to end of
buttonhole. Stop machine with needle in material left
of stitching.

Set zigzag width at fifth (\/Il|) mark, drop the feed
and bar tack end of buttonhole.

Return zigzag width to first (|) mark and take a few
stitches to tie in threads.

BLIND HEM

Apply seam tape to edge of material, or edgestitch.
Turn hem up and baste about 1/4” from finished edge.

On wrong side, fold hem back under garment along
basting line. Place under presser foot.

Behind Cover Plate B insert Decorator Disc A-1.
Turn indicator (Dial A) to 1.

|

Set stitch length at about 2. Set zigzag width at fifth
(i) mark,

Stitch along edge of fold, barely catching in fold with
left stroke of zigzag stitch.

SEWING ON BUTTONS, SNAPS OR HOOKS:
Attach button foot.

Drop feed by sliding lever (Lever E) up toill..
Slide needle position lev to left (Dial G).

Fasten button to material with the point of the needle.

Set zigzag width on firs. (|) mark (Dial C) Lower
presser foot and take {ew stitches to tie in thread,

Set zigzag width at fifth (\\|) mark or at width cor-
responding to space between eyes of button, snaps
or hooks.

Test width by turning the hand wheel manually.

Do 8 or 10 stitches from hole to hole, stopping on
left side. Stop machine. Return zigzag width to 0.
Take a few stitches to tie in threads.

Pull threads to wrong side and clip.
MONOGRAMS,

Adjust zigzag to width (Dial D) preferred for mono-
gram.

Turn indicator (Dial A) to WWW

Drop the feed by sliding lever (Lever E) up to il.
Set needle position (Dial G) in center.

Remove the presser foot.

Put material, with monogram right side up, in em-
broidery hoops. Place under needle and lower presser
bar.

Take one stitch to pull bobbin thread to right side.
Holding thread lightly to start, follow outline of
monogram by moving hoop.
View original page 1Page 2 · Read text
How to sew, mend and do decorative stitches quickly

and easily on the WHITE AUTOMATIC ROTARY

NOTE: Instructions indicate dial settings used to
obtain the stitches illustrated. Decorator stitches
can be varied to individual tastes by changing the

‘Type or Decorator Stitch Width Stitch _stitch width and length.

Name of Disc Settings. Length
| Stiten Used Left to Right Settings Decorator Stitches Notes and Comments
| Straight None 1 1 tos —— —
Indicator
Zig-zag at | tsttostn | 1tos MY~VYVYVYAAAAMA AAA AAA
NW
a Indicator
(Blastic) at asttosth | 1to5 OLA NAA NAL NS
Vu

Catch Stitch A
(Blind Hem) Al 5th Do 2 |e eyed aya eet etn oA en eon Mery

Crest A2 sth ott LA Aged

| Rickerack | Bt | sth | Near iad gill ada, |

ear (iiacell aa ER - del ;

ca | sly | Near 0 |e ll tle lll

| Arrowhead c-2 5th Near 0 ittsatendise Rbpeitra Hee trond ee te end

Bead Det | 5th | Near 0 beet ltt titi

Shell D-2 5th Near 0 fia, yay ABH iy, i, iy ot |
|
Spiral Ba | sm | Nero IP a ae a AP Aa
Sampler E-2 Sth Near 0 : tol ga te al al ll al ot pl
Indicator
Satin at Isttobth | Near 0 le saeORe nL mera WoT
AWW
; Inideator | 3ra 1to5

at Drop Feed at LAID OTT OOD AAG

aot www | Equal Intervals

Indicator |" 5th —_‘| Drop Feed
Daisy at Do 3 or 4 Stitches , 4 ea He
Aww | Pivot on Needle

Beautiful duplication of the above
stitches with TWIN NEEDLES us-
ing two threads provides even

greater contrast in both design and
color. C01565 LITHOGRAPHED IN U.S.A.

The Right 10 Mahe Desian d by the manufacturer
View original page 2
Related documents and language editions
WhitePDF
White Art of Sewing and Dress Creation
Reference guide
108 pages · EnglishRead →
WhitePDF
White Five-Stitch Attachment — Book 12
User manual
18 pages · EnglishRead →
WhitePDF
White Rotary Automatic Series 666
User manual
23 pages · EnglishRead →
WhitePDF
White Rotary Electric 41 & 45
User manual
16 pages · EnglishRead →
WhitePDF
White Rotary Electric — Book 12
User manual
18 pages · EnglishRead →
WhitePDF
White Rotary Electric — Book 13 (1937)
User manual
14 pages · EnglishRead →
WhitePDF
White Rotary — Book 10
User manual
14 pages · EnglishRead →
WhitePDF
White Rotary — Book 11
User manual
28 pages · EnglishRead →
WhitePDF
White Sewing Machine and Its Attachments
User manual
32 pages · EnglishRead →
WhitePDF
White — Book 6
User manual
16 pages · EnglishRead →
From the ISMACS International. Original publisher and archive notices are retained.
Check the model and edition against your equipment.
PDF verified 2026-10-11.