Lenses & filters
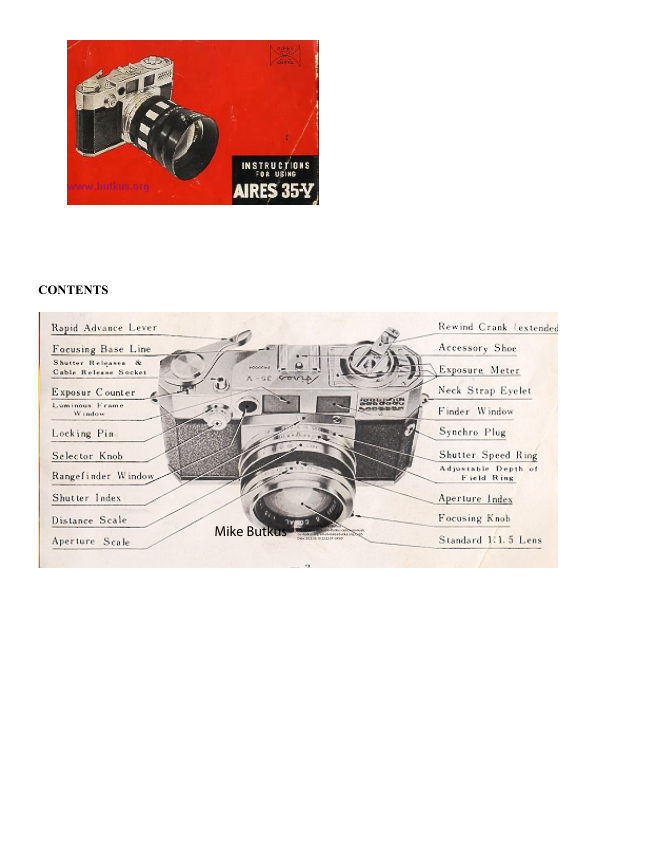
AIRES 35-V lenses User manual
User manual for AIRES 35-V lenses. 15 pages in English. Read the original PDF, download or print a copy without registration.
15 pagesEnglish2.3 MB PDF
Loading your manual…Open PDF directly
Document details
- Brand
- Aires
- Model / document
- AIRES 35-V lenses
- Document type
- User manual
- Language
- English
- Pages
- 15
- File size
- 2.3 MB
- Category
- Lenses & filters
- Document date
- Not specified in catalog
Search available document text
Find a term, then jump to its page in the original PDF. Image-only pages may not be searchable; check the PDF for exact wording and diagrams.
Page 3 · Read text
www.butkus.us


Introduction of Aires 35.V
Combining precision, versatility, ease of operation, plus the outstanding features the consumer has come to
expect from Aires, the New Aires is a compliment to the skill of the camera maker's art. A high precision,
specially designed Seikosha MX shutter gives consistent exposures over the entire scale--action stopping 1/400
sec. to the slow full second for night scenes and available light photography-all of this and full synchronization
for electronic and standard flash. The built in exposure meter provides accurate determining of exposure in all
situations--daylight, indoors or in dim light with the amplifier cell. Rapid advance lever and rewind crank
provides fast shooting plus speedy reloading. Smooth jar-free shutter release allows hand-held exposures at
slower speeds. Quiet shutter for distraction free shooting in the studio or when working with models.
Dependable, accurate, coupled rangefinder view Finder for all three lenses with provision for parallax
correction in close-up photos. Handy drop-out film loading chamber. Engraved depth of field scale for all
lenses. Double exposure prevention is automatic but may be made by turning the advance and rewind selector
knob to "D". Amplifier cell s electrical connection is built into the accessory shoe. Automatic back cover lock.
All of these features plus many others make the Aires 35-V the most outstanding camera to come from Japan in
recent years.


Interchangeable Lens System
The outstanding feature of the new Aires 35-V is its completely integrated interchangeable lens system. The
integrated concept was achieved by specifically designing a behind-the-lens-shutter and body to match the
outstanding advances of our optical specialists. Three completely new lenses, wide-angle, standard and
telephoto incorporating the latest technical advances of the Japanese optical industry, were designed specifically
for the integrated interchangeable-lens-shutter camera utilizing the basic Aires camera design as a starting
point. With the completion of these new lenses the new camera was designed to match, feature to feature, the
best in existing Aires cameras and those outstanding properties of the new lenses.
View original page 3
Page 4 · Read text
The camera possesses the ability to cope with almost any picture situation likely to be encountered by the user
of a 35mm camera. Snapshots, action, sports, scenic, and many more come within the scope of the Aires 35-V.

Three completely new lenses, standard wide-angle and telephoto, were specially designed for the Aires 35-V.
Particular attention was given to the integrated concept for matching three different focal lengths to a single
bayonet focusing mount Although new in design, none of the optical corrections essential to fine, precision
35mm photography were overlooked. Color corrections, longitudinal and lateral, have been carried out to a high
degree. All lenses are hard coated to increase shadow detail and prevent flare. Mounted in precision--machined,
matched bayonet mounts to assure permanent accuracy of focus, all have superb definition and resolving
power.


Description of Parts (front, rear and bottom        Operating Instructions - - 14
view) 2,3
                                            Loading 14
Introduction of Aires 35-V 4
                                             Determining Exposure with Aires Built-in
Interchangeable Lens System - 5                Exposure Meter 16

Characteristics of the Aires Interchangeable       Focusing . - -17
Lenses 6
                                             Holding the camera when taking pictures 18
Changing the Lens 8
                                           Framing 20
Removing the Lens 8
                                            Taking the picture 20
Setting the Adjustable Depth of Field Ring 9
                                             Unloading the camera 20
Replacing the Lens 10
                                               Miscellaneous Information -: 22
Trimming Coupled Range Viewfinder 11
                                                    Self-timer and Cable Release Z
Rapid Winding of Film and Winding of Shutter
12                                         Depth of Field of the Lenses and their
                                                     Utilization 22
Flash Synchronization and Intentional Multiple
Exposures 13                                Depth of Field Charts 24, 25, 26

Infrared Marking (The Red R) 14              The care of your camera 27
View original page 4Page 5 · Read text
www.butkus.us


 Characteristics of the Aires Interchangeable Lenses

Standard lens - S Coral, f--4.5 F 1 :1.5, 7 elements 4 groups
This lens combines high speed and resolving power lo cover a wide range of everyday photography. It is
extremely useful in available light photography or for sports where high shutter speeds require a large
diaphragm opening. Its superb definition makes it an excellent lens for general photography. Other data on the
lens are as follows:


                     Sharp Image Field: 50degree 30 sec.
                       Perpendicular Angle of View :29''
                       Horizontal Angle of View: 43°
                   Diaphragm Openings: 1.5, 2, 2.8, 4, 5.6, 8, 11, 16
                    Lens Mount: Exclusive Bayonet Mount
                    Lens Front Attachment Size: Filter screw 49mm P=0.75
                      Outside dimension 51mm
                     Weight: approximately 51 ozs.


Telephoto Lens Tele Coral, f=10cm. F 1: 3.5, 5 elements 3 groups High speed, long focal length combined
with high resolving power anti definition plus superb color correction make this lens ideal for distant subjects
and formal or informal portraiture. Image size is about twice that of standard lens. Focusing range is 7 feet to
infinity. Other data on the lens are as follows:


                        Sharp Image Field: 24° Perpendicular
                       Angle of View: 13°30' Horizontal Angle of View: 20 degrees
                       Diaphragm Opening: 3.5. 4, 5.6, 8, 11, 16, 22
                       Lens Mount: Exclusive Bayonet Mount
                       Lens Front Attachment Size : Filter screw : 62mm P=0.75
                          Outside dimension: 65mm
                         Weight: approx. 13 ozs.


Wide-Angle Lens--W Coral, f=3.5cm. F 1:3.2, 4 elements 3 groups
Medium wide-angle for close quarters work and where a large portion of the subject is desired In the picture.
Color corrections, definition, resolving power are comparable to the other matched integrated lenses for the
Aires 35-V. Short focal length of W Coral lens provides extended depth of field potentials. Focusing range is 2-
2/3 feet to infinity. Also useful for dim-light photography. Bayonet mount couples to rangefinder. Other data on
the lens are as follows:


                         Sharp Image Field 63 degrees
                            Perpendicular Angle of View 37°30' Horizontal Angle of View 54
                        Diaphragm Openings 3.2, 4, 5.6, 8, 11, 16, 22
                        Lens Mount: Exclusive Bayonet Mount
                        Lens Front Attachment Size: Filter screw 49mm E2=0.75 Outside
                          dimension: 51mm
                          Weight: approximately 51 ozs.
View original page 5Page 6 · Read text
Changing the Lens

                                        The Aires 35-V camera has an exclusive
                                              bayonet mount on the front which permits the
                                             removal and replacement of the interchangeable
                                                    lens with speed and ease. When changing the
                                                        lens, do so carefully. Especially, in replacing, be
                                                  sure it is securely fitted to the lens mount Care
                                               should be taken that the rear clement of the lens
                                                      will not be scratched when changing lens.


Removing the Lens
Set the distance scale to infinity (A). by turning the focusing knob. Push the pin at the bottom of the lens barrel
and simultaneously turn the knurled black ring counter clockwise until it stops (B). Now pull lens away from
camera body.


Setting the Adjustable Depth of Field Ring


                       Don't turn the Depth of Field ring unless the lens is removed.
                      For the three different lenses (Standard, Telephoto and Wide-Angle) there
                         are three different Depth of Field markings engraved on the Depth of Field
                     Ring as in the illustration on the right (A).


                               Press the small pin on the left side of the Standard lens Depth of
                                Field Ring engraving and simultaneously turn ring either way so
                                   that the focal length (4.5cm10cm. or 3.5cm.) of the lens you are
                             going to use is set at the red triangular mark on the shutter cover
                                 (B).
View original page 6Page 7 · Read text
www.butkus.us


Replacing the Lens


                 Standard lens -Set the distance scale to the infinity.
                  Line up the red dot on the lens barrel to the red dot
                 on the shutter cover (A). Turn the knurled black ring
                   clockwise until it stops (B). Now, you have replaced
                     the lens.
                  Telephoto lens--Set the distance scale to infinity. Set
                     the two red dots on the lens barrel in line with each
                      other. Now, set these two red dots in line with the red
                    dot on the shutter cover and simultaneously insert
                   alignment bar into groove (C). Turn the knurled
                   black ring clockwise until it stops with a click (D).
                The telephoto lens is now securely in its place.


Wide-Angle lens--Set the distance scale to infinity. Set the two green dots on the lens barrel in line with each
other: Now, set the red dot on the lens barrel to the red dot on the shutter cover and simultaneously insert
alignment bar into groove (E). Turn the lens barrel clockwise until it stops with a click (F). The wide-angle lens
is now securely in its place.


"Trimming" Coupled Range-viewfinder
The Aires 35-V is equipped with a "trimming" coupled range-viewfinder mechanism of the super-imposed
image type, with a single eyepiece. As the illuminated frame of the viewfinder is brilliant and as the two
rangefinder images are very clear, it is easy to coincide them and to focus as close as 32 inches with the
standard lens. The illustration shows the wide field that can be seen through the viewfinder eyepiece and the
illuminated frames. With the telephoto lens the closest distance is 7 feet with the wide--angle lens the focus
range is the same as with the standard lens.
The "trimming" range-viewfinder has the following 5 advantages:


                                         1.) With the Aires viewfinder mechanism, the subject shown in
                                    the frame is recorded by the lens exactly as it is seen by the eye.

                                         2.) As only the subject within the illuminated frame is recorded
                             by the lens and .... as the actual view seen through the full
                                  viewfinder is much larger in area, the photographer can frame
                              and compose his picture very easily.


3.) Fast moving objects passing through the field of view can be seen an instant before they enter the
illuminated frame itself, thus permitting the photographer to capture the subject at just the right instant.

4.) The illuminated frame will allow accurate composition in even the poorest light.

5.) It enables the photographer to see the entire image accurately even if he wears spectacles.
View original page 7Page 8 · Read text
Rapid Winding and Winding of Shutter

                                  The Aires 35-V is so designed that both film advance
                                     and shutter winding can be performed at one and the
                                   same time, very rapidly, by means of the Rapid
                                   Advance Lever used as follows:

                                              (1) Push the cove at the right corner of the lever with
                                       your index finger, and the lever comes into operating
                                            position (A).

                                           2) Put your thumb alongside the Lever as in illustration
                                        (B) and turn it to the right until it stops (C).

                                           3) Let your thumb slip off the Lever and it will return to
                                            position (D), ready for next picture.


The film has now been advanced one exposure and the shutter wound. Since the shutter cannot be released if
you stop the Lever halfway, it is necessary that it should be turned until it goes no further. Double exposures are
perfectly prevented. Since the Shutter Release is so conveniently located the index finger of your right hand fits
over it naturally when you hold the camera. You can wind the film and release the shutter very rapidly, at the
rate of 12 exposures per 10 seconds.


Flash Synchronization and Intentional Multiple Exposures (A)

                 The Seikosha MX shutter has built-in synchronization for standard medium
                   peak flash bulbs of the M class and electronic flash units having zero delay.
                     Flash terminal is located on left front of the camera body and accepts
                   European (RC) type synchro plugs. If you are using electronic flash unit turn
                      the switch lever to X and to M if you are using M class bulb. (A)
                    Important: When using the camera without flash equipment set the flash
                    synchro switch to X.


                                                 Although the Aires 35-V has built-in
                                                  double exposure prevention device the
                                                       designers added a provision to retain the
                                                      photographer's right to take double
                                                   exposures if he so desires. On the front of
                                                        the camera is an advance and rewind
                                                           selector knob with the markings
                                                       of D, A, R standing
                                                           for Double, Advance, Rewind (B). When
                                                  double or multiple exposures are desired on
                                                one frame the locking pin is depressed and
                                                     simultaneously the selector knob turned to
                                                        " D " (C).
View original page 8Page 9 · Read text
www.butkus.us


By advancing the rapid wind lever the shutter is wound but the film does not advance. Shutter is tripped in the
conventional manner.
Infrared Marking (The Red R)
Infrared film takes pictures by infrared waves invisible to human eyes. Focusing with this film is different from
regular film and the lens must be focused slightly in front of the visible subject. A red mark is provided on the
depth of field scale ring to compensate for this difference. Focus the camera in the regular way with the
rangefinder and set the distance focused upon to this compensating mark before shooting with infrared film.
When using the wide angle lens the depth of field is so deep there is no need to adjust the distance setting.

OPERATING INSTRUCTIONS
Please read the following instructions carefully at least once to familiarize yourself with the Aires features.
Handle the camera carefully and operate the various operating parts at least once before loading your first
roll of film.

Loading


                          Place the camera face down on a table or other solid support and release
                            the back cover lock by pulling down the lock release bar. The back
                          cover will spring part-way open and may be opened fully by hand (A).
                       Push upward on the slotted rewind shaft (B) (C) and insert a standard
                                 roll of 35mm cartridge film. Push the rewind shaft down until it
                         engages the rewind slot in the cartridge spool (1).


                      Bend the film tip about 1/8 inch from the end, and insert the film tongue
                             in the slot of the take up spool making sure the film is securely fastened
                        and that the sprocket gears fit the film perforations (E) Secure the film
                       on the take-up spool by 1 1/2 turn of the take up spool and close back of
                            the camera.
                        Locking is automatic.

                  Now take up the slack by turning rewind lever clockwise until tension is
                                    felt. Advance the exposed portion of the film by winding the advance
                             lever and tripping the shutter twice or until the counter registers 1.
                      Your Aires is now loaded.
View original page 9Page 10 · Read text
Determining Expose with Aires Built-in Exposure Meter (A)


                           1. Set the ASA rating of the film loaded in the camera in the following
                     manner: a. Determine the sensitivity of your film. (ASA number), b. Hold
                      only the ASA and Aperture dial (knurled lower metal ring) with your left
                     hand fingers and turn the small knob until the ASA number (in case ASA
                    100 film to 100) appears in the ASA window (B).

                           2. Point the photo-electric cell at the scene to be photographed. (In outdoor
                       scenes point the cell slightly downward to minimize skylight reading.)


3. Set the Standard pointer   on the ASA & Aperture Dial to this reading (C) and read the correct exposure
from any of the combinations indicated on right of the exposure dial (D). Set the desired combinations to the
shutter speed and aperture dials on the shutter and lens mount. Now, you are ready to focus the .. camera.


Focusing


                      Look through the Aires " trimming " range-viewfinder. You will see
                       two bright illuminated frames with a large bright dot of light in the
                              center.

                             Inside the bright dot two images will be seen of the subject as can be
                          seen from an example in the left top picture. By turning the focusing
                       knob these two images car. be made to merge as illustrated in the left
                        bottom picture. At this point the object is in sharp focus.

                      The procedure is the same with the Standard and Wide-Angle lens but
                            as mentioned on page 18 focusing is easier by turning the lens barrel
                     when using the Telephoto lens.
View original page 10Page 11 · Read text
www.butkus.us


Holding the Camera When Taking Picture

(A) Ordinary Horizontal Position


                          Hold the camera in both hands using the right index finger to operate
                               the shutter release and left index or middle finger to adjust focusing.
                     When using telephoto lens it is advisable to turn the lens barrel
                               instead of focusing knob. To look through the viewfinder either the
                                      left or the right eye will do. Use whichever is convenient to you.
                                 Stabilize the camera by holding it so that the left hand thumb is
                              pressed against your cheek.

                             (B) Vertical Position
                           There are two ways to hold the camera for shooting vertical
                                  pictures. One is with shutter release above your eyes, (that is with
                            your right hand above the camera).

                         The other is with the shutter release below eyelevel.


                              When the camera is held in the former way, the shutter
                                              release can be pressed with your right index or middle
                                              finger and film winding done without moving the
                                      camera from its shooting position. However, since the
                                      camera is held high, it is somewhat unstable especially
                                               for slow exposures. If the camera is held in the latter
                                       manner, the shutter release is pressed with your thumb.


When winding the film. your thumb is also used and has to be moved away from shutter release each time you
wind the film. This position, however, is the more stable. Both ways have merits and there are pros and cons on
them even among professionals. You must choose for yourself which suits you better.  It is also up to you to
decide which eye you can use more conveniently.

Framing
With the Standard lens the outer bright illuminated frame is used to compose the picture.
For subjects between 3' ft. to 2 2/8 ft. use the parallel parallax correction marks as a substitute for top of the
frame (standard lens). The center frame marks are for use with the Aires Tele Coral lens and the entire
viewfinder is used with the 35mm Wide-angle, W Coral lens. With telephoto and wide angle lenses parallax
may be compensated by a proportionate amount.
View original page 11Page 12 · Read text
Taking the Picture
With the subject in sharp focus and properly framed you are ready to take the picture. Press, gently, the shutter
release on the top right of the camera, something like the trigger of a rifle. Press downward slowly until about
half way and then at the precise moment of best expression or of peak action press all the way. A quiet click
will be heard and you'll know the film has been exposed. Do not advance the rapid advance lever immediately
unless you want to take another picture in the next few moments. By not winding the film immediately
you preserve the life of the shutter mechanism.

Unloading the Camera


                                                      As each picture is taken
                                                                                                             it is recorded in the film
                                                                   exposure counter
                                                             window. When the
                                                                       counter reaches 20 or 36,
                                                                 depending upon the
                                                                         length of roll, set the
                                                                              selector knob to "R" by
                                                                       depressing the locking
                                                                       pin and turning knob
                                                                          (A). Fold out the rapid
                                                                 rewind crank (B).


3. Set the Standard pointer   on the ASA & Aperture Dial to this reading (C) and read the correct exposure
from any of the combinations indicated on right of the exposure dial (D). Set the desired combinations to the
shutter speed and aperture dials on the shutter and lens mount. Now, you are ready to focus the .. camera.


Focusing


                      Look through the Aires " trimming " range-viewfinder. You will see
                       two bright illuminated frames with a large bright dot of light in the
                              center.

                             Inside the bright dot two images will be seen of the subject as can be
                          seen from an example in the left top picture. By turning the focusing
                       knob these two images car. be made to merge as illustrated in the left
                        bottom picture. At this point the object is in sharp focus.

                      The procedure is the same with the Standard and Wide-Angle lens but
                            as mentioned on page 18 focusing is easier by turning the lens barrel
                     when using the Telephoto lens.
View original page 12Page 13 · Read text
www.butkus.us

Holding the Camera When Taking Picture

(A) Ordinary Horizontal Position


                          Hold the camera in both hands using the right index finger to operate
                               the shutter release and left index or middle finger to adjust focusing.
                     When using telephoto lens it is advisable to turn the lens barrel
                               instead of focusing knob. To look through the viewfinder either the
                                      left or the right eye will do. Use whichever is convenient to you.
                                 Stabilize the camera by holding it so that the left hand thumb is
                              pressed against your cheek.

                             (B)Vertical Position
                           There are two ways to hold the camera for shooting vertical
                                  pictures. One is with shutter release above your eyes, (that is with
                            your right hand above the camera).

                         The other is with the shutter release below eyelevel.


                              When the camera is held in the former way, the shutter
                                              release can be pressed with your right index or middle
                                              finger and film winding done without moving the
                                      camera from its shooting position. However, since the
                                      camera is held high, it is somewhat unstable especially
                                               for slow exposures. If the camera is held in the latter
                                       manner, the shutter release is pressed with your thumb.


When winding the film. your thumb is also used and has to be moved away from shutter release each time you
wind the film. This position, however, is the more stable. Both ways have merits and there are pros and cons on
them even among professionals. You must choose for yourself which suits you better.  It is also up to you to
decide which eye you can use more conveniently.

Framing
With the Standard lens the outer bright illuminated frame is used to compose the picture.
For subjects between 3' ft. to 2 2/8 ft. use the parallel parallax correction marks as a substitute for top of the
frame (standard lens). The center frame marks are for use with the Aires Tele Coral lens and the entire
viewfinder is used with the 35mm Wide-angle, W Coral lens. With telephoto and wide angle lenses parallax
may be compensated by a proportionate amount.
View original page 13Page 14 · Read text
Taking the Picture
With the subject in sharp focus and properly framed you are ready to take the picture. Press, gently, the shutter
release on the top right of the camera, something like the trigger of a rifle. Press downward slowly until about
half way and then at the precise moment of best expression or of peak action press all the way. A quiet click
will be heard and you'll know the film has been exposed. Do not advance the rapid advance lever immediately
unless you want to take another picture in the next few moments. By not winding the film immediately
you preserve the life of the shutter mechanism.

Unloading the Camera

                                                      As each picture is taken it is
                                                                     recorded in the film exposure
                                                                      counter window. When the counter
                                                                       reaches 20 or 36, depending upon
                                                                          the length of roll, set the selector
                                                            knob to "R" by depressing the
                                                                      locking pin and turning knob (A).
                                                                  Fold out the rapid rewind crank (B).


                                                          Rewind the film into the film
                                                                             cartridge by turning the crank
                                                                    clockwise (in direction of the arrow)
                                                            no felt on the crank. The film is now
                                                                               fully rewound. Return knob to "A"
                                                                            (C).


Unlock the back cover (D). and pull up the rewind crank shaft (E). With the back fully open and the rewind
crank and shaft in the "up" position the camera is turned over and the film will drop out of its own accord ,or it
may it taken out as shown in (F).


MISCELLANEOUS INFORMATION

Self-timer and Cable Release
If the shutter speed is slower than 1/25 sec. use of cable release is advisable. The cable release or the self-timer
should be screwed into the cable release socket on the shutter release before the shutter is wound. If they are
screwed in after the shutter has been wound you might accidentally trip the shutter.

Depth of Field of Photographic Lenses and their Utilization
Photographic lenses have a tendency to be in focus in front of and behind the subject focused on. For instance,
if you focus on a person 10 feet away a clog closer than 10 feet and flowers further than 10 feet may also be in
acceptable sharp focus. The range from the front limit to the rear limit in acceptable sharp focus is called the
Depth of Field of a lens.
View original page 14Page 15 · Read text
www.butkus.us

This range is shallow in the foreground and deep in the background and the limits varies with different lenses
and also with the different apertures and distances as you can see from the Depth of Field Chart found
elsewhere in this booklet.
In actual work the control of the Depth of Field serves as a tool to achieve desired effects and is utilized in the
following two ways.

1. To get a sharp image of subjects located at different distances from the camera. Using a Depth of Field Chart
Will enable you to control what will or what will not be sharp in your picture.

2. To limit sharpness, to concentrate attention on a certain part of the picture by having it sharp, making
everything else blurred. Practice will teach you how to use and control this feature of the lens' depth of field.
View original page 15
Related documents and language editions
AccuraPDF
Accura Zoom Duplivar Slide / negative duplicator
User manual
11 pages · EnglishRead →
EdnalitePDF
Ednalite filters flier
Product booklet
2 pages · EnglishRead →

FocalPDF
Focal auto diaphragm lensesand tele-extenders
User manual
11 pages · EnglishRead →
Various brandsPDF
JC Penny Lens instructions
User manual
8 pages · EnglishRead →

KonicaPDF
Konica Autoreflex A lenses
User manual
66 pages · EnglishRead →

Various brandsPDF
Lens Guide - General (1960s)
Product booklet
97 pages · EnglishRead →
MinoltaPDF
Minolta Maxxum zoom lenses
User manual
20 pages · EnglishRead →
NikonPDF
Nikon 50-300
User manual
9 pages · EnglishRead →
Zeiss IkonPDF
Pantar lenses for Zeiss Ikon
Product booklet
17 pages · EnglishRead →
PentaxPDF
Pentax 645 lenses - '89
User manual
32 pages · EnglishRead →

PentaxPDF
Pentax 67 Interchangeable Lenses
User manual
30 pages · EnglishRead →

PentaxPDF
Pentax SMC Pentax A lenses
User manual
46 pages · EnglishRead →
From the M. Butkus Camera Manual Library. Original publisher and archive notices are retained.
Check the model and edition against your equipment.
PDF verified 2026-10-10.