Film cameras
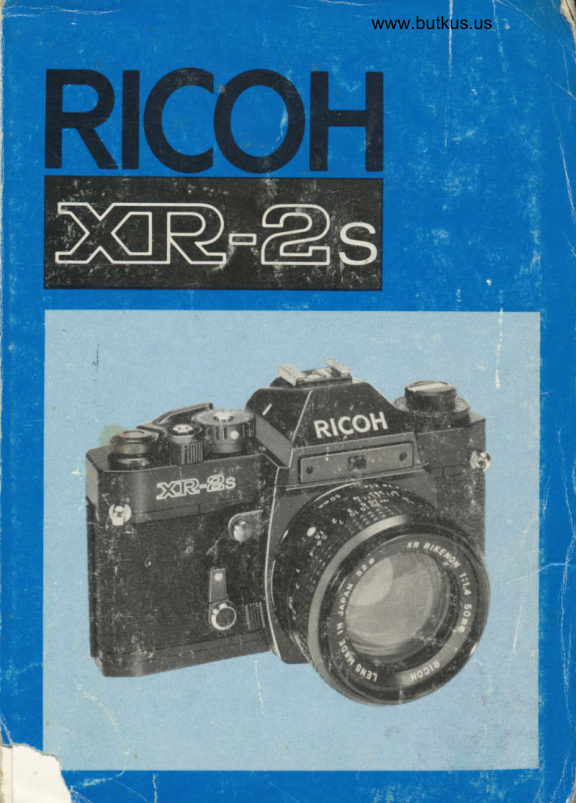
Ricoh Xr 2S User manual
User manual for Ricoh Xr 2S. 20 pages in English. Read the original PDF, download or print a copy without registration.
20 pagesEnglish2.0 MB PDF
Loading your manual…Open PDF directly
Document details
- Brand
- Ricoh
- Model / document
- Ricoh Xr 2S
- Document type
- User manual
- Language
- English
- Pages
- 20
- File size
- 2.0 MB
- Category
- Film cameras
- Document date
- Not specified in catalog
Search available document text
Find a term, then jump to its page in the original PDF. Image-only pages may not be searchable; check the PDF for exact wording and diagrams.
Page 4 · Read text
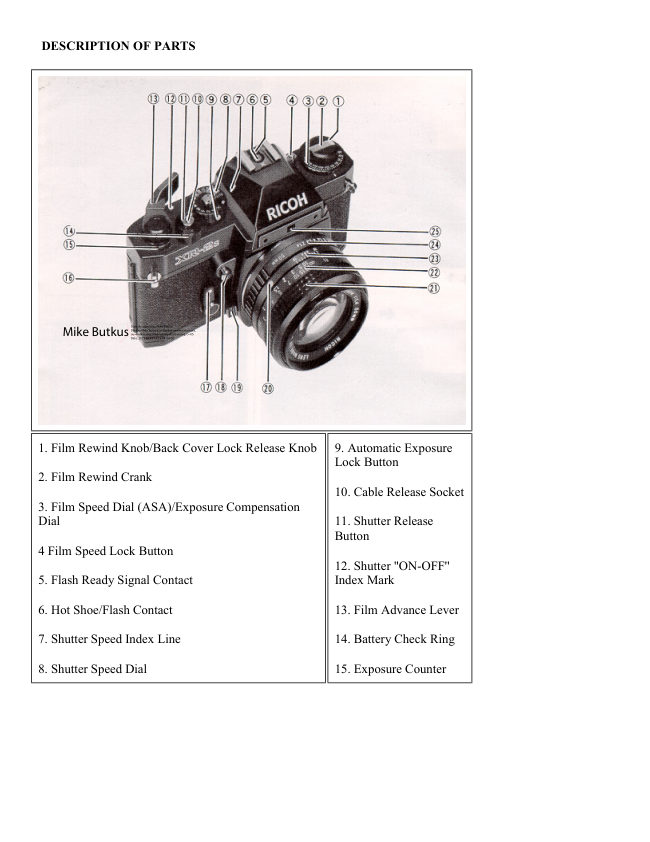
33. "X" Flash Terminal                                                                                                                                                                                             i
34. Film Rewind Shaft
35. Film Chamber
36. Battery Compartment Cover
37. Tripod Socket
38. Winder Contacts
39. Shutter Release Connection
40. Film Rewind Release Button
41. Winder Coupler
42. Positioning Hole
43. Film Take-up spool
44. Back Cover
45. Film Pressure Plate
46. Microprism-image Band
47. Split-image Spot
48. Exposure Meter Needle
49. Shutter Soeed Indicator
50. Battery Power Check Zone
51. Aperture Readout Window

We are most gratified that you have selected the XR-2s which we are
sure will give you many delightfull years of picture-taking pleasure.
The XR-2s is a 35 mm fully automatic electronically controlled ex-
posure system (aperture-priority) SLR camera which assures you of
superb optics and outstanding mechanical performance and reliability
and which will justify your choice for years to come.

Before Using Your XR-2s
Please read this instruction booklet carefully and familiarize yourself
with the equipment and its features thoroughly. Your pleasure in us-
ing your XR-2s will be greater if you know your camera properly.


                                                                                 I
View original page 4Page 5 · Read text
www.butkus.us
Since the camera is designed to accept any lens with the "K" type
bayonet mount, your XR-2s affords you the opportunity to select any
interchangeable  lens or accessory of the "K" type bayonet mount
available on the market.

RICOH XR WINDER-1:
The RICOH XR WINDER-1 can be used with the XR-1s and XR-2s.
By operating the shutter release button on the winder,  it can be used
for rapid sequence photography at approximate 2 frames per second.
(at shutter speed of 1/125 sec.) By just setting the selection switch
you may choose frame-by-frame shots or rapid sequence shots
according to your needs. You can for instance capture the rapid
movement in sports, or the fleeting facial expressions that make your
picture-taking a more enjoyable experience.

PROPER CARE OF YOUR CAMERA
 * Always carry your camera with its carrying case and neck strap.
 * Use the lens cap to protect the lens when not taking pictures'
  *  Protect your camera from dust, dirt, water, rain, dampness, salt
     air and rough handling.
  * Never expose your camera to excessively high or low tempera-
     tures for an extended period of time. In extremely hot climates,
   do not leave your camera inside closed automobiles during the
    daytime or in direct sunlight. In extremely cold climates, expose
    your camera to the outer air only when in use..... When using,
    expose your camera gradually to the outer air to prevent the lens
    from clouding.
       lf exposed to an extremely cold climate, the exposure meter
     batteries may fail to operate properly. Keep your camera inside
    your clothing until taking a picture.
  * Never touch the surfaces of the lens, metal focal plane shutter
     curtain, reflex mirror, etc. with your fingers.
View original page 5Page 6 · Read text
OBJECTIFS INTERCHANGEABLES ET
ACCESSO   I R ES
 Une large gamme d'objectifs interchangeables XR RIKENON est
 offerte; elle se compose d'objectifs grandangulaires, t6l6objectifs,
 objectifs d focable variable sans compter de nombreux accessorres
 qui sauront 6largir d'autant votre passion de la prise de vues et ses
 multiples formules. Les objectifs interchangeables XR RIKENoN et
 la gamme d'accessoires sont fabriqu6s d partir de mat6riaux de haute
 qualit6 s6lectionn6s; un contr6le de qualit6 est appliqu6 sous des
normes s6vdres pour assurer fiabilit6, performances 6lev6es et
satisfaction. choisissez les objectifs interchangeables XR RIKENoN
et les accessoires qui correspondent d vos besoins.
 Etant donn6 que votre appareil est congu pour accepter tout objectif d
 monture baionnette de type "K", votre XR-2s vous donne l,opportu_
nit6 de choisir tout objectif interchangeable ou accessoire d monrune
baionnette de type "K" actuellement disponible sur le march6.
RICOH XR WINDER-I:
Le RICOH XR WINDER-1 peut 6tre utilis6 avec le XR-1s. le XR-2s.
En actionnant le bouton de d6clenchement de l'obturateur sur le mo-
teur d'entrainement,  il peut 6tre utilis6 pour la prise de vues d s6-
quence rapide d environ deux expositions par seconde (d la vitesse
d'obturateur de 1/125 sec.).
En 169lant simplement le commutateur s6lecteur,  il est possible de
choisir entre la prise vue par vue ou la prise de vues en rafale. Vous
pouvez par exemple capter les mouvements rapides des sports, ou les
expressions faciales 6vanescentes qui font de votre prise de vue un
exp6rience plus agr6able.

ENTRETIEN APPROPRIE DE VOTRE APPAREIL
 *  Portez toujour votre appareil dans son 6tui et sa courroie.
 *  Utilisez le capuchon d'objectif pour prot6ger ce dernier quand
   aucune photo n'est prise.

                          -50-
View original page 6Page 7 · Read text
www.butkus.us
                                                                    '' Hinweise f0r optimale Ergebnisse
  * Dre Infrarot-strahlung variiert mit dem Grad der lnfrarotstrahlung
      in der Atmosphiire.
  * Beachten, Sie, ftir die Belichtung, die Gebrauchsanweisung in
     der Filmpackung und stellen Sie die Belichtung mit der Hand ein,
    da Messen mit dem eingebauten Belichtungsmesser nicht mo-
     glich ist.

WECHSELOBJEKTIVE UND ZUBEX6N
 Damit Sie lhr Steckenpferd ,,Fotografie" noch vielseitiger gestalten
konnen, sind eine groBe Anzahl von XR RIKENON Wechselobjekti-
ven, einschlieBlich extremen Weitwinkel- und Teleobjektiven sowie
Gummlinsen, und vielseitiges Zubehor erhdltlich. Die XR RIKENON
Wechselobjektive und das erhdltliche Zubehor sind unter strengen
 Oualitaitskontrollen aus hochwertigen Werkstoffen hergestellt, um
 hohes Leistungsvermogen und absolute Zuverldssigkeit zu gew6hrlei-
 sten. Unter dem vielseitigen Angebot von XR RIKENON Wechselob-
jektiven und Zubehor finden Sie sicherlich die f[r lhre Zwecke am be-
 sten geeigneten Modelle.
Da diese Kamera mit Bajonettfassung des Typs ,,K" ausgeriistet  ist,
 konnen mit lhrer XR-2s alle auf dem Markt erhdltlichen Wechselob-
 jektive und Zubehorteile benutzt werden, die ebenfalls mit Bajonett-
 fassungen des Typs ,,K" versehen  sind.

RICOH XR WINDER-I:
Der RICOH XR WINDER-'l kann zusammen mit den Kameras XR-1s
und XR-2s verwendet werden. Durch Betiitigen des Ausloseknopfes
am Motorantrieb (Winder)  ist ein Fotografieren  in schneller Folge mit
ungefdhr 2 Bildern pro Sekunde (bei einer VerschluBzeit von 1 /125 sl
moglich, Umstellen des Wahlschalters  genr.igt, um je nach Bedrf Ein-
zelbilder oder Aufnahmen in schneller Folge zu wdhlen. Sie konnen
zum Beispiel schnelle Bewegungsabldufe  bei Sportveranstaltungen
oder fltichtige Gesichtsausdrticke  einfangen, wodurch Fotografieren
noch mehr Vergntigen bereitet.
                      -77 -
View original page 7Page 8 · Read text
/a,/
VI       Como la cSmara estd disefiada para trabajar con cualquier objetivo
          con montura de bayoneta tipo "K", su XR-2s le proporciona  la opor-
           tunidad de seleccionar cualquier objetivo o accesorio intercambiable
           del mencionado tipo, disponible en el mercado.

       RICOH XR WINDER-I:
         EL RICOH XR WINDER-1 puede ser usado con las cdmaras XR-1s y
         XR-2s. Al apretar el disparador, el motor hace avanzar rSpidamenete
              la pelicula, siendo entonces posible sacar fotografias a una velocidad
         de aproximadamente 2 cuadros por segundo (con una velocidad de
           obtturador de 1/125 segundo).
         Saque fotogrfias haciendo avanzat la pelicula cuadro a cuadro o en
          suceci6n rApida, segfn sus necesidades. Saque por ejemplo goto-
            grafias de una r6pida sucesi6n de movimientos de una competencia
          deportiva o de las fugaces expresiones faciales de una persona
            querida.

      CUIDADOS OUE SU CAMARA NECESITA
            * Transporte su c6mara dentro de su estuche.
            * Ponga el tap6n del objetivo cuando no est6 tomando fotos.
            *  Proteja la cSmara del polvo, agua, lluvia, aire salino, ydel manejo
               descuidado.
            * Nunca exponga su cSmara a temperaturas extremas. En am-
                bientes extremadamente  calurosos, no deje su cSmara dentro del
              coche a pleno sol durante largo tiempo. En ambientes de frio in-
               tenso. exponga su cSmara al aire s6lo cuando debe utilizarla.
              H6galo gradualmente para evitar que se forme condensaci6n  en
                el objetivo.
             En caso de exponer la cdmara a ambientes de frio intenso, puede
                ser que el contador de exposiciones no funcione correctamente.
            Mantenga su c5mara dentro de su estuche hasta el momento de
l                 fotografiar.
\\
\'
View original page 8Page 9 · Read text
www.butkus.us
  3. For the second exposure, advance Film Advance Lever (1 3) while
    keep pressing Multi-exposure Button (27l, firmly with the other
    hand (Fig. 32). This will set the shutter for the second exposure
    without advancing the film and Exposure Counter (15).

Tips for Better Results
  * Good results in multi-exposure depend on careful shutter speed
    and lens opening setting. This means, in order to prevent overex-
    posure of the final picture, we suggest that the first picture
     should be underexposed by adjusting either shutter speed or lens
     openrng.
  *  lf you want, repeat the same action for the third exposure or
     afterwards.
  * Whenever advancing the Film Advance Lever (13) for second ex-
    posure or afterwards, make sure that the Multi-exposure Button
      (27l, is pressed firmly with the other hand and watch to see that
   '  Exposure Counter (15) is not advanced, indicating that multi-
    exposure picture is ready to be taken.
  * When multi-exposure shots are not required, be sure to lock the
    Multi-Exposure Button by sliding the Multi-Exposure Lock Lever
    (28) towards the right until the red dot disappears.
Take practice shots to get yourself accustomed to the multi-exposure
technique and take creative pictures of your own.

TAKING FLASH PICTU RES
You can use a flash at night or in a dimly lit room as well as for
supplementary lighting in outdoor photography. The camera and
electronic flash will be fully synchronized with the shutter speed at
"8","X" and 4 sec. to 1/125 sec. Since proper flash exposure may
not be obtained by automatic exposure setting, always override
Shutter Speed Dial (8) from "AUTO" setting.

                          -14-
View original page 9Page 10 · Read text
The RICOH XR Speedlite 24O is available exclusively for use with the
RICOH XR-2s.

How to Use the RICOH XR Speedlite 24O
  1. Attach XR Speedlite 24O to the XR-2s.
  2. Turn on the power source switch on the flash unit.
  3. When the flash unit is fully charged, the FLASH LED (31)on the
    frame of the view-finder eye-piece will turn red indicating  it is
    ready for use.
  4. When the shutter speed on the camera is set to "AUTO", it is
     automatically synchronized at 1/90 sec. This avoids the trouble
    of having to set the correct speed yourself.
  5. With ASA  l OO film, the F-stop should be set at 5.6, and the flash
     unit will automatically control the amount of light to give the cor-
     rect exposure.

Tips For Befter Results
  * Do not use other makes of flash units that have a special signal
    pin exclusively  for their cameras, as this will result in incorrect
    exposure or may even damage the circuitry.
  * The XR Speedlite 24O has a range of synchronization  of "AUTO",
    "8","X", and from 4 sec. to 1/125 sec.

IN CASES WHERE YOU DO NOT USE THE XR SPEEDLITE 2ItO

A. Cordless Electronic Flash Unit
lf you are using an electronic flash unit with a built-in hot shoe con-
tact, it can be attached directly to Hot Shoe (6) on top of the camera
pentaprism.

B. Electronic Flash Unit with Connecting Cord
 lf your flash unit does not have a built-in hot shoe contact, attach  it to
Hot Shoe (6) and plug the flash cord into the 'X' Flash Terminal (33).
                               15 -                            .      -
View original page 10Page 11 · Read text
T
 lr                                       www.butkus.us
tf  r          Tips for Better Results
     l
           * "125" fi/125 sec.) on Shutter Speed Dial (8) and'X'on Hot
             Shoe (6) are marked in red as a reminder for electronic flash syn-
                chronization (Fig. 33).
           * When using FP, M or MF class bulb, refer to the Chart (Fig. 34),
              showing the synchronizing ranges of shutter speeds.

         C. Exposure for Flash Photography
          The exposure  is determined by the guide number of the flash bulb or
            electronic flash unit. The guide number represents a relationship
          between the light output of the flash and the speed of the film. Guide
         numbers for flash bulbs can be found on the package and guide
         numbers for electronic flash units are found in the technical
            specifications. Using the guide number, you can determine the cor-
             rect f-stop for a given flash situation using the following formula:
              F-stop :  Guide number + Flash-to-subject distance
           For example,  if your flash unit has a guide number of 16 (m) or 52.8
                 (ft.) for the type of film you are using, and your subject is 2 meters
            (6.6 ft.) from the flash unit as indicated on Distance Scale (22) after
            focusing, divide 16 (52.8) by 2 (6.6). The answer is 8; set F-Stop
          Ring (141 to 8 (f/8).

          Tips for Bettsr Results
           *  lf you are using an auto electronic flash unit with power ratio
                  control. follow the instruction sheets packed with the flash unit.
           * Most electronic flash units have a built-in dial or exposure table
              which enables you to quickly compute f-stops based on flash-to-
                subject distances.
View original page 11Page 12 · Read text
PRISE DE VUES AU FLASH
Vous avez le loisir de faire une prise de vue de nuit avec un flash,
6galement dans une pidce faiblement 6clair6e, mais aussi l'utiliser
comme dispositif d'6clairage compl6mentaire pour une prise de vue d
l'ext6rieur. L'appareil et le flash 6lectronique sont entidrement syn-
chronis6s quand la vitesse d'obturation est r6gl6e sur la position "B",
"X" et de 4 sec. e 1/125 sec. Etant donn6 qu'une exposition ap-
propri6e au flash risque de ne pas 6tre obtenue par mode d'exposition
automatique,  il faut toujours asservir la bague des vitesses d'obtura-
tion (8) par la position "AUTO".
Le Rf COH XR Speedlite 24Q est disponible pour utilisation exclusive
avec le RICOH XR-2s.

Comment utiliser le RICOH XR Speedlite 24O
 1. Fixer le XR Speedlite 240 sur le XR-2s.
 2. Brancher l'interruoteur de courant du flash.
 3. Ouand le flash est compldtement charg6, la diode d lueurs du
    flash (31)sur le cadre de I'oeilleton de vis6e deviendra rouge in-
    diquant que le flash est pr6t d 6tre utilis6.
 4. Ouand la vitesse de l'obturateur de l'appareil est 169l6e sur "A"
     (auto), elle est automatiquement synchronis6e a 1/90 sec. Ceci
    vous 6vite le soucis d'avoir d 169ler vous-m6me la vitesse cor-
     recte.
 5. Avec un film de 100 ASA, 169ler l'ouverture de l'objectif df/5,6,
    et le flash contrdlera automatiquement la quantit6 de lumidre
    pour obtenir l'exposition correcte.

Conseils pour de meilleurs r6sultates
 * Ne pas utiliser d'autres moddles de flash ayant une fiche de sig-
    nal sp6ciale exclusivement pour leurs appareils, ceci 16sulterait
   en une exposition incorrecte ou pourrait m6me endommager le
      circuit.
 * Le XR Speedlite 24O a une gamme de synchronisation de
    "AUTO", "8". "X", et de 4 sec. d 1/125 sec.                   _43_
View original page 12Page 13 · Read text
www.butkus.us
DANS LE CAS OU VOUS N'UTILISEZ PAS LE XR SPEEDLITE
240
 A. Flash 6lectronique d contact direct
 Ouand un flash 6lectronique d griffe d contact direct incorpor6e est
 employ6, celle-ci peut 6tre fix6e sur le sabot/flash direct (6) plac6 en
 haut du pentaprisme de l'appareil.
 B. Flash avec cordon raccord
 Si votre flash n'est pas 6quip6 d'une griffe d contact direct incorpor6e,
 le fixer sur le sabot/flash direct (6) et raccorder le cordon du flash d la
prise flash "X" (33).

 Conseils pour obtenir de meilleurs r6sultats
  * "125" (/125 sec.) de la bague des vitesses d'obturation (8) et
      l'indication "X" du sabot/flash direct (6) sont indiqu6s en rouge
    pour rappeler qu'ils correspondent d la synchronisation du flash
     6lectronique (Fig. 33).
  * Ouand des lampes de cat6gorie PF, M ou FM sont employ6es,
    consulter le tableau (Fig. 34) indiquant les valeurs de syn-
     chronisation des vitesses d'obturation.

C. Exposition pour la prise de vues au flash
L'exposition est d6termin6e par le nombre-guide de lampe de flash ou
sur le flash 6lectronique. Ce nombre-guide est la relation entre la
puissance de l'6clair et la sensibilit6 du film utilis6. Le nombre-guide
des lampes de flash est indiqu6 sur l'emballage des lampes et le
nombre-guide des flashs 6lectroniques sont indiqu6s sur la fiche
technique de ce dernier. Vous pouvez d6terminer l'ouverture ap-
propri6e d l'aide du nombre-guide en rapport aux conditions de prise
de vues au flash tout en utilisant la formule suivante:
View original page 13Page 14 · Read text
Ouverture du diaphragme :
     Nombre-guide -  la distance su.iet-flash
Par exemple: Si votre flash 6lectronique possdde un nombre-guide de
16 (m)ou 52,8 (ft.) pour le type de film employ6 et que votre sujet se
trouve d 2 mdtres (6,6 ft.) du flash comme l'indique l'6chelle des dis-
tances (22), aprds avoir bien entendu  fait la mise au point, diviser 16
(52,8) par 2 (6,6). La r6ponse correspond d 8; r6gler la bague du
diaphragme (24) sur 8 (f/8).

Conseils pour obtenir de meilleurs r6sultats
 *  Si vous employez un flash 6lectronique automatique muni d'un
    contrdle de puissance, s'en tenir aux instructions de la fiche
    technique qui accompagne le flash.
 * La plupart des flashes 6lectroniques possddent une 6chelle ou
   une table de conversion d'exposition qui permet de calculer
    rapidement la valeur de l'ouverture du diaphragme en rapport
    aux distances flash d sujet.

BOUCHON D'OEILLETON DE VISEU R
Ouand une prise de vue est faite par l'interm6diaire du retardateur ou
d l'aide d'un d6clencheur souple et que vous ne regardez pas dans
l'oeilleton du viseur (30) au moment de l'exposition, le bouchon
d'oeilleton de viseur doit 6tre employ6 pour 6viter toute r6flexion
n6faste de lumidre dans le viseur pouvant affecter la pr6cision du
systdme d'exposition automatique.
 I D6placer le levier de bouchon d'oeilleton de viseur (29) dans le
   sens indiqu6 par la fldche (Fig. 34).
View original page 14Page 15 · Read text
www.butkus.us
BLITZLICHTAUFNAHMEN
Sie konnen ein Blitzlicht entweder nachts oder in einem dunklen
Raum, als auch als zus6tzliche Beleuchtung bei Aussenaufnanmen
gebrauchen. Die Kamera und der Elektronenblitz sind bei den Ver-
schlusszeiten,,B",,,X" und von 4 bis 1/125 Sek vollig synchroni'
siert. Da eine korrekte Blitzlichtbelichtung nicht durch die automati-
sche Belichtungsvorrichtung erhalten werden kann, immer die Ver-
schlusszeitenskala  (8) aus der,,AUTO"-Stellung herausnehmen
Das Rf coH-BlitzgerSt XR Speedlite 24O ist ausschieRlich zur
Verwendung mit der RICOH XR-2s vorgesehen'

Verwendung des RICOH-blitzgerdtes XR Speedlite 24O
  1. Bringen Sie das Blitzgerdt XR Speedlite 24O an der XR-2s an'
 2. Schalten Sie den Ein-Aus-Schalter am Blitzgerdt' ein'
 3. Bei voller Aufladung des BlitzgerStes leuchtet die Blitz-
     Leuchtdiode (31) am Rahmen des Sucherokulars  rot auf, um an-
     zuzeigen, daB es betriebsbereit  ist.
  4. Bei Einstellung der VerschluBzeit an der Kamera auf "A" (Auto-
     matik). ist sie automatisch bei 1/90 sek. synchronisiert. Dies er-
     spart die Mrlhe, die richtige VerschluBzeit selbst einzustellen.
  5. Bei ASA-100-Film  sollte die Blende auf 5,6 eingestellt werden;
    das Blitzgerdt regelt dann automatisch die Lichtmenge fur rich-
     tige Belichtung.

 Hinweise ftir optimale Ergebnisse
  * Keine andere Blitzgerdtfabrikate verwenden, die einen aus-
     schlieBlich ftir entsprechende Kameras vorgesehenen Spe-
      zialsignalstift aufweisen, weil dadurch eine falsche Belichtung
     verursacht wird, oder sogar eine Beschadigung der schaltung die
     Folge sein kann.
  * Das Blitzgerdt XR Speedlite 240 hat einen
     Synchronisierungsbereich von ,,A" (Automatik) , ',8" ' ,,X" und
    von 4 sek bis 1/125 sek'
View original page 15Page 16 · Read text
IN FALLEN, Wo sIE DAs BLITZGERAT xR sPEEDLITE 24o
 NICHT VERWENDEN SOLLTEN
 A. Elektronenbtitz ohne Kabel
 wenn lhr Elektronenblitz  mit Blitzkontakt im Aufsteckschuh ausgerri-
 stet ist, diesen direkt auf den Aufsteckschuh (6) am Dachkantprisma
 stecken.
 B. Blitzlichtgerete mit AnschluRkabel
 lst lhr Blitzlichtgerdt nicht mit einem Blitzkontakt im Aufsteckschuh
 ausgestattet, dieses am Aufsteckschuh  (6) der Kamera anbringen und
 das AnschluBkabel an den ,,X" BlitzanschluB (33) anschlieBen
 Hinweise ftir optimale Ergebnisse
  * Die VerschluBzeit ,,j25" (1/125 sek.) an der VerschluBzeiten_
     skala (8) und das ,,X" am Aufsteckschuh (6) sind mit roter Farbe
     markiert, um auf Synchronisation des Elektronikblitzes  bei dieser
     Einstellung hinzuweisen (Abb. 33).
  * Werden Blitzlampen (Typ pF, M oder MF) benutzt, dann sind die
      in der Tabelle (Abb. 34) angegebenen Synchronisierbereiche  der
     VerschluBzeiten  einzuhalten.

C. Beleuchtung bei Blitzaufnahmen
Die Belichtung kann anhand der auf der Blitzlampe bzw. am Elektro-
 nikblitz angegebenen Leitzahl bestimmt werden. Die Leitzahl stellt
ein VerhSltnis zwischen der Lichtstdrke des Blitzes und der Filmemp-
findlichkeit dar. Die Leitzahlen  frir Blitzlampen sind auf der Verpac-
kung, die fur Elektronenblitz in deren technischen Daten aufgefrihrt.
Mit Hilfe der Leitzahl konnen sie die richtige Blende anhand der
nachfolgenden Formel je nach den Blitzverhdltnissen bestimmen:
   Blende :   Leitzahl ;  Entfernung BlitzlObjekt
wenn lhr Blitzgerdt zum Beispiel eine Leitzahl von 16 frir den ver-
wendeten Filmtyp hat und die Entfernung zum objekt 2 Meter betrdgt
(wie es auf der Entfernungsskara  (22) abgelesen werden kann), dann
View original page 16Page 17 · Read text
www.butkus.us
 kann die richtige Blende durch Teilen der Leitzahl 16 durch die Entfer-
nung 2 mit 8 ermittelt werden; d.h. der Blendenring  (24) ist in diesem
 Fall auf Blende 8 einzustellen.
Hinweise fiir optimale Ergebnisse
  * Wenn Sie einen automatischen Elektronikblitz mit Lichtregelung
     benutzen, die dem Blitzgeriit begegebene Anleitung beachten.
  * Die meisten Elektronenblitze sind mit einer Belichtungstabelle
     ausgestattet, die sofortige Berechnung der Blende in Abhdngig-
     keit von der Entfernung ermoglicht,

SUCHOKU LARABSCH IRM U NG
Wenn mit einem Selbstausloser oder einem Kabelausloser Aufnah-
men gemacht werden, bei denen Sie nicht durch das Suchokular (30)
blicken, sollte die Suchokularabschirmung benutzt werden, um zu ve-
rhindern. dass Streulicht durch das Suchokular eindringt und automa-
tische Belichtungssystem beeinflusst.
 * Bewegen Sie die Suchokular-Abschirmvorrichtung (29) in Pfeil-
   richtung (Abb. 35).

SELBSTAUSLOSER
lhre XR-2s ist mit einem selbstausloser ausgestattet, der das Auslo-
sen um maximal 1O Sekunden verzogert. Dies erlaubt lhnen, sich
selbst zu fotografieren, und ist bei Nahaufnahmen und Mikro_
fotografie sehr vorteilhaft, da bei solchen Aufnahmen die Kamera auf
keinen Fall bewegt werden darf.
  1. Zuerst den Filmtransporthebel (13) betdtigen.
 2. Den Selbstausloserhebel  (17) entgegen dem Uhrzeigersinn  be-
   wegen (Abb. 36). Die Verzogerungszeit  bis zum Ausolosen oes
    Verschlusses hdngt davon ab, wie weit dieser Hebel bewegt
    wuroe.
  Um die maximale Verzogerungszeit zu erhalten, den Hebel bis
   zum Anschlag bewegen.
View original page 17Page 18 · Read text
* Siempre que haga avanzar la palanca de avance de la pelicula
     (13) para la segunda foto, asegfrese de presionar el bot6n de
     mufti-exposici6n l27l firmemente con la otra mano y observe
    que el contador de tomas (15) no avanza, indicando que la foto
    de multi-exposici6n est5 lista oara tomarse.
  * Cuando no necesite sacar fotos con exposici6n m0ltiple,
     aseg6rese de trabar el Bot6n de Exposici6n Mfltiple moviendo  la
     Palanca de Exposici6n M0ltiple (28) hacia la derecha hasta que
     desaparezca el punto rojo.
Acost[mbrese a la t6cnica de multi-exposici6n para obtener fotos
 creativas.

FOTOGRAFIAS CON FLASH
Usted puede usar un flash por noche o en un sitio con poca il-
uminaci6n asi como iluminaci6n suplementaria en la toma fotogrdfica
al aire libre. La c5mara y. el flash electr6nico se sincronizan com-
pletamente con la velocidad del obturador en "B". "X" V 4 seg.-
 1/125 seg. Con la correcta exposici6n de flash puede ser que no se
obtenga con la graduaci6n de exposici6n automdtica. siempre debe
regular el dial de velocidad del obturador (8) de la graduaci6n,,AUTO".
El RICOH XR Speedlite 24O es un aparato destinado a ser usado
exclusivamente con el RICOH XR-2s.

C6mo usar el RICOH XR Speedlite 24O                                                              l
  1. Acople el XR Speedlite 240 con el XR-2s.
 2. Conecte el interruptor del aparato de flash.
 3. Cuando el aparato de flash se pone completamente cargado,  el
   FLASH LED (31)en el cuadro del ocular del visor enciende con
    color rojo, indicando que el flash estS listo para funcionar.
 4. Al ajustar la velocidad del disparador de la c6mara en la posici6n
    "A"  (auto), 6sta es automSticamente sincronizada en 1/90
    segundo. El funcionamiento autom6tico evita la incomodidad de
    ajustar la velocidad correcta para oada toma.
                          -97-
View original page 18Page 19 · Read text
www.butkus.us
  5. Al usar peliculas ASA 10O. ajuste el anillo de abertura de dia-
    fragma en la posici6n 5.6, y el aparato de flash controlard
    autom6ticamente la cantidad de luz para hacer la exposici6n
     correcta.

Sugerencias para obtener mejores resultados
  * No use otras marcas de flash que tengan zapata de de contacto
     exclusivos para sus c5maras, porque pueden causar exposici6n
     incorrecta o mismo dafios en el circuito.
  *  El XR Speedlite 240 tiene una gama de sincronizaci6n de Auto,
    "8", "X", y de 4 segundos a 1/125 segundo.

EN CASO DE NO USR EL XR SPEEDLITE 240

A. Flash sin cable de conexi6n
Si utiliza un flash de contacto central, se puede unir directamente a la
zapata de contacto (6), la cual se encuentra en la parte superior del
cuerpo de la cSmara.
B. Flash con cable de sincronizaci6n
Si su flash no posee contacto de zapata, se puede unir a la zapata de
contacto (6) y enchufar el cord6n de flash en el terminal de flash "X"
(33).

Sugerencias para obtener mejores resultados
 *  El n(mero "125" 11/125 seg.) en el dial de velocidad del ob-
     turador (8) V "X" en la zapata de contacto (6) estdn marcados en
     rojo como una llamada de atenci6n respecto a la sincronizaci6n
     (Fig. 33).
 * En el uso de la bombilla clase PF, M o MF, refi6rase al cuadro
     (Fig. 3 ), la que muestra las gamas de sincronizaci6n de las
    velocidades del obturador.

                          -98-
View original page 19Page 20 · Read text
C, Exposici6n para la fotografia con flash
 La exposici6n se determina seg[n el "n(mero guia" que se encuentra
en el flash. Este nrimero guia, representa la relaci6n existente entre
 el destello del flash y la sensibilidad de la pelicula. En los flash de
bombilla. estos n0meros deber6n buscarse en el paquete de la bom-
 billa, y en los flash electr6nicos, se halla16 en la descripci6n t6cnrca.
Siguiendo esta guia. Ud. Pod16 determinar el diafragma correcto para
una situaci6n dada, mediante la siguiente f6rmula:
  Diafragma :  N0mero de guia :  Distancia del flash al objeto
 a fotografiar
Por ejemplo. si en su flash tiene marcado el nimero 16 m para el tipo
de pelicula que estd usando, y el objeto a fotografiar est6 a 2 metros,
tal como se indica en la escala de distancia (H), despu6s de enfocar.
dividir 16 por 2; el resultado es 8. Por lo tanto, seleccionar  el anillo
de abertura del diafragma en 8 (f/8).
Sugerencias para obtener mejores resultados
  *  Si utiliza un flash electr6nico con control de relaci6n de potencra,
    siga las instrucciones que hay en el paquete del flash.
  * La mayoria de los flash electr6nicos llevan un indicador o una
     tabla de exposiciones,  la cual da una mayor rapidez para encon-
     trar la abertura del diafragma deseada.
PALANCA DE CIERRE DEL OCULAR
Cuando usa el autodisparador o cable disparador donde no puede ver
por el ocular (3O) en el momento de la exposici6n, use la palanca de
cierre del ocular para evitar entrada de luz por el ocular, la que afecta
el sistema de exposici6n autom6tica.
  * Mueva la palanca ciega del ocular (29) en sentido de la flecha
     (Fig.35).
View original page 20Related documents and language editions
RicohPDF
Ricoh XR-2 Gebruiksaanwijzing
User manual
31 pages · DutchRead →
RicohPDF
Ricoh XR-2 Handleiding
User manual
36 pages · DutchRead →
RicohPDF
Ricoh XR-2
User manual
34 pages · EnglishRead →
RicohPDF
Ricoh XR-2s
User manual
24 pages · EnglishRead →
RicohPDF
Ricoh XR-2
User manual
38 pages · FrenchRead →
RicohPDF
Ricoh XR-2
User manual
38 pages · GermanRead →
RicohPDF
Ricoh XR-2
User manual
36 pages · ItalianRead →
RicohPDF
Ricoh XR-2
User manual
35 pages · SpanishRead →
From the M. Butkus archive. Original publisher and archive notices are retained.
Check the model and edition against your equipment.
PDF verified 2026-10-10.