Film cameras
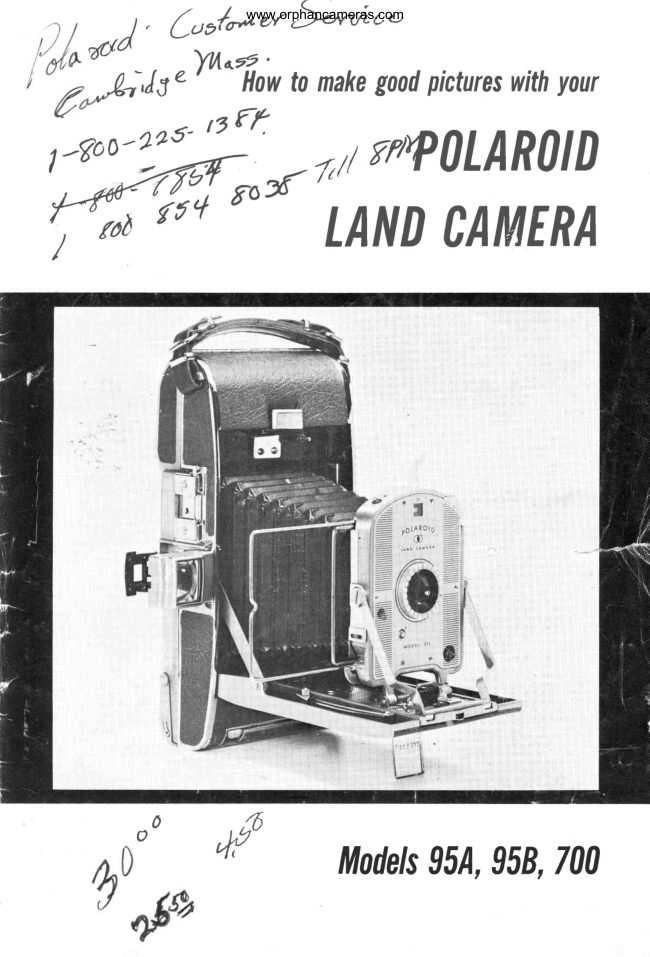
Polaroid Land Camera Model 95A, 95B, 700 User manual
User manual for Polaroid Land Camera Model 95A, 95B, 700. 21 pages in English. Read the original PDF, download or print a copy without registration.
21 pagesEnglish3.0 MB PDF
Loading your manual…Open PDF directly
Document details
- Brand
- Polaroid
- Model / document
- Polaroid Land Camera Model 95A, 95B, 700
- Document type
- User manual
- Language
- English
- Pages
- 21
- File size
- 3.0 MB
- Category
- Film cameras
- Document date
- Not specified in catalog
Search available document text
Find a term, then jump to its page in the original PDF. Image-only pages may not be searchable; check the PDF for exact wording and diagrams.
Page 3 · Read text
www.orphancameras.com

 KNOWYOURCAMERA
  Opening and closing   . . .         3
  The exposure controls.   .         4
  Aiming and focusing.  .          4
  How to hold the camera.  . . . . .    5
  Focusing the 700              6
   Free camera modification         6
  Choosing the film              6
  OPERATIONS
  Loading the fiIm                 7
  H o w t o m a k eu p i " t , r r " .. : . . . . .   1 0
  How to coat prints             L2
  Exposure meters              13
  3000 speedfilm outdoors        13
  Time exposures               13      Rear view shows: (A) film tab in tab slot;                                             (B) cutter bar; (C) back door lock; (D)  Flash pictures                14                                                   film release switch. Model 700 also has  The winkJight                 15                                           rangefinder housing shown below.   Picture troubles               16
  MISCELLANEOUS
  Care of the camera. . . .         20
   Print care.                   20
  Copies and enlargements       20
  Repair stations                20


                                MODEL 700: This camera has an auxiliary
                                                rangefinder  to help you  get correct focus
                                          and sharp  pictures. Use of  this device  is
                                             explained on page 6. Except for the range-
                                                       finder, the camera operates in exactly the
                                     same way as the N{odel 95A.
PI-EASE
  Do yourself a big favor and spend a few     tion.  There  is no  charge  for  this  work
minutes  reading  this  booklet  before you    (paee 6).
take your  first picture.                         Provided that   it has not been damaged,
  Model 95A cameras were manufactured     your  modified  camera  will  be capable  of
from  1954 to  1957: Model  700 cameras   making   excellent  biack-and-white   and
from 1955 to  Ig57: Model 95B cameras   color pictures.
from 1957 to 1960. This booklet has been     Because the Polaroid Land camera is the
specially prepared  for new owners of used    only camera in the world  that develops its
cameras of those rnodels.                 own pictures,  it  is unlike any other camera
  The Model 95A, 95B, and 700 cameras   you have ever owned or used. We urge you
were almost  identical  in construction  and     to read the instructions  carefully,  not be-
with  minor  variations  one set of instruc-    cause the camera  is difficult  to use  -     it
tionswill do for all models. Where necessary,    isn't  -   but because it's different.
special  instructions  have  been  included.     A few minutes now  with  this booklet,
   In the time since your camera was manu-     practicing  the  operation   of. the  camera
factured,   there  have  been  important     before loading  it  ivith  film,  will help you to
changes in  Polaroid  Land  films and  im-    get good pictures on your  first  roll.
provements   in  camera  design  to  assure          If you want more information about any
better  results  with  those  films.  For  best    of the material  in  this  booklet,  or about
results  with  current  films,  certain  modifi-    your  ca:mera, film,  or  other  equipment,
cations should be made in your camera by     rvrite  to Customer  Service. Polaroid  Cor-
an authorized  Polaroid camera repair sta-    poration, Cambridge, Mass. 02139.
2
View original page 3Page 4 · Read text
www.orphancameras.com
KNOWYOURCAMERA
  Get acquainted with the camera without
any film in it. First, try opening and closing
the camera a few times.


How  to open the camera
  Press the front cover latch (arrow) and
the cover will pop open part way. Open the
cover fully so the braces click into  place
and lock  it open rigidly.                                                                                                                                            Digitally signed by
  Grip  the  metal  bracket  directly  under              mike      mikeDN:o=orphancameras,cn=mikebutkus butkus,the shutter housing and  start  to  pull  the                                                                       ou=29,

                                                                                                                                                                                              org,                                                                                                                                                  c=USshutter slide out.                               butkus email=mike@butkus.                                                                                                                                                                                  Date:
   Pull the slide out  all the wzy,  until   it                                                                                10:19:182017.10.31-04'00'
locks firmly  in  place.  If  the  slide  is not
pulled out  all the way and locked, pictures
will be blurred.


How  to close the camera
  Always  set  the  distance  scale  to  the
Infinity  mark  (as shown) before closing the
front cover.  If  it's not set to  Infinity  you
may not be able to close the front cover,
and  if you do get  it closed it may jam so
that you can't open it.
   Also, be sure that  the  front  viewfinder
is pushed down before closing the camera.
  Squeeze the  slide release (black  piece)
and push the shutter  slide all the way back
into the camera body.
  To close the front cover, hold the camera
as shown, press the side braces with  both
thumbs  to unlock them and then push the
front cover closed.
View original page 4Page 5 · Read text
www.orphancameras.com
The exposure controls
  Turn the wheel (A) on the shutter
housing; note that  the numbers in  the
window (B) change.
  On the Model 95A and 700 these are
called the exposure numbers and they run
from 1 to 8. On the Model 958 they are
called EV numbers and run from 10 to 17.
Except that they are nine numbers higher,
the EV numbers on the Model 95B have
exactly the same function as the exposure
numbers on the 95A and 700.
  Number 8 (EV 17) sets the smallestlens
opening and fastest shutter speed, for use
in brightest sunlight. Turn to ft7 (EV 16)
and you give twice as much exposureas at
#8 (EV 17); turn to ff6 (EV 15) and you
double the exposureagain, and so on. At
#L (EV 10), which is for dimmest light,
you are giving l28X as much exposure as
you did at #8 (EV 17).
  When you turn from a lower number to
the next higher number you cut the expo-
sure in half each time  ff7 gives half the
exposure of. fr6, for example, and EV 16
gives half the exposureof EV 15).
  Use high numbers (6, 7, 8 or 15, 16, L7)
for subjects in bright light; use low num-
bers for subjects in dim light. On page 10
we'll explain how you pick the right expo-
sure number or EV number.
  For  all pictures except time exposures
the I/B  switch (D) must be set to  "I"
(Instantaneous, or  snapshot). How  to
make a  time  exposure is explained on
page 13.


Aiming and focusing
   Flip up the rear finder. This is only half
of the viewing system; you also need the
front finder.
  The front finder is made up of two wire
frames. Pull  it  out  all the way, by the
outer frame. This will also raise the smaller.
inner wire frame.
  Look through the rear finder; you should
see the complete outer frame of the front
finder. This finder setting is accurate for
distant scenicsand other subjects as close
as about 8 ft. However, for subjects closer
than  8  ft.  the  front  finder should be
reset (paee5).
View original page 5
Page 6 · Read text
www.orphancameras.com
    Subjects closer than 8  ft. may be partly
  cut off in the picture unless you adjust  the
  front  finder.
   On the back of the shutter housing you
  will find the markings 4, 8, INF. Push in on
  the inner wire frame  until  the end of the
 wire frame  (arrow)  is at  the  desired  dis-
 tance mark  (4 ft. here).
   The  camera  actually  records  slightly
 more of the scene than you see in the view-
 finder to allow for small errors in centering
 and focusing.


   Estimate  the distance  carefully. Then
 press down the lever and slide it along the
 distance scale until  the notch  is opposite
 the estimated  footage  (4  f.t. here).   For
 very  accurate  settings, measure distance
 from  the subject  to the  front  of the lens.


How  to hold the camera
  Pass your   left  hand  underneath  the
 carrying strap and get a firm  grip on the
eamera body. Grasp the front  of the cam-
era with your right hand, leaving the index
finger  free  to  press the  shutter  release.
Your hold  will be steadier  if you can rest
the  calnera on your  right  shoulder and
against your nose. Get your eye close to the
viewfinder but don't press on  it.
   Gently squeeze the shutter release lever
until you hear a distinct  click. Don't poke
it or jab at  it.


  For vertical pictures the grip is the same
as for horizontals.  In  fact,  it's easiest to
first hold the camera correctly horizontally
and then just shift to the vertical position.
View original page 6Page 7 · Read text
www.orphancameras.com
Focusingthe 700
  The rangefinder on the Model  700 tells
you the distance in feet from the camera to
the subject  -     it does not  set the camera
for that  distance.
  To learn how the rangefinder works, do
the  following:   First,  set the  rangefinder
wheel to the Infinity  mark  (".  ). Now look
through  the  little  window   -  you  will see
a bright spot in the center. Aim  the bright
spot  at  a nearbY  subject  (a lamP,  for
example, 4-5 f.t. away).
  You should see two images of the lamp
in  the bright  spot. Turn  the wheel  until
the images come together  to make one im-
age; the rangefinder now  is focused. Look
at  the footage markings  to  get the  right
distance and set the distance scale.


FREECAMERAMODIFIGATI()N        Out of focus              ln focus
  Open the back of your eamera (as shown
on page 7) and compare  it with  the photo.
 If  your  camera does not have the guide
 rails  (arrows)   it should be modified  with-
 out delay. There  is no charge.
   Pack your camera carefully and ship  it
 insured to the nearest authorized  Polaroid
 camera repair station (page 20) or ask your
 dealer to handle the shiPPing.
   Enclose a note stating:  "Install  tracking
 guides." Re sure to include your name and
 address, clearly printed  or typed. Also ask
 for an estimate  of the cost of any repairs
 that the repair station may find necessary.

CHOOSINGA FILM
   For  most  black-and-white   snapshots
 you'll  get best results with  Type 42 (200
 speed) film. Use  it  for both  daylight  and
 flash pictures. For information  about using
 3000 speed fllm, see page 13.
   Your  camera can make  excellent  color
 pictures.  Ask  your  dealer  for  the  free
 booklet about making  color pictures  with
 roll  fllm  cameras,  or  write  to  Customer
 Service, Polaroid Corporation, Cambridge,
 Mass. 02139 for the booklet.
 (r
View original page 7Page 8 · Read text
www.orphancameras.com
LOADINGTHEFILM
 We suggest that you start with a roll of Type
421200 speed) film.
  Hold the camera as shown and swing the
back latch  lever as far as  it  will  go. The
back will open slightly.  Don't  open  it  all
the way yet;  first lay the camera on a clean,
flat surface, front  dowtr.


  Open the outer back and lay  it flat. Then
open the inner back panel.  If  there  is a
spool  in  the  negative  film  chamber  (A)
remove  it. The larger chamber  (B)  is for
the positive print  roll.
  Examine  the  steel  rollers  (C)  carefully.
They are the heart of the cleveloping -""h-
anism. The negative and positive materials
pass between these rollers, which squeeze
the developer pods and distribute  the de-
veloper chemicals evenly between the nega-
tive and positive sheets.
   It's important to keep these rollers clean.
Use a damp cloth to remove any specks or
deposits that may appear on the rollers as
the camera is used. Inspect the rollers each
time vou load a film.


  To open the  foil bag, hold  it as shown,
tear the top  right  corner open (there's a
thumb  grip mark there) and pull down to
rip the bag open.
   Don't  grab the film around the middle
when trying  to open the foil bag. You may
crush one or more developer pods and ruin
some of your pictures.
View original page 8
Page 9 · Read text
www.orphancameras.com
Loading (cont.)

  The two rolls that make ob tft" film are
wrapped in a paper leader. Open the seal
that holds the leader closed, unwrap the
leader, and hold the large white positive
roll and the smaller negative roll as shown.
Be careful not to break the clear tape seals
(arrows)on the two rolls. If you do, you're
likely to have seriouspicture troubles later.
   Insert the two rolls in the chambersnext
to the bellows.If the larger one sticks, push
it  in only by the edges; don't press the
middle of the roll.
  Hold the leader straight up (but don't
pull hard) and clos.ethe inner back panel.
The steel roller should be about rAin. from
the small holes in the leader.


  Lay  the paper  leader  flat  betrveen the
metal guides (arrows) on the inner back.
Check that the white paper is smooth and
flat  (A).  If there  is a deep crease at  (A)  it
means  that  part  of  the  leader has been
tucked into the positive  roll chamber; open
the inner back again and carefully   lift  the
leader straight up to remove the crease in
the leader.


  Close the outer back; be sure that the
leader stays between the metal guides.                                         1fu


  Raise the camera and hold it as shown.
Swing the back latch lever as far to the left
as it will go, squeezethe back cover tightly
shut, and then swing the lever back all the
way to the right. Check both sides of the
outer back to be sure that they are fully
closedand locked.
8
View original page 9
Page 10 · Read text
www.orphancameras.com


  IMPORTANT:    Hold   the  camera  as
shown,   left  hand  under  the  strap  and
gripping  the  top  of  the camera  securely,
but  flexibly enough to  let  it  line up with
the direction  of your  pull when you  start
to pull the leader out  of the camera. Keep
your thumb   off the film  release switch.
    If you hold the camera in any other way,
you are apt to pull the leader out at an angle
and damage the film.


   Pull  the  leader  straight  out   of  the
camera until   it stops firmly.  I)on't  be sur-
prised  if you seem to be pulling out a lot of
paper on this  first  pull. You must  pull out
the entire leader (about 15 in.) before the
film stops, but   it  will stop automatically.
Raise the cutter  bar; you should see the
word STOI'  (bottom photo).  If not, keep
pulling  until you see it.
  Don't touch the film release switch while
pulling the leader. If you do, the film won't
stop automatically and you'll waste a con-
siderable part of the roll.
  Now change your  grip on the camera.
You can press the strap end against your
body as you  hold  the  cutter  bar  tightly
closed with  the  left thumb  and  tear  the
leader off with your  right hand. trlease dis-
card the waste paper carefully  -   d6n'[  [s
a litterbug.
  The most recently manufactured  Model
958 cameras have a locking  cutter  bar;
once it's snapped into  place you needn't
hold  it down. To unlock the cutter bar.  lift
the plastic strip.

  Tearing  off the leader against the cutter
bar leaves a small white tab, which you will
pull  later  to  develop  your   first  picture.
Never tear ofr the leader with the cutter bar
open. If you do, there'll be no tab for you to
pull to develop your  first picture.
  The camera  is now ready  for  the  first
picture. You can always  tell what number
picture  is ready by  lifting  the  cutter  bar
and looking at the tab.
View original page 10Page 12 · Read text
www.orphancameras.com
         Get ready to pull: Turn so as to shield the
       camera from  direct  sunlight.  Hold  the
       camera as shown,left  hand under the strap
      and gripping the top of the camera securely,
       but flexibly enough to let  it line up with the
        direction  of your  pull when you  start  to
        pull the tab.
         With  your  right hand,  Iift the cutter bar
      and get a tight  hold on the tab with  your
      thumb and several fingers.
                If you hold the camera in any other way,
      you are apt to  pull the tab out at an angle
      and damage the film.


          Pull  the tab to start development: Keep
      your  finger away  from  the  film  release
      switch  . Pull  the tab  straight  out  with  a
       single smooth, decisive motion.  This starts
      development, so begin timing  as soon as
      you pull the tab.
          Pull  it about as hard and rapidly as you
      might  to  pull down a window shade; not
      hard enough to pull the shade off the roll
        (or the film  off the spool) but not slowly
      and  hesitantly  either. The  film  will  stop
       automatically.
               If  the tab  will  not  pull  easily, flip the
       film release switch again (and don't touch
            it afterwards).
              If  it's  still balky, the film may be stick-
       ing to the inside of the back door. Open
     and close the door and pull again.
        Wait the recommended development time:
      While  waiting,  hold down  the  cutter  bar
     and tear off the excess paper.  (If you have
      a Model 95B with locking cutter bar you
     need not hold  it down; once pressed down
           it  locks  in  position.)  Please discard the
      paper carefully -   don't be a litterhug.rI

       Check the film  instruction  sheet for exact
      development time: This time varies for  dif-
       ferent types of film, and even the develop-
     ment time for a particular  film may change.
      Temperature  also affects developing times,
      so be sure to get the correct development
      recommenddtions.


       Open the door: When the development
       time is up, slide the latch  of the back door
      and open the door.

                                                                                                                                                                                                        l l
View original page 12Page 13 · Read text
www.orphancameras.com
   Removethe print: Get your fingernail un=
 der the triangular cutout and lift the print
 out carefully. Notice that  it's  lifted out
 straight, not at an angle.
   Don't let the print fall back on the damp
 negative.
   Separatethe print by tearing the precut
 edge that holds it to the rest of the roll.
 Close and lock the back door.


  Straighten black-and-white prints: Re-
move the curl by drawing the print face up
over a straight edge, as shown. DON'T do
this with color prints;  if you do you will
crack and damage the surface.


  Coatblack-and-whiteprints: Lay the print
face up on a clean, smooth, disposablesur-
face, such as a piece of paper. Apply the
Print Coater along the entire length of the
print, including edges, borders, and cor-
ners, with 6 or 8 overlapping strokes. For
the last two or three pictures in each roll,
pressthe coater hard against the tab end of
the print  (not right on the image) for a
moment to releaseextra liquid, then spread
the liquid smoothly acrossthe print.
    If a clean, flat coating surface is not
available, flatten the film box and store the
prints in  it until you get to a more con-
venient location.
DON'T coat color prinls
T2
View original page 13Page 14 · Read text
www.orphancameras.com
EXPOSUREMETERS
  The photo at right  identifies the different
models of Polaroid  photoelectric  exposure
meters that have been marketed  over the
years. Only  (1), the #625, is available new
and this  is the one to buy   if you need a
meter. The others are discontinued models
but they may turn up in used camera kits.
They arc: (2) #620; (3) PR-23A or PR-23B;
(4) PR-23;  (5)  PR-22.  For  information
about any  of these meters  write  to Cus-
tomer Service, Polaroid Corporation, Cam-
bridge, Mass. 02139.
  No  matter  which  of  the above meters
you have, keep in mind  that   it measures
the brightness  of the  iight  reflected from
the subject. Therefore, when taking a read-
ing be sure to bring the meter close enough
to the most important  part of your subject
so that the meter's electric eye "sees" only
the subject and not the background. How-
ever,  don't  come so  close as  to  cast a
shadow on the subject.


3(l(l(lSPEEDFILMOUTDOORS
  Type 47 (3000speed)film can't be used
in your camera in daylight without special                                                                   -!3
accessories.You needthe 45 Light Reducer,                                                                                                                                       fiwhich fits over the lens; then you use the
same exposures as  for  Type  42  film.                                                                                            lT
Cameras that do not have an "L"  before
the serial number (on the folding foot un-                                      t3
der the front cover of the camera) must be                                           {3e"fitted with light seals.To get these and the
43 Light Reducer, see your Polaroid Land
camera dealeror write to Customer Service,
Polaroid Corporation, Cambridge, Mass.
02139.

HOWTOMAKEA TIMEEXPOSURE
  Set the  I/B  srvitch to  "8"  and the
shutter  will  stay open as long as the
shutter release is held down. The  I/B
switch automatically returns to  "I"  after
each exposure.Place the camera on a firm
 support. For best results, screw a cable re-
 ieaseinto socket (A). Exposures must be
 arrived at by trial and error. If the picture
 comesout too dark, increasethe exposure
 time; if too light, decreaseit.
                                                   13
View original page 14Page 15 · Read text
www.orphancameras.com
 FLASHPICTURES
   Your  camera  has  synchronization    for
 flashbulbs at all exposure numbers  (or EV
 numbers)  and  for  electronic  flash  at  #4
 through #8 (EV 13 through EV  17).
   The flashgun wire  connection  is on the
 front  of  the  sliutter  housing.  Guide  the
 wire  under  the  bellows and around  the
 shutter so it can't block the Iens.
   The electronic flash connection  is on top
 of the shutter  housing. A special adapter
 cord  (Polaroid  #490)  is needed.  This  is
 shown at f.ar right.
      If a used flashgun came with  your cam-
 era be sure   it  has  fresh  batteries.  The
 Polaroid BC  flashgun  rt202 is the  correct
 one  for  your  camera.  (There  were  also
 similar guns, but gray to match the IVIodel
 700 camera, designated ff240.) It  is shown
 with  its diffuser for close work and bounce
 flash bracket  #290. IJse Press 25 or No. 5
 bulbs   for   black-and-white;   Press  258
 (blue) or No. 58 (blue) for color.
   The rt202 flashgun can be used for either
 direct  flash  (far  right)   or  bounce  flash
 (below) with  the gun aimed  at  a white
 ceiling 7-9 ft. high. Bounce flash  is prefer-
 able for  all black-and-white  snapshots in
 average sized rooms with  white  ceilings of
 ordinary height.
  The film instruction  sheet contains com-
 plete, accurate  exposure guides  for  flash
 pictures.  It's most important   to estimate
 correctly  the  distance  in  feet  from  the
camera to the subject, as the flash exposure
guides are based on the camera-to-subject
distance.
     If 5'su1 camera is numbered  1-8, foilow
the exposure recommendations  printed  in
black;   if  it's numbered  10-17 follow  the
exposure reeommendations  in red.
   Direct  flash pictures  with  Typ e 42 fiIm
and Press 25 bulbs will be overexposed  if
the subject  is closer than  6-7  ft., even at
18. To  cut down the  light  the equivalent
of  two   exposure  numbers,   place  the
diffuser over the flash gun shield.
   Don't  try  to make flash pictures  of your
subjects at ordinary distances with Type 47         SHUTTERSETTINGSFORTYPE42 ROLLS
(3000 speed)  film  unless  the  4S  Light              For No. 5 oror PressPres: 2525 FFloshbulbsloshbulbson
Redueer (described on page 13) is over the         Dist. (Feet)         3t/z  4   5   6   8     l 0    l 5 20
Iens. Then use the exposure guide  for 200     DIRECTFLASH        l 6 x    l 6 *  1 7 1 7   l 6  r6   t 5 1 4
speed fllm.                                                              7+   7*     I      I   7  7  6  5
                                                                                                                                                                                                                                 l 3         l 2                                     BOUNCEFLASH <--tf-+           4    3
                                                                                  *Use diffuser over flosh gun.


l4
View original page 15Page 17 · Read text
www.orphancameras.com
PICTURETROUBLES
  We hope that  no single Polaroid Land    you are faced with one or more of these
 camera owner ever encounters all the kinds      difficulties, stop and carefully decide what
 of  picture  taking  and camera  operation    you must  do  to  correct  the  trouble  and
 troubles shown on these pages. However,  if     prevent   it from recurring.


    All black: No light reached the film. I'er-
 haps you made  only  one exposure but
 pulled two tabs in a row. The flash sync
 may be inoperative;  the shutter may be
 broken.  If some faint  details are visible,
 perhaps you used a high exposure number
(EV 16 or EV 17) in dim  light where you
 should have usedEV  10 or EV 11  Check
 all your  picture  taking  steps.    'f'est  the
 shutter,  without  film  if possible.

    All  white: No  image  or  a few barely
 visible details.  If  the picture area has an
 overall cream  tint  with  china white  bor-
 ders, the film developed correctly bpt the
 negative was greatly overexposed or was
 light struck  in some way.
  You may have left the back door open
 while pulling the tab. Or perhaps the cam-
era back was opened after  loading  with
 film.  If there are faint details, perhaps you
used EV 10 or EV  11 in  bright  sunlight
when you should have set EV 16 or EV 17.
   Or, you were using 3000 speed film when
 you thought  the camera was loaded with
 Type 42 (200 speed) film.
   Or, the  I/B  switch may have been at
 "8"  instead of at  "I".

EXPOSURE,ilATURALLIGHT
  Too dark:  IJnderexposed, probably  be-
cause  the  camera  was  set  incorrectly.
Follow  the exposure guide  in the  film  in-
struction  sheet or use an exposure meter.
  To make a lighter  picture  of the same
subject  in  the same lighting  conditions,
turn  the  exposure  control   to  the  next
lower number.


  Too light: Overexposed, probably due to
setting the camera incorrectly.  Follow  the
exposure  guide  in  the   film   instruction
                                                    a +.,ltlsheet. To make  a darker  picture  of  the
same subject  in the same lighting  condi-
tions, turn the exposure control  to the next
higher nurnber.
16
View original page 17Page 18 · Read text
www.orphancameras.com
EXPOSURE,FLASHORWINK-LIGHT
  Too  dark:  Moderately   underexposed.
Either you misjudged  the distance  in feet
from camera to subject, or you set the ex-
posure control  to the wrong number.  Fol-
low the  flash exposure guides in the  film
instruction   sheet,  or  the  wink-light   ex-
posure guide on the back of the wink-light.
Or, use the same exposure setting but come
closer to the subject.

  T o o   l i g h t : M o d e r a t e l y  o v e r e x p o s e d .                "fi?
Either  you misjudged  the distance  in feet      6 .
from camera to subject  or you set the ex-          +gr#'
posure control to the wrong number.  Fol-            ;ffi                  $"low the  flash exposure guides  in  the  film          * + r
instruction sheet or the wink-light  exposure
guide on the back  of the  wink-light.  To
make a darker picture of the same subjectfrom the same distance, turn  the exposure  *;-**ffi
control to the next higher number.

  Burned out: Heavily  overexposed even
though  the exposure control was set to a                               k-'*#              "t"l
high number. You were too close for direct
flash. Or you  tried  to use Type 47 (3000
speed)  film  for  direct  flash.  Follow  the                 ffi__'&direct  flash exposure  guides  in  the  film
instruction  sheet. Use the flash diffuser for
pictures of close subjects. Don't  use 3000
speed film  for direct  flash.
   This can also happen with Type 47 film
and  the  wink-light.   Follorv  the exposure
guide on the back of the wink-light.

FUZZYPICTURES
                                                                                                       ,ly;.-WS                                                                                                                                                                                  ,;    .,                            Most            camera                       or subject:  Movement,                                               likely     Lr&sH#             dii,affi                                                                                                                                                   "*  #
                                                                                                                                                                                                                                                                                               ffi                                                                                                                                                                                                                                                . "ee#  : *d                    when the                                     shutter             dim  light   happen into
moves  slowly,  but  can happen  even  in
bright  sunlight.  Squeeze the  shutter  re-
lease, don't poke at  it.  If your subject  is
moving around rapidly,  wait  for or ask for
less movement  while you shoot.
  Be  particularly   careful when  shooting
wink-light   pictures.  These  are  usually
made at very slow shutter speeds.


  Subject blurred:  If everything  else in the
picture  is sharp and the subject  did not
move, you had the camera set for the wrong
distance.  Estimate  the  distance  in  feet
carefully and set the distance scale. For
most accuracy with close subjects, measure
from the front  of the lens.
View original page 18Page 19 · Read text
-.w.F,..i'i"'1i.."P,
                             www.orphancameras.com
TABPULLINGERRORS
  Marks like these: This  is called mistrack-
ing, and is caused by pulling the tab out at
an angle instead of straight  out of the slot.
With  moderate  mistracking   (top  photo)
you may save some of the remaining  ex-
posures by pulling  the remaining tabs very
straight.  Once  severe  mistracking   gets
started  (right)  the rest of the roll probably
will be ruined.
   Pull the tab only as shown on page 11.
 If your camera doesn't have the  tracking
guide rails shown on page 6, have this free
modiflcation done without  delay.


  Hesitation marks: You  slowed down,
hesitated, or stopped in the middle of the
tab  pull.  Don't  stop or  hesitate while
pulling the tab. Pull  it straight out of the
camera fairly  rapidly, smoothly,  in one
continuous motion,  until  the  film stops
automatically.


  Torn  print  roll: You  pulled  the tab  too
strongly. When  the film reached the stop,
the positive  print  roll was torn  in half and
the print  to be developed was dragged part
way  out  of the  slot. When  this happens,
throw away the rest of the  film, clean the
back of the camera and the rollers. Pull the
tab less violently and follow the tab pulling
instructions on page 11.

  Torn negative: Only  part  of the  print  is
developed  and  developer  chemicals  are
smeared over the rest and inside the cam-
era. The negative  roll was torn  in  half  in
some wzy, either due to an error in loading
or pulling the tab  at an angle.
   Discard  the  rest of the  film.  Clean the
 rollers and the back  of the camera with  a
damp  cloth.  Follow  the  loading  instruc-
 tions  carefully.  Pull  the  tab  straight.    If
 your  camera  doesn't  have  the  tracking
guide rails shown on page 6, have this free
modification done.
1 R
View original page 19Page 20 · Read text
www.orphancameras.com  Film didn't stop: Usually caused by
touching the  film  release switch  while
pulling the tab. Once you have releasedthe
film, keep your fingers away from the film
releaseswitch. If  it happens when you're
not touching the release, the mechanism
may need to be repaired.


   Partial development: If  an  irregularly
shaped section of the picture stays blank,
 it means that the developer pod for that
picture was damaged in some way before
you developed the picture. Perhaps you
broke the pod during  loading. NEVER
squeezethe roll of film. Follow the loading
instructions on page 7.


  Fogged film: Heavy fogging from  the
 long edgesof the print towards the middle
 is probably due to loading the camera in
 bright sunlight, or breaking the negative
 roll seal during loading, allowing the nega-
 tive to partly unroll. Load film out of the
 bright sun; don't break the seal on the
 negative roll.
    If you get a wedgeshapedfog strip at the
 tab end of the print, the back door prob-
 ably was unlatched when you pulled the
 tab. If the door was wide open, the entire
 print will have an even fog.
  Dark stains: Causedby developer chemi-
 cals that stick to the print. To avoid this,
 lift the picture from the back of the cam-
 era quickly; don't  let  it  fall back on the
 negative.
     If you work fast you can get rid of the
 stain. With color, wipe it off immediately
 with a dry tissue; with black-and-white,
 use the coater liberally, discard the coater
 to avoid staining other prints.


            -spots:   Seriesof      Usually two or three sets
 of spots (pinkish in color prints). Caused
 by dried developer or other dirt on the
 steel rollers. Keep the rollers and the back
 of the camera clean.
View original page 20Page 21 · Read text
www.orphancameras.com
 CAREOFTHECAMERA
   Rollers: The two  steel rollers must be         POIAROIDCAMERAREPAIRSTATIOI{S
 kept clean and free of foreign matter,
 which can causeevenly spacedspots along                   PolaroidCALIFOR}IIACorporation(WestDiy,)
 the length of the print. Before loading each                San333Gabriel,WestMissionCaliforniaDrive91776
 roll of film, turn the rollers slowly and re-                  R. M. Cudabac
 move any foreign deposits.Use a moistened                 678ASanFrancisco,HowardStreetCalifornia94105
 cloth; scrape hard accumulations loose               c0L0nAD0
 with a matchstick or piece of card, never                Rocky100MountainE. 20th AvenueCameraReDair
 with  anything  metallic. Don't  use your                    Denver,Colorado80205
 fingernails, either.                                                0tsTntcTStraussPhoto-Technical0F corumBtAService
    Interior: Foreign matter also may collect                   Washington,930 F Street.0.C.il.W.20004
 on the black painted parts of the interior.                  FtontDr
 Clean those parts in the same way as you                  SouthernPhoto-TechnicalService
 clean the rollers.                     .i                                            St.24 SecondPetersburg,Street.FloridaS.  33701
   Lens: Keep both the back and the front              EEORGIA
 clean, and be particularly careful to avoid                   Pola_r-ojd1325LoganCorporationCircle,(SoutheastN.W.     Div.)
 fingerprihts.  First  blow  off loose lint  or                      Atlanta,GeorSia30318
 dust, then breathe lightly on the surface to                   PolaroidrLUlt0rsCorporation(Midwestoiv.)
 moisten  it,  gently wipe with a piece of                  2041MelroseN. JanicePark,lllinoisAvenue60160
 elean absorbent cotton or wadded facial                    International844 WestAdamsCameraStreetCorD. tissue.  Don't scrub it!                                           Chicago,lllinois60607
   Lubrication: Don't  try to oil any part of                     t(El{TUCl(Y
 your camera.                                              Camera445 SouthService,FifthInc.Street
                                                                                       Louisville.Kentucky40202
                                                                                  t0ulstAilA     -Repair                                                                      Murphy'sCamera
                                                                        2320-22TulaneAvenue
                                                         Neworleans,Louisiana70llg
                                                         MASSACHUSETIS
                                                                                   folaroidCorporation(Factory)
                                                                   640 MemorialDrive
PRINTCARE                                                    tlxl{EsoTACambridge,Massachusetts02139
                                                                      NorthwestCameraRepairCo.
  The Print Coater leaves a hard plastic                   209Minneapolis,LqebArcadeMinnesota55402
coating on your  print.   If  you bend or                   mtss0ulrl
creasecoated pictures, or write on the back                NewtonPhotographicJ. oraperEquip.Services
                                                                                     S. Brentwood                                                                                                 Blvd.of the print, you can crack this coating,                 2915                                                                                      (Brentwood),                                                                                             St. Louiswhich can                                                                                    Missouri631114         'W.rite           lead to discoloration along the                 IIEW'ERSEY
cracks.       only on the tab or on the               MackCameraService
back along the edges.                                                Union,1025CommerceNew JerseyAvenur07083
  As with any photograph it is wise not to                  iEw Yonx
use paste or rubber cement to mount your               Mack78 EastCameral3thServiceStreetof N.Y.
pictures.  Impurities  in many  adhesives               New York.NewYork 10003
may causethe pictures to discolor.Polaroid                       oilt0PolaroidCorporation(No.CentralDiv.)
Land  prints may be stored safely in a                    Cleveland,4640 Manufacturing0hio 44135Road
Polaroid Picture Alburn,  or  in albums              TEXAS
with separate transparent acetate pages.                  Polaroid8919DiplomacyCorporationRow(SouthwestDiv.)
                                                                                 Dallas,Texas75247
                                                                                           wAslill{GIot
                                                                         Photo-Tronics
                                                                      223 Westlakel{.
                                                                                       Seattle,Washington98109
                                                                 CAl{ADA
                                                                           PolaroidCorporationof Canada,Ltd.
                                                                       24 PlywoodPlace
                                                                            Torontol8
                                                                                                                                                                           Fi
                                                                                                        cllctAltD          1.COPIESANDENIARGEMENTS                    Polaroid (U.K.) Limited

                                                                            0ueensway  Excellent copies and enlargements of                    QueenswayHouse
                                                                                                                                                                       .      Hertfordshireblack-and-white and  color pictures are                            Hattield
                                                                             G€NilANYavailable from Polaroid Copy Service. An                       Polaroid
                                                                                                    30order blank is iyrcludedin the film package.                       HolzhausenstrasseGMBH                                                                                               Frankfurt/ MainIt  gives details of prices, sizes available,
mailing, etc.

Printed in U.S.A.                                 Poloroid@
View original page 21Related documents and language editions
PolaroidPDF
POLAROID 220
User manual
37 pages · EnglishRead →
PolaroidPDF
POLAROID 350
User manual
53 pages · EnglishRead →

PolaroidPDF
Polaroid 108 film information
User manual
5 pages · EnglishRead →
PolaroidPDF
Polaroid 110A
User manual
30 pages · EnglishRead →

PolaroidPDF
Polaroid 125
User manual
23 pages · EnglishRead →

PolaroidPDF
Polaroid 135
User manual
25 pages · EnglishRead →

PolaroidPDF
Polaroid 210
User manual
27 pages · EnglishRead →

PolaroidPDF
Polaroid 215
User manual
25 pages · EnglishRead →

PolaroidPDF
Polaroid 225
User manual
29 pages · EnglishRead →

PolaroidPDF
Polaroid 230
User manual
28 pages · EnglishRead →

PolaroidPDF
Polaroid 240
User manual
27 pages · EnglishRead →
PolaroidPDF
Polaroid 3000 Wink Flash
User manual
13 pages · EnglishRead →
From the M. Butkus archive. Original publisher and archive notices are retained.
Check the model and edition against your equipment.
PDF verified 2026-10-10.