Film cameras
Zeiss Ikon Ikoflex Ib User manual
User manual for Zeiss Ikon Ikoflex Ib. 31 pages in English. Read the original PDF, download or print a copy without registration.
31 pagesEnglish5.4 MB PDF

Loading your manual…Open PDF directly
Document details
- Brand
- Zeiss Ikon
- Model / document
- Zeiss Ikon Ikoflex Ib
- Document type
- User manual
- Language
- English
- Pages
- 31
- File size
- 5.4 MB
- Category
- Film cameras
- Document date
- Not specified in catalog
Search available document text
Find a term, then jump to its page in the original PDF. Image-only pages may not be searchable; check the PDF for exact wording and diagrams.
Page 5 · Read text
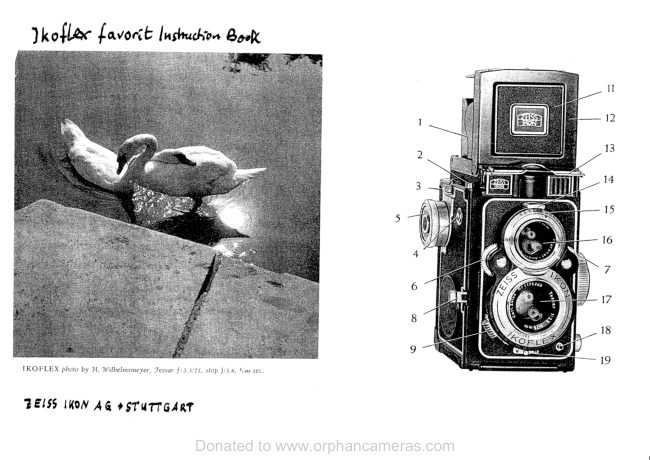
THE INDIVIDUAL COMPONENTS
      OF THE IKOFLEX Ib
           1 Finder hcod
           2 Thread for cable release
           3 Eyelet for carrYing straP
          4 Automatic frame counter
           5 Film wind knob with film type indicator
          6 Notched wheel for setting the frame coLlnter
          7 Shutter tensioning lever
          8 Diaphragm window
          9 Contact socket for flash
            10 Body shutter release
           11 Synchro-lever  for flash synchronisation
            12 Focusing magni{ier
           13 Centrallront panel of the ftnder hood
           14 Frarne of the front panel of the finder hood
           15 Finder lens
           16 Shutter speed window
           17 Diaphragm setting lever
            18 Taking lens
           19 Shutter speed setting ring
          20 Upper fflm spool holder
           21 Depth-of-fteld scale
           22 Foiusing knob with distance scale
           23 Lower film spool holder
           24 Lock bolt foi camera back
           25 Lock pin for ffnder hood
           26 Film window
           27 Tripod bush
           28 Eyepiece at the back of frame ftnder.


L
View original page 5Page 6 · Read text
The   IKOFLEX Ib
          manufactured by ZEISS IKON AG. STUTTGART  is a twin_
           lens reflex camera taking 12 2r/+,,x2rlE, exposures on
           standard roll ftlm, in black and white or colour. Its view_
           ing lens projects an unusually sharp and brilliant irnage
           of the subject matter on a light-collecting ground_glass
 I           screen. Since the viewing and taking lenses, which have
           equal focal lengths ahd speeds, are coupled, the IKoFLEXl
          can be quickly adjusted with only one hand. This permits
          rapid operation, convenient composition and the most
          accurate focusing. Both the taking and the viewing lens
         have been given an anti-reflection layer to prevent re_
            flections within the lens mount. Since the taking lens is
           excellently colour-corrected, it ensures .olou, photo_
          graphs as well as black and white work of .rn-ut.h.d
            deftnition. Vith the aid of the dependable ground_glass
          focusing mechanism, the efffciency of the high_Jpeed
           lens of the TKoFLEX can be exploited to the full. The
        IKOFLEX Ib has a fully synchronised shutter and an
          automatic ftlm-transport lock which prevents double ex_
          posures and blanks
            lseforc rttscrtutgl tbe frst film ifto your TKIFLEX rb, fl:c
          manipulations described in tbis insrructiort book slttotild
        be practised carelully. lf you take this trouble, you will
        be rewarded by makinQ Qood pictures frorn ibe oery
          beginning and tbe IKoFLEX  utill be a constant source
               ot' pleasure Io you,


                               www.butkus.us
View original page 6Page 7 · Read text
OPENING AND CLOSING THE
       FINDER HOOD OF THE IKOFLEX

          To open the ffnder hood, depress the locking pin (25);
             the linder hood will then open automatically. For pin-
               point focusing, swing up the focusing magniffer which is
                  fttted inside the front of the ftnder hood. To close the
              hood, ftrst fold back the magniffer, and then the front.
                In this way the ffnder hood folds up by itself.

       FOCUSING

           The special feature of the IKoFLEX is its reflex viewing
              system. The viewing lens, which has exactly the same
                properties as the taking lens, produces an image of equal
                size and sharpness as that thrown upon the film. The
              "viewing image" is projected by a mirror reflex system
   dl          on to a ground-glass screen, where it can be examined
  $             for correct focusing and pictorial effect at leisure.
            The extraordinarily bright ground-glass screen image of
              the IKoFLEX gives a surprisingly clear pre-view of thec
View original page 7Page 8 · Read text
ftnal picture. The taking lens and the viewing lens are
 coupled in suclr a way that they are focused simultane-
 ously. As the ground-glass screen image conveys a good
 idea of the pictorial effect of the scene before you, the
IKoFLEx allows you to assess the merits of the subject
matter. The high brilliance of the ftnder system illumi-
nates the ground-glass screen image evenly, right up to
the very corners.
For focusing, turn the focusing knob (22); rotating  it
through  1 30o covers all distance settings from 3 ft. to
inftnity. The ground-glass screen shows clearly when the
subject is correctly focused. Thanks to these features,


                       www.butkus.us
View original page 8Page 9 · Read text
the IKOI;l-I:X rrralies it easy to li.cl thc critical poirrt of
slrarpness. Evcn if tlre cliaphragrr of the taking lcrrs is
stoppecl clou,r'r, the irrrage clepictecl b-i' the vierving lens
u'ill alrval's retain its brightness. The clepth of llelcl of
the stoppecl-clou'n taking lerrs can casilv be reacl off the
depth-of-lield scale (2I).
To facilitate pirr-proirrt focusi'g, the r'ag'ilier (12) srro.lcl
be srvurrg into position llv a slight pressure against the
ccrrtral panel of the ljrrcler hoocl front (13). 11,1l.,r usirrg
tlrc- fo.usirrg rragri{ier', thc e'c rrrust be brought as close
as possible, ancl clirectlt' .l.rove the ccrrtrc of the rrrag-
rrilier. To a'oicl corr'ergirg lirres arcl othcr clistortiorrs,
tlre grouncl-glass screcn is cliviclccl into squares.
View original page 9Page 10 · Read text
TF{fi I)t:PTII OIr- Irl Et-D SC,,\l_E
The depth-of-lield scale (21) is beside the focusing
knob (22). The divisions on the depth-of-ffeld scale in-
dicate the zone of sharp deftnition for each individual
stop (aperture); the ftgures on the graduation indicate
the diaphragm settings. The zone of sharp deftnition for
any given diaphragm setting can be read off the distance
scale by lneans of the diaphragm figures to the right and
left of the distance setting mark. If, for instance, the
distance is set to 16 ft., the depth-of-fteld scale will then
indicate that anything between 5 ft. in the foreground
and 50 ft. in the background will be sharply deftned at
a stop of f ,11. Set to f :16, the zone of sharp deftnition
would cover anything between 8 ft. and o (inftnity). The
large stop f :3.5, however, would only de{ine sharply the
zone between approx. 13 ft. and 20 ft. In this way correct
information concerning the depth-of-fteld range is made
readily available.
For exact depth-
of-field values, see
table on page 1 1.


                      www.butkus.us
View original page 10Page 11 · Read text
l)i\l'illi     \(,\l    :l   I ll\(,

l-cvcr 17 is rrsecl to sct thc clial'rhraeirr to thc cclrrect lerts
aperture (cliaphragnr opcrtirtg), rvhich catr l're veriliecl bi'
lool<ing into the littlc u'inclorv (tt). The largcr the clia-
phragrrr setting ligurc, the snraller is the'lens ape'rturc,
resulting in longer exposure tinrcs but also in a largcr
clepth-of-tielcl zorre. "Stopping clorvn" (rnaking tl're lens
apcrture suraller)  u'ill furtlrer crtcncl the zone of sharp
clelinition.  I lon'evcr, r'ou shoulcl avoicl stopping clou'n to
srrch an e\tent that ove'r-lclng cxposurc tiurcs u'hich can
no lorrger be safel-r'tttaclc rvith a harrcl-hclcl canrcra
becorne nccessAr\'. As thc grouncl-glass screen of the
iur:rgc of the  I I( O  I: L E X 1-.ernrits constantl,\r corrtrollecl
sharp focusing,  it is aclvisable to use sltorter cxposure
tirrres *'itlr larger lens apcrturcs.
View original page 11
Page 13 · Read text
E X POSU RE

The following table contains the various exposure times
and their relation to the lens apertures, covering all the
picture, taking occasions most frequently encountered.
The values contained in the table are based on black and
white film of 40 ASA :27o BSI :  18/10o DIN, used in
sunshine.

                               F: 1/        3.5             ).b
              inside room near window        1/roo    tlao   Tlzs   lln
                                                                                                                                                                            1 | zs                                                                                                                             1l so  Figures under trees                              l/zoo   1/roo
             outdoors                                  1/soo    llzoo  1/roo  llso
                                                                       tl;                                                                  t/soo  llr*                 dark                      foreground             with  Land-                                                            'lt*     1/roo                                                   1/soo   llzoo                        foreground  scapes             with                   bright      _
                                                                                       rlso                                                                 1/soo      r/soo                                             rlno                      (dark)   Jtreets.    narrow                                                                                             1/roo                                                                          1/goo                                                                                                                                                                                                                           | | zoo             squares                   and opeir places
1. The table is valid in medium northern latitudes for the months
  Mav to Aueust and between 9a.m. and 3 p.m. The exposure
   times must 6e doubled for Seotember. Octobei, March and April.
   For November to Fcbruary, t6ey shodld be 4 times longer and are
   only valid for the hours between 10 a. m. and 2 p.m.
2. In addition to the above-mentioned  times, it is necessary to double   the exoosure times when usine 25 ASA:25o BSI : 15/10' DIN
    film arid to halve them with a.-100 ASA:31o BSI:21110' DIN.
3. Exposure times given for f:8 must be doubled for f:11 and
    multiplied by four whcn using f :16.
4. Vith a slightly ovcrcast sky, all exposure times given should be
   doubled, whilc a heavilv overcast skv needs cxDosure timcs four
    times as long.
In all light conditions/ even the most difffcult, the IKo-
PHOT photo-electric exposure meter made by ZEISS
IKoN will always give dependable exposure time values,
most important when taking colour photographs.
View original page 13Page 14 · Read text
THE StfLt-t--l-trtt
 The IKoFLEX rb is equipped with a fully synchronised
 Prontor sVS shutter with self-tirner. The-shutter speeds
 r_ange fron l/soo sec. to 1 seconcl and are set by rn.on, of
 the-settin-g ring (8). Furthermore, other .*poru.., of any
 period of time are also possible. For veriftcation, th'e
 shutter speed setting can be seen in the window (f 6). fne
 figures..appearing  here are fractions of seconcls; for ins_
tance "5" nreans  1/.; sec., " 100,, r.neans r/roo sec. and so
 forth.
The shutter should be set to ',8,, in all cases where the
required exposure time exceeds 1 second, with the ,"rult
that the shutter remains open as long as the release but_
ton is depressed. For time .*po.ur., you are strongly
recommended to work with a iable release to eliminate
the danger of camera shake. Moreover, the use     t.ip"Jor  ,any other ftrm support is strongly aclvised"f "  w'hen
mak_ing        time             exposures.                  The                                 built-i.                                        seii-tim., .onnot bl                                               ,,B,,.used when           the                shutter is                           set to

          th


                     www.butkus.us
View original page 14Page 15 · Read text
l)r'essul-(] agailtst
 " ll"    r'clcase s    it.
The plrrrrurr catelr
tt)ecltllrisi)l  allorr's
t irtt c c r ltosrr rcs of
;ln,\'  rltrr;rl iorr  lo
be rrraclc rvithorrt
keeping thc lingcr'
colrstalltl,\' ()rr tltr.
plrr rrgcr.
View original page 15
Page 16 · Read text
Itl-l) I)()-[ St.-f-l'l \(;

 hr orcler to exploit the largc clepth of field of stopped-
clown taking lens apertures under good lighting con-
 clitions, the diaphrag.n ancl the focusirrg lever should be
set to the red dots,  i. e., at approximately 25 ft. and
between  f  : 8 and  f :11 . \flith this setting (Red Dot
Setting), everything beyond approx. 13 ft.  will be
rendered sharply rvithout further focusing. Franring and
courposition is done on the ground-glass screer.l and fast
action shots are greatly facilitatecl by using the franre-
type clirect vision ffncler. An expcsure tinre of r/ru,, sec.
is 1'ust right under especially favourable lighting con-
clitions; trse r/.;o sec. if the light is only reasonably goccl.,
but only r/r; sec. if it is becourine poor.


                    www.butkus.us
View original page 16Page 17 · Read text
.l'lll:Il()l  I)lN(;          Iti()lrl.l:X
I)Ll  lt  I N(;  trX t)()SLl ltl-

For taking pictures with a hand-held canrerA, the
IKOI:LEx is best carried around the neck on a strap,
which should be adjusted so that you can look into the
finder hood comfortably and adjust the image at your
leisure. The left forelinger sets the exposure tirne while
the thumb operates the diaphragm setting. Then the
thumb and the forelinger set the distance by ureans of
the distance settirrg knob (22). Vhile the left hand
steadies arrd supports the calltera, the right thurnb cocks
the shutter (7) and brings the release knob (10) into
position.
A gentle and by no nteans abrupt pressLrre on the body
shutter release effects the exposrrre. The release knob
nrust be clepressecl to its full extent. After each exposure
                                      the filnr transport
                               knob (5) nrust be
                                         tunrecl on until it
                                                                       s tops.


                                                               tt \
                                                                                                                                                                                                                                                                                      il
View original page 17Page 18 · Read text
TH I:
                                                               lr IiA,\1 Ir  Ir I N I) E li
                           For taking pictures at eye
                                          level, use the built-in frarne
                                     ftnder in the following way,
                                    the central panel in the front
                                plate of the hood (13)  is
                                     pressed upwards. The front of
I'           the hood and the eye piece at the rear together then form
       a frame ffnder. Correct framing is ensured when the
           edges of the eye piece coincide with the inner edges of
            the frame. Focusing takes place in advance on either the
           ground-glass screen or by nleans of the "Red Dot
            Setting." The direct view ftnder is especially suitable
            for photographs of sports events and fast-action snap-
              shots.


I


                                www.butkus.us
View original page 18Page 19 · Read text
Itl,1l)l\(,       Ilil   (  \\ilrli,\
 \t'hen loaclirrg the carrrcra, lirst r;ralic sure that the {il;l
lccking clevicc is unlockecl. lt  rvill be irr this positiorr
alreaclf if the prececling lilur has becn aclvancecl  bc1'orrcl
thc tu'elfth franre (No. 12 shou,ins in the fraure counter),
as thcn the lllrn rvincl l<nob can be turned inclelinitelv
ri'ithout errcountc'rirrg  f urtl'rcr rcsistancc. lf  foruo',.,"
reason the locl<ing cln'icc is still errgagecl, the filnr rvincl
krrob nrust l'le rvourrcl on urrtil rrurrrber 12 has passecl the
franre counter rvirrclorv. To do tlris, terrsion thc shutter,
release it arrcl u'lrile the relcase krrob rernains clenressecl    .
turn tlre lilnr rvirrcl knob urrtil the nunrber l2 apircars  irr
the frarne counter. As socln as rrurnbcr 12 has passccl thc
frarrrc cor.lnter rr'irrclor.,', thc locliirrg clevicc is autonrati-
callv clisengagecl.
Opcu thc cAnrcra bacli bv pushing thc locl< bolt (24) in
the clirection of thq arro\\'; the lilrn spool pivot (20) of
tlre uppcr spool clrarnbcr is pullecl outs'arcls ancl turnecl
so that it becorrres locl<ecl. Thc curptl' take-u1'r spool  is
                                                    tlrerr insertecl irrto
                             the uppcr spool
                                        eharirbcr so that
                                 thc prong of the
                                                         {ilrn rvincl l<nob (5  )
                                  engages rvith the
                                        slot irr the spool.
View original page 19Page 20 · Read text
Tr.rnr bac-k l<noll (20) arrcl let its ;livct srtap ittto thc hole
of the spool, rvhiclr cAll llow be rotatecl easily by nlearts
of thc filnr rvincl krrob (5). The spool with the tttrerposccl
lilrn is irtsertccl into the lower chattrber (23) irr exactll'
the sartte way, so that the beginning of the backing paper
poirrts torvarcls the upper spool chanrber. Threacl the
bacliing paper into the lorrg slit of the e;lrpty tal<e-r.t;l
spool by pulling it across the filnr rvitrclorv, attcl turtt dre
lilrn rvirrcl l<nob urrtil the paper is properly tightenecl,
arrcl rvincls evenly on to tl're takc-trp spool. Thcn close
thc canrera bac'li arrcl rvincl on the lilnr tttttil ttuittber  1
appcars irr the lilnr n'irrclon, (2(r). The cartterr is ttort
correctly loaclecl arrcl the lilrn is reacl1' fcr the lirst ex-
posrlrc. Close the lilnr rvinclorv, clcpress the rtotclrecl
rvheel ((r) of the franre counter (4) arrcl turrt it in an
anti-cloc'l<u'ise clirectiort urttil it loc-lis. Thc u'irr'-lorv of the
frarnc ccrurter rvill norv also inclicate trit:nbcr 1. Fronr
no\v on. thc nurnbers of the frattte counter arc the ortlv
oncs to l're regarclecl
t-cacling thc c'aincra sltoulcl ttcver be clonc in l'rright sun-
shine; looli for a
shacly spot ancl if
vou cannot  lincl
one, tr.rrrl )'our
bac'li to thc light
arrcl use yor.rr  o\\'l'l
shaclorv.


                    www.butkus.us
View original page 20Page 21 · Read text
I] II-,\1 -W IN I)  I NTH It LOC K
,,\NI) I]RN,\,1 I- COLINTT]It

After every exposure the film is advanced by turning the
fflm wind (5) until it stops. As you need not watch the
frame numbers, the ftlm can be advanced even in the
dark. The number of the frame ready for exposure
appears automatically in the window of the frame
counter (6). As long as the body release is folded into its
rest position, unintentional exposures cannot take place.
For exposure, it must be swung into the operational
position.
The ftlm can be advanced only after an exposure has
been made and the next exposure can be only made after
the ftlm has been wound on to the next frame. Double
exposures or blanks are completely eliminated.
View original page 21
Page 22 · Read text
Ll\l().\l)l\(           llil     (.\\ltli.\

 After the trvelfth exposure, the filnr rvincl interloc-k dis-
 engages itself arrtouratically arrcl the lilrn can now be
 aclvancecl freely. Turn the lllnr rvincl knob urrtil the end
 of thc bacl<ing paper passes the opcnecl  lilrn rvindow (26);
a ferv nrore trrnls rvill rvirrcl the filrn tightly on to the
 take-up spool. Open the back of the tKOI:LEX, seal the
 lilrn rvhile still in the spool c'hanrber and renrove it, after
pulling out the spool pivot (20). Renrove the empty
feeclirg spool ir''rediately  frorrr the lorver spool cfiamber
ancl place it in the upper one. Care nrust be taken to
ensrrre that the prong of the filrn rvind knob (5) engages
the slit in the spool. Tlren the carrrera is reaclr, for a
rterv lllin.


I',,11,'ri
ll\(   )i   I  I  \


    21              www.butkus.us
View original page 22Page 23 · Read text
E


EXPOSURE

 Set the diaphragm and the shutter speed according to
 the exposure table on page 12 or the reading of your
 photo-electric exposure meter. Make sure that the ffln
 wind knob (5) has been wound right up to the stop, cock
 the shutter with the cocking lever (7) and swing the body
 shutter release (10) into working position. Study, com-
 pose and focus the subjects on the ground-glass screen
 in the {inder hood. Compare the vertical and horizontal
 lines of the subject with the lines of the squares on the
ground-glass screen in order to prevent converging lines.
As soon as the screen image appears to be satisfactory
in all respects/ the shutter should be released. During
exposure, hold the camera steadily in both hands, while
the right thumb gently depresses the body release (10)
right down until it stops. Do not move the camera while
releasing the shutter ! Immediately after exposure, turn
the fflm wind knob (5) right to its stop. The next frame
of the fflm is then ready for the following exposure.
The base of the IKOFLEX is equipped with a tripod
bush for attaching  it to the tripod. All exposures requir-
ing exposure times of more than 1/z: sec. should be made
from a tripod. Moreover, the use of a cable release,
which should be screwed into the special thread (2), is
strongly advised.
View original page 23Page 24 · Read text
E-
         I
             I

                        .l'1.\ll-lt            5t'll

           For rraking exposures rvith the self-tinrer, the shutter
            speed should be set and the shutter tensioned. Then set
            the synclrro-lever (11) to the "V" mark. The delayed
             action nrechanisnr starts to operate when the cable re-
              leasc or the body release (10) is depressed. After approx.
            l0seconds the shutter will be automatically  released, dre
            exposure tirne being that set beforehand.
          The use of a self tirner is recommended in all cases where
            the exposure time exceeds 1/ro sec., as it acts as a safe-
           guard against canlera shake. Vhile the delayed action
                rureclranisnr is running off the canlera can be firmly held
            with both hands so that even longer exposure times can
         be nrade successf ully without a tripod, provided the
            photographer does not nrove during exposure.
         The self-tiurer cannot operate rvhen thc shutter is set
           to "B" (tirne ex-
            posures) or  the
              synchro-lever (1 1 )
             points to the "M"
            or "X" mark.


                                www.butkus.us
View original page 24Page 25 · Read text
FLASH PHOTOGRAPHY
\TITH THE IKOFLEX Ib
The fully synchronized shutter of the IKOFLEX can be
used with both flashbulbs and electronic flash. The flash
is ftred by the shutter release and synchronized to operate
at the most effective moment. For taking flash photo-
graphs, slip the plug of the connecting lead into the
contact nipple (9). The fully synchronized shutter not
cnly permits the ftring of flashes at the very moment
when the shutter is wide open ("X" setting) but also
when set to pre-ignition (setting "M").
FLASH PHOTOGRAPHY
\TITHOUT DELAY
Exposures with electronic flash units and with all shutter
speeds available between 1 sec. and l/aoo second can be
nrade only when the synchro-lever (11) is set to "X".
The same applies to flashbulbs and shutter speeds
between 1 sec. and r/z; sec.
Tension and release the shutter as usual for exposures
with the self timer (V setting); the flash will be fired as
soon as the delayed action mechanism has run off and
the shutter is wide open, in the same way as when the
"X" setting is used.
It is one of the remarkable features of the Prontor SVS
shutter that the three settings "V" (for self timer with
irnmediate ignition) "X" ([or immediate ignition) and
"M" (for ignition with delay) can be operated or dis-
engaged selectively, whether the shutter is cocked or not.
View original page 25Related documents and language editions

Zeiss IkonPDF
ZEISS IKON IKOFLEX I
User manual
17 pages · EnglishRead →

Zeiss IkonPDF
Zeiss Ikon IKOFLEX Guide
Reference guide
35 pages · EnglishRead →

Zeiss IkonPDF
Zeiss Ikon Ikoflex
User manual
17 pages · EnglishRead →

Zeiss IkonPDF
Zeiss Ikon Ikoflex IIA
User manual
32 pages · EnglishRead →

Zeiss IkonPDF
Zeiss Ikon Ikoflex III 23 - 24 pgs. missing
User manual
26 pages · EnglishRead →

Zeiss IkonPDF
Zeiss Ikon Ikoflex Ia
User manual
29 pages · EnglishRead →

Zeiss IkonPDF
Zeiss Ikon Ikoflex Ic
User manual
32 pages · EnglishRead →

Zeiss IkonPDF
Zeiss Ikon IKOFLEX 1A
User manual
18 pages · FrenchRead →

Zeiss IkonPDF
Zeiss Ikon Ikoflex 1A numérisation d'une seule page
User manual
26 pages · FrenchRead →

Zeiss IkonPDF
Zeiss Ikon Ikoflex IIa Gebrauchsanleitung
User manual
32 pages · GermanRead →
Zeiss IkonPDF
ZEISS IKON IKOFLEX
User manual
16 pages · Not specifiedRead →
Zeiss IkonPDF
Zeiss Ikon a guide to the IKOFLEX I-a
Reference guide
12 pages · Not specifiedRead →
From the M. Butkus archive. Original publisher and archive notices are retained.
Check the model and edition against your equipment.
PDF verified 2026-10-10.