Film cameras
Zeiss Ikon Ikoflex Ic User manual
User manual for Zeiss Ikon Ikoflex Ic. 32 pages in English. Read the original PDF, download or print a copy without registration.
32 pagesEnglish2.3 MB PDF

Loading your manual…Open PDF directly
Document details
- Brand
- Zeiss Ikon
- Model / document
- Zeiss Ikon Ikoflex Ic
- Document type
- User manual
- Language
- English
- Pages
- 32
- File size
- 2.3 MB
- Category
- Film cameras
- Document date
- Not specified in catalog
Search available document text
Find a term, then jump to its page in the original PDF. Image-only pages may not be searchable; check the PDF for exact wording and diagrams.
Page 3 · Read text
www.orphancameras.com


The    IKOFLEX  Ic
made by ZEISSIKON AG. STuficART  is a twin-lens
 mirror reflex camera with  built-in exposure meter
taking twelve 2r/qX2r/n ins. exposureson 120 roll ftlm
in blacl<and white or colour. The viewing lens projects
an unusually sharp and brilliant image of the-su6ject
on to a -bright ground glass screen. The readings
derived from the exposuremeter can be seen on-a
scale clearly visible at the front of the ground glass                F"
screen. Since both the viewing and taking lenses,                 F;
which have equal focal lengths and speids, are
coupled,the IKoFLEX can be qui&ly adjustedwith
the use of only one hand. This permits rapid opera-
tion and accuratefocusing,allowing the photographer
to concentrate on the composition.Both the taking
and viewing lenseshave an anti-reflection coating to
prevent internal reflections and flares. The taking
lens is excellently colour-corrected,ensuring coloui
photographs as well as blacl<and white pictures of
superb deffnition. The thoroughly reliable ground
glass focusing mechanismallows the quality of the
high-speedlens of the IKOFLEX to be utilised
to the  full.  The IKoFLEX Ic has a  fullv  svn-
chronised shutter and an automatic fflm trinsport
lock to prevent double exposuresand blanks.
BeforeinsertinQtbe first film into your TKIFLEX rc,
tbe operations described in  this instruction book                      Fsbouldbe practisedcarefully.lf you take tbis trouble,
you will be rewardedby good picturesfrom tbe oery
beginningand your rKoFLEx will be a neoer-ending
sourceof pleasureto you,      FF
                                           Ik
View original page 3Page 4 · Read text
www.orphancameras.com


The    IKOFLEX  Ic
made by ZEISSIKON AG. STuTTGARTis a twin-lens
 mirror reflex camera with  built-in exposure meter
taking twelve2r/aX2rlnins. exposureson tZO roll ftlm
in black and white or colour.The viewing lens projects
an unusually sharp and brilliant image of the su6ject
on to a -bright ground glass screen. The readings
derived from the exposuremeter can be seen on1
scale clearly visible at the front of the ground glass
screen. Since both the viewing and taking lenses,
which have equal focal lengths and speeds, are
coupled,the IKoFLEX can be quicJdyadjustedwith
the use of only one hand. This permits rapid opera-
tion and accuratefocusing,allowing the photographer
to concentrate on the composition.Both the taking
and viewing lenseshave an anti-reflection coating to
prevent internal reflections and flares. The taking
lens is excellently colour-corrected,ensuring colour
photographs as well as black and white pictures of
superb deffnition. The thoroughly reliable ground
glass focusing mechanismallows the quality of the
high-speedlens of the IKoFLEx  to be utilised
to the  full.  The IKOFLEX Ic has a  fullv  svn-
chronised shutter and an automatic ftlm trinsport
lock to prevent double exposuresand blanks.
Beforeinsertingtbe first.film into your TK)FLEX rc,
tbe operations described in   tltis instruction book
sbouldbe practisedcarefully,lf you take tbis trouble,
you will be rewardedby good picturesfrom tbe oery
beginningand your TKoFLEXwill be a neoer-endin-g
sourceof pleasureto you.
View original page 4
Page 6 · Read text
www.orphancameras.com


COMPONENTS AND CONTROLS

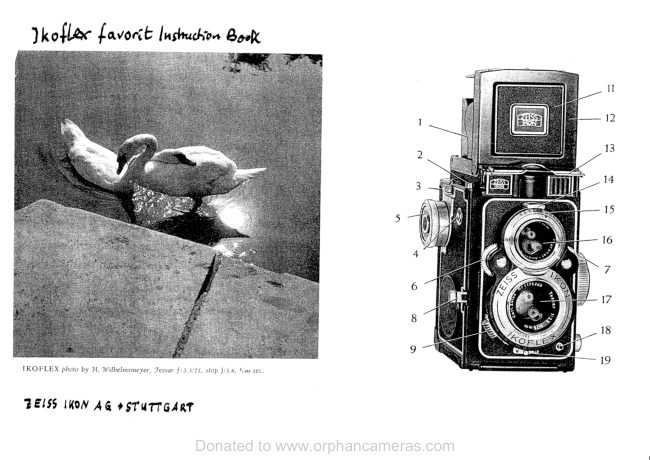
   I Finder hood                                                         ': 2 Thread for cable release                                                         : 3 Eyeletfor carrying strap
 4 Automatic frame counter
 5 Film wind knob with fflm type indicator
 6 Notched wheel for setting the frame counter
 7 Shutter tensioninglever
 8 Diaphragm control window
 9 Flash contact
1 0 Body sl-rutterrelease
1 1 Settinglever for flash synchronisationancl delayed
   action (self-timer)
 l 2 Focusingmagnifter
1 3 Central front panel of ftnder hood
 l 4 Frame of front panel of finder hood
r 5 Cover flap of exposuremeter
t6 Viewing lens
1 7 Shutterspeedcontrol window
1 8 Diaphragm setting lever
l9 Taking lens
20 Shutter speedsettingring
21 Upper fflm spoolholder
22 Depth-of-ffeldscale
23 Focusingknob with distancescale
24 Exposuremeter computerdisk
25 Lower ftlm spool holder
26 Locking catch for cameraback
27 Locking pin for ftnder hood
28 Film window I             seePage2229 r;ilJ'il;h     )
30 Frame ffnder eyepiece
View original page 6
Page 7 · Read text
www.orphancameras.com


OPENING AND CLOSING
THE FINDER HOOD

To openthe ffnder hood,depressthe lockingpin (27); the
hood will then open automatically. For critically sharp
focusing,swing up the focusingmagnifter(12) which is
fftted insidethe front of the ffnder hood (1). To closethe
hood, ffrst fold back the magnifter, and then the front of
the hood itself.ln this way the ffnder hood will fold up flat.


FOCUSI NG

 The specialfeature of the IKoFLEx is its reflex viewing
 system,by which the viewing lens showsan exact replica
 of the subject to be taken. This viewing lens, which has
 the same focal length and speed as the taking lens,
 projects,via an inclined mirror, a brilliant upright image
 on to a ground glass screen. The ftnal picture will be
 depicted sharply on the ftlm when  it appears sharply
 focused on the screen. On account of the high light-
View original page 7
Page 8 · Read text
www.orphancameras.com


 transmission of the viewffnder system, the ground glass
 is evenly illuminated right  into the corners, so that the
 franring  is indicated exactly and the deftnition can be
 judged rvith precision.

 For focusing, turn  the focusing knob  (23); by turning
 through 130o all distance settings from 3 feet to inftnity
 (-)  can be covered. As the focusing knob  is turned, ob-
 jects lying at varying distances from the camera can be
 seen coming into sharp focus one after another. Thanks
 to the ground glass screen focusing system, the I KoFLE x
 makes it easy to find the critical point of sharpness.Even
when the diaphragm of the taking lens is stopped down,


Tocttsirtg tl:e uiew-
firrder itttnlJe by
ttrrtritt! tbc distatrce
scttitrg Ivrol.;
View original page 8
Page 9 · Read text
www.orphancameras.com


the image depictedby the viewing lens will always retain
its full brightness.The depth of fteld of the stopped-down
taking lens can easily be read ofi from the depth-of-fteld
scale(22).
To facilitate really critical focusing, the magnifter (12)
can be swung into position by pressing gently against
the central panel of the ftnder hood front (13). Vhen
using the focusingmagnifter,the eye must be brought as
close as possibleand directly above the centre of the
magnifter. To assist the avoidance of converginglines
and other distortions,the ground glass screenis divided
 into squares.


                                           Vtagnifiertor
                                            pin-pointf oasing
View original page 9Page 10 · Read text
www.orphancameras.com


D E PT H - O F - F I E L D S C A L E

The depth-of-fteld scale (22) surrounds the focusing
knob (23). The divisionson the depth-of-fteldscaleindi-
 cate the zone of sharp deftnitionfor eachindividual dia-
phragm stop (aperture setting); the ftgures representing
 the actual diaphagm settings.The extent of the zone of
sharp deffnition at any given diaphragm setting can be
 read off from the distance scale by means of the dia-
phragm ftguresto the right and left of the distanceset-
 ting mark. If, for instance,the distancesetting mark is
 set to the red dot (seepage 16) and a diaphragm setting
 of  f tS has been chosen,everythingbetween12 and 45
 feet will be recordedsharply. If stop f /16 is used, the
zone of sharp deftnition will extend from 9 feet to @,
whereaswhen the largeststop I/3.5 is used (denotedby
 the strokeson either side of the setting mark), the zone
 will only extend from 18 to 36 feet. In this way the ex-
tent of the depth-of-fteldrange can always be deter-
mined at a glance. For exact depth-of-fteldvalues,see
table on page 13.


 Aulctttttttic
deptb-c,i-lieldscale
View original page 10
Page 12 · Read text
www.orphancameras.com


  lf , at any particular setting, the triangular mark is set
 to any figgre between12 and 16 (whit; ftgure, on 6t"*
 ground), thg gree.nftgur.esalso appearing 6n the seconds
 scalesnoutclnot be used under any circumstances.
  If the can'rerais loadedwith a ftlm rated at 24/t0o DIN (80 ASA). and  if                    exposure meter on th.  fo.*ing                         lh.. screenscaleshows 14, an e-xposurecan only b. -iJe  at  f /16,            s€c..;the green ftgures 30 and 60-*iii.ri  or.         ll:,rg arsovtstDtewlll result in over-exposure.
 Basicrule :
  If        triangular mark A, points to figures between 2    lhg. and.t I (blad<-ftgureson white ground),lti
 on the secondsscalecan be usEd.    "     "itr.r',tt*n
 If the triangular mark A points to ftgures between 12
 and 16 (white ftgures on blbck ground)] the gr..r,
 second ftgures will always risult in'excessive",hoi.over-
 exposureand should not be used.
 For exposureswith ftltersthe ftlter factor, e.g. 2 x (yellow
 ftlter) lhould be set instead of the triarrgularmark A
 againstthe ftgure
 indicated by- the
exposuremeter.


Conrputer disk lor
tbe exposuremeter
View original page 12
Page 13 · Read text
www.orphancameras.com


AP E R T U I { E S E T T I N C

Lever (18) is used for setting the diaphragm to the cor-
rect lens aperture, which can be read off from the little
window (8). The larger the aperture ftgure, the smaller
is the actual diaphragm opening, which necessitateslonger
exposure times but also provides a larger depth-of-fteld
zone. "stopping dorvn" (making the lens aperture smal-
ler)  will  extend the zone of sharp  deftnition  further.
However, you should avoid stopping down  to such an
extent that over-long exposure times become necessary,
for rvhich the canlera can no longer be safely employed
without tripod. Since the focusing screen of the IKOFLEX
perntits continuous focusing control,  it  is better to use
                                      shorter  exposure
                                    times with  larger
                                     lens apertures.


                                                                            I) ialtl ttitr/rrr-rclI irrg/
                                                                                                                                i pdlrtes Crnr  ltc   r ead
                                                         c , I f  f r ( ) n l l / ) c r l i r t r [ r r r r )
View original page 13Page 15 · Read text
www.orphancameras.com


 SH U l ' T E R

The I KoF LEx. r c is equippedwith a fully-sh,ltte,sy'chronised
 Prontor svs  shutter with self-timer.The          ,p...1,
range from l/soosec. to  I secondand are set by nr.un,
 of the setting ring (20). Furthermore,time .*p6rures of
any lengths are also possible.The speedto which the
shutteris set can be seenin the window (lz).The  ftg.rr.,
appearinghere representfractionsof seconds;e.g; " j,'
means1Asec.," I00" meansr/roosec.,etc.
 If the requiredexposuretime exceeds1 second,the shut-
ter shouldbe set to "8" , with the result that t'heshutter
remainsopen as long as the shutter releaseis depressecl.
For time exposuresit is strongly recommendedio wo.l.
with a cable releaseto eliminite any danger of camera
shake; the use of a tripod or other ffrm support is also
advised.The built-in self-tinrer clnnof be ut.a when the
shutteris set to "8".


                                           S h u t t e r s p c e d s e t t r t t g
                                                  (unlues can be reatl
                                                                 oft  lrotn  tlte *1rrr1r',rr,',
View original page 15Page 16 · Read text
www.orphancameras.com


T H E Z E I S S  I K O N C A B L E R E L E A S Ei s e q u i p p e d w i t h
a plunger  catch, making  longer  time  exposures much
more convenient to take. The cable release is screwed
into the thread (Z) on the camera body. For  all instan-
taneous and short time exposures, press the small plate
                           ttC""8" towards the sleeve     and turn  it slightly, where-
upon  it will remain in this position. For longer time ex-
                                   posures the plate
                                        "B" should not be
                                   pressed   against
                                                ttCt'.                                                  In this case
                                     a gentle pressure
                                  on  the  plunger
                                                                tt                                      A"  will lock it in
                                       the depressed po-
                                           sition until a se-
                                 cond pressure on

plate "B" releases
it.  This  plunger
catch allows time
exposures of any
duration   to  be
madewithout hav-
ing  to keep  the
{inger on the plun-
ger all the time.
View original page 16Page 17 · Read text
www.orphancameras.com


RED DOT SETT'ING

One way of beneftting from the large depth of fteld
provided by small taking lens apertures can be parti-
cularly useful when the lighting conditions are good. By
setting the diaphragm setting lever (18) and the focusing
knob (23) to the red dots, i. e., at approximately25 feet
and betweenf/8 and f/11, everythingbeyond approxi-
mately 13 feet will be rendered sharply without further
focusing.Framing and compositioncan be done on the
ground glassscreen,whilst fast action shotswill be made
mucheasierby using the direct vision frame ftnder.Using
a ftlm rated at l7/1}o DIN (16 ASA), an exposuretime
of l/soosec. will be correct if the lighting conditionsare
excellent;use l/roosec.if the light is only reasonably
good,and 1/z;sec.if  it is rather poor.


                                               .Rcrl1)ot Scllirr4
                                            Jor srrn/r.sirol.s.
                                            Dislarrceappr0x.25Jt
                                                   diapl:trajttt
                                           b ctu e e trls a u d llrr
View original page 17Page 18 · Read text
www.orphancameras.com


                 F R A M E F I N D E R
                       For taking Picturesat eye
                           level,thereis a built-inframe
                           ftnder.Pressthe front Panel
                                                   '                            of the ftnder hood (13) in-
                      wardsso that it foldsuP.The
                            front frame of the hood (14)
                      can then be used together
                          with the eyePiece(30) at the
rear as a frame ftnder. Correct framing  is ensured when
the edges of the eye piece coincide with the inner edges
of the front frame. Focusing can either be done in ad-
vance on the ground glass screen or by using the "Red
Dot Setting". This direct viewftnder is especiallysuitable
for takirrg sports events and rapid actiorr srrapshots.


 j r , t t t r c    l r r r t l c r   l o r
c r l l r r l i r l s l , , r l r  r l l t r l
  l r t r l  r l c l t , ' l t  / t i c l t n c s
   : / r 1 r 1 l s C t ' t ' t t l s
        T
View original page 18Page 19 · Read text
www.orphancameras.com


L O A D I N C T H E C A M E R A

Before loading the camera, ffrst make sure that  the
automatic ftlm lock is released. It will be unlod<ed if the
last ftlm used has already been advanced beyond the
twelfth frame No. 12 showing in the frame counter (4),
as then the film rvind knob (5) can be turned indeftnitely
without encountering further resistance.
lf , for sorne reasons, the ftlm lock is  still engaged, the
ftlm rvind knob must be rvound on until the ftg. 12 has
passed the frame counter window. To do  this, tension
the shutter, release it and while keeping the release knob
depressed turn the fflm wind knob  until  frg. 12 appears
in the frame counter window. As soon as the ftg. 12 has
passed the rvindow, the ftlm lock will be automatically
released.
Open the canrera back by pushing the locking catch (26)
in the direction of the arrow; then hinge the back down-
wards and  pull  out  the upper  ftlm spool holder (21),
                                   turning it so that
                                                              it is lockedin the
                                  rvithdrawn posi-
                                         tion. The empty
                                 take-up spool is
                                then insertedinto


                                                hscrtinj tbe etttitty
                                           take-upspool into tbe
                                                                          ttltl'ser spool (barrtber
View original page 19Page 20 · Read text
www.orphancameras.com


the upper spool clrartrberso that the prot)g of the  ftlnl
wind knob (5) engages the slot in the spool. Turn back
the upper {ilnr spool holder (21) and allow the pivot to
snap into the hole of the spool, which can now be rotated
easily by means of the ftlm wind knob (5).
In exactly the same wtY, the new spool of ftlm is insertecl
into the lorver spool chamber (25) ; tear the seal and
thread the tongue of the backing paper into the long slit
cf the enrpty take-up spool by pulling  it across the ftlm
rvindow. Turn  ftlm wind knob (5) until the paper is tight
and winds evenly on to the tal<e-up spool. Then close the
canlera back and wind on the {ilm  until  the figure 1
appears in  the ftlm window  (28). The camera  is no\v
correctly loaded and ready for the ftrst exposure. Close
the ftlm windorv, depress the notched wheel (6)  of the
frame counter (4) and turn  it in an anti-clockwisedirec-
tion until  it locks. The window of the frame counter will
now also indicate No.  1; from now on  it is only neces-
 sary to consult the frante cotttrter.
 I-oading the  ca-
 nrcra is best done
 in subdued light,
 n e\rer  in  bright
 sunlight !


  T t tllttettttttl
  ll'e  tl,r ctdetl
  r,,rcl.'ilr tl lttt!tg7
View original page 20Page 21 · Read text
www.orphancameras.com


MAKING AN EXPOSURE
\Whentakinghand-heldexposures,theIKoFLpx should
hang from  its carrier strap, adjusted to a comfortable
length for viewing the subject in the ffnder hood. The
aperture and shutter speed required should be read off
from the exposure computer disk (2a) on the focusing
knob (23). Set the shutter speedwith the left foreftnger
and the aperture with the thumb; both thumb and fore-
ftnger should be used to operate the focusing knob (23)
 foi  distance settings. Make sure that the fflm wind
knob (5) has beenwound on correctlY,i.e.,until it comes
 to a stop. Cock the shutter (7) and swing the shutter
release(10) into position.Composethe picture and focus
 it sharply on the ground glass screen; the grid pattern
 rvill help you in aligning both the vertical and the hori-
 zontal lines of the subject.As soon as the screenimage
 just looks right, make the exposureby giving a gentle
 pressureon the releaseknob (10); NEVER jerk the knob
 abruptly. Although the releaseknob (10) must be depres-
 sed as far as it will go, the camera must be kept absolu-
 tely still at the moment of exposure.After every picture,
 the fflm transport knob (5) should be wound on fully in
 order to be ready for the next shot.
 For exposureslonger thant/zs seconda tripod should be
 used.The tripod should be screwedinto the tripod bush
 (29) at the base of the camera.It is a good plan to use
 a cable release,which should be screwedinto its appro'
 priate thread (2).
View original page 21
Page 22 · Read text
www.orphancameras.com


F I L M  \ 7 I N D  L O C K A N D
F ' R A M E C O U N T E R

After each exposure the ftlm is advanced by turning  the
ftlm wind knob (5) until  it comes to a stop. The ftlm can
be advanced even in the dark: there is no need to watch
the numbers in the frame counter. The number of the
frame ready for exposure appears automatically  in this
window (a). As long as the shutter release (10) is folded
back into  its rest position, exposure cannot take place.
In order to release the shutter, the lever must be swung
into the operational position.
The ftlm can be wound on only after the shutter has been
released and the next exposure cannot be made until the
film has been advanced to the next frame. Double ex-
posures or blanks are therefore eliminated completely.


S c l l i r r4  t l t c
 I t r t t t t cc ( r r r t t l e r
View original page 22
Page 23 · Read text
www.orphancameras.com


U N L O A D I N G  T I I E C A M E R A

After the trvelfth exposure,the ftlnr wirrcllock is auto-
matically disengaged.Open the ftlm window (28) and
turn the film wind knob until the end of the backing
papercan be seenpassingthe window; a few more turns
will wind the ftlm tightly on to the take-up spool.Open
the backof the IKoFLEX, sealthe ftlm,pull out the upper
ftlm spool holder (21) and rernovethe spool from the
chamber.Straight away removethe empty feedingspool
from the lower spoolclramberand replaceit in the upper
one. Care must be taken to ensurethat the prong of the
ftlm wind knob (5) engagesthe slit in the spool. The
canrerais now readv for a new {ilm.


                                                         Jilrtr tttntdowAnd
                                              lripod busb nt tlse
                                               bottortrof tbe
                                                                                     I K O F L E X
View original page 23Page 24 · Read text
www.orphancameras.com


S E L F - T I M E R  ( " V " S E T T I N G )

For taking pictures with the self-tinrer, the shutter speed
should be set and the shutter tensioned. Then  set the                               ttV,,synchro-lever(11) to the     mark. The delayed action
rnechanismstarts to operate when either the cable release
or the body shutter release (10) is depressed. After ap-
proximately 10 seconds,the shutter will be automatically
released, the exposure time being that which was set
beforehand.
The use of the self-timer is recommended in  all cases
when the shutter speed is slower than 1/z; second, as  it
acts as a safeguard against camera shake. Vhile  the
delayed action mechanism is running the camera can be
lirmly  held  with  both hands, so that  even longer  ex-
posure times can be used successfully without a tripod
provided that the photographer does not move during the
actual exposure.
The  self-timer cannot operate when the shutter  is set
    ttB"to      (time ex-
posure)  or  rvhen
the synchro - lever
(1 1) is set to "M"
    ttX"or      nrarks.


 Tensiotritrrl tbe
             the s|rlter                 f t-tr                    seli-                                                                   \       (set tinrcr              tlte              syndtro-
 l e u e r t o   ' 7 " )
View original page 24Page 25 · Read text
www.orphancameras.com


PICTURES\rITH FLASHLIGHT

The fullv svnchronised-both       shutter of the IKoFLEX can be
used wilh      expendable flashbulbs and electronic
flash. The flash is hred bv the shutter release and is
svnchronisedto operate at t'he most effectivemoment.To
tike  flash photofraphs, slip the plug of the connecting
lead over the contait nipple (9). The fullv svnchronised
shutter not only permitsihe ftiing or flashis it the exact
momentthe shutferis wide open ('X"  setting),but, when
set to pre-ignition(" yl" setting),a fraction of a second
beforethe shutteris fully opened.


PICTURES\TITH INSTANTA-
NEOUS FLASH ("X" SETTING)

Before making exposureswith  electronic flashes, the
synchro-lever("tt) shouldbe set to "X";  all shutterspeeds
between 1 sec. and l/soosec. mav then be used. This set-
ting may also be used for flash6ulbs,but only at shutter
speedsbetween1 sec.and l/zssec.
For flash pictures with the self-timer, set the synchro-
lever to "V"; the flashwill be ffred as soonas the delayed
actionmechanismhas run off and the shutteris wide open,
in the sameway as when the "X" settinghas been used.
It is one of the remarkable features of the Prontor SVS
shutter that the three settings,"V" (for self-timerwithout
delav), "X"  (for instantaniousignition) and "M"  (for
pre-ignition),can be operatedoidisengaged selectively
whetherthe shutter is cockedor not.
View original page 25Related documents and language editions

Zeiss IkonPDF
ZEISS IKON IKOFLEX I
User manual
17 pages · EnglishRead →

Zeiss IkonPDF
Zeiss Ikon IKOFLEX Guide
Reference guide
35 pages · EnglishRead →

Zeiss IkonPDF
Zeiss Ikon Ikoflex
User manual
17 pages · EnglishRead →

Zeiss IkonPDF
Zeiss Ikon Ikoflex IIA
User manual
32 pages · EnglishRead →

Zeiss IkonPDF
Zeiss Ikon Ikoflex III 23 - 24 pgs. missing
User manual
26 pages · EnglishRead →

Zeiss IkonPDF
Zeiss Ikon Ikoflex Ia
User manual
29 pages · EnglishRead →

Zeiss IkonPDF
Zeiss Ikon Ikoflex Ib
User manual
31 pages · EnglishRead →

Zeiss IkonPDF
Zeiss Ikon IKOFLEX 1A
User manual
18 pages · FrenchRead →

Zeiss IkonPDF
Zeiss Ikon Ikoflex 1A numérisation d'une seule page
User manual
26 pages · FrenchRead →

Zeiss IkonPDF
Zeiss Ikon Ikoflex IIa Gebrauchsanleitung
User manual
32 pages · GermanRead →
Zeiss IkonPDF
ZEISS IKON IKOFLEX
User manual
16 pages · Not specifiedRead →

Zeiss IkonPDF
Zeiss Ikon a guide to the IKOFLEX I-a
Reference guide
12 pages · Not specifiedRead →
From the M. Butkus archive. Original publisher and archive notices are retained.
Check the model and edition against your equipment.
PDF verified 2026-10-10.