Film cameras
Zeiss Ikon Ikoflex IIA User manual
User manual for Zeiss Ikon Ikoflex IIA. 32 pages in English. Read the original PDF, download or print a copy without registration.
32 pagesEnglish3.3 MB PDF

Loading your manual…Open PDF directly
Document details
- Brand
- Zeiss Ikon
- Model / document
- Zeiss Ikon Ikoflex IIA
- Document type
- User manual
- Language
- English
- Pages
- 32
- File size
- 3.3 MB
- Category
- Film cameras
- Document date
- Not specified in catalog
Search available document text
Find a term, then jump to its page in the original PDF. Image-only pages may not be searchable; check the PDF for exact wording and diagrams.
Page 3 · Read text
\:i


IKOFLEX-picture,  Dr.Vleizsa&.er, IessAr 1:3.s, Diapbr. 5.6, €lectronic flasb


                         www.butkus.us
                             s
View original page 3Page 5 · Read text
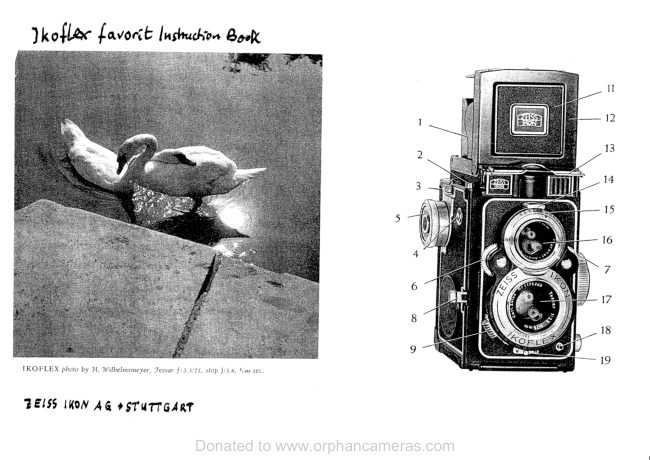
THE PARTS OF THE II(OFLEX IIA

 1 Right side of ffnder hood
 2 Double exPosure Prevention
 3 Body shutier releise threaded to fit cable release
 4 Signal window of double exposure prevention
 5 Eyelet for cattYing straP
 6 Knob for advancing film and winding shutter
 7 Automatic Picture counter
 8 Setting wheel of Picture counter
 9 Shutter sPeed setting wheel
 10 Diaphragm setting wheel
 11 Taking lens
 12 Viewing lens
 13 Windoi' fo. verifying shutter speed and diaphragm
     settings
 14 Flash synchronisation switch
 15 Focusing magnifter
 16 Left side of finder hood with exposure table
 17 Eyepiece of frame-type sports ftnder                                                                                                                                                                                                                                                                                                          i
 1B Bolt for closing ftnder hood                                                                                                                                                                                                                                                       I
 19 Bolt for closing camera back                                                                                                                                                                         I
 20 Upper spool chamber
 21 Depth-of-fteld scale
 22 Focusing knob with distance scale
 23 Lower spool chamber
 24 Film window
 25 Contact niPPle
 26 Tripod thread
 27 Sports finder frame in front side of ftnder hood
 28 Piate closing finder hood from inside


                    www.butkus.us
View original page 5Page 8 · Read text
IIA   IKOFLEX
is a twin-lens mirror reflex camera manufactured by
ZEISS IKON AG, STuTTGART, taking 72 2rla" by
 2rl+" pictures on standard B II/S-120 roll or colour ftlm'
Its viewing lens renders an unusually brilliant and sharply
deffned image of the motive on a bright ground glass'
The coupleJ tukittg and viewing lenses, which are of
equal speed and focal length, permit high-speed one-
hand rnanipulation, and ensure 100 0/o accurate focusing
as well as convenient composition. The taking lens, the
world-famous Zeiss Tessar, is excellently colour cor-
rected and ensures black and white as well as colour
pictures of unmatched sharpness. Both lenses are coated
 io prevent reflexes and eliminate flare' The dependable
                                                          €X-g.ound glass focusing mechanism permits full
 ploitation of the high-speed Tessar lens.
The IKoFLEX IIa is equipped with a fully synchronised
 Synchro-Compur shutter which is automatically wound
when the fflm is advanced. Furthermore the IKoFLEX IIa
 features an automatic film stop as well as a shutter
 release lock preventing double exposures and blanks:
 Before inserting tbe first film it                                                             is .recommendable  to
 !amiliarise oneielf wrih atl tlte manipulations described  'in      tlsis booklet. Iakinq this trouble will pay because with
 an excellent working knowledge about tbe lxorlEX IIa
 and its controls your l)ery first pictures will be a com-
   ptlrete succes ond tbe camera will remain a source ol
 constant Pleasure lor You.


      5
View original page 8Page 9 · Read text
OPENING AND CLOSING THE
FINDER HOOD OF THE IKOFLEX IIa
The ffnder hood opens and erects itself automatically
upon pressing bolt (18) to the left.
For 100 0/o accurate focusing swing out the focusing
magnifter (15) which is fftted to the frontside of the
ffnder hood. \When closing the ffnder hood ffrst fold the
magnifter back, then fold the left and right sides and
the rear side successively to the center and ftnally
cover these with the front side which, after snapping
into the lock, automatically blocks the shutter release
thus preventing unintentional picture-taking while the
finder hood is closed.

FOCUSING
The special feature of the IKoFLEX is the erect ground
glass image of the object produced by an ingenious
mirror reflex system and a viewing lens which has the
same optical efftciency as the taking lens and renders
an image of the motive which is equal in sharpness and
framing to the image thrown on the ftlm by the taking
lens.


                     www.butkus.us
View original page 9Page 10 · Read text
Framing and sharpness can be conveniently and accu-
rately controlled on the ground glass because the novel
finder system is of such brilliancy that the entire ground
glass is evenly illuminated from corner to corner.
The taking lens and the viewing lens are coupled so
that both lenses are focused simultaneously. Indeed, the
IKOFLEX IIa ensures split-second and 1000/o accurate
focusing and composition of any given motive.
Objects are focused by turning the focusing knob (22)
which covers all distances from 3 feet to inftnity with
a 90o turn. The point of ultimate sharpness can be
easily ascertained on the ground glass.


Tocusing witb
f ocusing knob
View original page 10
Page 11 · Read text
Consequently it is very easy to achieve accurate focusing
with the IKoFLEX IIa. Even if the taking lens is
stopped down pin-point accurate focusing can be ac-
complished with the bright ground glass image because
the opening of the viewing lens is not reduced. The depth-
of-field of the stopped down taking lens can be con-
veniently ascertained from the depth-of-ffeld scale (21)-
Delicate focusing problems can be easily solved with
the focusing magnifier (15). If  it is necessary to use
the magnifter, swing it out with the right index ftnger
after pressing inward the right side of the ftnder hood.
The eye should be as close as possible to the magnifier
and should be directly above its center so that the
entire ground glass image can be conveniently viewed
in magnification.


                                            Tocusing magnifier
                                                                                                                    f or rcAola dccurdte
                                                                                                                                                      f ocusinq


                    www.butkus.us
View original page 11Page 12 · Read text
THE DEPTH-OF-FIELD SCAI,E
 Beside the fbcusing knob (22) is thc' depth-of-ffeld
  scale (21). The bracket-like lines of this ,.u1. indicate
 the depth-of-ffeld for any given lens opening; the ffgures
 between the convergent .ndr of these lines ui. diuph.ugm
 settings. The depth-of-ffeld for a given lens op.rring
 can be read off the focusing scale it the two distance
 setting marks               lpposite the ends of the left and right
 bracket lines of the respective diaphragm settings. Fo.
 example : Vhen-using distance setting 5 m (appro*irnutely
 5 yards and 1 foot) the depth of fteld rungL from 3 to
      (3 yards 1 foot to approximately li  yards) with 1l ry
 diaphragm setting 1 1, from 2.5 m (2 yards arrd 2 feet)
 t9 inftnity with diaphragm setting 16, and from 4 to
     (4 yards and 1 foot to 6 yards and 2 feet) with 9 m_
 diaphragm setting 3.5  .
T!: exact ftgures may be found in the depth-of -fteld
 table on page ||.


Ibe selJ-workin4
deptb-of-field scaie
View original page 12Page 13 · Read text
The diaphragm is set with the diaphragm setting wheel
 (10), the black frgures appearing in the windorv (1 3)
 indicating the different lens op.ni.rgs. These ftgures and
 the lens opening are reciprocal, thit is, the higher the
 figure the smaller the opening, the longer *.rrt b. the
exposure. With a small diaphragm opening, horvever,
the depth of field will be larger. when taking pictures
by hand the diaphragm opening should not be eicfssiuely
reduced, otherwise the picture will be blurred because
of the vibrations of the hands during the long exposure
required when the lens is stopped down. \7h.rr- using
Llzs second or during shorter exposures the camera can
be held by hand. The gro.rnd glass image of the
IKoFLEX ensures 100 0/o accurate focusing. It is, there-
fore, advisable to use a wide diaphrag- op.ning and a
short_ exposure time. correct shuttei speedr Luy be
found out from the exposure table on t-he left  si je of
the finder hood.


                                        Diapbragm settinQ
                                             wbeel (settings can be
                                                     uerified in window)


                    www.butkus.us
View original page 13Page 15 · Read text
THE EXPOSURE TABLE
 The exposure table on the left side of the ftnder hood
 (16) gives the proper settings for the most fresuentlv                        -The occurring taking conditions.      data are based on a film sensitivity of 18/tOo DIN (22 Scheiner US;
 4.0 4q4) an4 presuppose sunlight. The following hints should be taken into consideration when taking p"ictures
 under different lighting conditions:
    1. \When using 15/l}o DIN (19 Scheiner USA;
     20 ASA) fflm-the exposure must be doubled; for
     21/10o DIN half the given shutter speed is'suf-
        ftcient.
   2. tVhen using lens opening 1l instead of g the ex-
      posure time must be doubled; for lens opening 16
     the exposure must be increased 4 times.
   3. \7hen the sky is slightly overcast the siven ex-
     posures must be doubled, when it is cloudv the ex-
      posures must be increased 4 times.
  4. During the months of September, October, March
    and Ap.ril, the.given exposures must be doubled;
     during the months of November, December, Ianuarv
    and February the given exposures must be multi-
       pli,e$ by 4. During the latt-ef months they are appli-
     cable only to the hours from l0 a. m. to 2 p. m.
The data of the exposure table are valid for inter-
mediate and northern latitudes.
The IKOPHOT, the dependable and easy-to-use photo-
electric exposure meter manufactured bv ZEISS ixoN
AG, S'TUTTGART, will give you the correct exposure
tinre. for any given leni oplning_ under all Iighting
conoltrons, even under the most adverse circumstances.

                     www.butkus.us                 4                                                                                                                                                                                               g.it;f
View original page 15Page 16 · Read text
T'I_{ E STI UTTER
 The IKoFLEX  I Ia is equipped with a fully synchronised
 f fnchro-Compur shutler with shutter speeds ranging
 from 7 torlsoo-second. The shutter speeds are set witlithE
 se_tting wheel (9).For long exposures use setting "8".
The shutter speed settings- can be verified from"above
 in the window (13). The red figures appearing in this
 rvindow indicate fractions of a si.otrd, for instance  cc|."
 means   r lr second, " 100" means r lrco second, etc. Please
 note that rl;oo second can be set only before winding
 the shutter.
For extremely lolg exposures use setting ..8,'. With
this setting the shutter remains open as- long as the
shutter release is pressed. In ordbr to ensure really
sharp pictures, all fime exposure should be made witir
a cable release, and the  I K o F LE x should be screwed
on    ,a .tripod or on a firm_ support- -    such as a table, ora chair, or sornething similar.


Sbutter speed settinQ
wbeel (shutter speeds
can be uerified in
window)
View original page 16Page 17 · Read text
THE ZEISS IKON CABLE REI-EASE
equipped with plunger catch may be used for long ex-
posures. It is screwed into the thread of the body
shutter release (3). For action photographs and short
                      ((8"        ((C"exposures/ press plate     toward     and turn  it
 slightly to the right until it remains in the pressed-in
                                          (68"position. For long exposures/ separate plate      from
                                  "C." Upon press-
                               ing  the  cable
                                      release the plun-
                                 ger then remains
                                 pressed in  until
                                          ((8"     is                               plate
                               pressed slightly.
                                With this plunger
                            catch you  can
                       make time  ex-
                               posures of  un-
                                 limited   length
                                   without constant-
                                      ly  pressing the
                                     cable release.


                     www.butkus.us
View original page 17Page 18 · Read text
THE RED-DOT SETTING
 The practical red-dot setting of the IKoFLEX IIa ensures
 utmost readiness for snapshots in good lighting con_
  ditions. vith  the focusing knob and the diaphragm set
 to the red dots the rKoFLEx has such a great depth of
 field (from 13 feet to inftnity) that snapshots can be
 taken without any further focusing. Framing is done
 as usual on the ground glass. For split-second snapshots
  it is preferable to use the frame-type sports ftnder. In
 especially good lighting conditions use a shutter speed
 of r/too second, otherwise 1Ao or, under less favourable
 conditions, r/zr second.


Red-dot setting
View original page 18
Page 19 · Read text
HOVi TO FIOI-D THE IKOFLEX IIa
DI.IRII\TG THE EXPOSURE
When taking pictures from the hand the  I K O F LE X is
hooked to the carrying strap which is to be adjusted
so as to permit convenient viewing of the ground glass
image. The right hand gives the camera the necessary
stability; the right thumb sets the shutter speed (9)
and then releases the shutter (3).
The left hand supports the camera from the left; the
left thumb sets the lens opening (10). The left thumb
and index finger are used for focusing (22).
The film must be wound on after every shot. In doing
so the shutter is wound automatically. A red mark will
appear in the signal window of the double exposure
prevention (4) upon completion of this manipulation.
Should a white mark be in the signal window the film
must ftrst be wound on. Exposure is made by slowly, not
                                    jerkily, pressing
                                                    shutter                                                      :.nin',   the body                                      release knob (3)                                                                 ;;1ij:n'rii
                                down  as  far   as
                                              possible.


                                                    'Jbe IKOFLEX ready
                                                for picture-taking


                     www.butkus.us
View original page 19Page 20 · Read text
TH E FRAM E-TYPE
                              S PORTS FI IND ER
                           For taking pictures at eye
                                      level use the built-in frame-
                                 type sports finder. Press the
                                   inner plate (28) of the front
                                  side of the {inder hood up-
                           ward. The frame in  the
I'          front side (27) and the sighting aperture (17) at the
          back of the hood constitute the sports ftnder. Proper
           framing is ensured when the edges of the rear (sighting)
I          frame cover the edges of the front-side frame. Focusing
              is done in advance on the ground glass or with the aid
          of the red-dot setting. The frame-type viewftnder  is
            preferably used for sports photographs and other split-
           second snapshots.


              Trame-type
                direct-uision finder
                                 f or snapsbots and
              sports pbotograpbs
View original page 20Page 21 · Read text
LOADII{G THE CAMERA

For loading the camera disengage the film stop mechanism.
This mechanism is out of gear when, after the 12th ex-
posure, the ftlm has been advanced. Then the fflm
winding knob may be turned freely.
However, should the film stop mechanism not be out
of gear the ftlm winding knob (6) must be turned until
the number " 72" has passed the picture counter window.
This is achieved by alternately turning the film winding
and shutter winding knob (6) and releasing the shutter
with the body shutter release, as for an ordinary ex-
posure (3).
Open the bolt (19) of back, pull out the ftlm spool


                                                    Jlotu to insert empty
                                                    film spool into upper
                                                  spool cbamber


                     www.butkus.us
View original page 21Page 22 · Read text
holder (20) and turn it a little to the right so that
 it cannot snap back. Then insert the empty fflm spool
into the upper spool chamber so that the prong of the
ftlm winding knob (6) engages into the slit of the ftlm
spool. The spool holder snaps back and engages when
 it is slightly turned to the left. Then the ftlm can be
conveniently rvound with the ftlm winding knob (6).
In exactly the same manner the unexposed film spool
is inserted into the lower spool chamber with the be-
ginning of the ftlm, i. e. the narrow end of the protec-
tive paper back, pointing toward the upper film spool
chamber. But use only the standard 120 (B IIl8) wide
core. Other cores may trouble the fflm transport mechanism.
Pull the protective paper over the picture frame, insert


TIow to introduce
tbe protectiue paper
View original page 22
Page 23 · Read text
it into the long slit of the upper spool and tighten
 it by turning the film winding knob (6).Take care
that the paper winds evenly on the ftlm spool. Close
the camera and turn the film winding knob until the
number cc l"  appears in the film window (24).
Vhen these manipulations have been completed the
ftrst exposure can be made. Close the film window and
turn the setting wheel (8) of the picture counter under
constant pressure anti-clockwise until it catches. If one
turn of the hand is not sufficient, turn the thumb to
the right without diminishing the pressure on the setting
wheel and turn again to the left. From then on it  is
only necessary to watch the number of the picture
counter. The camera should preferably be loaded in
                              subdued daylight
                                     or in the shadow.


                                             Jilm window
                                          and tripod tbread at
                                          bottom of camera


                    www.butkus.us
View original page 23Page 24 · Read text
AUTOMATIC FILM STOP
AND PICTURE COUNTER
After every exposure, advance the ftlm by turning the
ftlm and shutter winding knob (6) until a resistance is
felt in the mechanism. As the picture numbers need not
to be watched in the ftlm window, this manipulation can
even be properly done in the dark. The number of the
picture which is ready for the exposufe automatically
appears in the picture counter window (7). At the same
time the red mark appearing in the signal window (4)
of the double exposure prevention indicates that this
frame has not yet been exposed. If the film has not
 been advanced after an exposure a white mark is visible


 Jlow to set
  tbe picture coumter
View original page 24
Page 25 · Read text
in the signal window (a). The film can, however, be
advanced only if an exposure has been rnade. On the
other hand, the shutter can be released only if the
knob (6) was wound until it caught. Consequently the
IKOFLEX IIa will not take any double exposures and
prevents blanks.

UNLOADING THE CAMERA
After the 12th exposure the ftlm stop mecl-ranism
disengages automatically. Turn the ftlm winding knob
(6) until the end of the protective paper passes the fflm
window (24). Open the bolt of the camera back of the
IKoFLEx, seal the fflm spool while it is in the spool
chamber and ffnally take it out of the camera after
pulling out the ftlm spool holder (20). Remove the
empty. feeding spool from the lower spool chamber and
 insert it into the upper spool chamber' Take care that
the prong of the film winding knob (6) properly engages
with the slit of tl-re spool. Having completed these
manipulations you may insert a new ftlm.


                     www.butkus.us
View original page 25Page 26 · Read text
TAKING THE PICTURE
 Set the diaphragm and the shutter speed according to
 the exposure table on the ftnder hood or according to
 the measurings obtained with a photo-electric exposure
 meter.The red dot in the signal window (4) indicates
 that an unexposed section of the ftlm is in the picture
 frame and that the shutter has been wound. If a white
 marl< is seen in the signal window it is either necessary
 to wind the knob (6) until it catches or, in case the
camera has been newly loaded, the setting wheel (8)
must be wound.
The shutter is automatically wound when the ftlm is
advanced. Shutter speeds from "B" to r/zro second may
be set even after tl-re shutter has been rvound. However,
 1/roo second may be set only before winding the shutter,
that is, prior to turning the ftlm and shutter winding
knob (6).
Focusing and framing is done on the ground glass in
the finder hood. As soon as the ground glass image  is
satisfactory as regards composition and sharpness, release
the shutter. The camera should be held ftrmlv and
steadfastly during the exposure.
The right thumb presses down the body shutter release
(3) slowly and smoothly, without giving the camera
a jerk.
View original page 26
Related documents and language editions

Zeiss IkonPDF
ZEISS IKON IKOFLEX I
User manual
17 pages · EnglishRead →

Zeiss IkonPDF
Zeiss Ikon IKOFLEX Guide
Reference guide
35 pages · EnglishRead →

Zeiss IkonPDF
Zeiss Ikon Ikoflex
User manual
17 pages · EnglishRead →

Zeiss IkonPDF
Zeiss Ikon Ikoflex III 23 - 24 pgs. missing
User manual
26 pages · EnglishRead →

Zeiss IkonPDF
Zeiss Ikon Ikoflex Ia
User manual
29 pages · EnglishRead →

Zeiss IkonPDF
Zeiss Ikon Ikoflex Ib
User manual
31 pages · EnglishRead →

Zeiss IkonPDF
Zeiss Ikon Ikoflex Ic
User manual
32 pages · EnglishRead →

Zeiss IkonPDF
Zeiss Ikon IKOFLEX 1A
User manual
18 pages · FrenchRead →

Zeiss IkonPDF
Zeiss Ikon Ikoflex 1A numérisation d'une seule page
User manual
26 pages · FrenchRead →

Zeiss IkonPDF
Zeiss Ikon Ikoflex IIa Gebrauchsanleitung
User manual
32 pages · GermanRead →
Zeiss IkonPDF
ZEISS IKON IKOFLEX
User manual
16 pages · Not specifiedRead →
Zeiss IkonPDF
Zeiss Ikon a guide to the IKOFLEX I-a
Reference guide
12 pages · Not specifiedRead →
From the M. Butkus archive. Original publisher and archive notices are retained.
Check the model and edition against your equipment.
PDF verified 2026-10-10.